


How to use Insta360 GO 3 - Compact and lightweight 2.7K action camera weighing 35.5 grams
The Insta360 GO 3 camera is a thumb-sized 2.7K action camera that weighs only 35.5g. It can be used as an aerial camera for FPV drones and radio-controlled aircraft.- What is Insta360 GO 3 Camera?
- Introducing Insta360 GO 3 Camera
- Introduction of accessories for GoPro that can be used with Insta360 GO 3 camera
- Name of each part
- Shooting mode
- List of shooting modes
- What is FreeFrame video?
- Other video formats
- Applying FlowState stabilization
- What is insp format?
- What is PureShot?
- How to charge
- Activation
- Basic operation
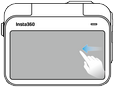
- How to use the Action Pod touch screen
- Action Pod screen
- Camera setting screen
- Advanced camera settings screen
- Quick Capture: Start shooting immediately when power down
- Customizing the GO 3 Camera Button
- Preset: Saving shooting parameters
- Importing videos/photos to a computer
- Add location information (geotagging) to videos and photos
- Waterproof performance/How to use Dive Case
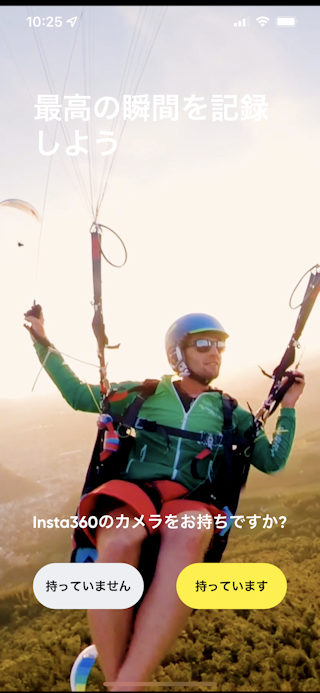
 Install the Insta360 app
- Connect with Insta360 app, Set shooting mode, Remote control
- Manage videos and photos taken
- Export from Insta360 app to your smartphone
- Remove watermark logo from video
 How to use Insta360 STUDIO
- Insta360 GO 3 Camera Indicator Light Meaning
- Insta360 GO 3 Camera specifications
- Insta360 GO 3 Related Sites
What is Insta360 GO 3 Camera?


The highest resolution is 2.7K30fps (2720x1530). When fully charged, you can shoot up to 47 minutes of video on its own. 170 minutes of video can be taken by connecting with the included Action Pod. Despite its small palm size, Insta360's image stabilization technology "FlowState" can be used to minimize blurring.
The product variety includes three types of models, 32GB, 64GB, and 128GB, with different built-in storage capacities. Each model can save up to 1 hour 25 minutes, 2 hours 50 minutes, 5 hours 40 minutes of video (at resolution 1440P/30fps, aspect ratio 16:9).
-
Insta360 GO 3 Action Camera

Insta360 2023/06/27 USD399.99
Max resolution: 2.7K: 2720x1530@24/25/30fp / Weight:35.5g
Weighing in at only 35g, GO 3 is an incredibly tiny action camera that you can take anywhere. Capture effortless, hands-free POV videos or creative angles at 2.7K. Perfect for mountain biking, pets, travel, anything goes! A versatile magnetic design with a set of handy accessories such as the Magnet Pendant and Easy Clip, GO 3 gives you endless creative possibilities, with angles no other camera can handle.
 (US)
(UK)
(US)
(UK)
-
Insta360 Care
Insta360 2023/06/27 USD40.00
Accident compensation service. By paying a small additional fee, Insta360 will provide one free repair or replacement for accidental damage to your camera within one year. One of the following conditions must be met. Customers who purchased new Insta360 camera. Customers who have purchased an Insta360 camera and have not yet activated the product or within 3 days after activation.
-
Insta360 GO 2 Action Camera
Insta360 2021/04 USD329.99
Max resolution: 1440p (2560x1440 pixel, 50/30/25/24fps) / Weight:27g
Thumb-sized action camera that weighs just 1 oz. Uses a powerful 1/2.3” image sensor to shoot crisp 1440p video. Rugged and waterproof to 13ft. Wearable camera design. Mount GO 2 anywhere with its magnetic in-the-box accessories and shoot hands-free.
 (US)
(UK)
(US)
(UK)
-
BETAFPV SMO 4K Camera
BETAFPV 2020/12 USD239.99
Max resolution: 4k (4000x3000 pixel, 24/25/30fps) / Weight:30g
A high-degree ultralight action camera designed for your FPV Drones! Developed by BETAFPV using Insta360 technology, SMO 4K camera only weighs 30g and is perfectly fit for FPV drones. (US)
(UK)
How to use the BETAFPV SMO 4K Camera - 4K video camera for FPV drones weighing 30 grams
(US)
(UK)
How to use the BETAFPV SMO 4K Camera - 4K video camera for FPV drones weighing 30 grams -
Insta360 X4 - Waterproof 8K 360 Action Camera, 4K Wide-Angle Video
Insta360 2024/04/16 USD499.99
The 8K era is here. Insta360 X4 delivers 360° video in stunning 8K or 5.7K60fps! Use Active HDR to keep shots color accurate too, even in action scenarios. With Insta360 X4, get out there and shoot, not having to worry about lining up a shot. Shoot first, then reframe easily after, all in the AI-powered Insta360 app.
(US)
(UK)
How to use Insta360 X4 - 360 degree action camera that can shoot 8K
Introducing Insta360 GO 3 Camera
 This time, I chose the 128GB model, which has the maximum capacity, in preparation for future long trips and aerial photography with
FPV drone
there.
When I chose the "Travel Kit", the price was JPY72,750 (USD506.19).
This time, I chose the 128GB model, which has the maximum capacity, in preparation for future long trips and aerial photography with
FPV drone
there.
When I chose the "Travel Kit", the price was JPY72,750 (USD506.19).
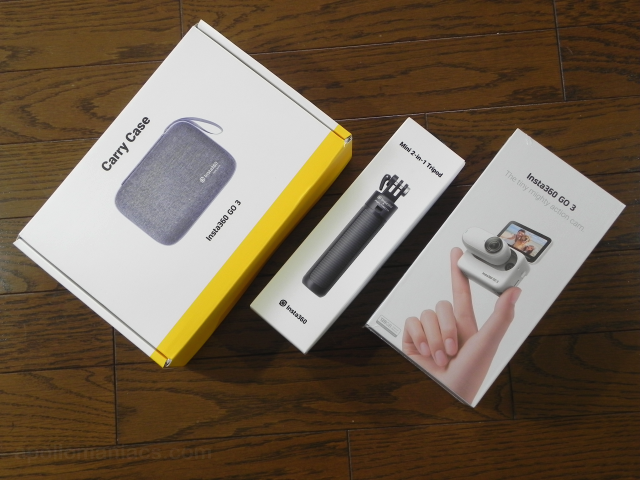
However, there is no special package called "travel kit". The camera, "mini invisible selfie stick + tripod", and "storage case" will be delivered as a set. I ordered them on Insta360 GO 3 official net store on the night of June 27, just before the product announcement, and it arrived six days later, on the morning of July 3. Shipped by FedEx - Japan Post.
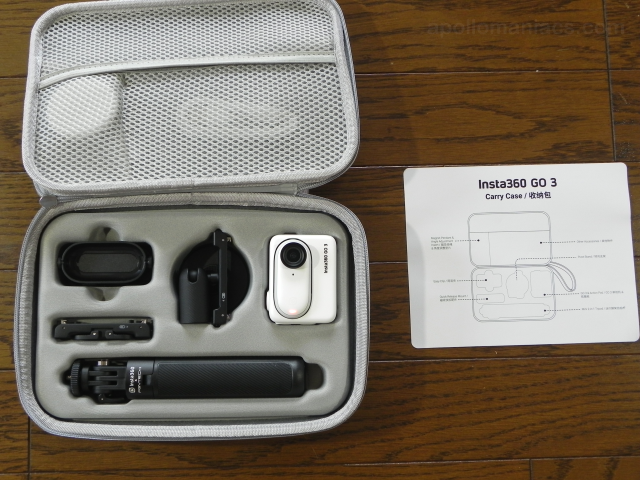
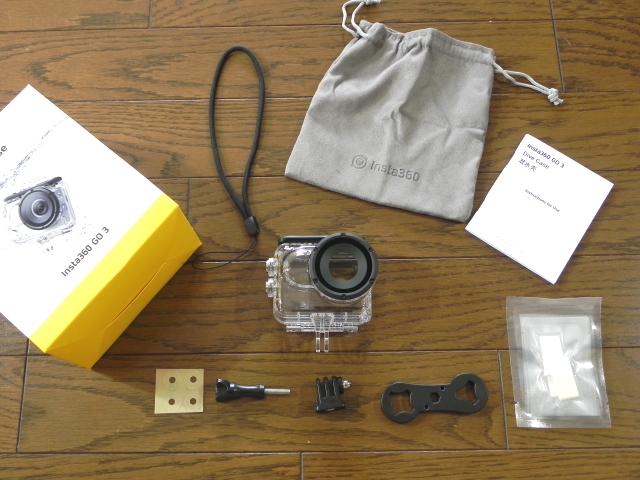
 The camera box contains what you see in this photo.
The left column are the pivot stand and its base, the simple clip, and the magnetic pendant from the top.
The middle row are instruction sheets, a USB Type-C to Type-A cable, an Insta360 GO 3, and an angle adjustment base for a magnetic pendant.
The right column are the sticker and operation guide.
The camera box contains what you see in this photo.
The left column are the pivot stand and its base, the simple clip, and the magnetic pendant from the top.
The middle row are instruction sheets, a USB Type-C to Type-A cable, an Insta360 GO 3, and an angle adjustment base for a magnetic pendant.
The right column are the sticker and operation guide.
A more detailed user manual can be downloaded from Insta360 GO 3 manual download page .
 And don't forget the Action Pod
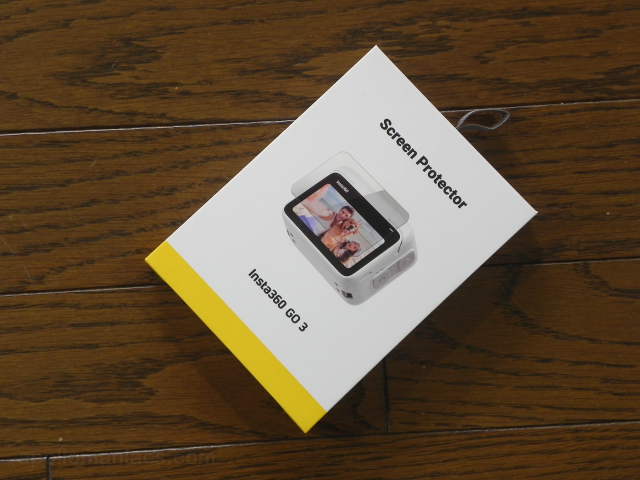
Screen Protector (Amazon.com)
.
According to the
dronedj review article (dronedj)
, despite the Insta360 GO 3 being an action camera, unfortunately the touchscreen is prone to scratches.
Apply the screen protector before you start using it.
And don't forget the Action Pod
Screen Protector (Amazon.com)
.
According to the
dronedj review article (dronedj)
, despite the Insta360 GO 3 being an action camera, unfortunately the touchscreen is prone to scratches.
Apply the screen protector before you start using it.
Is this a plot by Insta360 to sell accessories and make money?
This box contains 2 screen protectors and 2 cleaning cloths for application. If you have just peeled off the protective sticker that was originally attached to the touch screen, just put it on and it will stick well.
 The inside of the
Carrying Case (Insta360)
included in the travel kit looks like this photo.
It holds all the accessories included in the travel kit plus a
Quick Release Mount (Insta360)
.
The inside of the
Carrying Case (Insta360)
included in the travel kit looks like this photo.
It holds all the accessories included in the travel kit plus a
Quick Release Mount (Insta360)
.
It's good to be able to throw away all the packing boxes that are generated in large quantities when buying many accessories and store them in one place.
 Here is the
Quick Release Mount (Insta360)
that seems to be another must-have accessory.
Here is the
Quick Release Mount (Insta360)
that seems to be another must-have accessory.
This can be used to attach Insta360 GO 3 to a GoPro arm etc. using the fork-like mounting system "2 prong mount" that became famous in the GoPro series. When the "2 prong mount" part is folded, a female hole for a "1/4 inch screw mount", which is common in camera tripods, appears from underneath. This is a must-have accessory for anyone who has an arm or tripod for their GoPro series or camera.
The Quick Release Mount is shipped with what is shown in this photo. The brown sheet seen in the lower right of the photo is a spacer sheet that is attached to the holes of the 2-prong mount. If there is a gap in the connecting part such as the arm to be attached and the Quick Release Mount cannot be fixed firmly, paste this sheet to increase the thickness.
 If you are likely to use the Magnetic Pendant that comes with your camera for strenuous activities such as off-road biking or bicycling, we recommend adding the
Magnetic Pendant Safety Cord (Amazon.com)
.
Even if the camera comes off the magnetic pendant due to impact, the lanyard will prevent it from being lost.
If you are likely to use the Magnetic Pendant that comes with your camera for strenuous activities such as off-road biking or bicycling, we recommend adding the
Magnetic Pendant Safety Cord (Amazon.com)
.
Even if the camera comes off the magnetic pendant due to impact, the lanyard will prevent it from being lost.
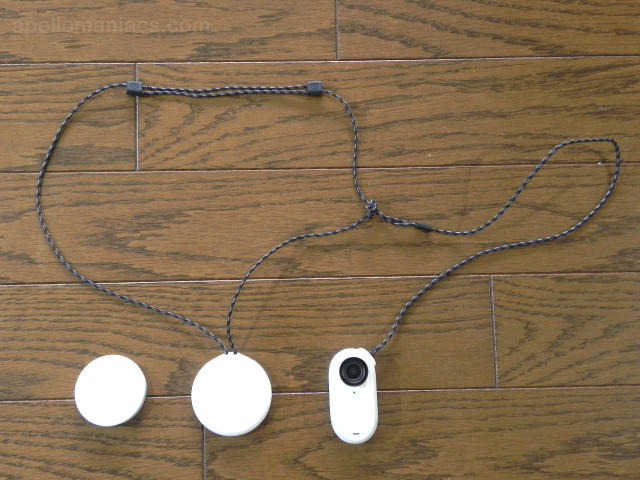
The Magnetic Pendant has a smart mechanism that allows you to adjust the total length. Surplus collars can be wrapped around the body of the Magnetic Pendant and stowed away.
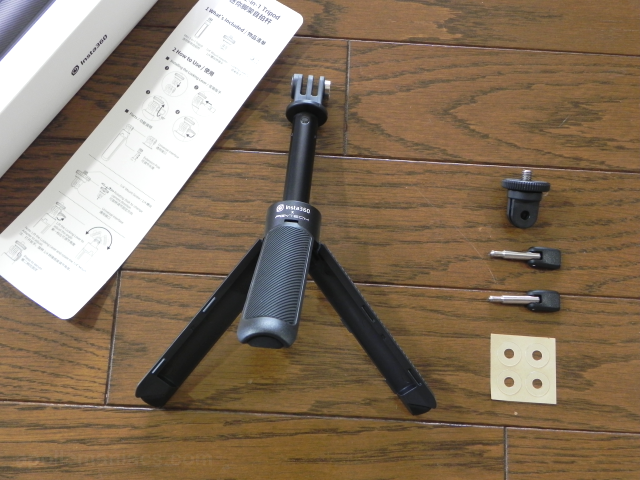 The
Mini Invisible Selfie Stick + Tripod (Insta360)
included in the travel kit contains what you see in this photo.
The
Mini Invisible Selfie Stick + Tripod (Insta360)
included in the travel kit contains what you see in this photo.
This is a telescoping selfie stick with a "two-prong mount" and is not a dedicated accessory for the Insta360 GO 3. It is a convenient thing that functions as a tripod when the handle is opened. The two "locking levers" visible in the center right of the photo are used by inserting them into the holes of the 2-prong mount. Unlike general screws, it is excellent in that it can be attached and detached with one touch.
The pivot stand that comes with the camera is compact, but if you tilt the camera too far, it will tip over. Using a tripod gives you more freedom in camera angles.
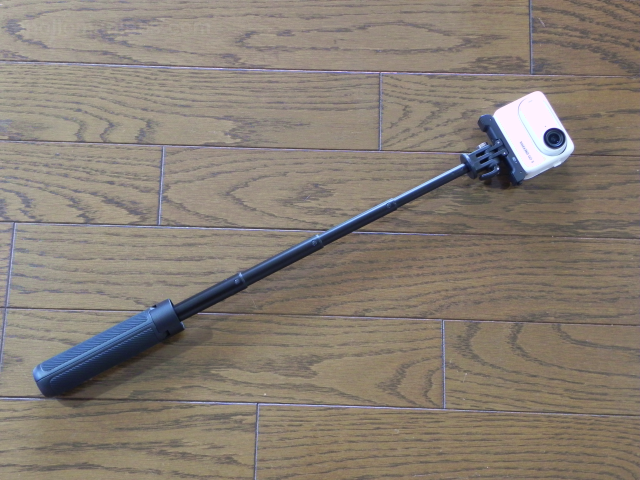 The
Mini Invisible Selfie Stick + Tripod (Insta360)
is as long as this photo when fully extended.
It's long enough for common use cases.
In this photo I used
Quick Release Mount (Insta360)
shown above to attach the camera to the selfie stick.
The
Mini Invisible Selfie Stick + Tripod (Insta360)
is as long as this photo when fully extended.
It's long enough for common use cases.
In this photo I used
Quick Release Mount (Insta360)
shown above to attach the camera to the selfie stick.
 If you want to use Insta360 GO 3 for marine activities, such as divers and snorkelers, prepare a
Dive Case for Insta360 GO 3 (Insta360)
.
If you want to use Insta360 GO 3 for marine activities, such as divers and snorkelers, prepare a
Dive Case for Insta360 GO 3 (Insta360)
.
The Insta360 GO 3 camera alone is water resistant to a depth of 5m (16.4ft), but the Action Pod is water resistant to IPX4 and cannot be used for marine activities. If you put it in a Dive Case, it will be water resistant to a depth of 60m (196.9ft), making it safe enough for leisure diving.
Accessories of the Dive Case are, from the upper left of the photo, a strap, a storage bag, and a manual. From the middle left, a box and a Dive Case. From the bottom left are the spacer sheet, the 2-prong mount, the screw and the handle, and the anti-fog sheet (Amazon.com) .
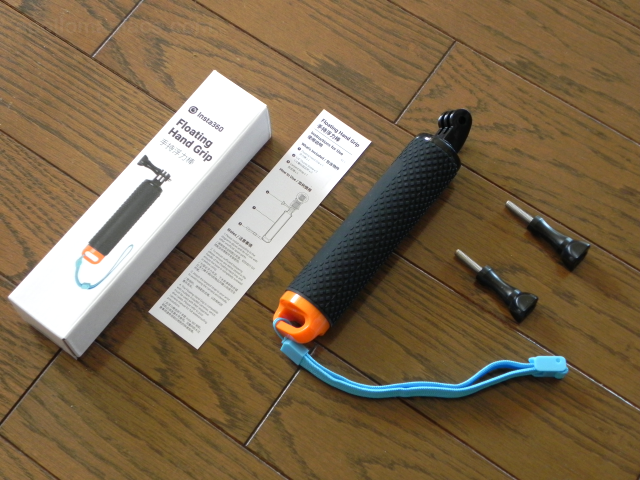 The
Floating Hand Grip (Insta360)
is sold separately.
If you don't mind if it doesn't float on water, you can use the "mini invisible selfie stick + tripod" introduced above.
The
Floating Hand Grip (Insta360)
is sold separately.
If you don't mind if it doesn't float on water, you can use the "mini invisible selfie stick + tripod" introduced above.
Floating hand grips have hollow grips that create buoyancy. It might be good to put your hotel room key in when diving at a resort.
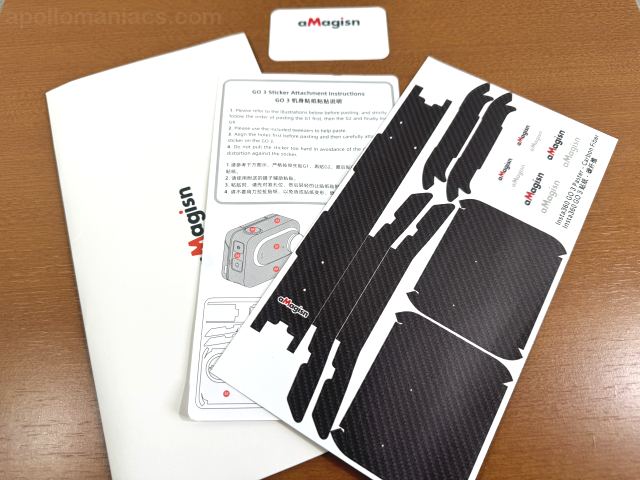 The white body is a little too conspicuous to use as a wearable, so I bought a third-party Insta360 GO 3 camera sticker.
It comes with a simple instruction manual and tweezers (not shown in the photo).
The white body is a little too conspicuous to use as a wearable, so I bought a third-party Insta360 GO 3 camera sticker.
It comes with a simple instruction manual and tweezers (not shown in the photo).
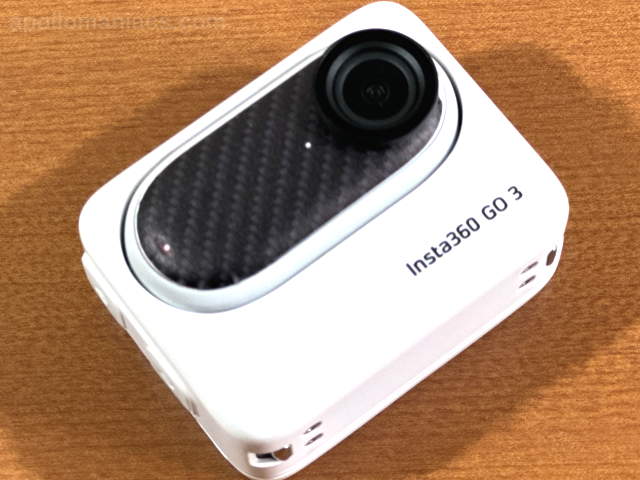 It is quite difficult to paste it neatly.
For now, I pasted it only on the Go3 camera.
The LED lamp and microphone part have holes, so remove them with tweezers.
It is quite difficult to paste it neatly.
For now, I pasted it only on the Go3 camera.
The LED lamp and microphone part have holes, so remove them with tweezers.
Introduction of accessories for GoPro that can be used with Insta360 GO 3 camera
Here are some GoPro accessories that are useful for fixing the camera in various places. In either case, the camera is attached using Quick Release Mount (Insta360) introduced above.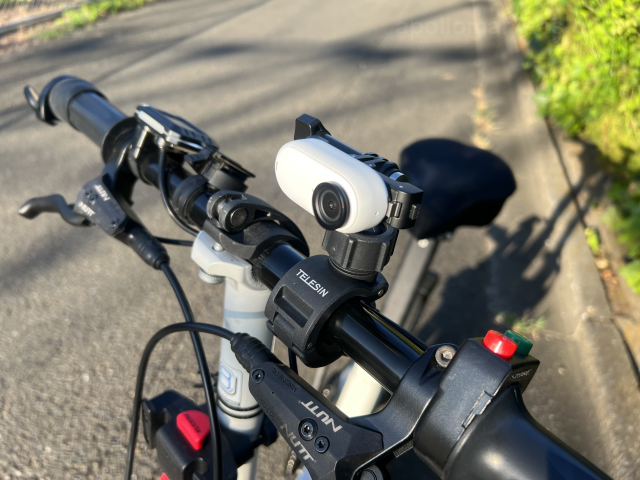 This is an arm that can fix the camera to the handlebar of a bicycle or motorcycle.
Easy to install and remove.
There are also
Helmet mount (Amazon.com)
that you can attach to your motorcycle helmet, and
Mouthpiece mount (Amazon.com)
that you can put in your mouth while surfing.
This is an arm that can fix the camera to the handlebar of a bicycle or motorcycle.
Easy to install and remove.
There are also
Helmet mount (Amazon.com)
that you can attach to your motorcycle helmet, and
Mouthpiece mount (Amazon.com)
that you can put in your mouth while surfing.
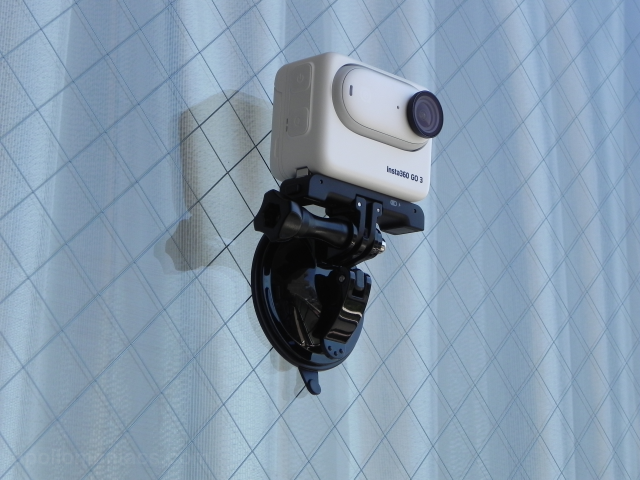 This is an arm that allows the camera to be fixed to a hard, flat surface such as glass, the windshield of a car, or the body of a car.
Since the adsorption is quite strong, it is also possible to attach the camera to the roof or side of the car.
However, it may not stick well to strongly curved windshields.
This is an arm that allows the camera to be fixed to a hard, flat surface such as glass, the windshield of a car, or the body of a car.
Since the adsorption is quite strong, it is also possible to attach the camera to the roof or side of the car.
However, it may not stick well to strongly curved windshields.
There is a lot of variety in arm shape. Please choose according to the installation position. To install on an uneven dashboard, sandwich a gel adhesive sheet or the like.
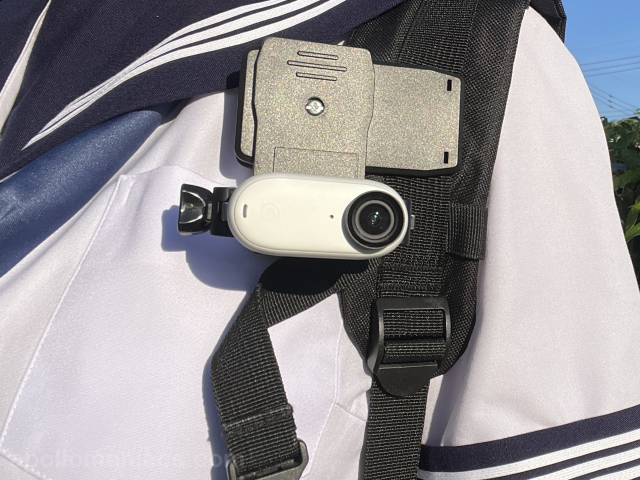 This is an arm that can be used to secure the camera to a backpack strap, etc.
If you attach a heavy camera, it will bow down, but the light Insta360 GO 3 is no problem at all.
This is an arm that can be used to secure the camera to a backpack strap, etc.
If you attach a heavy camera, it will bow down, but the light Insta360 GO 3 is no problem at all.
There are also Chest mount (Amazon.com) that hold the camera around your chest with a belt, and Necklace mount (Amazon.com) that hang the camera around your neck, and Wrist Strap Mount (Amazon.com) that you can attach to your wrist.
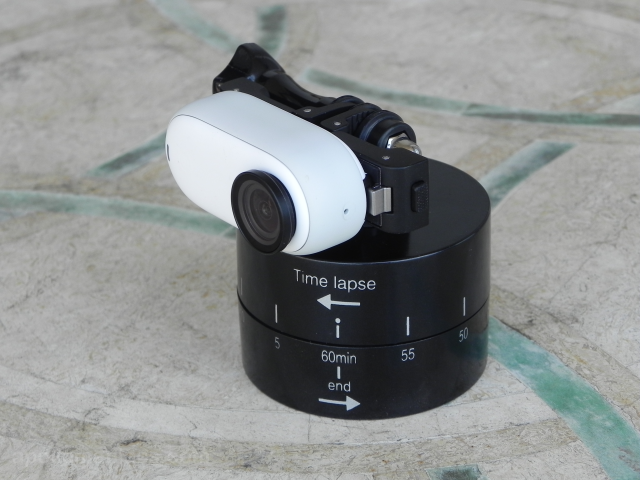 A camera platform that rotates automatically and slowly for time-lapse photography.
You can take panorama shots with time lapse.
A camera platform that rotates automatically and slowly for time-lapse photography.
You can take panorama shots with time lapse.
The product in the photo has a simple construction similar to a mechanical kitchen timer, and rotates only from right to left, and the rotation speed is fixed at 360 degrees in 60 minutes. If you shoot for about 15-30 minutes with a shooting interval of 2-4 seconds, you can take a nice time-lapse panoramic video. You can also increase the rotation speed by stacking multiple pieces of this product. There is a 1/4 inch male screw on the top and a 1/4 inch female screw hole on the bottom, so you can attach it to a tripod. It costs just over USD10, is light and small, and does not require batteries, so you can easily take it with you when traveling.
There is also a product called Sevenoak SK-EBH01 (Amazon.com) that can change the rotation direction and rotation speed.
Speaking of GoPro / action camera, it is
FPV drone
. Small and lightweight, Insta360 GO 3 is perfect for your FPV drone.
You can shoot
amazing aerial videos
full of speed and thrills.
Name of each part


Shooting mode

List of shooting modes
Shoot normal video. Aspect ratio can be selected from 16:9 / 9:16. Resolutions can be selected from 2.7K / 1440p / 1080p.
Shoot a FreeFrame Video with adjustable aspect ratio etc. after recording. Aspect ratio can be selected from 16:9 / 9:16. Resolutions can be selected from 1440p / 1080p.
Shoot time-lapse videos. Fix the camera when shooting, or place on an Rotating Tripod (Amazon.com) to take panoramic shots. No audio is recorded.
The shooting results cannot be played back on the camera and must be exported by Insta360 app or Insta360 Studio .
Shooting interval can be selected from 0.5s / 1s / 2s / 4s / 10s / 30s / 1min / 2min. Format is fixed at 1440p/30fps.
While shooting, the touchscreen displays two times in the format "MM:SS->MM:SS". The number on the left is the shooting time, and the number on the right is the time of the video being created. For example, the recording time required to create a time-lapse video of 10 seconds (=300 frames @ 30 FPS) is as follows.
| Shooting interval | Recording time |
|---|---|
| 0.5s | 150s (2.5min) |
| 1s | 300s (5min) |
| 2s | 600s (10min) |
| 4s | 1200s (20min) |
| 10s | 3000s (50min) |
| 30s | 9000s (150min : 2.5h) |
| 1min | 300min (5h) |
| 2min | 600min (10h) |
Capture hyperlapse (speed-up / fast forward) video. A fast-forward video with a playback speed of about 10 times (playback time is about 1/10) is recorded. This is a time-lapse video shot at 3 frames per second (interval 0.333 seconds). For example, recording for 15 minutes (900sec) will generate a video of 1 minute and 30 seconds (90sec). If you shoot while moving the camera, you can get a great effect. No audio is recorded.
The shooting results cannot be played back on the camera and must be exported by Insta360 app or Insta360 Studio .
Resolution is fixed at 1440p. Frame rate can be selected from 15 / 30. Even if you choose a frame rate of 15 FPS, the output video will be about 30 FPS, but the bit rate will be about 60% (about 50 Mbps) and the image quality will be low. However, the file size is also reduced by 60%, so you can save storage space when you want to shoot for a long time.
Shoot slow motion video. Record at 120fps and play back at 30fps, so playback speed is 1/4 of the real speed. No audio is recorded.
The shooting results cannot be played back on the camera and must be exported by Insta360 app or Insta360 Studio .
The aspect ratio is 9:16 when the camera is held horizontally, and 16:9 when held vertically. The format is fixed at 1080p/120fps.
The video will be recorded continuously for the length specified by "Loop Time", but older recordings will be deleted automatically. Always leave the video for the length specified by the loop time. For example, if you specify 1 minute as the loop time, the last 1-2 minutes will be left as a video no matter how many minutes you shoot. It is suitable for applications such as drive recorders and surveillance cameras. The loop (shooting) time can be selected from 1 / 3 / 5 / 10 / 15 / 20 / 25 / 30 minutes.
Take a normal photo. Aspect ratio can be selected from 16:9 / 9:16 / 1:1 / 2.7:1. Format can be selected from insp / insp+Raw / PureShot . Timer can be selected from Off / 3 / 5 / 10 / 30 / 60 seconds.
This is a dedicated starry sky shooting mode that takes time-lapse shots of the movement of stars. You can shoot the starry sky even in the city, but the screen will be brighter. A darker place, such as in the mountains, is better for capturing beautiful starry skies. With Insta360 Studio on PC , you can choose to export photos individually or combine them as a video after shooting. Also, using Insta360 app , you can choose whether or not to leave the trail of the moving stars.
Aspect ratio can be selected from 16:9 / 9:16 / 1:1 / 2.7:1. Format can be selected from insp / insp+Raw. Timer can be selected from Off / 3 / 5 / 10 / 30 / 60 seconds.
Fix the camera on a tripod and start shooting after the sky has darkened. It takes about 122 seconds to shoot one frame. Therefore, in order to generate a 10-second (=250 frames @ 25 FPS) video, it takes about 8.5 hours of continuous shooting. If you don't shoot continuously for at least 3-4 hours, the resulting video will be very short. If you press the shutter button during shooting, shooting will end after the current photo is taken.
Connect the camera to a charger or high-capacity mobile battery and shoot for a long time. If you select insp+Raw as the format and turn on PureShot when exporting, you can see a more beautiful starry sky.
It keeps taking pictures at the specified interval. With Insta360 Studio on PC , you can choose to export photos individually or combine them as a video after shooting. Aspect ratio can be selected from 16:9 / 9:16 / 1:1 / 2.7:1. Format can be selected from insp / insp+Raw. Shooting interval can be selected from 3s / 5s / 10s / 30s / 1min / 2min.
Regarding the shooting date and time information (Exif information) of photos, when you export with Insta360 app , the date and time when interval shooting start (when the shutter button is pressed) is written to all photos. On the other hand, when you export with Insta360 STUDIO , each photo has its own date and time when it was taken.
Take high dynamic range (HDR) photos. By continuously shooting underexposed and overexposed photos in addition to properly exposed photos and combining them, a photo with a wider dynamic range is generated. However, since there is a time difference between continuous shots, the composite image will be blurred when the subject or photographer is moving. Not suitable for shooting fast-moving scenes. Aspect ratio can be selected fro 16:9 / 9:16 / 1:1 / 2.7:1. Format can be selected from insp / PureShot . Timer can be selected from Off / 3 / 5 / 10 / 30 / 60 seconds.
What is FreeFrame video?
FreeFrame video is unprocessed RAW data, and can be applied with the image stabilization technology "FlowState image stabilization", adjust horizontal leveling (Horizon Lock), adjust FOV (field of view), and adjust aspect ratio (vertical to horizontal ratio), using an app or computer after shooting. This is suitable for aspect ratio changes and more sophisticated editing for TikTok, Instagram and Facebook.
The file is saved in the camera with the file name "PRO_VID_YYYYMMDD_HHMMSS_nn_xxx.mp4". The "YYYYMMDD_HHMMSS" part of the file name is the year, month, day, hour, minute, and second when the video was taken. The format of this file is 2688x2688 pixels resolution, and the codec is MPEG4 AVC Level5.2 Main profile.
To apply FlowState etc. to this video, you need to export using Insta360 app on your smartphone or Insta360 Studio on your computer. If you open "PRO_VID_YYYYMMDD_HHMMSS_nn_xxx.mp4" as it is without exporting with a media player etc., unprocessed circular image will be played.
At the same time, a preview movie with a resolution of 640x640 pixels with the file name "PRO_LRV_YYYYMMDD_HHMMSS_nn_xxx.mp4" is also generated. This is used when previewing in the app or on a touchscreen.
Other video formats
In-camera image stabilization is applied to non-FreeFrame videos. It is saved with the file name "VID_xxx.mp4" and can be played as is on any media player. The codec of this file is MPEG4 AVC Level5.2 Main profile.
At the same time, a preview movie with a resolution of 640x368 pixels with the file name "LRV_YYYYMMDD_HHMMSS_nn_xxx.mp4" is also generated. This is used when previewing in the app or on a touchscreen.
Applying FlowState stabilization

There are three strengths (levels) of FlowState image stabilization, as shown in the table below, which can be specified in the "Stabilization" field on the shooting format setting screen (right figure).
| Level | Description |
|---|---|
| Off | No image stabilization |
| Standard (Level 1) | Good for everyday activities (low preview delay) |
| High (Level 2) | Suitable for high-intensity sports such as running (medium preview delay) |
| Max (Level 3) | Suitable for extreme sports such as mountain biking (higher preview delay) |
What is insp format?
The photo extension ".insp" is Insta360's own format. A raw circular image is recorded at 24bit sRGB 3040x3040 pixels. Insp file can be exported as a JPG file with the file name "IMG_YYYYMMDD_HHMMSS_nn_xxx.jpg" by exporting using Insta360 app or Insta360 Studio . The JPG file will have a resolution of 2560x1440 pixels. When insp+Raw is specified as the shooting format, two files are saved inside the camera: insp format and Raw(DNG) format.
What is PureShot?
PureShot is an AI shooting mode developed by Insta360 that uses AI to extend the dynamic range of a photo while reducing noise and preserving details to produce sharp images. HDR photography synthesizes multiple photographs with different exposures, but PureShot is a technology that uses AI to extend the dynamic range with just one photograph. PureShot can be enabled/disabled in Insta360 app or Insta360 Studio after shooting. When PureShot is specified as the shooting format, two files are saved inside the camera: insp format and Raw(DNG) format. On the other hand, for photos with insp+Raw as the shooting format, you can enable PureShot later in the app.
This feature was added to Insta360 ONE R in September 2020.
How to charge

When charging, both the camera and Action Pod indicator lights are solid red. It takes about 47 minutes to charge the device to 80% and about 65 minutes to fully charge. The indicator light will go out when the device is fully charged.
About battery life
The nominal value is 47 minutes for video shooting with the GO 3 camera alone and 170 minutes with the Action Pod (at 1080p30fps). In the case of photography, depending on how often you shoot, it should last at least twice as long as video. The Action Pod can be used while charging. If you want to shoot a long time-lapse or star-lapse, you can shoot while connecting the charger or mobile battery.
Activation
To use Insta360 GO 3, you need to activate it first using the Insta360 app. First, install the Insta360 app on your smartphone.-
With the GO 3 camera set in the Action Pod, press
 (Power)
button on the Action Pod to start it.
(Power)
button on the Action Pod to start it.
- Enable Wi-Fi and Bluetooth on your smartphone.
-
Open
(Insta360) app on your smartphone and tap the yellow
 (camera)
icon at the bottom center of the screen.
(camera)
icon at the bottom center of the screen.
- In the pop-up window, select the device "Insta360 GO 3" to connect and follow the on-screen instructions to complete the connection. By default, the camera name is "GO 3 xxxxxx". The "xxxxxx" part is the last 6 digits of the serial number on the GO 3 packing box.
- When connecting GO 3 and a smartphone for the first time, it is necessary to perform the "authentication" operation. Authenticate the connection on the Action Pod touchscreen. After the camera is successfully connected, follow the on-screen instructions to activate the camera.
- The app will prompt you to update the firmware if there is a newer version available. Follow the on-screen instructions to update your GO 3 and Action Pod firmware.
Basic operation
When the GO 3 camera is set in the Action Pod and the Action Pod is powered, the buttons on the camera body are disabled. Control the camera via the Action Pod buttons or the Insta360 app.When the GO 3 Camera is removed from the Action Pod and the Action Pod is not powered, the buttons on the camera body are enabled. When the GO 3 Camera is taken out of the Action Pod, the Action Pod acts as a remote control for the GO 3 Camera. You can control your GO 3 camera from up to 5 meters (16ft) away.
Action Pod
| Button | Action | Function |
|---|---|---|
(Power) | Click |
If the power is off, turn it on. When the power is on, wake from sleep or turn on/off the touch screen. |
| Hold for 2 seconds | Power off. (Release your finger when the power off animation is displayed) | |
| Hold for 5 seconds | Force power off | |
(Shutter) | Click | Take a photo or start/end video recording when powered on. |
|
If it is powered off, power it on and start recording (if GO 3 is powered off and in the action pod).
If Quick Capture is set to ON, any photo-taking or video recording can be started upon single-clicking or double-clicking, even when the power is off. |
||
| Confirm the connection with the app (when connecting for the first time) | ||
(Quick) | Click | The tutorial screen is displayed at the first startup. |
|
Press once to open the
Preset
switch menu or
Shooting mode
switch menu.
Press again to switch to another preset or another shooting mode.
Tap the
|
Insta360 GO 3 Camera
| Button | Action | Function |
|---|---|---|
(GO 3 Button) | Click | Take a photo or start/end video recording when powered on.
You can
customize
what photos/videos are taken when you single or double click this button.
If Quick Capture is set to ON, any photo-taking or video recording can be started when single-clicking or double-clicking, even when the power is off. |
| Confirm the connection with the app (when connecting for the first time) | ||
| Hold for 2 seconds |
Turns the power on when it's off (if not set in the Action Pod).
Turns the power off when the power is on. |
|
| Hold for 7 seconds | Force power off |
How to use the Action Pod touch screen
| Gesture | Description |
|---|---|
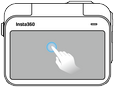 (tap the screen) | Hide/Show information on the touchscreen. |
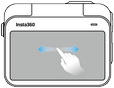 (Swipe left or right on center) | Switch Shooting mode . Select shooting modes such as Video, Photo, Timelapse, TimeShift, and Slow Motion. |
 (Swipe in from the right edge) | Switch to the shooting parameter setting screen. You can specify shutter speed, ISO, EV, white balance, etc. for each selected shooting mode. |
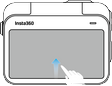 (Swipe up from the bottom edge) | Switch to the shooting format setting screen. FlowState stabilization, Aspect ratio, resolution, frame rate, etc. can be specified for each selected shooting mode. |
 (Swipe in from the left edge) | Switch to the album page. You can browse videos and photos that have been taken so far. |
 (Swipe down from the top edge) | Switch to the Camera setting screen. |
Action Pod screen

(The image is quoted from the official user manual)
The meanings of the icons displayed around the screen are shown in the table below.
| No. | item | description |
|---|---|---|
| 1 | (storage) | Displays the remaining number of photos or length of video footage that can be stored in the internal storage. |
| 2 | (screen lock) | Indicates that the touch screen is locked. Swipe up on the touch screen to unlock. |
| 3 | (time capture) | Indicates that time capture (scheduled recording: recording starts at the specified time) is set. |
| 4 | (preset) | Indicates that a preset shooting mode is set. Displays an icon for the currently selected preset. |
| 5 | (Wi-Fi) | Indicates that Wi-Fi is enabled. |
| 6 | (Bluetooth) | Indicates that the GO 3 camera and Action Pod are connected via Bluetooth. Appears when the GO 3 camera is detached from the Action Pod. If this icon does not disappear after 10-15 seconds of placing your GO 3 camera in the Action Pod, check that the charging points are clean. Or try a forced power off and restart. |
| 7 | (GO 3 battery status) | Displays the battery level of the GO 3 camera. |
| 8 | (Action Pod battery status) | Displays the battery level of the Action Pod. |
| 9 | (shooting mode) | Indicates the current shooting mode . Touch here to switch to the shooting mode switching screen. Swipe left or right on the screen to switch shooting modes. |
| 9 | (shooting format) | Indicates the current shooting format. Touch here to display the shooting format switching screen. You can switch by touching and swiping each item. |
| 9 | (FOV(field of view)) | Indicates the current FOV (Field Of View). Either ULTRA (ultra wide angle: UltraWide) / ACTION (action wide angle: ActionView) / LINEAR is displayed. Touch here to display the FOV switching screen. You can switch the FOV by tapping the icon. |
Camera setting screen

| Icon | Description |
|---|---|
| Turn screen rotation lock on/off. It is off by default. When the screen rotation lock is off, rotating the camera 180° also rotates the image 180° (upright). Turn this off when you want to shoot an upright image by fixing the camera upside down. On the other hand, when shooting an action like a somersault, turn this on. | |
| lock the screen. If you lock it, even if you tap the touch screen carelessly, it will not react. Swipe up on the touch screen to unlock. | |
| Sets the speaker volume. You can choose from High, Medium, Low and Mute. Default is Medium. | |
| Adjust screen brightness. Adjust the brightness by sliding the bar displayed on the screen up and down. The default setting is maximum brightness. Dimming saves battery. | |
| Turn Quick Capture on/off. It is on by default. | |
| Turns voice control on/off. Available languages are English or Chinese only. You can use voice commands such as "Take a Photo", "Start Recording", "Stop Recording", "Mark That", "Shutdown Camera". | |
|
Pre-Recording can be set and turned on/off. Pre-recording is a feature that starts recording 10/15/30 seconds before you press the shutter button.
When it's on, there's always a recording activity going on in the background, capturing the few seconds before you press the shutter button.
It's convenient when you don't want to miss an unpredictable photo opportunity, but constant recording may cause the camera to heat up or drain the battery faster.
I think it's a good idea to turn it on only when you need it.
Pre-recording can be specified only for Video or FreeFrame Video modes. |
|
| Set the time capture (scheduled recording: start shooting at the specified time) function. When turned on, you can specify the start time, shooting mode, shooting format, shooting time, etc. This feature is available for Video, FreeFrame Video, Timelapse, Photo and Interval. | |
| Switch the audio mode (sound setting). Choose from "Wind noise reduction" / "Stereo" / "Direction Focus". | |
| Turns on/off the touch screen grid display. Showing the grid makes it easier to keep the camera horizontal/vertical. | |
| OpenAdvanced camera settings screen. You can check the firmware version, set quick capture and camera buttons, turn Wi-Fi on/off, gyro calibration, reset, etc. |
Advanced camera settings screen

| Item | Description |
|---|---|
| Camera Info | You can check the Device Type (product name), Firmware version, Serial Number, Audio Authorization, Camera Hardware version, and Action Pod Hardware version. |
| General | Vibration on/off, Indicator Light on/off, Auto Power Off time (3min / 5min / 15min / Never), Auto Sleep time (60s / 90s / 3min / Never, During recording on / off) can be set.
Turn off the vibration and indicator lights and mute the speaker volume to shoot in complete silence. You can shoot without being noticed by people nearby. |
| Camera Storage | You can see the total capacity and remaining capacity of the storage, and format (initialize) the storage. About 4GB is consumed as system area. |
| QuickCapture Settings |
Turn Quick Capture on/off and specify what happens when you click the Action Pod's Shutter button and GO 3 button once or twice.
Pressing the Action Pod's shutter button when the Action Pod's power is off will quickly start shooting with the mode and parameters set here. Or when GO 3 is powered off and not in the Action Pod, pressing the GO 3 button will quickly start shooting with the mode and parameters set here. |
| GO 3 Button Settings |
Specifies what happens when you click the GO 3 button once or twice when GO 3 camera is running.
Pressing the GO 3 button while GO 3 is running and not connected to the Action Pod, it will start shooting with the mode and parameters set here. But pressing the GO 3 button while GO 3 is remotely connected to the Action Pod will apply the current Action Pod settings to the camera and start shooting. |
| Wi-Fi Settings | You can turn on/off Wi-Fi and display SSID and password. You can save battery by turning it on when connecting to a smartphone and turning it off otherwise. |
| Voice Control |
You can turn on/off voice control and select language (English, Chinese).
The same screen as
|
| Pre-recording Settings |
You can make settings related to pre-recording.
The same screen as
|
| Video Bitrate | You can select the video bit rate from High / Standard. "High" is usually fine. If you want to save storage even if the image quality is lowered, please select "Standard". |
| Video Sharpness | Video sharpness can be selected from Highest / High / Medium / Low. |
| Anti-Flicker | Anti-flicker can be selected from Auto / 50Hz / 60Hz. "Auto" is usually fine. |
| Gyro Calibration | You can calibrate the gyro sensor installed in the camera. Simply place the camera on a horizontal surface with the lens facing up and tap the button that appears on the screen. Calibrate at least once immediately after purchase. |
| Language | Specifies the language of messages displayed on the touch screen. |
| Certification | Displays the device certification information for each country that the camera has acquired. |
| Reset Tutorial | You can redisplay the tutorial screen that was displayed on the touch screen when you first started. You can choose to Confirm (redisplay) / Cancel (do nothing) |
| Factory Reset | Factory reset the Camera and Action Pod. You can choose to Confirm (initialize) or Cancel (do nothing). |
Quick Capture: Start shooting immediately when power down

When the power is off, by pressing the GO 3 camera button (when separated from the action pod) or the Action Pod's shutter button (when combined with the GO 3 camera), you can start taking photos and videos at the same time as booting. After clicking the button, it will start up in a few seconds, take a video or picture, and then return to the power off state. This is called "Quick Capture".
This feature can be set in the settings screen of the Insta360 app or the camera settings screen of the Action Pod, and you can specify what happens when you single or double click the button. However, shooting mode that can be specified are limited to three types: "Video", "FreeFrame Video", "Photo", and "None".
When using the Action Pod, swipe down from the top edge of the touch screen to open the " Camera settings screen ", tap
Customizing the GO 3 Camera Button
Apart from the "Quick Capture" above, you can specify what happens when you single or double click the button when the GO 3 camera is separate from the Action Pod and already powered on. This can also be set in the settings screen of the Insta360 app or the camera settings screen of the Action Pod. All shooting mode and "None" can be specified here.When using the Action Pod, swipe down from the top edge of the touch screen to open the " Camera settings screen ", tap
Preset: Saving shooting parameters

You can switch presets by flicking this preset menu screen left or right or by clicking
By tapping
Tap
The following 5 types of presets are prepared as initial settings. Furthermore, by tapping the "+" icon at the top right of the screen, you can add "Custom 1 to 5", and you can store a total of 10 presets.
| Name | Mode | Format | Parameter | FOV |
|---|---|---|---|---|
Skiing | Video | 16:9/1440P/30 | Auto | UltraWide |
Biking | Video | 16:9/1440P/30 | Auto | UltraWide |
Outdoors | Loop Recording | 16:9/1440P/30 | Auto | UltraWide |
Vlog | Video | 16:9/1440P/30 | Auto | UltraWide |
Starfield | Starlapse | 16:9/insp+Raw | Manual(1/40 ISO1000) | UltraWide |
Importing videos/photos to a computer

Add location information (geotagging) to videos and photos
Insta360 GO 3 does not have GPS, and photos taken remotely from an iPhone will not have location information attached. However, you can manually add location information later.When using Insta360 GO 3, at the same time, start the GPS logger app on your iPhone and record the location information. Then, on the computer, write the recorded location information to the photos taken with Insta360 GO 3, relying on the shooting date and time information.
Geotag Photos Pro App is recommended for GPS logger function and location information writing. However, JPEG files generated by exporting photos in Raw (DNG) format or PureShot format do not have the correct shooting date and time. Before adding location information to photos, it is necessary to set the correct shooting date and time using ExifTool etc.
For more information, please see each link below.
Waterproof performance/How to use Dive Case
Insta360 GO 3 Camera
The camera body is water resistant to a depth of 5m (16.4ft), but a lens guard must be attached. It is attached at the time of shipment. Check the lens guard for looseness before entering the water.
Also, do not leave it in a humid environment such as a hot spring or sauna for more than 1 hour. The operating temperature of the camera is -20°C ~ +40°C (-3.9°F ~ +103.9°F).
After using the camera underwater, shake the camera well to remove any water that may have entered the microphone or speaker. Allow to air dry completely before attaching to Action Pod. In particular, dry the charging points well.
Do not heat it with a hair dryer, etc. to dry it. Otherwise, the microphone or speaker may be damaged. Also, after using it in seawater, it must be soaked in fresh water for at least 15 minutes to remove the salt.
Action Pod
The Action Pod has an IPX4 splash-proof rating when equipped with the Insta360 GO 3 camera. It will protect against light rain and snow, but should not be submerged in water or used in heavy rain or action sports such as surfing or water skiing. If you remove the camera, the waterproof performance will be lost.
Before attaching the camera to the Action Pod, make sure the inside of the Action Pod and the charging point are free of moisture, mud and dirt.
Insta360 GO 3 Dive Case

Before each use, make sure that there is no water leakage by submerging it in a bathtub with the contents empty. You can check for water leakage by putting a tissue paper in it. There are slots on the top and side of the lens for inserting anti-fog sheet (Amazon.com) . Please put the anti-fog sheet just before using. When using a third-party anti-fog sheet, cut it to 28x15x1.2mm. Before closing the lid, make sure that the O-ring (rubber seal) is free of sand.
After getting out of the water, wipe it with a soft towel before opening the lid. Avoid opening the lid when the Dive Case is wet. After using it in seawater, it must be soaked in fresh water for at least 60 minutes to remove the salt before storing. After use, let it dry naturally and apply silicon grease for O-rings (Amazon.com) to the O-ring (rubber seal) before storing. Also, when storing, do not close the lid tightly to avoid sticking or deformation of the O-ring (rubber seal).
Install the Insta360 app
Like other Insta360 action cameras, the Insta360 GO series can be controlled with the Insta360 app. Install Insta360 app on your smartphone.-
Insta360
Shenzhen Arashi Vision Co., Ltd. Photo / video free
Insta360 cameras give creators, athletes and adventurers tools to create like they’ve never created. Whether you're upping your shooting game with an Insta360 ONE R or ONE X, the Insta360 App is a creative powerhouse in your pocket that acts as your camera’s sidekick. Editing on your phone has never been easier.
view details (App Store)
Connect with Insta360 app, Set shooting mode, Remote control
 Enable Bluetooth and Wi-Fi on your iPod / iPad / iPhone.
Then open
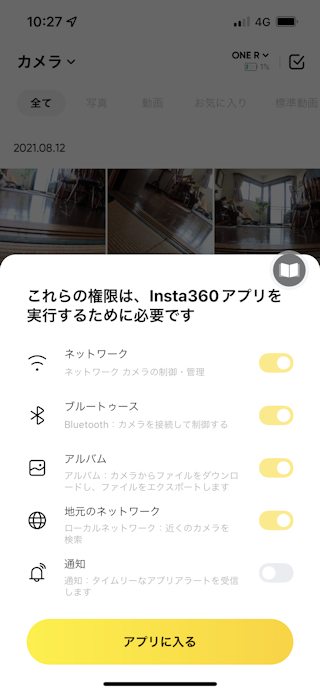 Then you will see a screen like this.
This is the screen for requesting various permissions.
Allow everything but "notifications" to control the camera.
Set "Notification" to your liking.
Then tap "Enter app".
Then you will see a screen like this.
This is the screen for requesting various permissions.
Allow everything but "notifications" to control the camera.
Set "Notification" to your liking.
Then tap "Enter app".
You can get help by tapping book icon displayed on the edge of the screen.
 Press the power button on your Insta360 GO 3 camera.
Then, "Connect now" is displayed at the bottom of the screen as shown in the figure, so tap this. Alternatively, tap the yellow
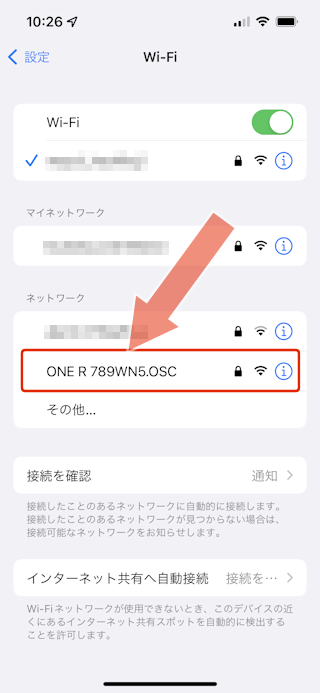 If "Connect Now" is not displayed and tapping the
When you open
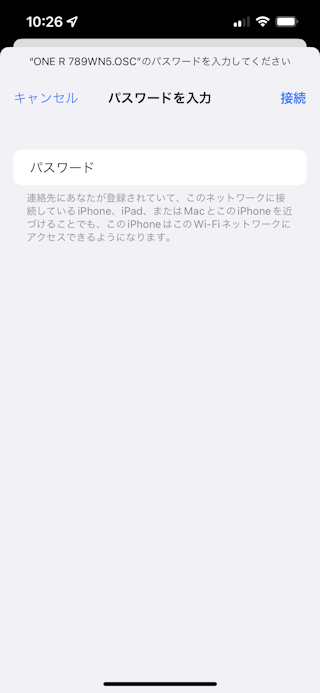 Then you will be asked for your password.
Enter "88888888" and tap "join".
Then you will be asked for your password.
Enter "88888888" and tap "join".
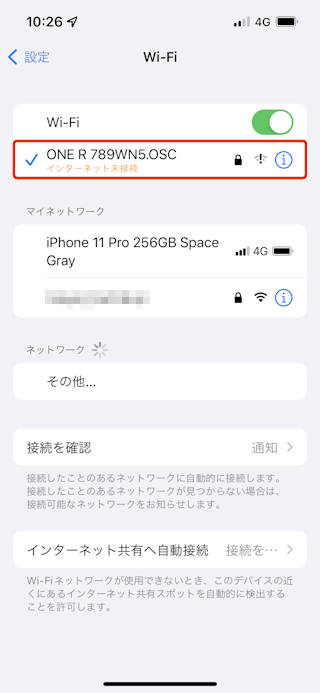 If you see a screen like this, the connection is successful.
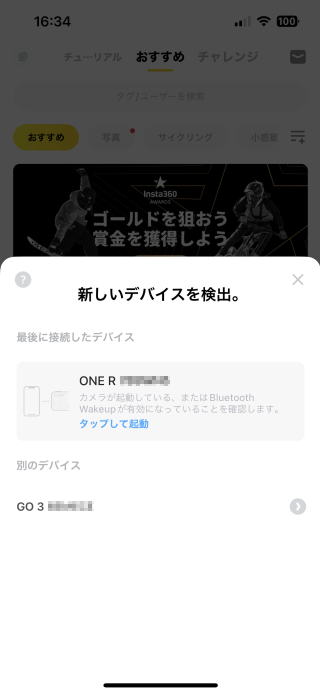 Then, "A new device was found" is displayed like this.
Tap the name of the camera.
Then, "A new device was found" is displayed like this.
Tap the name of the camera.
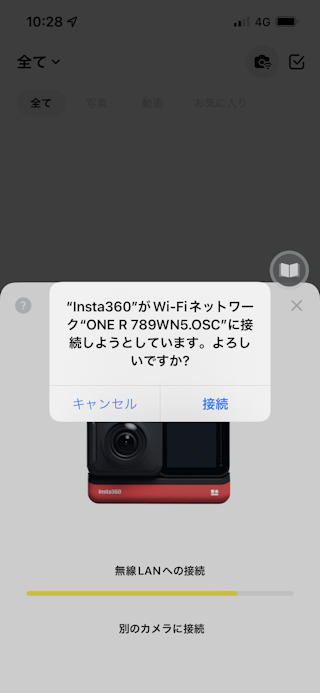 Then Insta360 app and Insta360 GO 3 Camera will be connected.
A confirmation screen like this is displayed on the way.
Tap "Connect".
Then Insta360 app and Insta360 GO 3 Camera will be connected.
A confirmation screen like this is displayed on the way.
Tap "Connect".
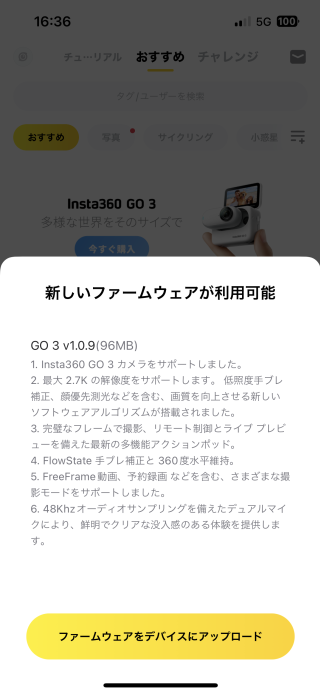 Sometimes it says "New firmware available" like this.
You can update the firmware (basic software) of the camera.
Follow the instructions on the screen to update.
Sometimes it says "New firmware available" like this.
You can update the firmware (basic software) of the camera.
Follow the instructions on the screen to update.
Note: Make sure your camera battery is fully charged when updating. If the camera loses power during the update, it may stop working. I think it's good to update while charging with a charger or mobile battery.
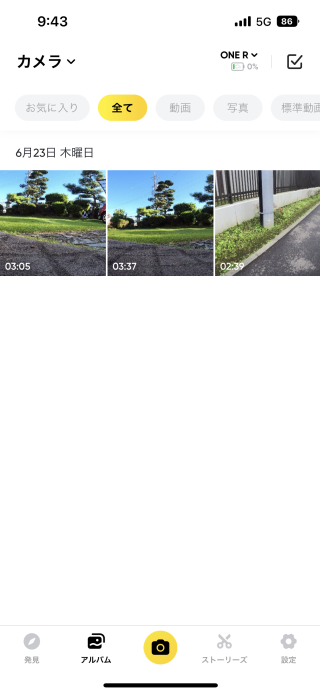 Once connected, the
By tapping the place where "Camera" is written on the upper left of the screen, you can switch the display target to "All", "Downloaded (within the iPhone's Insta360 application)", and "Camera (within Insta360 GO 3's on-board storage)".
You can play videos by tapping the thumbnail.
Tap yellow
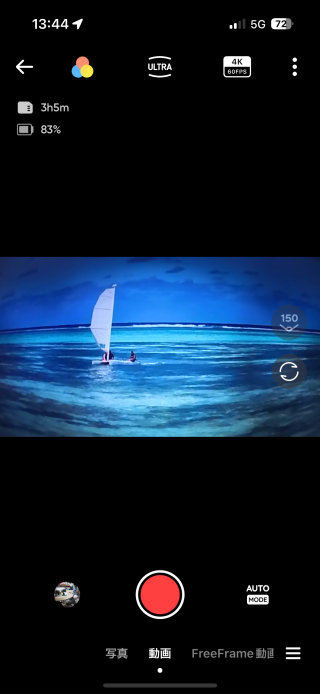 Tap
Tap
Tap red record button to start recording.
You can switch between shooting modes by flicking the menu at the bottom of the screen left or right, or by tapping
By tapping icons lined up at the top of the screen, you can specify the resolution, file format, etc. for the selected shooting mode.
 Tap
Tap
 Then the screen will look like this.
Tap "Disconnect" to disconnect the Insta360 app and camera.
Then the screen will look like this.
Tap "Disconnect" to disconnect the Insta360 app and camera.
Manage videos and photos taken
Managing and editing videos on a smartphone is a very heavy task, so the smartphone will get hot.
We recommend using
Insta360 Studio
on your computer whenever possible.
Videos and photos stored in the Insta360 GO 3 can be processed on the app or downloaded to smartphone.
On the
 The screen will look like this.
When you tap thumbnail, it will be selected with a yellow check mark in its upper right corner.
And at the bottom of the screen, the following icons are lined up.
The screen will look like this.
When you tap thumbnail, it will be selected with a yellow check mark in its upper right corner.
And at the bottom of the screen, the following icons are lined up.
Tap
Tap
Tap
Tap
 When you tap
Export from Insta360 app to your smartphone
 In the
 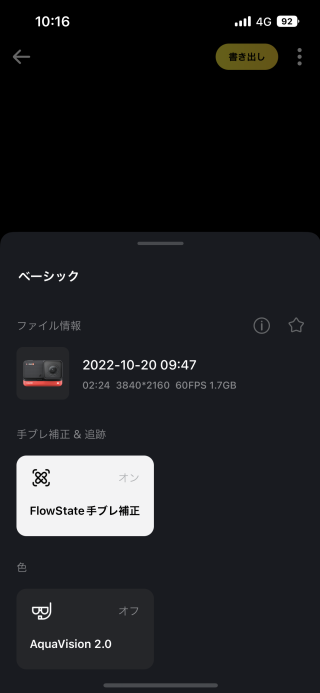 Tap
Tap
You can turn ON/OFF "FlowState image stabilization" on this screen. This is ON by default.
 Tap
Tap
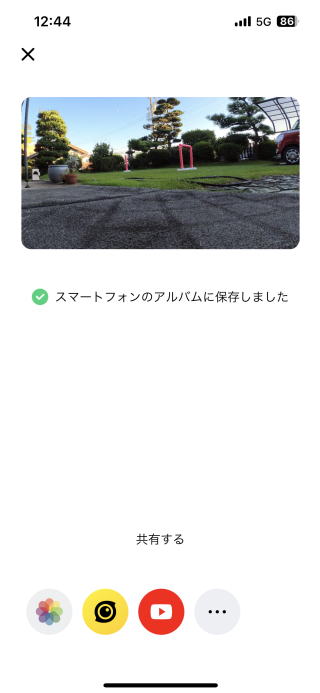 When the screen looks like this, the export is complete.
An album called "Insta360" will be created in
When the screen looks like this, the export is complete.
An album called "Insta360" will be created in
Remove watermark logo from video
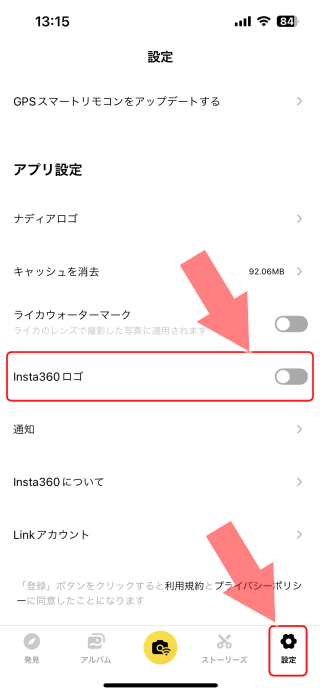 When exporting from Insta360 app to a smartphone, a watermark logo "SHOT ON Insta360 ONE R" is burned into the bottom right of the image by default.
To turn it off, open the Insta360 app's Settings screen and set the "Insta360 logo" to
When exporting from Insta360 app to a smartphone, a watermark logo "SHOT ON Insta360 ONE R" is burned into the bottom right of the image by default.
To turn it off, open the Insta360 app's Settings screen and set the "Insta360 logo" to
How to use Insta360 STUDIO
Software called "Insta360 STUDIO" that allows you to edit videos and photos of Insta360 series cameras on a Windows / Mac computer has been released.
You can export multiple videos and photos at once on a large screen, so you can work more efficiently than Insta360 app.
You can download the free app "Insta360 STUDIO" from Insta360 Applications page
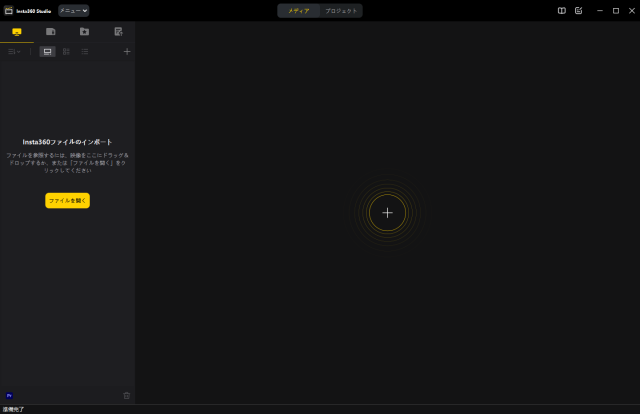 After installing Insta360 STUDIO, click
When the camera is turned on and connected to a computer with a USB cable, the screen on the right will be displayed on Action Pod.
If you select "U-Disk Mode", you can access the camera as a USB memory.
After installing Insta360 STUDIO, click
When the camera is turned on and connected to a computer with a USB cable, the screen on the right will be displayed on Action Pod.
If you select "U-Disk Mode", you can access the camera as a USB memory.
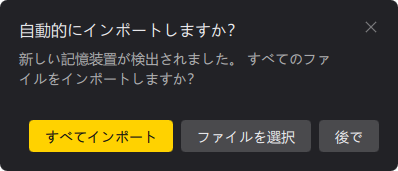 Then, dialog box like this will bring up.
Click "Import All" to load all videos / photos on the Insta360 GO 3 into Insta360 STUDIO.
Click "Select File" to open Insta360 GO 3 in Explorer. Select the file you want to load and drag and drop it to Insta360 STUDIO.
In addition, "Import" here means simply loading the "file list" of the Insta360 GO 3 into Insta360 STUDIO. Videos and photos themselves are not copied to your computer.
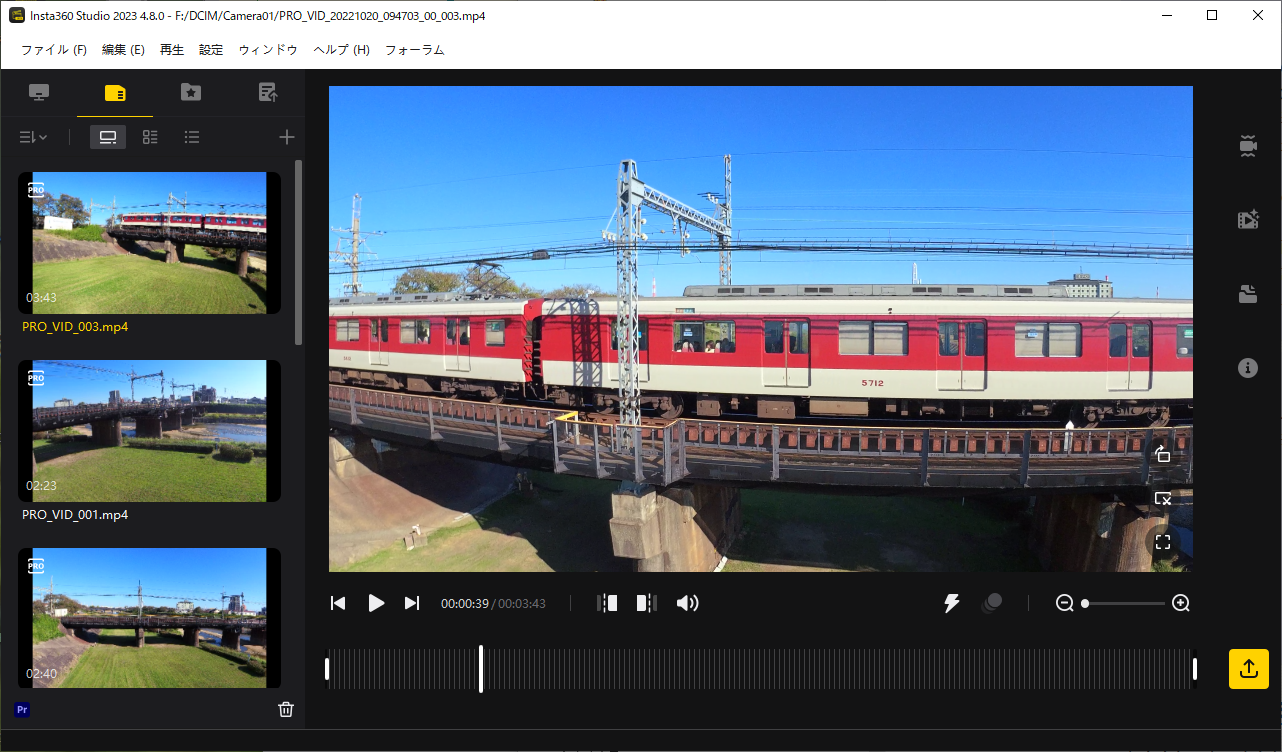 When loading is complete, you will see a screen like this.
On the left side of the screen, a list of thumbnails of videos and photos on the Insta360 GO 3 is displayed.
Currently selected video / photo is displayed on the right side of the screen, and you can play it back and perform various processing / trimming.
When loading is complete, you will see a screen like this.
On the left side of the screen, a list of thumbnails of videos and photos on the Insta360 GO 3 is displayed.
Currently selected video / photo is displayed on the right side of the screen, and you can play it back and perform various processing / trimming.
Operation is easy. Double-click the video / photo you want to edit from the thumbnail on the left side of the screen. Then you can process it by clicking each icon on the right screen. Hover your mouse cursor over each icon on the screen to see a description of the function.
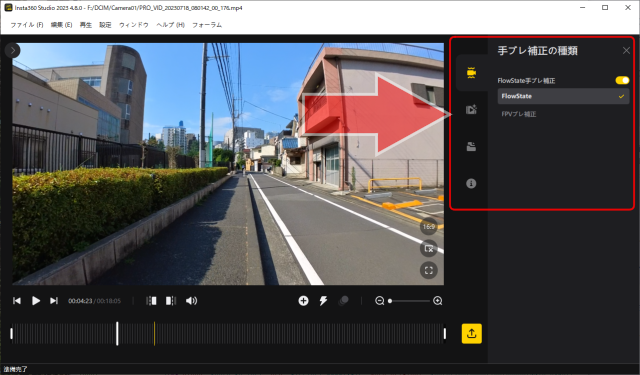 By clicking the icons on the right side of the screen, you can set FlowState image stabilization, FOV, image processing (colorful, vivid plus, AquaVision), audio noise cancellation, etc.
You can also view media information such as the shooting date and time, resolution, and bitrate.
By clicking the icons on the right side of the screen, you can set FlowState image stabilization, FOV, image processing (colorful, vivid plus, AquaVision), audio noise cancellation, etc.
You can also view media information such as the shooting date and time, resolution, and bitrate.
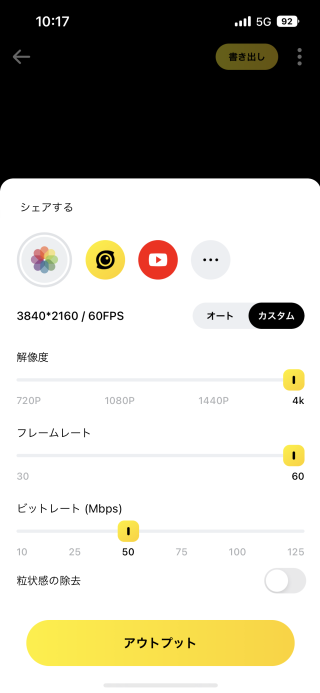
After editing, click
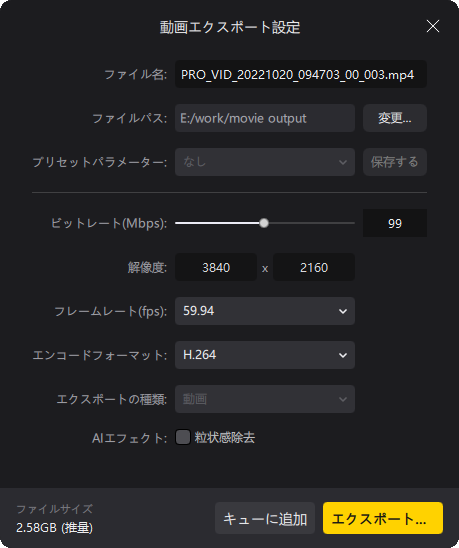 Then you can see a dialog box like this.
You can specify the output file name, folder you want to store, bit rate, resolution, frame rate, format, etc.
Click "Export" at the bottom right of the screen to store the edited video in the specified folder on your computer.
Then you can see a dialog box like this.
You can specify the output file name, folder you want to store, bit rate, resolution, frame rate, format, etc.
Click "Export" at the bottom right of the screen to store the edited video in the specified folder on your computer.
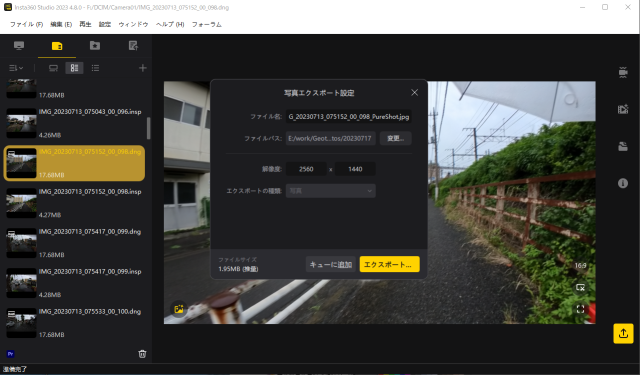 When exporting photos, the screen will look like this.
There are almost no items that can be set.
However, for Raw (DNG) format photos, you can turn PureShot on/off by clicking
When exporting photos, the screen will look like this.
There are almost no items that can be set.
However, for Raw (DNG) format photos, you can turn PureShot on/off by clicking
 For Interval/Starlapse photos, you can choose to export photos individually or combine them to export as a video.
Choosing insp+Raw as the format will generate two files, one with "DNG" in the filename and one without.
PureShot can be applied by selecting a file with "DNG".
For Interval/Starlapse photos, you can choose to export photos individually or combine them to export as a video.
Choosing insp+Raw as the format will generate two files, one with "DNG" in the filename and one without.
PureShot can be applied by selecting a file with "DNG".
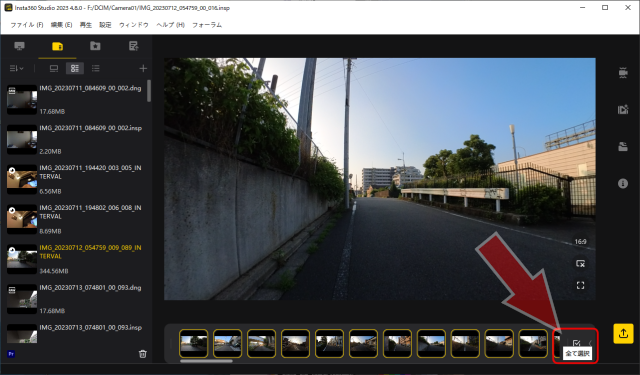
You can export all photos at once by clicking the "Select All" checkmark at the bottom right of the screen as shown.
Alternatively, if you select several photos from the thumbnails lined up at the bottom of the screen, you can export only the selected photos at once.
 When exporting as a photo, you can choose to specify aspect ratio, resolution, and auto-horizontal correction.
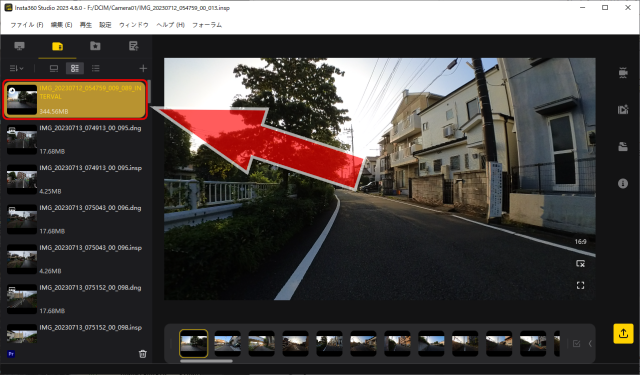 To combine Interval/Starlapse photos and export them as a video, double-click an interval photo from the list on the left, and then click
 If you want to export as a video, specify "Combined video" in the "Export type" field.
You can select the resolution, frame rate, and type of camera shake correction (Stationary(fixed position shooting) / Motion(moving shooting)).
Frame rate can be selected from 24 / 25 / 30 / 50 / 60 fps for interval and 24 / 25 fps for starlapse.
If you want to export as a video, specify "Combined video" in the "Export type" field.
You can select the resolution, frame rate, and type of camera shake correction (Stationary(fixed position shooting) / Motion(moving shooting)).
Frame rate can be selected from 24 / 25 / 30 / 50 / 60 fps for interval and 24 / 25 fps for starlapse.
If you specify "Interval/Starlapse Sequence" in the "Type of export" field on this screen, you can export all photos as "Photos".
 When disconnecting the camera from the computer, first close the Insta360 STUDIO app.
Then, in the same way as when removing the USB memory, first perform the "eject" operation of the drive and then remove it.
Otherwise, videos and photos stored in the camera may be corrupted.
When disconnecting the camera from the computer, first close the Insta360 STUDIO app.
Then, in the same way as when removing the USB memory, first perform the "eject" operation of the drive and then remove it.
Otherwise, videos and photos stored in the camera may be corrupted.
Insta360 GO 3 Camera Indicator Light Meaning
The indicator lamp can be turned on/off on "General" menu of the Advanced camera settings screen .| Indicator Light Status | description |
|---|---|
| Blinks slowly in cyan (light blue) and then stays lit | Booting ~ power on |
| Cyan (light blue) blinks 5 times | During power off sequence |
| lights out | Taking photo / Charging finished / Power off |
| flashing red | video shooting |
| Steady red | Charging |
| Flashing blue | Updating firmware |
| Flashing yellow | Overheat. need cooling |
| Always lit in cyan (light blue) | USB memory mode / Webcam mode |
| Steady Yellow | Storage space full / File error / USB error |
| Fast blinking yellow | Insufficient storage space |
Insta360 GO 3 Camera specifications
| item | description |
|---|---|
| Aperture | F2.2 |
| 35mm Equivalent Focal Length | 11.24mm |
| Photo Resolution |
2560x1440 (16:9) 2560x2560 (1:1) 1440x2560 (9:16) 2936x1088 (2.7:1) |
| Video Resolution |
2.7K: 2720x1536@24/25/30fps 1440P: 2560x1440@24/25/30/50fps 1080P: 1920x1080@24/25/30/50fps |
| FreeFrame Video |
1440P: 2560x1440@24/25/30/50fps 1080P: 1920x1080@24/25/30/50fps |
| Timelapse Video | 1440P: 2560x1440@30fps |
| TimeShift Video | 1440P: 2560x1440@15/30fps |
| Slow Motion Video | 1080P: 1920x1080@120fps |
| Pre-Recording Video |
2.7K: 2720x1536@24/25/30fps 1440P: 2560x1440@24/25/30/50fps 1080P: 1920x1080@24/25/30/50fps |
| Loop Recording Video |
2.7K: 2720x1536@24/25/30fps 1440P: 2560x1440@24/25/30/50fps 1080P: 1920x1080@24/25/30/50fps |
| Photo Format |
INSP DNG * Both file types can be exported to JPG through the Insta360 mobile app or Insta360 Studio. |
| Video Format | MP4 |
| Photo Modes | Photo, HDR Photo, Interval, Starlapse |
| Video Modes | Video, FreeFrame Video, Timelapse, TimeShift, Slow Motion, Pre-Recording, Loop Recording |
| Color Profiles | Standard, Vivid, Flat |
| Video Coding | H.264 |
| Max. Video Bitrate | 80Mbps |
| Exposure Value | ±4EV |
| ISO Range | 100-3200 |
| Shutter Speed |
Photo: 1/8000 - 120s Video: 1/8000 - to the limit of frames per second |
| White Balance | Auto, 2000 - 10000K |
| Audio Modes | Wind Reduction, Stereo, Direction Focus |
| Audio Format | 48Khz, 24bits, AAC |
| Weight |
GO 3: 35.5g (1.25oz) Action Pod: 96.3g (3.40oz) |
| Dimensions (W x H x D) |
GO 3: 25.6x54.4x23.2mm (1.0x2.1x0.9in) Action Pod: Screen Folded: 63.5x47.6x29.5mm (2.5x1.9x1.2in) Screen Unfolded: 63.5x86.6x29.9mm (2.5x3.4x1.2in) |
| LCD screen resolution | 640x320p |
| Color | White |
| Storage | 32GB (1h25min), 64GB (2h50min), 128GB (5h40min) (Video mode at 1440P/30fps in 16:9 resolution) |
| Battery Capacity |
GO 3: 310mAh Action Pod: 1270mAh |
| Charging Method |
GO 3: Action Pod Action Pod: Type-C |
| Charging Time |
GO 3: 23 mins to 80% | 35 mins to 100% Action Pod: 47 mins to 80% | 65 mins to 100% |
| Run Time |
GO 3: 45 mins GO 3 + Action Pod: 170 mins *Tested in 25°C (77°F) lab conditions at 1080p@30fps in "Video Mode", with screen and Wi-Fi off. Run time may vary in different conditions. |
| Use Environment |
GO 3: -4°F to 104°F (-20℃ to 40℃) Action Pod: -4°F to 104°F (-20℃ to 40℃) |
| Bluetooth | BLE 5.0 |
| Wi-Fi | 5GHz, 802.11a/n/ac |
| USB | Type-C |
| Gyroscope | 6-axis gyroscope |