


 How to update radio firmware
Here, we will introduce how to upgrade the firmware, multi-protocol module (transmitter), and boot loader of OpenTX/EdgeTX radio.
The same operation is possible with any radio that uses OpenTX / EdgeTX. However, keyswitch assignments / functions differ depending on model, and screen / menu configuration differs depending on installed version of OpenTX / EdgeTX.
このページを日本語で見る
Table of contents
- About update method of radio
- Install OpenTX/EdgeTX Companion
- Checking and backing up the current firmware
- OpenTX/EdgeTX Companion Settings
- Download the latest version of OpenTX/EdgeTX firmware
- Download the latest multi-protocol module firmware
- Installation of the latest version of OpenTX/EdgeTX firmware
- Installation of the latest boot loader
- Installation of the latest multi-protocol module firmware
- How to update radio firmware directly from OpenTX/EdgeTX Companion
-
RadioMaster Zorro 2.4GHz 16CH Hall Sensor Gimbals

RadioMaster 2022/02 USD89.99
On-board firmware:EdgeTX(OpenTX)
Featuring an ergonomic design, large bright LCD screen in the perfect viewing position, travel adjustable HALL sensor gimbals, a nano size external RF module bay

 (US)
(UK)
How to use RadioMaster Zorro
(US)
(UK)
How to use RadioMaster Zorro
About update method of radio
There are two ways to update OpenTX/EdgeTX-equipped radio:- Connect PC and radio with USB cable, and update from OpenTX/EdgeTX Companion
- Save firmware to microSD card, insert it into radio, and update with radio itself
And at the end of this page, we will show you How to update radio firmware directly from OpenTX/EdgeTX Companion .
How to update radio firmware directly from OpenTX/EdgeTX Companion
If you update radio, it may be regarded as a new device when you connect radio to your computer afterwards.
If you want to use
drone simulator on your computer
, you need to reset stick settings.
Install OpenTX/EdgeTX Companion
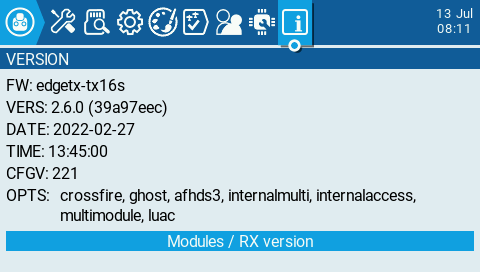
Download the latest firmware for the radio equipped with OpenTX/EdgeTX from the latest version of its companion software, OpenTX/EdgeTX Companion. First, install OpenTX/EdgeTX Companion on your PC. If you already have it installed, please update it to the latest version. See below for detailed instructions. For EdgeTX, version 2.8.0 or later must be installed in order to download firmware with Companion. For earlier versions, please download the firmware directly from EdgeTX official site. For detailed download instructions, see How to install EdgeTX on the radio page.Checking and backing up the current firmware
OpenTX/EdgeTX Companion Settings
Before downloading the firmware, set OpenTX/EdgeTX Companion once.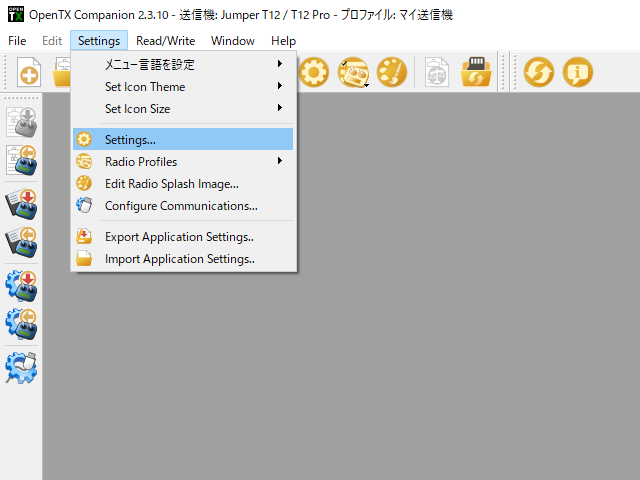 Start OpenTX/EdgeTX Companion and select [Settings]-[Settings] from the menu.
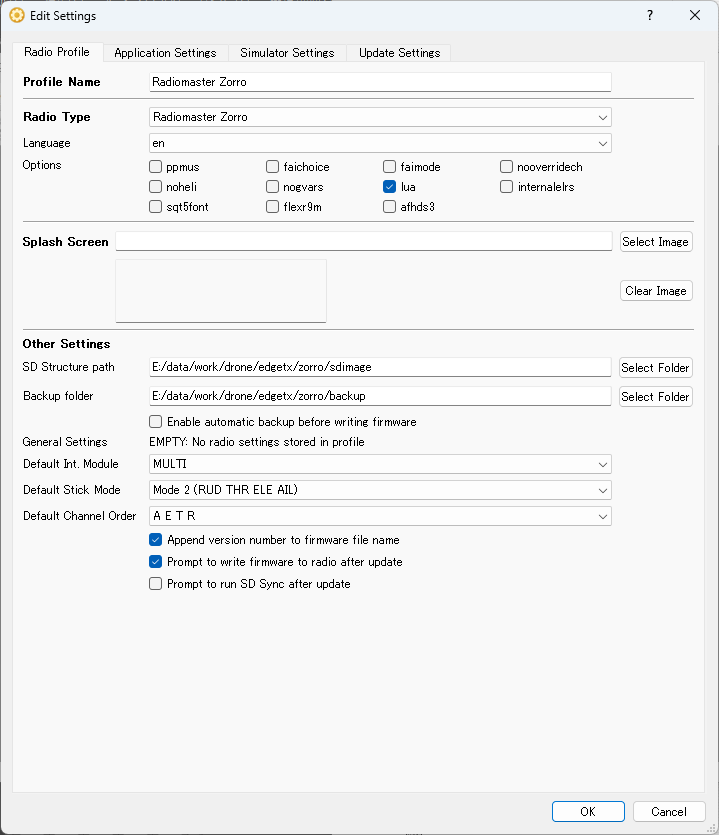 Then, a screen like this will appear, so register your radio information.
If you have already registered your radio, select the target radio from [Settings]-[Radio Profile] menu.
Then, a screen like this will appear, so register your radio information.
If you have already registered your radio, select the target radio from [Settings]-[Radio Profile] menu.
In "Radio Type" drop-down list, select your radio model.
In the "Options" field, you can select whether to enable or disable various functions of the radio. This list of features will change depending on selected radio model. Hover your mouse cursor over each item name to see details of the function.
I think you should select "lua (enable Lua custom script screen)" and "internalmulti (support for internal 4IN1 MULTI-Module)". Select "internalELRS" for radios with a built-in ExpressLRS(ELRS) transmitter.
If you specify "SD Structure path" field, you can generate SD card image here when you upgrade the radio. It is convenient to create a folder such as "[Radio name]/sdimage" under any folder, copy the contents of Radio's SD card, and specify that folder here.
In "Default Int. Module", specify the type of transmitter (communication protocol between transmitter and radio) built into your radio. Select "MULTI" if you have a built-in 4in1 multi-protocol module, or select "CRSF" if you have a built-in Express LRS (ELRS).
Select "Default Stick Mode" and "Default Channel Order" according to your radio settings.
If you check "Append version number to FW file name", it will be easier to distinguish the version of the downloaded file.
Finally, click "OK". You may then be advised to download and install the latest firmware. Since the installation is not performed from the computer here, close this dialog box with "Cancel".
If your radio's name isn't in "Radio Type" drop-down list, it's probably not yet supported by OpenTX/EdgeTX Companion. Recently released radios may not yet be compatible with OpenTX/EdgeTX Companion. In that case, please wait for the version upgrade of OpenTX/EdgeTX Companion.
EdgeTX, which has a faster development pace than OpenTX, may already support even radios that OpenTX does not support. If you are using OpenTX, you may consider migrating to EdgeTX.
List of radios currently supported by OpenTX Companion (OpenTX)
How to install EdgeTX on the radio
How to install EdgeTX Companion
 For EdgeTX, in addition to the above settings, also configure the following.
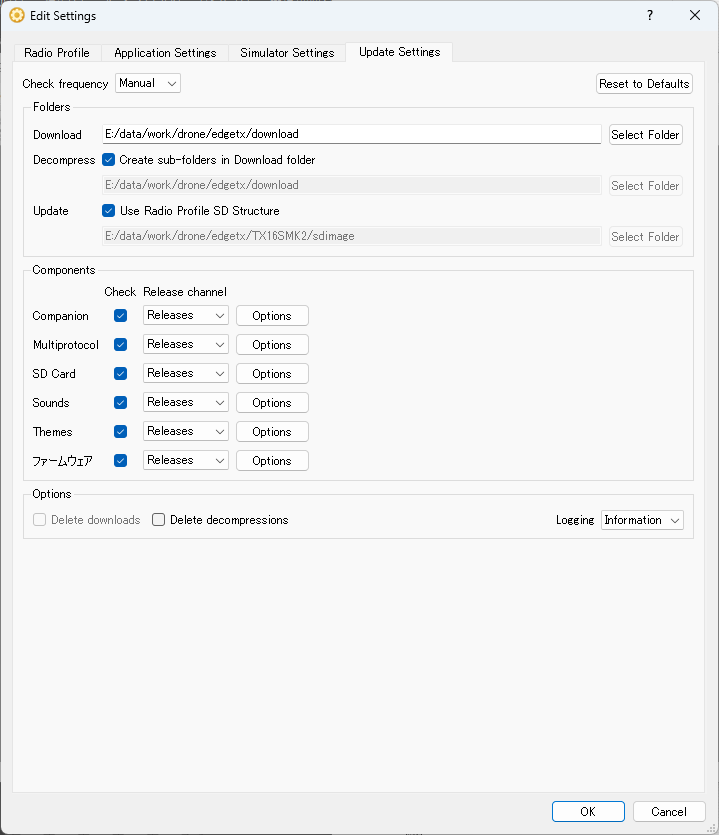
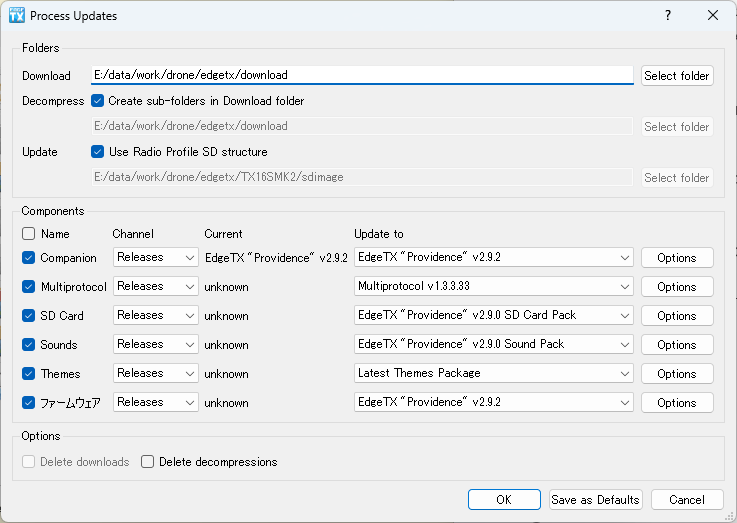
Open the [Settings]-[Settings] screen from the menu, select the [Update Settings] tab, and enter each item on the screen.
For EdgeTX, in addition to the above settings, also configure the following.
Open the [Settings]-[Settings] screen from the menu, select the [Update Settings] tab, and enter each item on the screen.
For [Folders]-[Download], specify the folder to store the downloaded firmware.
For [Folders]-[Update], specify the folder to save the microSD card image, and store contents of current SD card of radio in that folder. The contents of [SD Structure path] on the [Radio Profile] screen will be copied here.
In [Components] column, check the category of the firmware you want to download.
The firmware will be downloaded to the folder specified in [Download]. Then, a microSD card image is generated in the folder specified in [Update]. The downloaded firmware will be copied to the appropriate location under the generated microSD card image.
Do not specify the same folder for [Download] and [Update]. Otherwise there will be extra copies of individual components in the microSD card image.
Download the latest version of OpenTX/EdgeTX firmware
Firmware can be downloaded using the OpenTX/EdgeTX Companion. Please click one of the options below.Firmware download procedure: For OpenTX
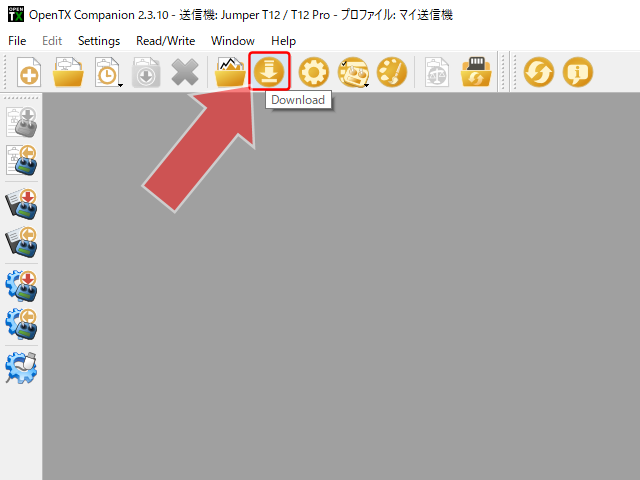 In OpenTX Companion, click "Download" in the menu.
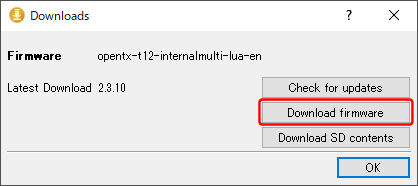 Then a dialog box like this will be displayed.
Click "Download firmware".
Then a dialog box like this will be displayed.
Click "Download firmware".
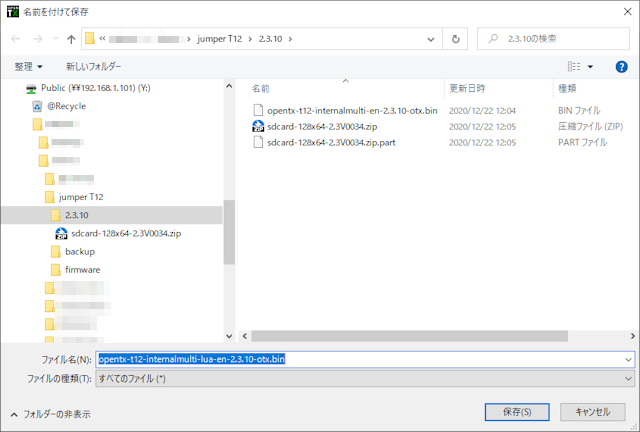 The folder selection dialog will be displayed, so save it in any folder.
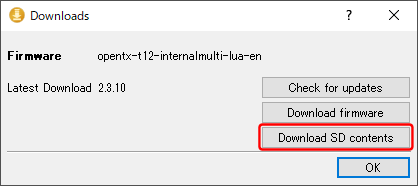 Version information is also stored in the microSD card image.
Download the microSD card image as well.
Click "Download SD contents".
Version information is also stored in the microSD card image.
Download the microSD card image as well.
Click "Download SD contents".
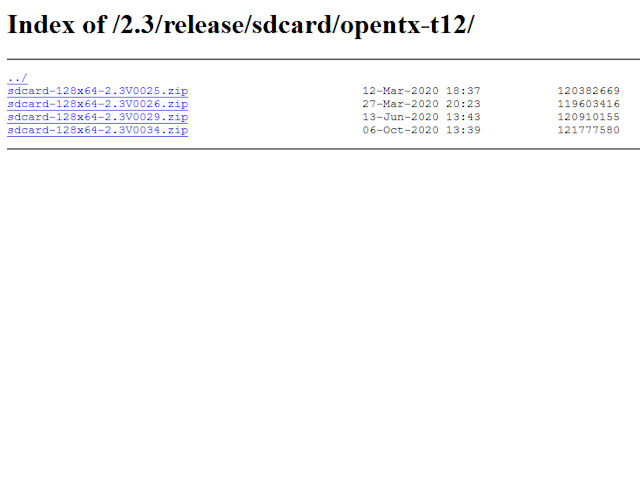 Then, browser will be launched and download page of microSD card image on OpenTX official site will open.
Click the latest file name to download.
Then write it to microSD card you use for radio.
Then, browser will be launched and download page of microSD card image on OpenTX official site will open.
Click the latest file name to download.
Then write it to microSD card you use for radio.
If you used microSD card image without customizing, you can just overwrite new card image. If you have customized audio, images, scripts, etc., save them, overwrite new card image, and return customized information.
Alternatively, you can overwrite only the version information file "opentx.sdcard.version" in the root directory with a new one. Since "opentx.sdcard.version" is a text file, you can edit the contents with an editor.
See below for information on how to prepare a microSD card.
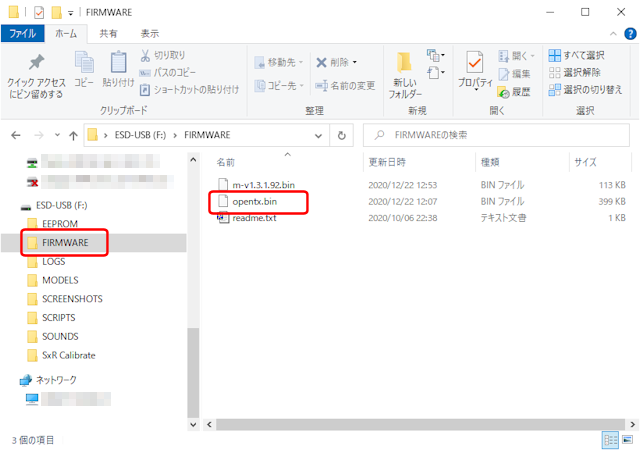 Store the downloaded OpenTX/EdgeTX firmware in "FIRMWARE" folder of microSD card used for radio.
At this time, if the file name is too long, radio will not be recognized, so change it to a shorter name (max 28 chrs + ".bin").
Then insert this microSD card into the radio.
Store the downloaded OpenTX/EdgeTX firmware in "FIRMWARE" folder of microSD card used for radio.
At this time, if the file name is too long, radio will not be recognized, so change it to a shorter name (max 28 chrs + ".bin").
Then insert this microSD card into the radio.
Firmware download procedure: For EdgeTX
 In EdgeTX Companion (Version 2.8.0 or later), click "Download" in the menu.
 Then Companion will access the official site and check the latest release information.
 You will then see a list of files to download, along with their versions and storage locations.
Please check and correct if necessary.
You will then see a list of files to download, along with their versions and storage locations.
Please check and correct if necessary.
Make sure that the check mark in the "Name" column and the version in the "Update to" column are set correctly for the component you specifically want to download. It seems that sometimes the correct (latest) version is not selected.
After checking all items, click "OK" at the bottom right of the screen.
However, about downloading "Sounds", it's better to download directly from the official site for more options (languages).
In addition in the "Channel" column, to "Releases", you can also select "Pre-release" and "Nightly" , but these are beta versions for developers, so they may not work properly or contain bugs. General users should select "Releases".
EdgeTX audio file release page (GitHub)
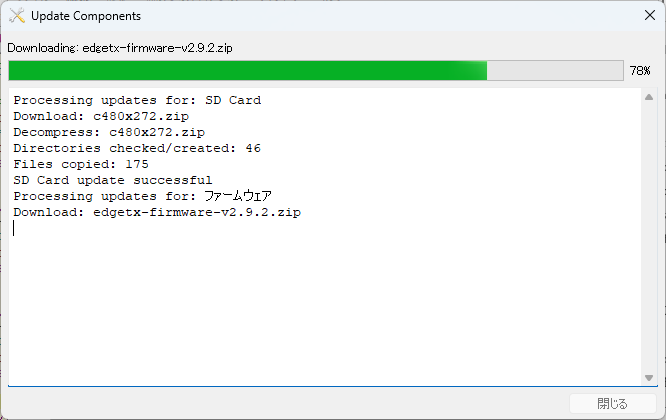 Component download begins.
The time required for downloading is about tens of seconds even if all components are selected.
Component download begins.
The time required for downloading is about tens of seconds even if all components are selected.
 If you check the component "Firmware", a dialog like this will appear on the way.
It is also possible to rewrite the radio's firmware directly here.
Click "No" if you do not want to rewrite.
If you check the component "Firmware", a dialog like this will appear on the way.
It is also possible to rewrite the radio's firmware directly here.
Click "No" if you do not want to rewrite.
If you want to rewrite here, you need to start your radio in DFU/Bootloader Mode and connect it to your computer in advance. For this procedure, please see How to update radio firmware directly from OpenTX/EdgeTX Companion below.
However, only EdgeTX firmware can be rewritten here. Multiprotocol module and bootloader will not be upgraded.
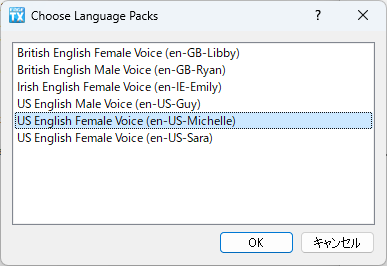 If you check the component "Sounds", a dialog like this will appear on the way.
Select the language and gender of the audio file you want to store on the microSD card.
Then click OK.
If you check the component "Sounds", a dialog like this will appear on the way.
Select the language and gender of the audio file you want to store on the microSD card.
Then click OK.
However, it is recommended to download "Sounds" directly from the official site as mentioned above.
EdgeTX audio file release page (GitHub)
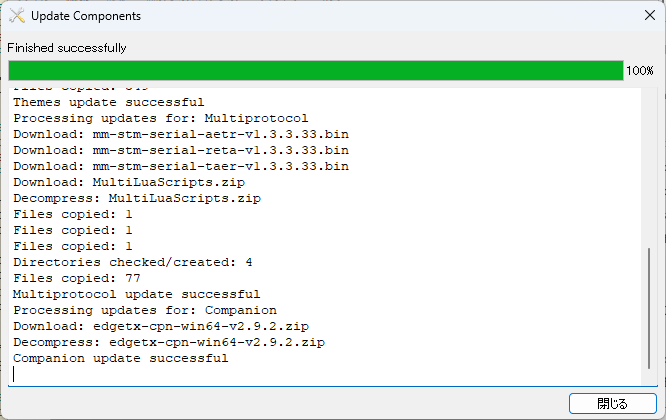 When "Finished successfully" is displayed on the upper left of the screen, the download is complete.
Click "Close" at the bottom right of the screen.
When "Finished successfully" is displayed on the upper left of the screen, the download is complete.
Click "Close" at the bottom right of the screen.
 If you select the components "SD card" and "Firmware", a microSD card image including the latest firmware file will be generated under the folder specified in the "Update" field.
If you store the contents of the Radio's SD card in this folder in advance, it will be updated to the latest data.
If you select the components "SD card" and "Firmware", a microSD card image including the latest firmware file will be generated under the folder specified in the "Update" field.
If you store the contents of the Radio's SD card in this folder in advance, it will be updated to the latest data.
Copy all of this to your microSD card and you're ready to update. Continue from Installation of the latest version of OpenTX/EdgeTX firmware .
By the way, each specified component is stored separately under the folder specified in the "Download" field.
If you used microSD card image without customizing, you can just overwrite new card image. If you have customized audio, images, scripts, etc., save them, overwrite new card image, and return customized information.
For products with a microSD card pre-installed in the radio, the contents of the microSD card may have been customized by the manufacturer. Be careful not to overwrite such files.
Download the latest multi-protocol module firmware
If you have a radio with a 4-in-1 multi-protocol module, update its firmware at the same time.For OpenTX, follow the instructions below to download.
For EdgeTX, follow the instructions below, or check "Multiprotocol" in the [Components] column of the Companion's [Settings]-[Settings]-[Update Settings] screen described above "download procedure". Then when the EdgeTX firmware is downloaded, the multi-protocol module firmware is also downloaded. And it is stored in the "FIRMWARE" folder of the SD card image.
 The firmware can be downloaded from
MULTI-Module Firmware Downloads (https://downloads.multi-module.org/)
.
The firmware can be downloaded from
MULTI-Module Firmware Downloads (https://downloads.multi-module.org/)
.
A screen like this will open, so select the model from the drop-down list at the bottom left. Please select each item at the bottom right of the screen as you like. I don't think there is any need to change anything other than Channel Order.
MULTI-Module Firmware Downloads
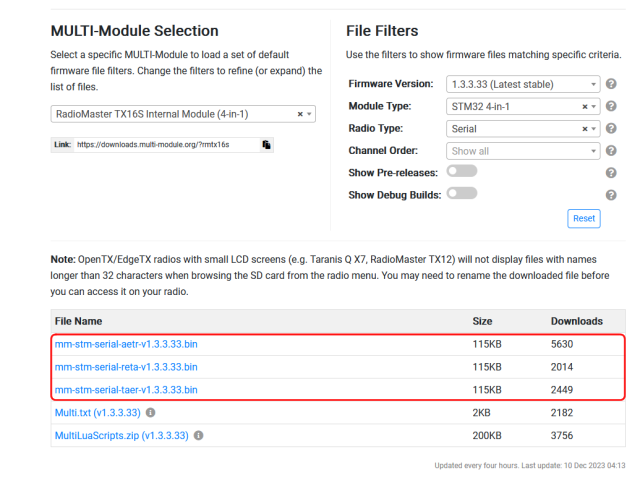 Then, a list of firmwares that match the specified conditions will be displayed at the bottom of the screen.
The firmware has a .bin extension.
Modules such as "AETR", "RETA", and "TAER" are provided for each channel map (channel order).
Download the channel map you normally use.
If you are not sure, select "AETR".
Then, a list of firmwares that match the specified conditions will be displayed at the bottom of the screen.
The firmware has a .bin extension.
Modules such as "AETR", "RETA", and "TAER" are provided for each channel map (channel order).
Download the channel map you normally use.
If you are not sure, select "AETR".
However, the channel map can be changed for each drone on the radio, so you don't have to worry too much.
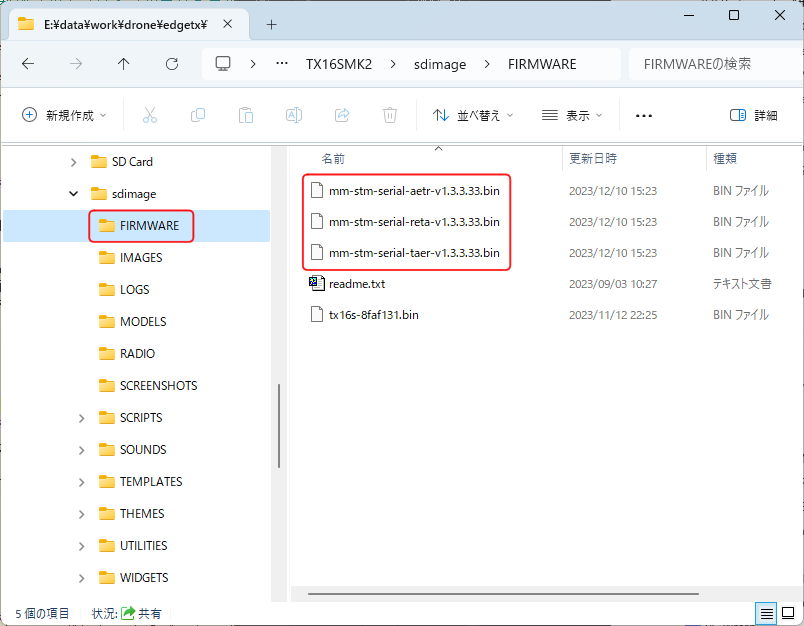 Store the downloaded multi-protocol module firmware in "FIRMWARE" folder of microSD card used for radio.
At this time, if the file name is too long, radio will not be recognized, so change it to a shorter name (max 28 chrs + ".bin").
Store the downloaded multi-protocol module firmware in "FIRMWARE" folder of microSD card used for radio.
At this time, if the file name is too long, radio will not be recognized, so change it to a shorter name (max 28 chrs + ".bin").
Installation of the latest version of OpenTX/EdgeTX firmware
The following steps are the same for monochrome models and color models, the only difference is the screen design.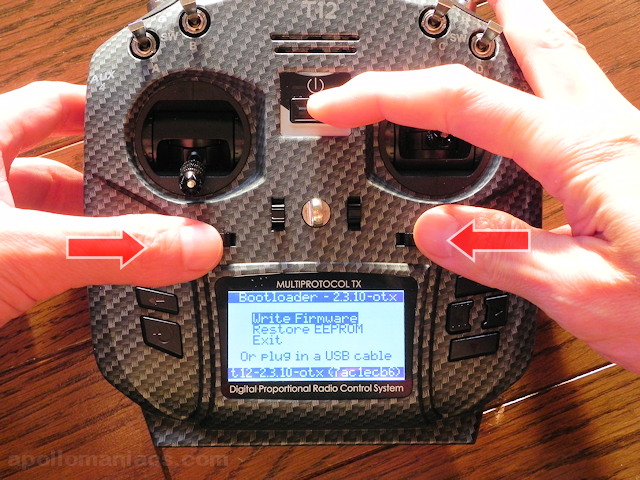 Set the microSD card containing the latest firmware to the radio.
And make sure the radio battery is fully charged.
If power is lost during a firmware update, it may never boot again.
Set the microSD card containing the latest firmware to the radio.
And make sure the radio battery is fully charged.
If power is lost during a firmware update, it may never boot again.
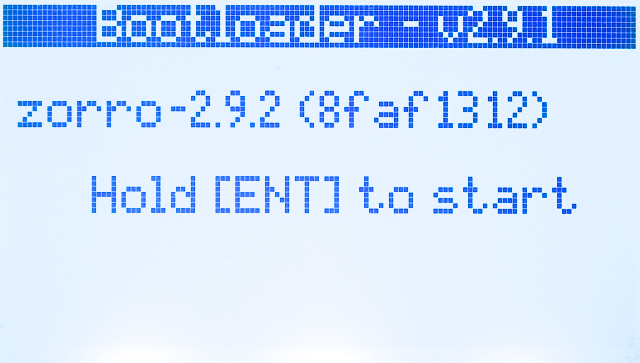
Boot the radio in DFU/Bootloader Mode. Hold down left and right horizontal trim buttons inward and press power button. When screen becomes bright, release trim buttons and you will see a screen like this. Select "Write Firmware".
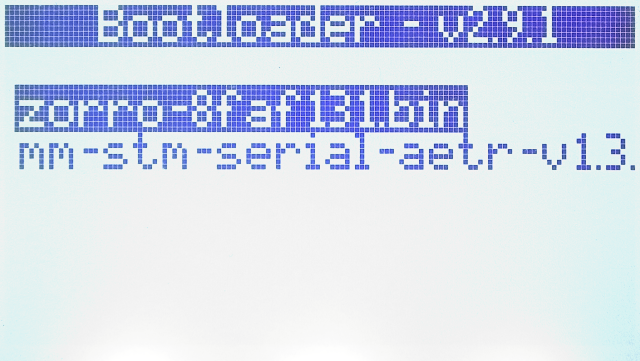 Then, a list of files stored in the "FIRMWARE" folder of the microSD card set in the radio is displayed.
Select file for the latest version of OpenTX/EdgeTX firmware, then press [ENTER] key.
Then, a list of files stored in the "FIRMWARE" folder of the microSD card set in the radio is displayed.
Select file for the latest version of OpenTX/EdgeTX firmware, then press [ENTER] key.
 Version of the selected firmware file is displayed.
If there is no problem, long press [ENTER] key.
Version of the selected firmware file is displayed.
If there is no problem, long press [ENTER] key.
 Then the firmware writing will start.
It takes about several tens of seconds to write.
Then the firmware writing will start.
It takes about several tens of seconds to write.
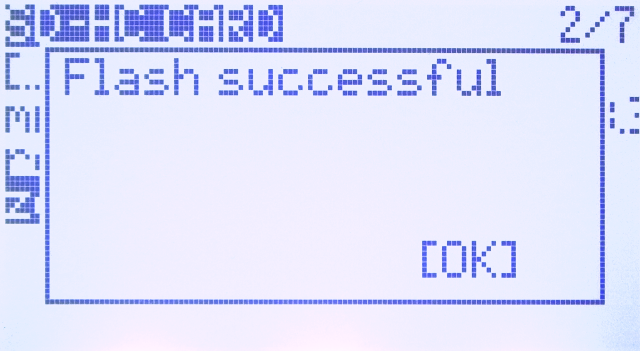
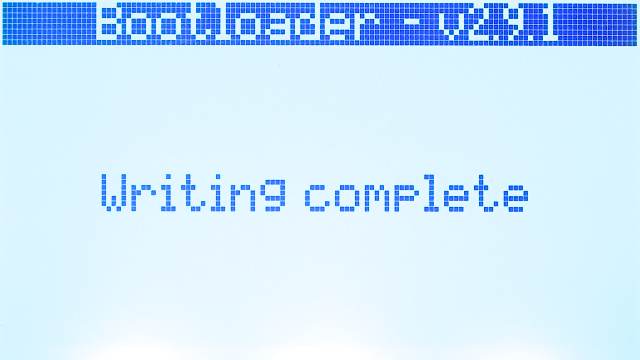 When the screen looks like this, the update is complete.
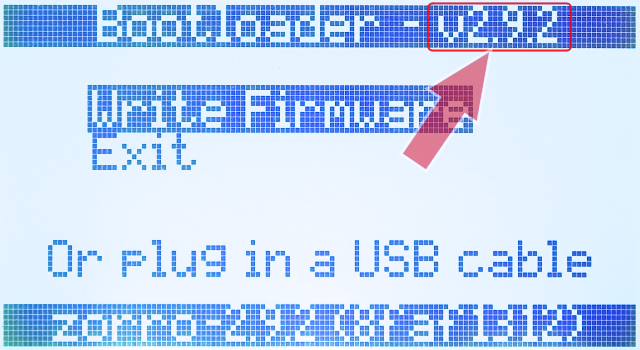
 Press [EXIT] key to return to boot loader top screen and look at the bottom of the screen to see updated firmware version.
If you select [Exit] from menu here, DFU/Bootloader Mode will be exited and the radio will boot normally. After that, you can use the radio as usual.
Installation of the latest boot loader
 When you update OpenTX/EdgeTX firmware, it is recommended to update the boot loader at the same time.
Boot loader is also updated using OpenTX/EdgeTX firmware file.
When you update OpenTX/EdgeTX firmware, it is recommended to update the boot loader at the same time.
Boot loader is also updated using OpenTX/EdgeTX firmware file.
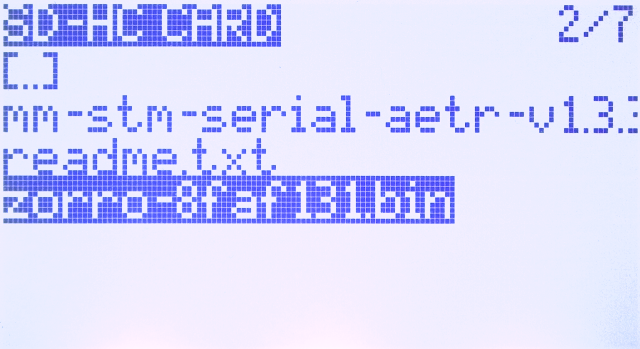
With the latest version of OpenTX/EdgeTX firmware stored in "FIRMWARE" folder of radio's microSD card, open "SD-HC CARD" or "SD CARD" screen of RADIO(SYSTEM) menu and move to "FIRMWARE" folder. Then select the latest OpenTX/EdgeTX firmware file and press and hold [ENTER] key.
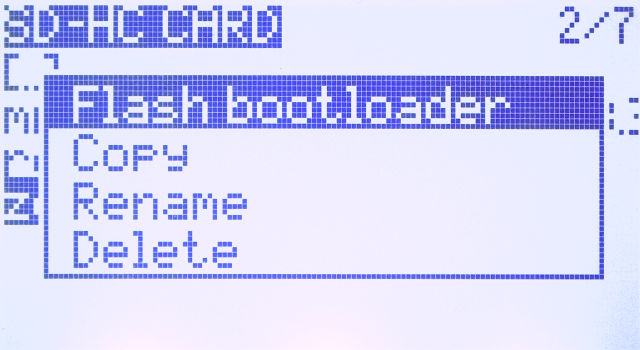 Then a menu like this will be displayed.
Select "Flash boot loader".
Update will be completed in an instant.
Then a menu like this will be displayed.
Select "Flash boot loader".
Update will be completed in an instant.
 When the screen looks like this, the update is complete.
 You can check boot loader version on Boot loader Mode screen.
Installation of the latest multi-protocol module firmware
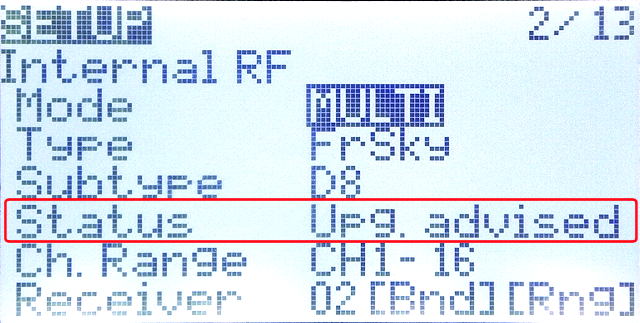 After upgrading OpenTX/EdgeTX, if you look at Status column of Internal RF / External RF on SETUP screen of Model menu, you may see a message saying "Upg. advised" recommending the upgrade.
In this case, upgrade the multi-protocol module as well.
After upgrading OpenTX/EdgeTX, if you look at Status column of Internal RF / External RF on SETUP screen of Model menu, you may see a message saying "Upg. advised" recommending the upgrade.
In this case, upgrade the multi-protocol module as well.
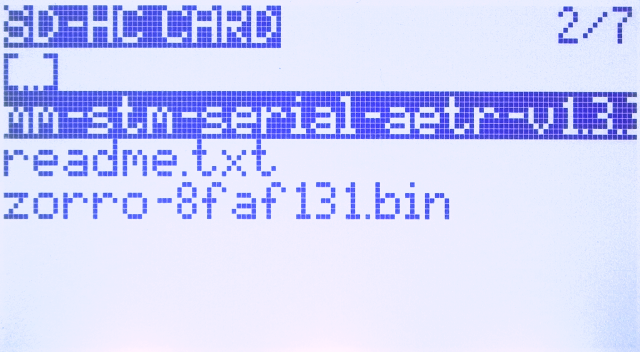 With the latest firmware of 4-in-1 multi-protocol module stored in "FIRMWARE" folder of radio's microSD card, open "SD-HC CARD" or "SD CARD" screen of RADIO(SYSTEM) menu and move to "FIRMWARE" folder.
Then select the latest firmware file and press and hold [ENTER] key.
With the latest firmware of 4-in-1 multi-protocol module stored in "FIRMWARE" folder of radio's microSD card, open "SD-HC CARD" or "SD CARD" screen of RADIO(SYSTEM) menu and move to "FIRMWARE" folder.
Then select the latest firmware file and press and hold [ENTER] key.
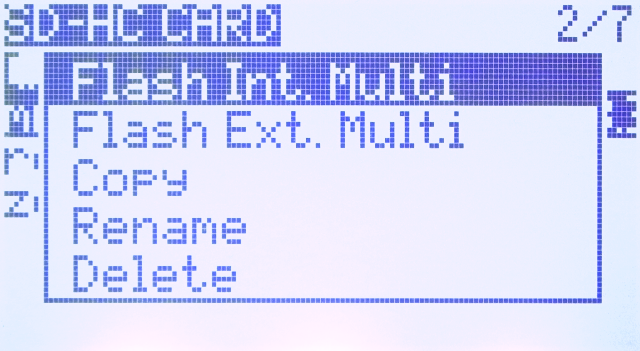 Then a menu like this will be displayed.
Select "Flash Int. Multi" if multi-protocol module is built into your radio,
or "Flash Ext. Multi" if you are using an external module.
Then a menu like this will be displayed.
Select "Flash Int. Multi" if multi-protocol module is built into your radio,
or "Flash Ext. Multi" if you are using an external module.
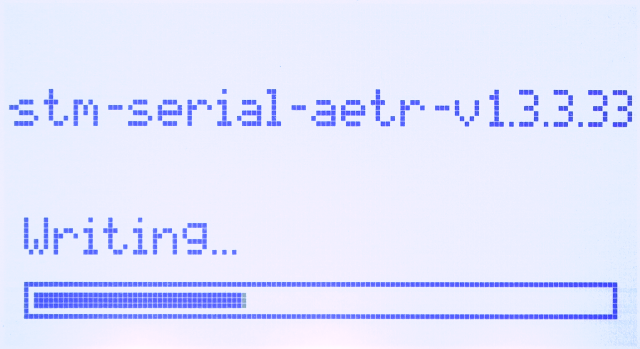 Then firmware writing will start.
It takes about several tens of seconds to write.
Then firmware writing will start.
It takes about several tens of seconds to write.
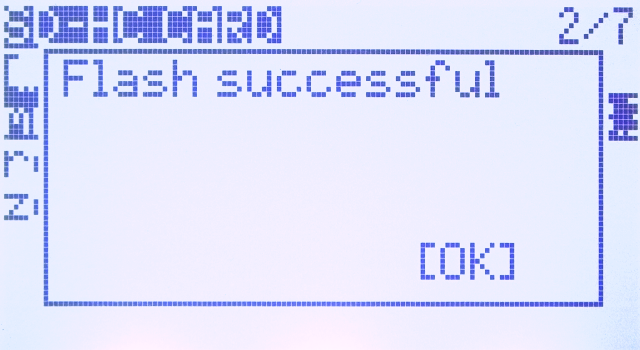 When the screen looks like this, the update is complete.
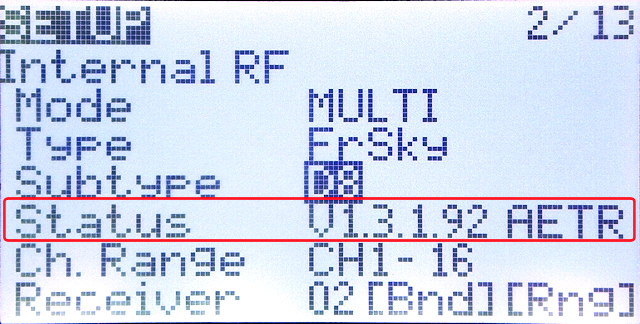 You can check updated version by looking at Internal RF / External RF column on SET UP screen of Model menu.
How to update radio firmware directly from OpenTX/EdgeTX Companion
Here, we will show you how to use OpenTX / EdgeTX Companion to directly update radio firmware connected to your computer. However, this method does not update bootloader or multi-protocol modules. This method can be used when you want to rewrite only the radio firmware in a hurry.Install the driver : STM32 BOOTLOADER
To access the firmware of FPV drones and OpenTX/EdgeTX radios using STM32 processors on Windows PC, it is necessary to install a driver called "STM32 BOOTLOADER". Normally this driver is not installed automatically and must be installed manually. See below for details.
Firmware download
Next, download the firmware to your computer. See Download the latest version of OpenTX/EdgeTX firmware above for instructions on how to do this.
Firmware installation
Make sure the radio battery is fully charged.
If power is lost during a firmware update, it may never boot again.
Boot the radio in DFU/Bootloader Mode. Hold down left and right horizontal trim buttons inward and press power button. When screen becomes bright, release trim buttons and you will see a screen like this. Connect the radio to your computer with a USB cable.
 Radio screen looks like this.
There are two types of USB cables: "For data communication" where all terminals are connected, and "For charging" where only power supply terminals are connected. You need to use "For data communication" to communicate with OpenTX/EdgeTX Companion. Please note that some cables attached to bonus of mobile phone or charger, battery are "For charging".
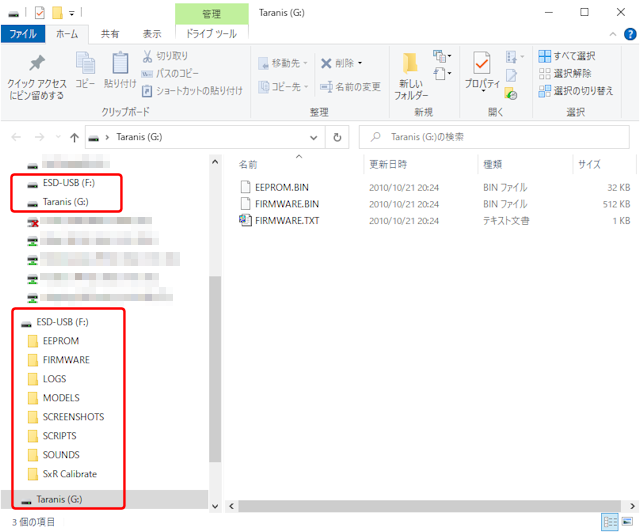 Then, after waiting for a while (about 20-30 seconds), two drives, "ESD-USB" or "USB drive", and "Taranis" or "(your radio name)" will be mounted in Explorer on your computer.
(For EdgeTX, only "USB drive")
Now you are ready to access the radio.
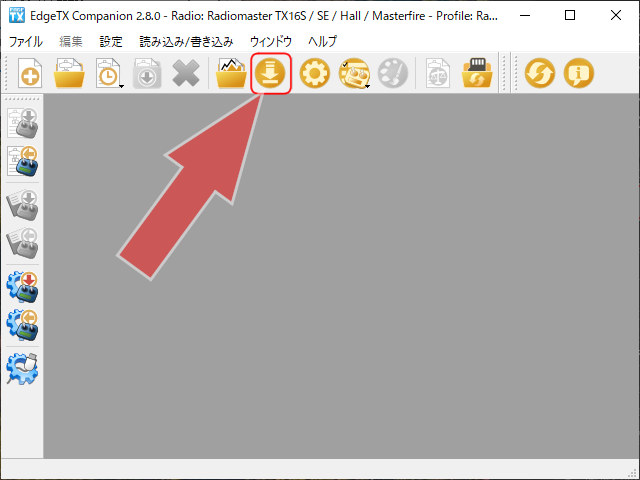
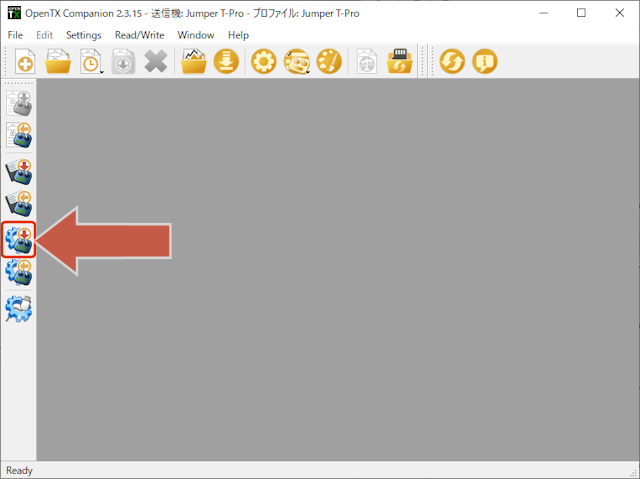 Click the "Write firmware to Radio" icon from the icons on the left side of the screen.
Alternatively, select [Read/Write]-[Write firmware to Radio] from the menu.
Click the "Write firmware to Radio" icon from the icons on the left side of the screen.
Alternatively, select [Read/Write]-[Write firmware to Radio] from the menu.
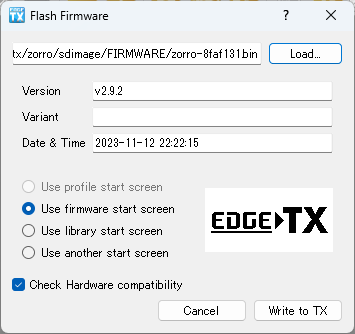 Then you will see a screen like this.
Check the "Version" column and click "Write to TX".
Then you will see a screen like this.
Check the "Version" column and click "Write to TX".
If you click "Load" button here, you can specify the firmware file saved on your computer.
If you select "Use another start screen" on this screen, you can change Splash Screen of the radio. For how to create an image file for the startup screen, see How to set or change Splash Screen / Background Image / Model Image .
 Writing is completed in a few seconds.
The update is complete when "Flashing done" is displayed on the screen.
Writing is completed in a few seconds.
The update is complete when "Flashing done" is displayed on the screen.
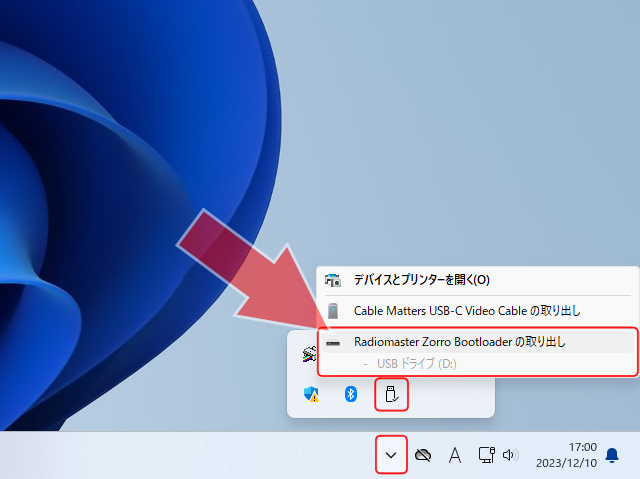 When radio is connected to PC in DFU/Bootloader Mode, memory of the radio is visible as a USB memory.
When removing radio from PC, perform "Eject" operation of two drives, "ESD-USB" or "USB drive", and "Taranis" or "(your radio name)", and then remove it, in the same way as when removing USB memory.
When radio is connected to PC in DFU/Bootloader Mode, memory of the radio is visible as a USB memory.
When removing radio from PC, perform "Eject" operation of two drives, "ESD-USB" or "USB drive", and "Taranis" or "(your radio name)", and then remove it, in the same way as when removing USB memory.
After that, turn off / on the radio to restart, and it's done.