


 How to use Special Functions / Global Functions
This section describes how to use Special Functions / Global Function of OpenTX / EdgeTX radio.
このページを日本語で見る
Table of contents
What is Special Functions / Global Functions
Special Functions / Global Functions are combination of 20 types of actions (functions) that are pre-installed in OpenTX / EdgeTX and their triggers (starting conditions). These actions can be triggered by sticks, switches and other conditions. You can configure up to 64 sets of Special Functions for each model. Global Functions can be set up to 64 sets in common for all models.Explanation of setting screen (monochrome display model)
 If you open "SPECIAL FUNCTIONS" screen from "MODEL menu", you will see a screen like this.
Alternatively, if you open "GLOBAL FUNCTIONS" screen from "RADIO (SYSTEM) menu", the screen will be almost the same.
Functions that can be set and setting methods are the same on both screens.
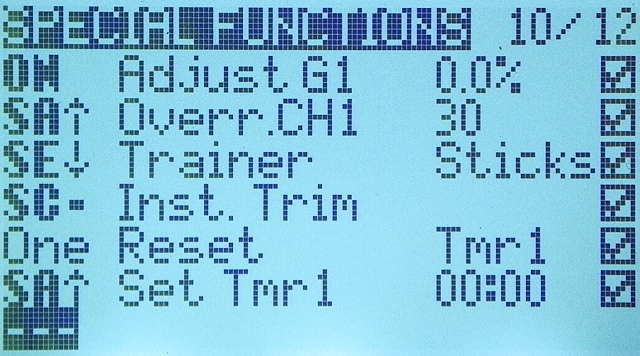
If you open "SPECIAL FUNCTIONS" screen from "MODEL menu", you will see a screen like this.
Alternatively, if you open "GLOBAL FUNCTIONS" screen from "RADIO (SYSTEM) menu", the screen will be almost the same.
Functions that can be set and setting methods are the same on both screens.
You can define a combination of trigger and action (function), one per line.
The meaning of each field is as shown in the table below, starting from the left. Any item can be entered and changed directly on this screen by pressing and holding [ENTER] key.
| field | item | description |
|---|---|---|
| 1 | Trigger | Specify the trigger (start condition) that calls action. Triggers that currently meet the condition and are set to "TRUE" are displayed in bold here. |
| 2 | Action | This is the action (function) to be set for this Special Functions / Global Functions. Depending on the type of action, an argument can be specified. |
| 3 | Value | Specify the numerical value etc. used in selected action. Some actions do not use Value. |
| 4 | Check | Specify whether to enable / disable this Special Functions / Global Functions. You can define actions in advance and switch effectively only when necessary. If this field is not checked, it will be disableed. The default value of the newly set action is disableed. |
 Move cursor to any line and press and hold [ENTER] key to display the menu shown in this figure.
You can call the following functions.
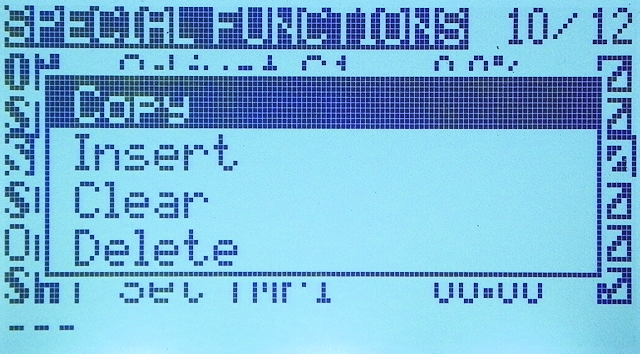
Move cursor to any line and press and hold [ENTER] key to display the menu shown in this figure.
You can call the following functions.
- Copy
- Copies the selected line to clipboard. After that, if you move cursor and press and hold [ENTER] key to select "Paste", the copied line will be overwritten on that line.
- Insert
- A blank line is inserted above the selected line.
- Clear
- The settings on selected line will be erased. That line will be blank.
- Delete
- Selected line will be deleted. Lines set below this will move up one line.
Explanation of setting screen (color display / touch panel model)
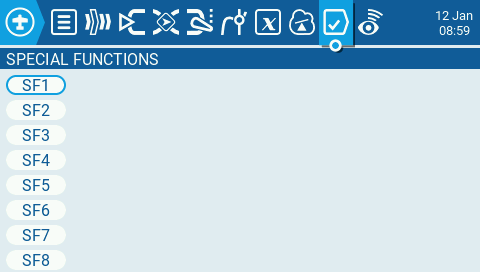 When you open "SPECIAL FUNCTIONS" screen on a color display / touch panel model, the screen looks like this.
Alternatively, if you open "GLOBAL FUNCTIONS" screen from "RADIO (SYSTEM) menu", the screen will be almost the same.
Functions that can be set and setting methods are the same on both screens.
When you open "SPECIAL FUNCTIONS" screen on a color display / touch panel model, the screen looks like this.
Alternatively, if you open "GLOBAL FUNCTIONS" screen from "RADIO (SYSTEM) menu", the screen will be almost the same.
Functions that can be set and setting methods are the same on both screens.
You can define a combination of trigger and action (function), one per line.
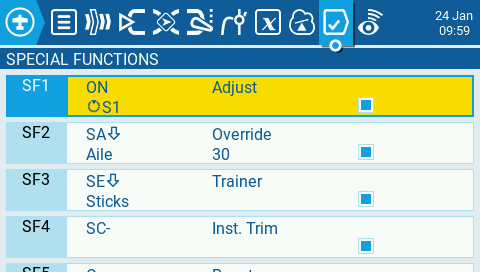 After setting triggers and actions for each entry, the screen changes like this.
A summary of configuration information is displayed.
After setting triggers and actions for each entry, the screen changes like this.
A summary of configuration information is displayed.
Background color of the entry that satisfies the condition and is "TRUE" changes. And, by specifying "Enable" (described later) on, enabled entries will have a checkmark lit (blue square in the figure).
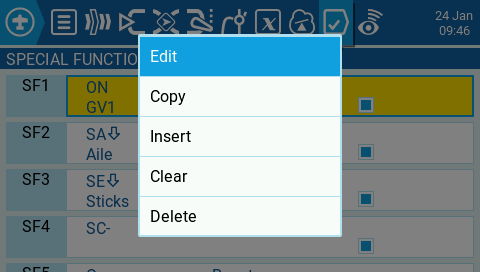 Move cursor to any line and press [ENTER] key to display the menu shown in this figure.
You can call the following functions.
Move cursor to any line and press [ENTER] key to display the menu shown in this figure.
You can call the following functions.
- Edit
- Edit the selected line. Open the advanced settings screen.
- Copy
- Copies the selected line to clipboard. After that, if you move cursor and press and hold [ENTER] key to select "Paste", the copied line will be overwritten on that line.
- Insert
- A blank line is inserted above the selected line.
- Clear
- The settings on selected line will be erased. That line will be blank.
- Delete
- Selected line will be deleted. Lines set below this will move up one line.
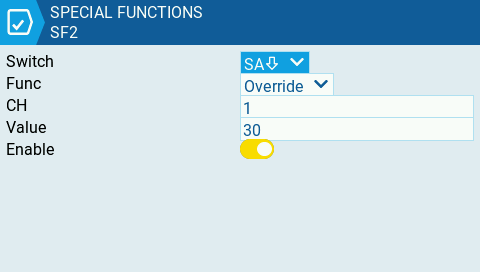 If you select "Edit" in the menu above, you will see a screen like this.
The meaning of each field is shown in the table below.
If you select "Edit" in the menu above, you will see a screen like this.
The meaning of each field is shown in the table below.
| field | item | description |
|---|---|---|
| 1 | Switch | Specify the trigger (start condition) that calls action. |
| 2 | Func | This is the action (function) to be set for this Special Functions / Global Functions. Depending on the type of action, an argument can be specified. Depending on the action selected here, the display in the CH/Value column below this will change. |
| 3 | CH/Value | Specify the numerical value etc. used in selected action. Some actions do not use Value. |
| 4 | Enable | Specify whether to enable / disable this Special Functions / Global Functions. You can define actions in advance and switch effectively only when necessary. If this switch is not on, it will be disabled. The default value of the newly set action is disableed. |
Trigger (start condition)
One of the following can be specified as a trigger (start condition).| set value | description |
|---|---|
| SA↑ | Activates when SA switch is in up / front position. Similarly, SB to SH switches can be specified. |
| SA- | Activates when SA switch is in middle / center position. Similarly, SB to SH switches can be specified. |
| SA↓ | Activates when SA switch is in down / back position. Similarly, SB to SH switches can be specified. |
| tRl | Activate when rudder trim switch is clicked to left. |
| tRr | Activate when rudder trim switch is clicked to right. |
| tEd | Activate when elevator trim switch is clicked down. |
| tEu | Activate when elevator trim switch is clicked up. |
| tTd | Activate when throttle trim switch is clicked down. |
| tTu | Activate when throttle trim switch is clicked up. |
| tAl | Activate when aileron trim switch is clicked to left. |
| tAr | Activate when aileron trim switch is clicked to right. |
| L01 - L64 | Activate when logical switches L01 - L64 is enabled. |
| FM0 - FM8 | Activate when flight mode FM0 - FM8 is enabled. This option does not appear unless the flight mode is set for this MODEL. |
| Tele | Activates when telemetry data is being generated (when it is able to communicate with receiver). |
| Act | Activates when operating physical input devices such as sticks, switches, buttons, trim switches, dials, etc. |
| One | Activated only once when radio is started or when MODEL is switched. |
| ON | Always be activated. |
Action (function)
One of the following can be specified as an action (function).| set value | description |
|---|---|
| Overr. (Channel Override) |
Overrides the channel specified by argument. When this action is in effect, the channel value is replaced with the value specified by "Value". An integer from -100 to +100 can be specified for "Value". |
| Trainer | Enable trainer mode. The value of the channel specified by "Value" is sent to the student's radio. "Value" can be "Sticks"(all sticks), "Rud"(Rudder), "Ele"(Elevator), "Thr"(Throttle), "Ail"(Aileron), "Chans"(all channels). |
| Inst. Trim (Instant Trim) |
Set the value of current sticks to trim . |
| Reset |
Resets
timer
and
telemetry
specified in "Value" to their initial values.
If target value continues to change, for example a running timer, it will continue to change after finish reset.
One of the following can be specified for "Value".
"Timer (Tmr1, Tmr2, Tmr3)": Specified timer is reset to 00:00:00. "All": Resets all timers and telemetry set to MODEL. "Telemetry (Telm)": Specified telemetry is reset to 0. |
| Set Tmr (Set Timer) |
Set timer (Tmr1, Tmr2, Tmr3) specified by argument to the value specified by "Value". |
| Adjust (Adjust Global Variable) |
Changes the value of
global variable
specified by the argument.
Change method is specified by "Value" field.
Press and hold [ENTER] in "Value" field to select "Value" type.
If you specify a constant for "Value", that value is set in the global variable. If you specify a global variable name (Global var) for "Value", that value is set in the global variable. If you specify "+=(number)" or subtraction "-=(number)" (Inc / Decrement) for "Value", that value is added / subtracted to the global variable. If you specify "ON" for trigger and a stick, switch, etc. (Mixer source) for "Value", you can change the global variable with that stick, switch, etc. |
| Volume |
Change playback volume of sounds.
Change method is specified by "Value".
For "Value", in addition to the "input" defined on INPUTS screen and physical devices such as sticks, switches, and dials (Pot: Potentiometer), you can also specify MAX (constant always returns 100), Cyclic (defined on the Heli Setup screen), trim switch, logical switch, telemetry, channel. |
| Set Failsafe | Sets current stick value to Failsafe of transmitter specified by "Value". As long as the trigger for this action is active, Failsafe value will continue to be updated by stick value. When the trigger for this action is disabled, last value of stick is set to Failsafe. "Int. (Internal RF)" or "Ext. (External RF)" can be selected for "Value". |
| Play Sound | Plays the sound with built-in radio specified by "Value". No SD card sound pack required. "Value" can be Bp1, Bp2, Bp3, Wrn1, Wrn2, Chee, Rata, Tick, Sirn, Ring, SciF, Robt, Chrp, Tada, Crck, Alrm. You can specify ringing method in "Check" field. |
| Play Track | Plays the audio file saved in "SOUNDS / (language) /" folder of SD card specified by "Value". SD card sound pack is required. You can specify ringing method in "Check" field. |
| Play Val (Play Value) |
The value (numerical value) specified by "Value" is read aloud.
SD card sound pack is required.
For "Value", in addition to the "input" defined on INPUTS screen and physical devices such as sticks, switches, and potentiometers, you can also specify MAX (constant always returns 100), Cyclic (defined on the Heli Setup screen), trim switch, logical switch, telemetry, channel, global variables Battery level (Batt), time, GPS, timer . You can specify ringing method in "Check" field. |
| Lua Script | Executes "Function" type Lua script specified by "Value". The Lua script to be called by this action must be stored in "/SCRIPTS/FUNCTIONS/" folder on the SD card. |
| BgMusic (Background Music) |
Play WAVE file saved on SD card.
The file name is specified by "Value".
Playback starts from the beginning of the WAVE file when it finishes playing to the end, or when the trigger is disabled and then re-enabled.
Playback of this WAVE file will pause when another sound is played.
File name of the WAVE file must be up to 6 characters plus ".wav". Also, it must be stored in "SOUNDS/(language)/" folder on SD card. You can read the specifications of playable WAVE files on Audio explanation page on OpenTX official site. |
| BgMusic II (Background Music Pause) | Pauses the playback of WAVE file specified in the action "BgMusic (Background Music)". When the trigger set for this action is disabled, WAVE file playback will resume. |
| Vario | Enables Variometer warning sound that detects ascent and descent of the aircraft. Ringing method of the Variometer is set on RADIO SETUP screen . |
| Haptic |
Make the radio vibrate.
Select the vibration pattern with "Value".
Vibration pattern can be selected from 4 types from 0 to 3.
You can specify ringing method in "Check" field. |
| SD Logs |
Telemetry value is saved on SD card at the interval (seconds) specified by "Value".
You can specify 0.1 to 25.5 (seconds) for "Value".
Specifying Zero seconds disables this action.
Collected log will be saved as a csv format text file named "(model name)-YYYY-MM-DD.csv" in "LOGS" folder of Radio's microSD card. The logs can also be graphed using OpenTX/EdgeTX Companion's log viewer. |
| Backlight |
Change the brightness of the backlight of the radio screen.
The change method is specified by "Value".
For "Value", in addition to the "input" defined on INPUTS screen and physical devices such as sticks, switches, and potentiometers, you can also specify MAX (constant always returns 100), Cyclic (defined on the Heli Setup screen), trim switch, logical switch, telemetry, channel. |
| Screenshot | Take a screenshot of the radio screen. A file in ".bmp" format, which is the same size as the screen resolution, is saved in "SCREENSHOTS" folder of the radio's microSD card. |
| RacingMode | Enables racing (low latency) mode on FrSky Archer RS receiver. When using this, the racing mode on external transmitter must also be enabled. |
| No Touch | Disable touch panel on the radio equipped with touch panel. |
| Set Main Screen |
Switches main view screen of the color display radio.
For "Value", specify the number of the screen you want to display. The number of screens can be checked or added in Screens Settings menu . You can specify the update frequency of the screen in the Repeat column. When this function is enabled, even if the user manually switches to another screen, it will return to the specified screen at the frequency specified here. In the Repeat column, you can specify the update interval (1 to 60 seconds), "1x" (update only once), or "!1x" (do not switch at startup). |
Specify how to play sound
Following ringing methods can be specified in "Check" or "Repeat" field of the actions "Play Sound", "Play Track", "Play Value", and "Haptic".| set value | description |
|---|---|
| !- / !1x | Plays only once when the action is enabled. However, it will not be played while loading MODEL. |
| - / 1x | Plays only once when the action is enabled. |
| (number) | When the action is enabled, it will play for the specified number of seconds. You can specify a value from 1 to 60. |