


How to use FPV drone goggles SKYZONE COBRA X/S
- What is SKYZONE COBRA series?
- Introducing SKYZONE COBRA X V2
- Powering the Goggles
- Turning on/off the power
- Select receiving band/channel
- Band/channel signal status display and auto search
- Mode menu
- System menu
- DVR recording function
- System Settings
- Drone finder
- Replace VRX : RapidMix SteadyView Receiver
- Use of glasses
- Using digital FPV system
- Carrying case
- SKYZONE COBRA series specifications
What is SKYZONE COBRA series?

Here we will introduce the gray model of SKYZONE COBRA X V2.
Model variety
The SKYZONE COBRA series has the upper model "X", the lower model "S", and the beginner's "LITE". In addition, the "X" also has "X V2" model that is capable of DVR recording at 60fps. And there are two types of body colors: gray (ivory) and black. Previously, the “X” was only available in black and the “S” in white, but now both models are available in two colors.
The biggest difference between the "X", "S" and "LITE" models is the LCD resolution. The "X" model has a resolution of 1280 X 720 pixels, so it is suitable for use with computer simulator screens and digital receivers such as HDZero and Walksnail Avatar connected via HDMI cable. On the other hand, if you only use analog VTX, the lower-priced "S" model has sufficient functions and performance.
For details, please refer to SKYZONE COBRA series specifications .
-
Skyzone Cobra FPV Goggle

SKYZONE USD224.39
The SKYZONE Cobra S Diversity FPV Goggles have a high-resolution LCD screen with vivid colors and high luminance allowing the pilot can see more details during flying. With the SteadyView receiver, two signals are merged into one to avoid image tearing and rolling when the signal is weak.

 (US)
(UK)
(US)
(UK)
Introducing SKYZONE COBRA X V2
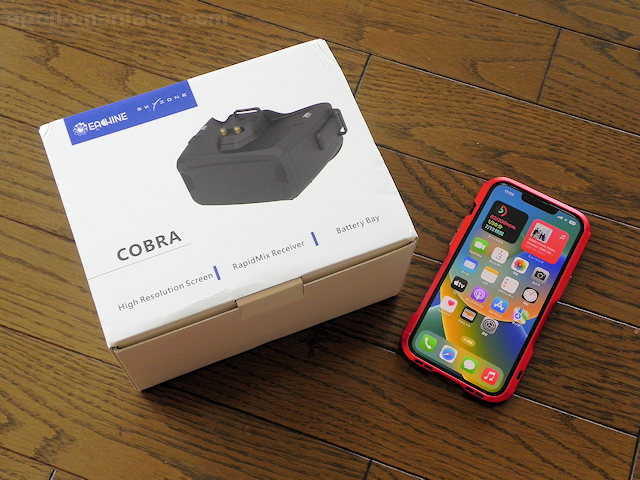 This is a photo of the SKYZONE COBRA X V2 packaging box.
Comes in a compact box.
The box says RapidMix receiver, but the RapidMix receiver is sold separately for the V2 model.
Included with the V2 model is a simple Diversity receiver.
However, even the Diversity receiver has sufficiently high reception performance compared to cheap goggles under USD100.
This is a photo of the SKYZONE COBRA X V2 packaging box.
Comes in a compact box.
The box says RapidMix receiver, but the RapidMix receiver is sold separately for the V2 model.
Included with the V2 model is a simple Diversity receiver.
However, even the Diversity receiver has sufficiently high reception performance compared to cheap goggles under USD100.
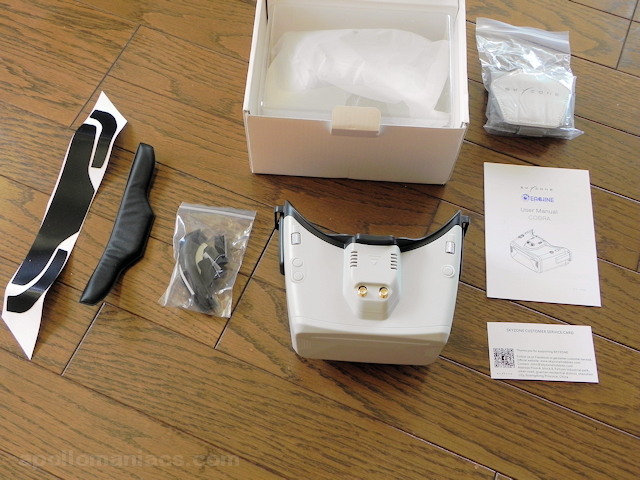 This is a photo of included items (part 1).
From the left, the tape for attaching faceplate, the faceplate (cushion), the cushion to fill the gap between the face and the goggles, and the goggles themselves.
On the right side of the goggles are the strap, user manual, and customer service card.
This is a photo of included items (part 1).
From the left, the tape for attaching faceplate, the faceplate (cushion), the cushion to fill the gap between the face and the goggles, and the goggles themselves.
On the right side of the goggles are the strap, user manual, and customer service card.
The user manual can also be downloaded from SKYZONE site .
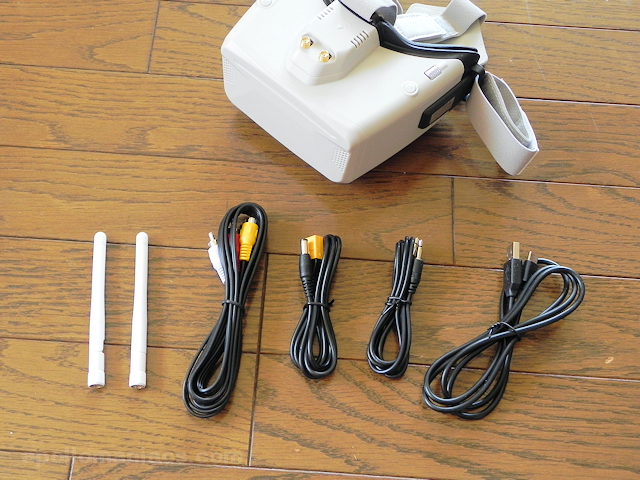 This is a photo of included items (part 2).
From the left are two antennas, a video/audio cable, an XT60 cable, a head tracker cable, and a USB Type-C - Type-A cable.
This is a photo of included items (part 2).
From the left are two antennas, a video/audio cable, an XT60 cable, a head tracker cable, and a USB Type-C - Type-A cable.
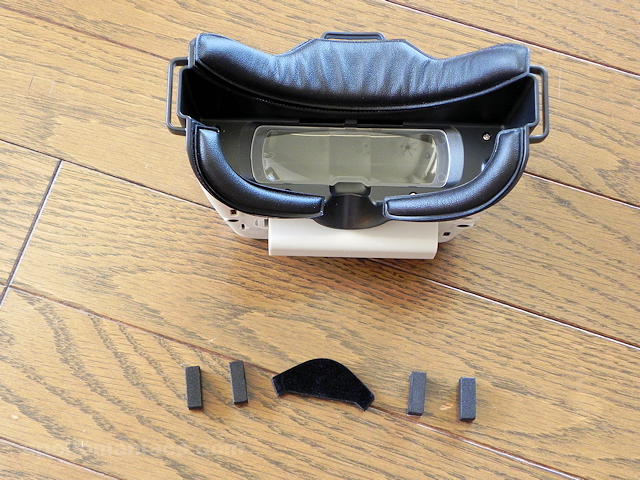 The faceplate (cushion) is attached by yourself using tape.
The tape is like Velcro (magic tape), so you can replace or reattach the faceplate later.
The faceplate (cushion) is attached by yourself using tape.
The tape is like Velcro (magic tape), so you can replace or reattach the faceplate later.
If you don't wear glasses, you can use extra cushions to fill the gaps between the left and right straps.
Also, if you have a small face and the light leaks through the nose part of the googles, you can put a triangular cushion on it to fill the gap.
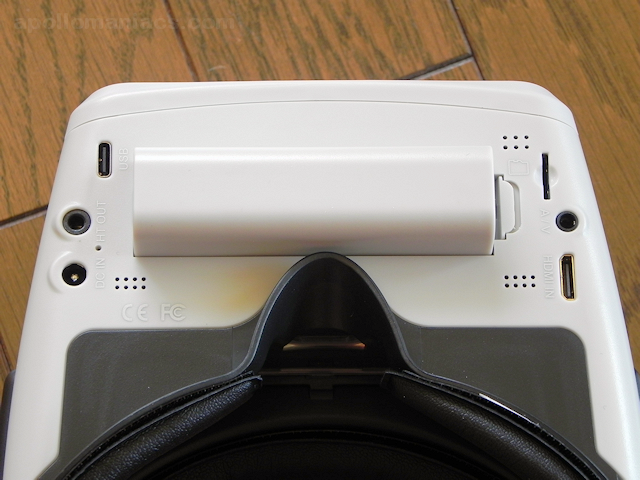 This is a picture of the goggles viewed from the bottom.
The horizontal ledge in the center is the 18650 type lithium-ion battery bay.
This is a picture of the goggles viewed from the bottom.
The horizontal ledge in the center is the 18650 type lithium-ion battery bay.
On the left side of the photo are a USB Type-C connector for power supply and battery charging, a 3.5mm jack for head tracking, and a DC port for power supply from LiPo battery.
On the right side of the photo are a microSD card slot for recording DVR functions, a 3.5mm jack for video/audio cable connection, and an HDMI input connector that can connect digital VRX, etc.
The HDMI input connector is Type-C (mini-HDMI). mini HDMI to HDMI conversion connector (Amazon.com) is required to connect to a general HDMI cable (Type-A).
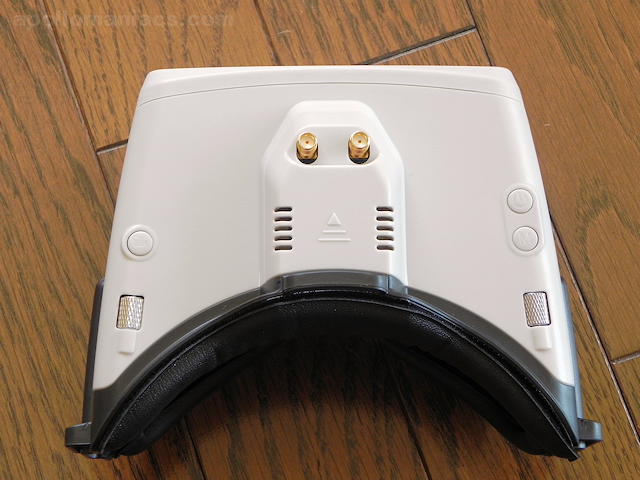 This is a picture of the goggles viewed from above.
In the middle is VRX (video receiver) module bay.
Inside this is Diversity receiver. It can be exchanged with other VRX modules.
This is a picture of the goggles viewed from above.
In the middle is VRX (video receiver) module bay.
Inside this is Diversity receiver. It can be exchanged with other VRX modules.
On the left side of the photo are the DVR function recording start/stop button and Mode scroll wheel.
On the right side of the photo are the Power/Fan button, System Menu/Headtracker reset button, and CH/BAND/Search scroll wheel. The scroll wheel behaves as a button when clicked.
This photo shows the goggles with the strap and antenna attached.
The antenna has RP-SMA connector.
The height is lower than the box type goggles of other companies, slim and cool.
 The strap is a 3-point support type.
Powering the Goggles
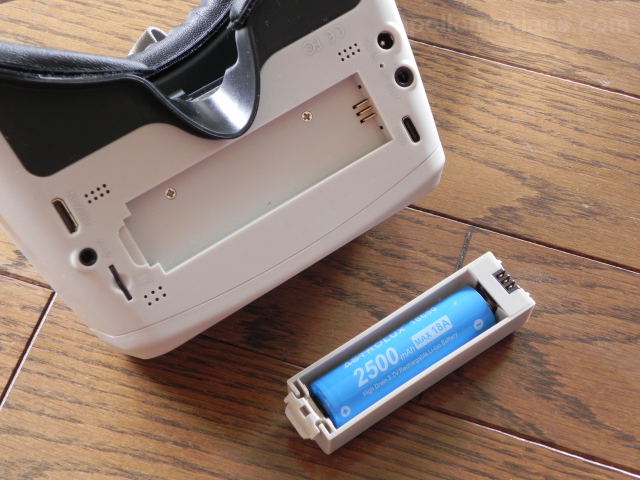 One 18650 Li-ion battery can be installed in the battery box at the bottom of the goggles.
However, the opening of the battery box lid is hard, so it is not suitable for frequent battery replacement.
Instead of replacing the battery when the battery is low, it may be better to use another power supply, which is described later.
One 18650 Li-ion battery can be installed in the battery box at the bottom of the goggles.
However, the opening of the battery box lid is hard, so it is not suitable for frequent battery replacement.
Instead of replacing the battery when the battery is low, it may be better to use another power supply, which is described later.
Alternatively, I think it would be good to use this battery as a backup power source when other power sources are cut off.
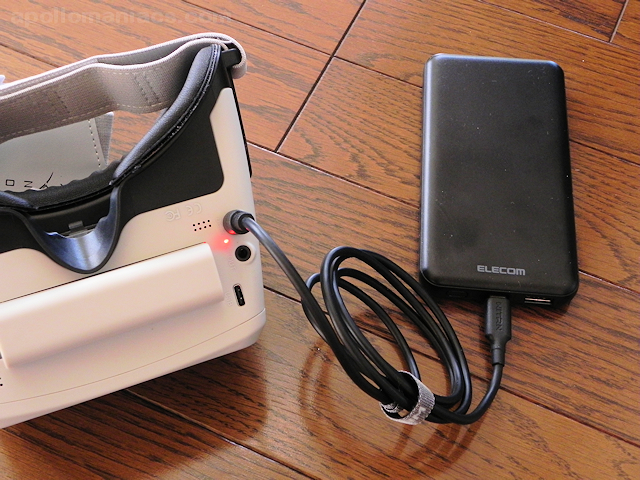
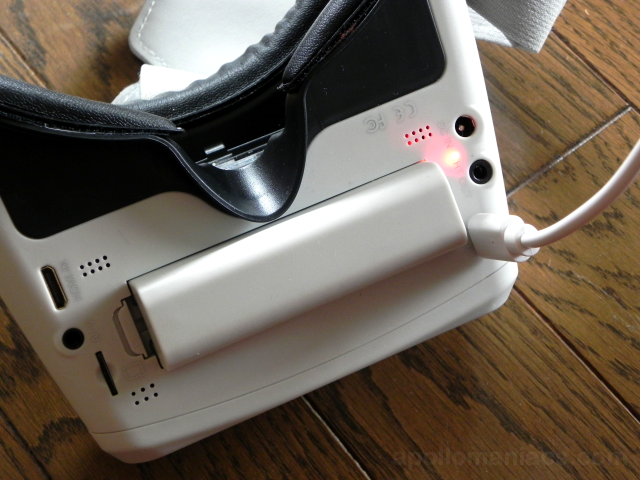 Battery is charged by connecting a power supply to the USB Type-C connector or DC port.
LED lights red when the battery is charging.
Depending on the battery and power supply used, it takes about 2 hours to fully charge.
Battery is charged by connecting a power supply to the USB Type-C connector or DC port.
LED lights red when the battery is charging.
Depending on the battery and power supply used, it takes about 2 hours to fully charge.
Also, although the connector is Type-C, it doesn't seem to support USB PD (USB Power Delivery), so charging didn't start even when I connected a PD compatible charger (output 35W) and cable (60W compatible). You need a charger/battery that outputs from a Type-A connector.
When charging is finished, the LED will turn green.
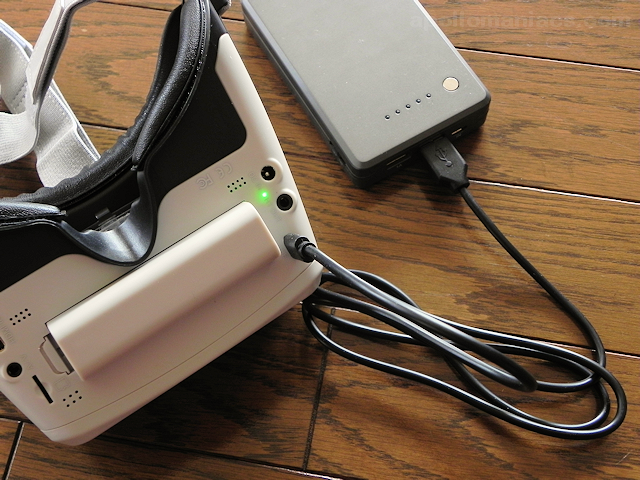 SKYZONE COBRA can use various power sources besides 18650 type lithium-ion battery.
Commercially available mobile batteries or AC adapters can be used via the included USB Type-C cable.
It is a good idea to prepare a mobile battery with a USB Type-A output connector with a capacity of about 10,000mAh.
SKYZONE COBRA can use various power sources besides 18650 type lithium-ion battery.
Commercially available mobile batteries or AC adapters can be used via the included USB Type-C cable.
It is a good idea to prepare a mobile battery with a USB Type-A output connector with a capacity of about 10,000mAh.
 If you want to use a commercially available mobile battery compatible with USB PD standard equipped with a USB Type-C connector, purchase a separate
PD trigger cable (Amazon.com)
and connect it to the DC port for power supply.
If you want to use a commercially available mobile battery compatible with USB PD standard equipped with a USB Type-C connector, purchase a separate
PD trigger cable (Amazon.com)
and connect it to the DC port for power supply.
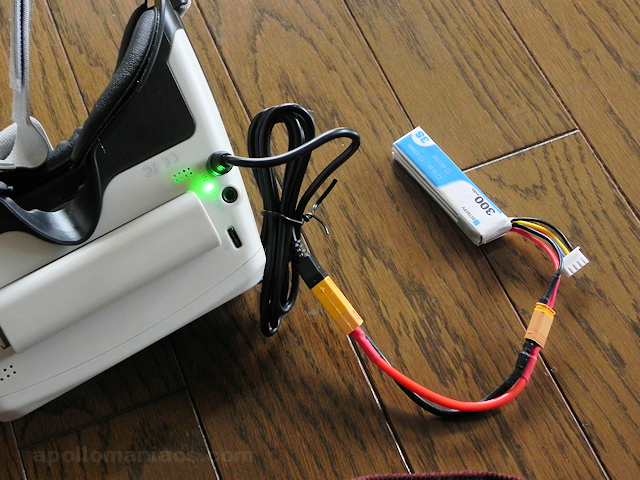 2S~6S LiPo batteries can be used via the included XT60 cable.
When using a mobile battery or LiPo battery, 18650 type lithium ion battery in bay is also charged.
2S~6S LiPo batteries can be used via the included XT60 cable.
When using a mobile battery or LiPo battery, 18650 type lithium ion battery in bay is also charged.
Turning on/off the power
After connecting the power supply to the goggles, press and hold the Power/Fan button to turn on the power. SKYZONE logo will be displayed on the screen, and after a while you will hear a beep indicating that the gyro sensor has been initialized, and the startup will be completed. When you use head tracking function, the goggles must be kept horizontal until the gyro sensor initialization is complete. If you do not use head tracking function, turn off the head tracking function in the system menu to shorten the startup time.Also, if you press and hold the Power/Fan button during operation, the power will turn off.
Select receiving band/channel
Select receiving band/channel with the right wheel. Click once on the right wheel to show the status bar, and click again to enter channel switching mode. The currently selected band (A,B,E,F,R,L) and channel (1~8) are displayed in the center of the status bar. And the letter of the channel turn yellow. Turning the right wheel at this time will change the channel.Then click the right wheel once to enter band switching mode. The letter of the band turn yellow. Turning the right wheel at this time will change the band.
The band/channel switching mode will be exited after 3 seconds from the right wheel operation.
Band/channel signal status display and auto search
Press and hold the right wheel to view the signal status of the currently selected band/channel. Then turn the right wheel to switch channels. Press and hold the right wheel again to exit the signal status display.If you click the right wheel while the signal status is displayed, auto search will start. After scanning all band channels, the receiver switches to the strongest band channel. Press and hold the right wheel to exit auto search.
However, since the channel frequencies of the FPV signal are adjacent to each other, using the auto search function may set a different channel than the drone's transmit setting. Basically, let's specify the band and channel manually.
Mode menu
Click once on the left wheel to show the status bar, and click again to brings up the mode menu. Then turn the left wheel to select the menu (move the cursor). Clicking the left wheel selects an item (ENTER).| item | description |
|---|---|
| RF Normal | This is normal mode. All 48 channels are selectable. |
| RF Racing | Only race (R) band channels are selectable. |
| RF Steadyview X | Specify when using the SteadyView receiver. If the image is distorted, try switching to "RF Normal". |
| RF Third-Party | Specify when using a third-party receiver. You cannot specify the band/channel from the goggles. Also, it is not possible to display the band/channel on the OSD screen of the goggles. |
| AV Input | Displays the video input from AV IN/OUTPUT port. The goggles receiver will be powered off. |
| HDMI Input | Displays the video input from the HDMI port. The goggles receiver and DVR recording function will be powered off. |
| Playback | Select and play videos recorded on microSD card of the goggles using DVR function. Right wheel selects, plays, and stops files. Adjust the volume with left wheel. Rotate right wheel during playback to fast forward or rewind. |
| Return | Exit the mode menu |
System menu
Click once the System Menu/Headtracker reset button to show the status bar, and click again to brings up the system menu. Then turn the right wheel to select the menu (move the cursor). Clicking the right wheel selects an item (ENTER).| item | description |
|---|---|
| Head tracking | You can turn the head tracking function ON/OFF and set various parameters. Head Tracker ON/OFF / PPM Channel / Pan Tracking range / Tilt Tracking range / Pan correction / Tilt correction / PPM Reverse can be set. |
| Image | You can adjust color tone e.t.c. of the screen. In the Image mode field, you can select settings from 7 types: "Standard", "Bright", "Vivid", "Soft", "User 1", "User 2", and "User 3". And when you select one of "User 1", "User 2", "User 3", you can adjust Brightness / Contrast / Saturation / Hue / Sharpness individually. |
| DVR | You can make settings related to the DVR function. For more information, please refer to " DVR recording function ". |
| Display | You can adjust the screen display such as OSD (status bar).
OSD Timeout (display time) / OSD Position (display position) / OSD Transparency / LCD Luminance / Aspect ratio / RSSI Display (display format) / RSSI Position can be selected. * Aspect ratio is only available on 'X' model. |
| System | Various other system settings can be made. See " System Settings " for details. |
| Return | Exit the system menu |
DVR recording function
Images received from VTX (drone) are recorded on the microSD card inserted in the goggles. Every time you press the recording start/stop button for DVR function, status bar will appear, and clicking it again will start/stop recording. The DVR function can record videos from receiver and video input from AV IN/OUTPUT port.Remaining capacity of microSD card is displayed in blue letters on the upper left of the status bar. If microSD card icon is displayed in red, the SD card is not recognized by the goggles. SD card initialization is required. The maximum capacity of microSD card supported by SKYZONE COBRA is 128GB (X model) or 64GB (S model) or 32GB (LITE model).
| item | description |
|---|---|
| Cycric REC | Select whether to automatically delete old files when the SD card runs out of space. The initial value is OFF (do not delete). |
| Auto REC |
Auto : Recording will start automatically when a video signal is input. Press the record button during recording to stop recording.
Auto&Follow : Recording will start automatically when a video signal is input, and stop recording after 30 seconds when the video signal is lost. Recording will start automatically when the video signal is available again. Follow : Press the record button to start recording. Stops recording after 30 seconds when video signal is lost. Recording will start automatically when the video signal is available again. * Auto&Follow, Follow can only be selected on "X" model. |
| Video length | Recorded videos are automatically split into multiple files. Select the maximum recording time for one file from 5 minutes / 10 minutes / 20 minutes / 30 minutes. The initial value is 30 minutes. |
| REC Audio | Select whether to record audio when recording video input from the AV IN/OUTPUT port. The default is OFF (no recording). |
| Format SD card | Initialize the microSD card inserted in the goggles in FAT32 format. If you select "YES" in this menu, "Format sd card, press [ok]" will be displayed. Click the right wheel to format the SD card. |
System Settings
Selecting "System" in the system menu calls up the following functions.| item | description |
|---|---|
| Power supply | Select the type of battery connected to the goggles from 2S to 6S. Setting this correctly will give a more accurate remaining capacity display on the goggles screen. |
| Voltage Calibration | Specifies the voltage of the battery connected to the goggles. It can be specified in the range of ±0.9V. Setting this correctly will give a more accurate voltage display on the goggles screen. Measure the voltage of the battery with a tester in advance, and use this menu to select the closest value. |
| RSSI Caribration |
Calibrate to display RSSI signal strength correctly.
First, with the VTX (drone) turned off, turn on the goggles and confirm that noise (snow storm) is displayed on the screen. Then select "RSSI Caribration" menu and select "Low". You will hear two beeps. Next, turn on the power of the VTX (drone), confirm that the frequencies of the VTX and the goggles match (camera image displayed in goggles), and move the VTX 2m away from the goggles. Finally, select "High" in "RSSI Caribration" menu. You will hear 4 beeps. |
| RF mode |
The operating mode of the receiver can be selected from "MIX mode" or "Diversity mode".
Normally select "MIX mode".
With some cameras, images may not be displayed correctly in "MIX mode" and the screen may appear to be scrolling. In such cases, switch to "Diversity mode". |
| Language | Switch the display language of the menu. Choose from English or Chinese on 'S' model and 10 languages on 'X' model. |
| Fan speed | You can switch the rotation speed of the cooling fan in the range of 0-15. The initial value is 12. You can turn the anti-fogging function ON/OFF by clicking the power button when the goggles are on. |
| Rotary switch | Swap the functions of the right and left wheels. |
| Beeps | Toggles whether to sound a beep. |
| Factory settings | Reset all settings to factory default. |
| DVR FW upgrade |
Upgrade DVR recording function firmware (basic software).
Store the firmware file in a FAT32 formatted microSD card, set it in the goggles, and select this menu to upgrade.
* This menu is only available on 'X' models. The firmware can be downloaded from SKYZONE web site .
SKYZONE download page (SKYZONE)
|
| Firmware version |
Displays the goggles and DVR recording function firmware (basic software) version and product serial number.
To update the goggles firmware, first connect the goggles to your computer with a USB cable, then turn on the goggles while pressing the left wheel. Then take your finger off the left wheel and wait for the driver to install on your computer. Next, store the firmware file in the USB storage device newly displayed on the computer. Then the goggles will be upgraded. When the file copy is completed, the version upgrade is also completed. Do "Remove" action the USB storage device from the computer. There are three types of firmware according to the hardware version (V1 to V3). You must use the firmware that matches your hardware version. If you select "Firmware version" in the system settings menu with goggles, the screen will display "FW1:" followed by the hardware version. The firmware can be downloaded from SKYZONE web site .
SKYZONE download page (SKYZONE)
|
Drone finder
COBRA X is equipped with a "Drone Finder" function that audibly indicates the strength of RSSI signal from the drone. Attach a strong directivity patch antenna to VRX of the goggles, and press and hold left wheel to activate "Drone Finder". The beep tone changes according to the strength of RSSI signal. Press and hold left wheel again to exit "Drone Finder".Replace VRX : RapidMix SteadyView Receiver
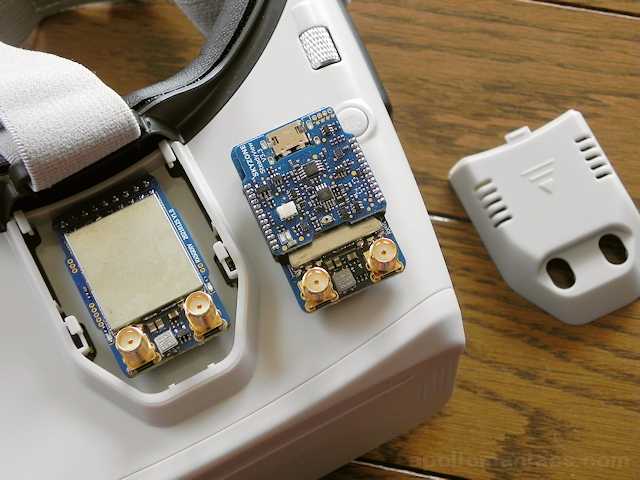 From the V2 model, SKYZONE COBRA X comes with a simple Diversity receiver instead of RapidMix SteadyView receiver that was previously included.
So I also purchased
RapidMix SteadyView receiver (Banggod)
.
The SteadyView receiver also has
a model with ELRS Backpack function
.
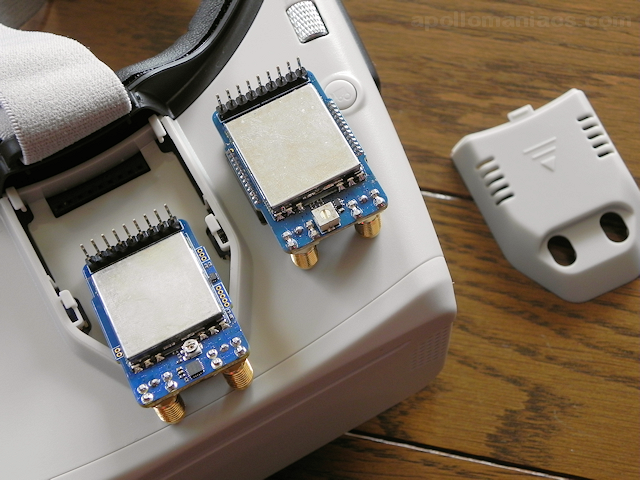
The RapidMix SteadyView receiver (V3.3) is on the right of the photo.
A Fusion board is layered on top of the receiver.
Due to the thickness of this receiver, VRX bay lid barely fits.
I think that the lid cannot be closed if a slightly larger receiver is installed.
From the V2 model, SKYZONE COBRA X comes with a simple Diversity receiver instead of RapidMix SteadyView receiver that was previously included.
So I also purchased
RapidMix SteadyView receiver (Banggod)
.
The SteadyView receiver also has
a model with ELRS Backpack function
.
The RapidMix SteadyView receiver (V3.3) is on the right of the photo.
A Fusion board is layered on top of the receiver.
Due to the thickness of this receiver, VRX bay lid barely fits.
I think that the lid cannot be closed if a slightly larger receiver is installed.
 This photo is the back side of the receiver. Also on the right of the photo is the RapidMix SteadyView receiver.
There is little difference on the back side.
Just plug it into a 9-pin socket and you're good to go.
This photo is the back side of the receiver. Also on the right of the photo is the RapidMix SteadyView receiver.
There is little difference on the back side.
Just plug it into a 9-pin socket and you're good to go.
Unfortunately, so far I haven't been able to find any noticeable performance difference between the Diversity and SteadyView receivers. Both receivers generate noise in the same way in areas with poor VTX reception. I tried both "RF Normal" and "RF Steadyview X" modes on the SteadyView receiver and also found no difference.
Even the built-in Diversity receiver has better reception performance than cheap goggles costing less than USD100, so it may not be necessary to replace it with a SteadyView receiver.
How to upgrade the firmware of RapidMix SteadyView receiver
Remove the receiver from goggles, and while pressing BOOT button on the receiver board, connect it to your computer with a USB cable. Then wait for driver to be installed on your computer. Next, store the firmware file in the USB storage device newly displayed on the computer. Then the receiver will be upgraded. When the file copy is completed, the version upgrade is also completed. Do "Remove" action the USB storage device from the computer.
The firmware can be downloaded from SKYZONE online shop download page .
-
Eachine SKYZONE RapidMix SteadyView VRX receiver
Eachine/SKYZONE USD123.59
The Skyzone Steadyview Receiver Module is able to merge two video signals into one, avoid image tearing and rolling, and make the image more stable and clear in challenging conditions. This module works in the. This is an OEM part and does not come with packaging or manual.
(US)
(UK)
Use of glasses
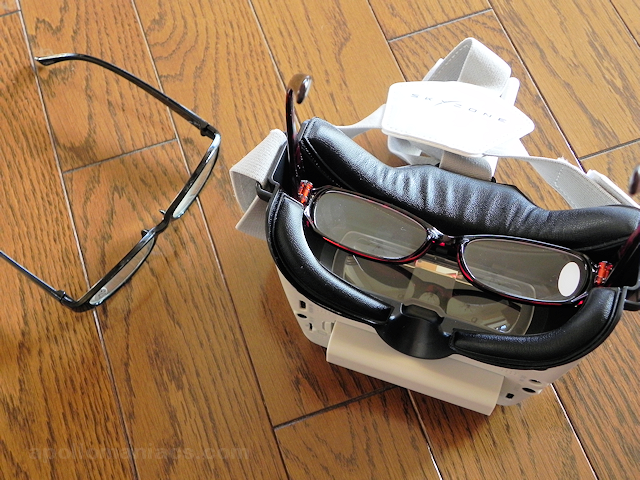 SKYZONE COBRA series is box-shaped, so you can use it while wearing glasses.
Glasses in the photo are reading glasses that can be purchased at one dollar stores, with a maximum height of 31mm and a width of 137mm.
Glasses larger than this may not work.
SKYZONE COBRA series is box-shaped, so you can use it while wearing glasses.
Glasses in the photo are reading glasses that can be purchased at one dollar stores, with a maximum height of 31mm and a width of 137mm.
Glasses larger than this may not work.
However, SKYZONE COBRA series has a built-in magnifying lens, so visibility is high even without glasses. If you normally use reading glasses with a magnification of +1.5, you can use this goggle without glasses.
Using digital FPV system
Carrying case
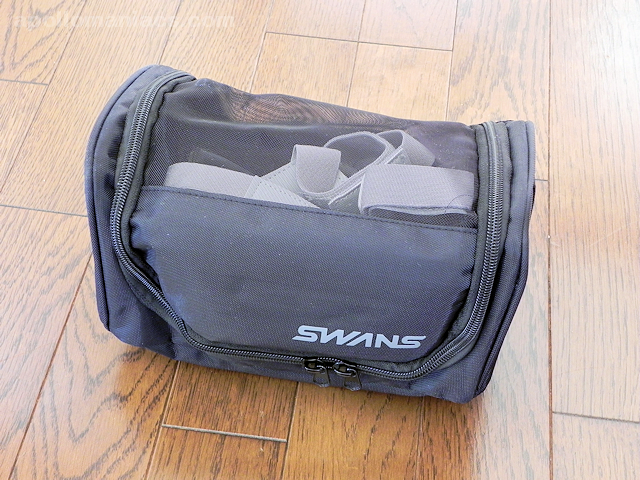 As a carrying case, I used
SWANS A-135 (Amazon.com)
case for ski/snowboard goggles.
Since it is a soft case, it cannot protect the contents from strong impacts, but it can store items with special shapes such as FPV goggles.
The upper part of the lid is mesh.
As a carrying case, I used
SWANS A-135 (Amazon.com)
case for ski/snowboard goggles.
Since it is a soft case, it cannot protect the contents from strong impacts, but it can store items with special shapes such as FPV goggles.
The upper part of the lid is mesh.
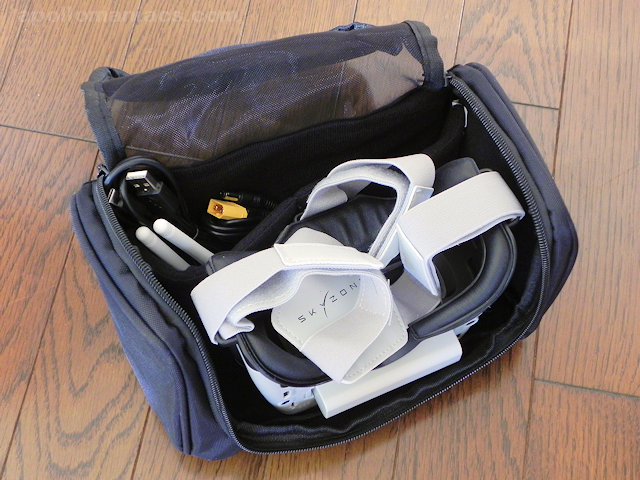 The size of the bag is wide enough, but the height is barely there.
The depth of the bag is not enough, so I put the goggles in the vertical direction.
It comes with a removable partition and can store all accessories such as antennas and cables.
Goggles and a set of accessories can be carried in a minimal size.
The size of the bag is wide enough, but the height is barely there.
The depth of the bag is not enough, so I put the goggles in the vertical direction.
It comes with a removable partition and can store all accessories such as antennas and cables.
Goggles and a set of accessories can be carried in a minimal size.
-
SWANS snow goggle case A-135
SWANS JPY3141
Capacity: 1 SWANS/DICE goggle, 1 spare lens Size: Width 24cm, Height 13cm, Depth 14cm Material: Polyester Country of origin: China Goggle case that can hold one SWANS/DICE goggle and one spare lens is. When not in use, it can be folded compactly for convenient carrying and storage.
(US)
(UK)
SKYZONE COBRA series specifications
| item | COBRA X | COBRA S | COBRA LITE |
|---|---|---|---|
| Manufacturer | SKYZONE | ||
| Screen | LCD | ||
| Resolution | 1280 X 720 | 800 X 480 | 480 X 272 |
| FOV (Diagonal) | 50° | ||
| AspectRatio | 4:3 / 16:9 | 16:9 | |
| Receiver | 5.8Ghz 48CH RapidMix SteadyView (V1 model) / Diversity (V2 model) Receiver | Diversity Receiver | |
| Language | 10 Language | English / Chinese | English |
| Power Supply | 1 Cell 18650 / DC 6.5-25.2V / USB 5V | 1 Cell 18650 / USB 5V | |
| Power Consumption | 12V 0.63A 5V 1.5A | 12V 0.59A 5V 1.4A | |
| DVR | H.264 30fps (V1 model) or 60fps (V2 model), MOV 6Mbps, "Auto&Follow" and "Follow" mode | Motion JPEG 30FPS | |
| Support microSD card | FAT32, Class10, up to 128Gb | FAT32, Class10, up to 64Gb | FAT32, Class10, up to 32Gb |
| Head Tracker | 3-axis Accelerometer, 3-axis gyroscope | None | |
| Dimentions | 190*150*110mm | ||
| Weight | 332g | ? | |
| Package Included |
1x Cobra FPV Goggles 1x Receiver Module 1x Head Strap 1x Power Cable 1x Headtracker Cable 2x 5.8GHz 2dD Antennas 1x Video/Audio Cable 1x USB-C Cable 1x User Manual |
? | |