


How to use Walksnail Avatar VRX / Digital FPV System for FPV Drone
- What is Walksnail Avatar?
- What is Walksnail Avatar VRX?
- Introducing Walksnail Avatar VRX
- Operation buttons
- Set up
- Power on/off
- Application to national standards/switching modes
- Unlocking output power
- Bind (Link) with VTX
- Focus Mode
- Main screen
- How to operate the menu screen
- Select transmission channel
- System settings menu
- DVR recording function
- Playback menu
- Firmware upgrade
- Setting the OSD Display
- Change OSD font
- Connect Goggles/VRX to TV/Computer: Use as webcam
- Walksnail Avatar VRX specifications
- Walksnail Avatar Related Sites
What is Walksnail Avatar?
Model variety
Below are FPV goggles/VRX that can be used with the Walksnail Avatar Digital FPV System.
-
Walksnail Avatar HD Goggles X

Caddx 2023/11 USD459.00
The display is OLED 1080p/100FPS FOV50°. The maximum microSD capacity supported by the DVR function is 256GB. Weight: 290g. Equipped with AV / HDMI input, it is also possible to connect analog VRX. If you use Bluetooth, Wi-Fi, and HDMI output, you can display the video from the goggles on a TV, etc.


 (US)
(UK)
Walksnail Avatar HD Goggles X Official web site (CADDXFPV)
(US)
(UK)
Walksnail Avatar HD Goggles X Official web site (CADDXFPV) -
Walksnail Avatar HD Goggles L
Caddx 2024/07 USD199.00
The display is a 4.5" LCD 1080p/60FPS. The maximum microSD capacity supported by the DVR function is 256GB. Weight is 350g.
(US)
(UK)
Walksnail Avatar HD Goggles L Official web site (CADDXFPV) -
Walksnail avatar Goggles V1 (Walksnail avatar digital HD FPV Goggle)
Caddx 2022/10 USD559.00
The display is OLED 1080p/90FPS FOV46°. The DVR function can record at 720p/60fps. The maximum capacity of the corresponding microSD is 256 GB. Weight is 315g.
(US)
(UK)
Walksnail avatar Goggles V1 Official web site (CADDXFPV) -
Fat Shark Dominator HD
Fat Shark 2022/10 USD599.00
Same product as the Walksnail avatar Goggles V1 shown above, but different colors.
This is a different product from the previously released "Fat Shark Dominator HDO" and "Fat Shark Dominator HDO2" (analog).
(US)
(UK)
Fat Shark Dominator HD Official web site (Fat Shark) -
Fat Shark Recon HD
Fat Shark 2022/12 USD279.00
The display is 4” LCD (TFT) 1080p/60FPS FOV44°. With DVR function. The size is 170 x 120 x 90mm. The weight is 336.5 g. Although it is a box type, glasses cannot be used.
This is a different product from the previously released "Fat Shark Recon" and "Fat Shark Recon V2" (analog).
(US)
(UK)
Fat Shark Recon HD Ofiicial web site (Fat Shark) -
Walksnail Avatar VRX
Caddx 2022/12 USD219.00
There is no display and you will need to connect to the HDMI video input of your existing analog FPV goggles. Output images are 1080p/60fps, 720p/100fps, 720p/60fps. With DVR function. The maximum capacity of the corresponding microSD is 256 GB. The size is 114 x 55 x 22mm. Weight is 83g.
(US)
(UK)
Walksnail Avatar VRX Ofiicial web site (CADDXFPV)


What is Walksnail Avatar VRX?
Introducing Walksnail Avatar VRX
Apart from these, a sheet of quick start guide is included.
You can download a more detailed user's manual from Caddx download page .
Operation buttons
Link button is used to bind(Link) VTX (drone) and VRX. Press by inserting a thin pin into the hole.
Record button is used to record the image displayed on the screen (goggles) with DVR function .
Back button and 5D button are used when operating setting screen displayed on the screen (goggles). Back button is used to return to the previous screen or to "cancel". 5D button is a joystick and can be operated in five ways: up/down, left/right, and push. Up, down, left, and right operations are used to move the cursor, and push operations are used to "select" or "determine".
Set up
Attach VRX to FPV goggles (the photo is SKYZONE COBRA X ) with included adhesive sheet. The adhesive is not very strong, so you can remove it whenever you like. You can buy similar gel double sided tape (Amazon.com) at your local store.
Power the goggles and VRX from power supply using bifurcated power cable that comes with the VRX.
Then switch the goggles input to HDMI.
Power on/off
This VRX does not have a power button. It starts when you connect power to the DC input port. It takes about 30 seconds to complete booting.Switch the input on your FPV goggles to HDMI and you should be able to see the VRX main screen.
Buzzer keeps ringing after startup!?
If the buzzer continues to sound after startup, this is most likely due to a problem with the inserted microSD card. First, remove the microSD card, restart, and check if the buzzer stops sounding. Then try reinserting the microSD card firmly. If there is a problem with the microSD card, a short and long beep will be heard repeatedly.
Application to national standards/switching modes
Walksnail Avatar Goggle/VRX is set to SRRC mode when shipped from the factory. You must switch to the standard mode for your region before use.Prepare a text file named "avatar_std.txt" in which only one number is written, and store it in the microSD card. Put it in the goggles/VRX and power on the goggles/VRX to set/switch the mode. In "avatar_std.txt", enter the number (0 to 3) in the table below for only one character.
If you download "FCC Unlock Procedure" from Caddx download page , you can get a template of "avatar_std.txt". The file "avatar_std.txt" can be left in the microSD card all the time.
| No. | standard | Application | description |
|---|---|---|---|
| 0 | SRRC | China | 4 channels available |
| 1 | CE | EU and others | 4 channels available |
| 2 | FCC | USA | 8 channels available |
| 3 | MIC | Japan | 3 channels available, Transmit power fixed at 350mW |
Unlocking output power
With Walksnail avatar goggles/VRX, you can increase the output power to 1000mW, 1200mW by following the unlock steps. However, in order to use this, it is necessary to check the radio law of the area where you live, obtain the required radio engineer license, and operate in a way that is not illegal. Also, increasing the output power will cause equipment to overheat, so set it carefully.This function is mainly available in the applicable regions of FCC mode. Unfortunately amateur FPV drone pilots in other regions are probably not available.
To unlock, download "FCC Unlock Procedure" from Caddx download page and follow the instructions included in it, "UNLOCK PROCEDURE.docx". Store "avatar_pwr.txt" text file in a microSD card, set it in the goggles/VRX, and power on the goggles/VRX to unlock.
Bind (Link) with VTX
Also, one goggle/VRX can be bound (linked) to multiple VTXs (drones). Once bound, all you have to do is turn on the VTX you want to use and it will be connected to the goggles/VRX.
Bind (link) procedure
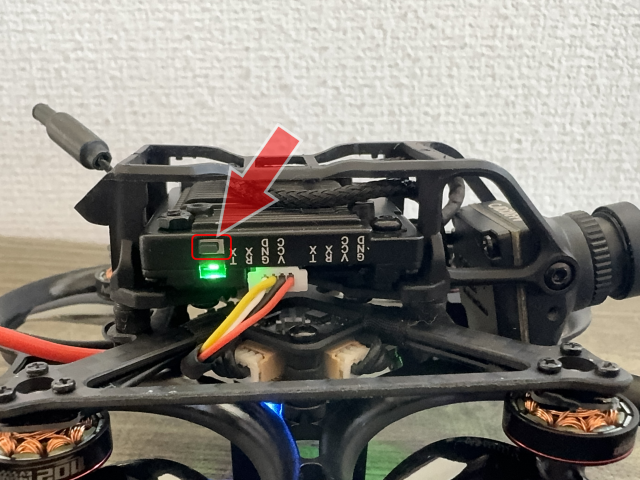
- Turn on the VTX (drone) and wait for a while, the VTX will start up and the VTX LED will blink green.
- When you press LINK button on the VTX, the LED on the VTX lights up red constantly.
- Next, press LINK button on the goggles/VRX and immediately release it. A beep will sound and the bind (link) process will begin.
- Wait a few seconds and it will be bound (linked). Bind is complete when the VTX LED is solid green and the goggles/VRX stops beeping. Connected goggles/VRX should show the video from the camera connected to VTX.
- If the display position of the OSD numerical data is shifted vertically or horizontally within the goggles, adjust the position using the [Display]-[OSD Position] menu.
Focus Mode
Walksnail Avatar digital FPV system has a function called "Focus Mode" that secures the resolution in the center of the screen and reduces the resolution at the edges of the screen to reduce the amount of communication data. If this is set to "Auto", Focus Mode will turn on when the communication situation deteriorates. Despite the digital FPV system, it is possible to judge the communication situation from the image situation like analog FPV system.Main screen
(image is quoted from official user manual)
The meanings of the icons displayed around the screen are shown in the table below.
| No. | item | description |
|---|---|---|
| 1 | VTX input voltage | Displays the input voltage of the VTX installed in the drone. The number of cells (2S-6S) is automatically determined, and when one cell falls below 3.5V, the display characters turn red. |
| 2 | VRX input voltage | Displays the input voltage of goggles/VRX. When "Low Battery" is turned on on the setting screen, the number of cells (2S-6S) is automatically determined, and when one cell falls below 3.5V, a beep sounds and the display characters turn red. |
| 3 | Real-time bit rate | Displays the bit rate of image data transfer in real time. A maximum of 25.0Mbps (Standard) or 50.0Mbps (High) will be displayed. |
| 4 | Time delay | Displays the delay time (msec) from the camera (VTX) to the goggles/VRX screen in real time. |
| 5 | Ranging mode | When "Ranging mode" is turned on on the setting screen, the distance (m) between VTX and goggles/VRX calculated from the signal delay is displayed in real time. Errors occur when there is interference in the signal. |
| 6 | Status prompt | Displays the current status of the system in string. |
| 7 | Current channel | Displays current channel number and signal strength. |
| 8 | VRX SD card status | Displays the Goggles/VRX's microSD card status and remaining capacity. A red circle flashes to the left of the icon during DVR recording. "NO SD" is displayed when the microSD card cannot be recognized. "-" is displayed when the capacity is full. |
| 9 | VTX SD card status | Displays the status and remaining capacity of the memory installed in the VTX. A red circle flashes to the left of the icon when onboard recording is in progress. "NO SD" is displayed when the VTX memory cannot be recognized. "-" is displayed when the capacity is full. |
How to operate the menu screen
(image is quoted from official user manual)
Click [Back button] at the top of the goggles/VRX to close the menu screen. Some of the menu screens can be operated even if VTX (drone) is not turned on.
Move [5D button] at the top of the goggles/VRX up, down, left, or right to move the white frame (cursor). Push [5D button] to select that item.
At the top of the menu screen, there is a menu bar with four items: "Channel", "Share", "Settings", and "Playback". Select any item and press [5D button] to switch screens.
Select transmission channel
(image is quoted from official user manual)
On this screen, you can select the channel to be used for image transfer and check its status. Up to 8 channels of CH1~CH7, CHP(CH8) are displayed here. Four bars to the left of each channel number indicate the interference situation. Channels with all black bars cannot be selected. Channels with green bars have little interference and are suitable for use. Move [5D button] at the top of the goggles/VRX up, down, left, or right to move the white frame (cursor). Push [5D button] to select that channel.
CHP (CH8) is selected when shipped from the factory. Select a channel other than CHP (CH8) for the channel used for flight.
Select [Refresh] on the upper right of the screen to update the interference status display for each channel. When [Auto] at the top right of the screen is turned ON, the interference status display for each channel is automatically updated.
| standard | CH1 | CH2 | CH3 | CH4 | CH5 | CH6 | CH7 | CH8 (CHP) | region |
|---|---|---|---|---|---|---|---|---|---|
| FCC | 5660 | 5695 | 5735 | 5770 | 5805 | 5878 | 5914 | 5839 | US |
| CE/SRRC | 5735 | 5770 | 5805 | - | - | - | - | 5839 | EU/China |
| MIC | 5660 | 5700 | - | - | - | - | - | 5745 | Japan |
When you power on the goggles, it will first connect to the VTX using CHP(CH8) and then switch to the channel you set. So when you turn on your goggles, make sure there are no FPV pilots using CHP(CH8) nearby. Also, specify a channel other than CHP(CH8) for flight.
For this reason, only CH2 of MIC can be used in Japan, and only one person can use it at the same time.
Switching the bitrate between "Standard" and "High" sets the communication channel to CHP(CH8). Therefore, when you switch the bit rate, reselect the communication channel as well. However, high bit rate can only be selected in FCC mode. Also, if you select high bitrate, the available channels will be reduced to 4 channels, CH1~CH3 and CHP(CH8).
System settings menu
(image is quoted from official user manual)
For "Camera", "Display", "Record set" and "Device", a submenu screen opens when these items are selected. Other items can be changed directly on this screen.
| No. | item | description |
|---|---|---|
| 1 | Camera | Adjust the image received from the camera.
See Camera menu for details. |
| 2 | Display | Adjust the displayed image.
See Display menu for details. |
| 3 | Record set | Make settings related to recording.
See Record menu for details. |
| 4 | Device | Set various settings for goggles/VRX.
See Device menu for details. |
| 5 | Transmit Power | Switch the radio output power. Initial value is 25mW. You can choose from 25mW, 200mW, 500mW, 700mW. Up to 1200mW can be selected in FCC mode. Maximum output is fixed at 350mW in MIC mode. |
| 6 | Resolution | Switch the display resolution. The initial value is 720p. 720p or 1080p can be selected. Select the resolution supported by the connected FPV goggles. If you select 1080p, you will not be able to select high frame rate. |
| 7 | Bitrate | Switch the bitrate (image quality). Initial value is "Standard". "Standard" (Max 25Mbps) or "High" (Max 50Mbps) can be selected. However, "High" can only be selected in FCC mode. |
| 8 | Frame Rate | Switch the frame rate (screen update speed). Initial value is "Standard". "Standard" (60fps) or "High" (100fps) can be selected. However, "High" can only be selected when the screen resolution is 720p. |
| 9 | Standby Mode | Specify On/Off for standby mode. Initial value is On. When this is set to On, radio output power is reduced to 10mW when not armed to avoid overheating the unit. When the standby mode is turned off or Armed, it will return to the output set in "Transmit Power" field. For this feature to work with the Arm, the VTX's serial port must be properly wired to FC. |
| 10* | Language | Switch the display language of the setting screen to English or Chinese. Initial value is English. |
| 11* | Low Battery | Turn On/Off the VRX low voltage warning. Initial value is On. |
| 12* | Goggle icon | Specify whether to show/hide various icons on the main screen. Default is show. You can choose show / FC ctrl / hide. |
| 13* | broadcast | Default is Off. |
Camera menu
| No. | item | description |
|---|---|---|
| 1 | Scene | The image quality is selected according to the scene you specified. Initial value is "day". You can choose "day"/"night"/"race". |
| 2 | EV | Specify EV(Exposure compensation Value). Initial value is "0". -0.3 / -0.7 / -1.0 / +1.0 / +0.7 / +0.3 can be selected. |
| 3 | Saturation | Adjust saturation. The initial value is 5. You can choose from 1 to 10. |
| 4 | Sharpness | Adjust sharpness. The initial value is 5. You can choose from 1 to 10. |
| 5 | WB | Adjust the white balance. Initial value is AWD. AWD, 7000~4000 can be selected (step 100). |
| 6 | Rotate | Specify screen rotation. Initial value is 0°. 0° or 180° can be selected. |
| 7 | Ratio | Specify the screen aspect ratio. The default is 16:9.You can select 4:3 / 4:3 FULL / 16:9. |
Display menu
| No. | item | description |
|---|---|---|
| 1 | Zoom Out | Specify the screen zoom. Initial value is 100%. You can choose from 10 to 100 (step 10). |
| 2 | Brightness | Adjust brightness. Initial value is 3. |
| 3 | Focus Mode | When this is set to On, the resolution at the edges of the screen is reduced while maintaining the resolution in the center of the screen. If you select Auto, this function will turn on when the radio communication situation deteriorates. Default is Off. On / Off / Auto can be selected. |
| 4 | Custom OSD | Specify the OSD type. Default is Auto. Off / KISS / FTTC(Fettec) / ARDU(ArduPilot) / INAV / BTFL(betaflight) / Auto / Custom can be selected. |
| 5 | OSD Position | Adjust the OSD display position. You can move the display position with [5D button]. |
| 6 | Font Update | Upload OSD fonts to FC. |
| 7 | Custom Font | Switch the OSD font to the uploaded one. |
| 8* | Viewfinder | Specifies whether to show or hide the viewfinder. Default is Off. On/Off can be selected. |
| 9 | Viewfinder Edit | Adjust the display position of the viewfinder. You can move the display position with [5D button]. |
Record menu
| No. | item | description |
|---|---|---|
| 1 | VTX REC | Specify the VTX recording resolution. Default is 1080p-60fps. You can choose 1080p60 / 720p60. |
| 2 | REC Device | Specify the device to record. Default is Both. VTX / VRX / Both can be selected. |
| 3 | Takeoff REC | When this is set to On, Arming will automatically start recording. Initial value is On. On/Off can be selected. |
| 4 | REC Loop | Specify "loop recording" to delete old files when the recording capacity is insufficient. Default is Both. VTX / VRX / Both / Off can be selected. |
| 5* | Format SD Card | Initialize the microSD card inserted in the goggles/VRX in exFAT format. |
| 6 | Format VTX | Initializes the memory installed in the VTX in exFAT format. |
Device menu
| No. | item | description |
|---|---|---|
| 1* | Buzzer | Specify the volume of the buzzer (warning sound). The initial value is 10. You can choose from 1 to 10. |
| 2 | Ranging mode | When this is set to On, the distance between the VTX and Goggles/VRX calculated from the signal delay is displayed at the bottom of the main screen. Default is Off. On/Off can be selected. |
| 3* | Weak Signal | Specify the warning method when the radio wave becomes weak. The initial value is remind (screen display). You can choose remind / off / buzzer. |
| 4* | Reset All | Factory reset the goggles/VRX. Execute this command when you update the goggles/VRX firmware. |
| 5* | Device Info | Displays the hardware version, serial number, and software version of goggles/VRX and VTX. |
| 6* | Instruction | Displays an explanation screen for goggles/VRX switches, etc., which is also displayed when the goggles/VRX is initially started. |
DVR recording function
This is a function to record the image received from the VTX (drone) to the microSD card inserted in the goggles/VRX. Recording resolution is 720P/60fps. Being a digital system, it can record very clear video. OSD screen is not recorded in the video file, but it can be overlaid when playing back in goggles/VRX.Start/end recording
By default, recording starts automatically when armed and stops when disarmed. Or you can manually start/stop recording by pressing [Record button] on the top of the goggles/VRX. If [Settings]-[Record Set]-[Takeoff REC] is set to "Off", automatic recording at Arm can be disabled.
There are two microSD card icons in the upper right corner of the main screen, and the top icon indicates the recording status of the DVR function and the remaining capacity of the microSD card. A red circle flashes to the left of this icon when recording. If "NO SD" is displayed here, the microSD card is not recognized. Check whether the microSD card is inserted correctly, is not damaged, and has sufficient capacity and writing speed.
The maximum capacity of the microSD card supported by Walksnail Avatar VRX is 256GB.
Note: If you remove battery during recording or continue recording until battery is empty, you will end up with unplayable files. Be sure to press record button to stop recording before turning off the power or removing the battery.
Recording file format
The Goggles/VRX microSD card stores videos with filenames like "AvatarG0000.mp4". Each time a new recording is made, the 4-digit number part of the file name is incremented. Goggles/VRX do not have a calendar, so the date of the file is not correct, but a temporary date and time are given in chronological order.
The video track format is MPEG-4 AVC Level 4 High profile. The resolution is 1280x720 and the bitrate is 38.9Mbps. This MPEG-4 container contains only video tracks and no audio tracks.
Two files with the same primary file name and extensions of ".osd" and ".srt" are also generated at the same time.
A ".srt" file is a so-called subtitle file, and various information displayed on the main screen of the goggles/VRX during flight is written in text.
The ".osd" file is a binary file that stores the OSD image of the FC (drone).
Walksnail Avatar Goggles/VRX's Playback feature allows you to overlay this information and the OSD screen onto your video.
Playback on PC
Also, a tool to combine video files, ".srt" and ".osd" files into a single video: "walksnail-osd-tool" is available on github . It is convenient for uploading the screen of goggles/VRX to YouTube etc.
Playback menu
(image is quoted from official user manual)
You can play videos recorded with DVR function on the microSD card inserted in the goggles/VRX. Move [5D button] at the top of the goggles/VRX up, down, left, or right to move the white frame (cursor). Push [5D button] to play selected video.
When "OSD" on the upper right of the screen is switched to ON, OSD screen and various information on the goggles/VRX main screen will be displayed over the video being played.
If you press and hold [5D button] while selecting videos, it will switch to multiple file selection mode, and the screen will show "Delete", "All" and "Cancel" buttons. Pressing [Back button] during multiple file selection mode exits this mode.
You can play/pause the video by pushing [5D button] during video playback. You can also rewind/fast forward by tilting [5D button] left and right.
Firmware upgrade
Firmware upgrade procedure is published in Avatar system update procedure (PDF file) that can be downloaded from Caddx page . Firmware files are available on Caddx download page , d3vl and github page.Variety of firmware
There are different types of firmware for the Walksnail Avatar digital FPV system as shown in the table below, and each target device is different. Please be careful not to make a mistake when updating.
| No | name | apply |
|---|---|---|
| 1 | AvatarX_Gnd_xx.xx.xx.img | Walksnail avatar Goggles X |
| 2 | Avatar_Gnd_xx.xx.xx.img | Walksnail avatar Goggles V1, Fat Shark Dominator HD |
| 3 | AvatarMini_Gnd_xx.xx.xx.img | Fat Shark Recon HD |
| 4 | AvatarSE_Gnd_xx.xx.xx.img | Walksnail Avatar VRX |
| No | name | apply |
|---|---|---|
| 1 | AvatarMoonlight_Sky_xx.xx.xx.img | Walksnail Moonlight Transmitters(4K recording support VTX) |
| 2 | Avatar_Sky_xx.xx.xx.img | All Walksnail Avatar transmitters (VTX) except Walksnail Moonlight |
| 3 | AvatarMini_Sky_xx.xx.xx.img | Walksnail Avatar Mini 1s Transmitter (VTX) before version 28 |
How to upgrade goggles/VRX
Make sure the battery is fully charged before starting the upgrade. If power is lost during a firmware update, the update will fail and the device will stop working.
- Prepare an empty microSD card and format it in exFAT format. Using the Goggles/VRX [Settings]-[Record Set]-[Format SD Card] menu allows you to format the microSD card set in the Goggles/VRX.
- Using a computer, store the firmware file in the root directory of the prepared microSD card.
- Insert the microSD card into microSD card slot of goggles/VRX and turn on the goggles/VRX.
- Once the goggles/VRX have booted, press Link button for at least 8 seconds.
- The goggles/VRX screen will then go black, a single beep will sound, and the update will begin. Release your finger from Link button.
- After a while, the goggles/VRX will begin to beep repeatedly. The update takes a minimum of tens of seconds to a maximum of about 10 minutes.
- After the final long beep, the beeping will stop and the goggles/VRX will reboot when the update is finished.
- After the goggles/VRX has restarted, do [Settings]-[Device]-[Reset All] from the menu. Then redo the necessary settings such as binding with VTX and specifying the channel number.
- Goggles/VRX firmware version can be checked by selecting [Settings]-[Device]-[Device Info] from the menu. You can check the firmware version in the "Goggle SW Version" column.
How to upgrade VTX
Make sure the battery is fully charged before starting the upgrade. If power is lost during a firmware update, the update will fail and the device will stop working. Also, please cool down the VTX (drone) with a small fan while updating the firmware.
- Connect the VTX (drone) to your computer with dedicated USB cable that comes with the VTX, and connect battery to VTX (drone).
-
Then a USB memory drive will appear on your computer, so store the firmware file here.
When upgrading Walksnail Avatar Mini 1s transmitter from version 28 or earlier, change the name of the firmware file from "Avatar_Sky_xx.xx.xx.img" to "AvatarMini_Sky_xx.xx.xx.img" before storing. Otherwise, it will be judged as unmatch firmware file (LED turn solid red) and firmware cannot be updated. - Next, remove the VTX (USB memory drive) from your computer.
- After confirming that the VTX LED is flashing green or is constantly lit green (when bound with goggles), press Link button for at least 8 seconds.
-
Then the LED will turn off once and the update will start. LED flashes red during the update.
The update takes a minimum of tens of seconds to a maximum of about 10 minutes.
However, if you have stored a firmware file that does not match your device, the LED will turn solid red. In this case, remove the VTX (drone) battery and start over. - The update is complete when the LED flashes green or changes to solid green.
- VTX firmware version can be checked by selecting [Settings]-[Device]-[Device Info] from the bound goggles/VRX menu. You can check the firmware version in the "TX SW Version" column.
Setting the OSD Display
Not only immediately after assembling your drone, but also when updating firmware of the FC, it is necessary to redo the settings related to OSD display. Otherwise, OSD screen will not be displayed on the screen of goggles/VRX. Here, I will explain the setting method when using Betaflight (Ver.4.4) for FC firmware.After setting, click "Save and Reboot" at the bottom right of the screen.
"set osd_displayport_device=MSP"
"set vcd_video_system=HD"
"save"
. Alternatively, if you enter "Avatar" in the search box on "Presets" screen, you will find the presets shown on the right. You may apply this.
After setting, click "Save and restart" at the bottom right of the screen.
Change OSD font
Download the "FC osd fonts update" from Caddx download page and follow the included instructions "ReadMe.txt".Open "font_update.ini" included in "FC osd fonts update" with a text editor, etc., and change it as necessary. Then store this "font_update.ini" and font file (.png) in microSD card and set it in the goggles/VRX. Start Goggles/VRX and select [Settings]-[Display]-[Font Update] to write font files to FC. Next, select [Settings]-[Display]-[Custom Font] and select "user_ardu" or "user_bf" to switch the font. Also, specifying this switches [Settings]-[Display]-[Custom OSD] to "Custom".
Font files are prepared for ArduPilot and betaflight. If you change this image file with a drawing tool, you can set the original font.
| No | name | apply |
|---|---|---|
| 1 | user_ardu_24.png | Font for ArduPilot with screen resolution of 720p |
| 2 | user_ardu_36.png | Font for ArduPilot with screen resolution of 1080p |
| 3 | user_bf_24.png | Font for betaflight with screen resolution of 720p |
| 4 | user_bf_36.png | Font for betaflight with screen resolution of 1080p |
Connect Goggles/VRX to TV/Computer: Use as webcam
The HDMI output connector of Walksnail avatar goggles/VRX is Mini-HDMI(HDMI Type-C). A commercially available Mini HDMI to HDMI conversion cable (Amazon.com) allows you to connect to a standard HDMI (HDMI Type-A) input such as a TV.
Also, if you connect a device called " HDMI Capture Board (Amazon) " that has an HDMI connector for input and a USB connector for output to your computer, you can use the goggles/VRX as a web camera for your computer. And you can use software such as Zoom, teams, and YouTube to distribute it online.
When using an HDMI capture board, first connect the goggles/VRX and the HDMI capture board, turn on the power of the goggles/VRX, and finally connect the HDMI capture board to the computer.
Please see the following page for details.
Walksnail Avatar VRX specifications
| item | description |
|---|---|
| Model | Avatar FPV VRX |
| Communication Frequency | 5.725 - 5.850 GHz |
| Transmitter Power (EIRP) | FCC : < 30 dBm CE : < 14 dBm SRRC : < 20 dBm MIC : < 25 dBm |
| I/O Interface | HDMI, micro SD card slot, DC 5.5x2.1mm |
| HDMI Out | 1080p/60fps, 720p/100fps, 720p/60fps |
| Power Input | 7 - 25.2V (2S - 6S) |
| SD Card | Support up to 256GB |
| System | Avater HD system |
| Dimention | 114mm x 55mm x 22mm |
| Weight | 83g |
| item | description |
|---|---|
| Model | Red bird |
| Polarization | LHCP |
| Bandwidth | 5.6 GHz - 6.0 GHz |
| Average Gain | 1.9 dBi |
| Radiation Efficiency | => 97% |
| VSWR | =< 1.3 |
| Cross-Polar Rejection | -15 - 30 dB |
| Connector | RP-SMA |
| Dimention | H24.8mm x R15.3mm |
| Weight | 4.2g |
| item | description |
|---|---|
| Model | Built-in antenna |
| Polarization | LHCP |
| Bandwidth | 5.6 GHz - 6.0 GHz |
| Average Gain | 7.6 dBi |
| HPBW | 90°H plane + 90°E plane |
| VSWR | < 1.5 |
| Input Impedance | 50Ω |
| Dimention | 35mm x 35mm x 7mm |