


 How to use DIPS-REG (drone registration system) / How to get registration ID
In Japan, Drones with a takeoff weight of 100g (0.22lb) or more, including batteries, must be registered in "DIPS-REG (Drone/UAS Information Platform System)" operated by Ministry of Land, Infrastructure, Transport and Tourism of Japan (MLIT) to obtain "registration ID" and indicate it on the aircraft.
This system came into effect on June 20, 2022.
このページを日本語で見る
Table of contents
- What is the registration system for unmanned aerial vehicles?
- Overview of registration procedure
- Manufacturer name can be specified as "Manufactured UA"
- Get an account for DIPS-REG
- Log in to DIPS-REG
- Register a new drone
- Pay the application fee
- Confirm examination result / Obtain registration ID
- Register "Amateur-Built UA/Others"
- Related links
What is the registration system for unmanned aerial vehicles?
This system was established in November 2021 by MLIT Japan to keep track of owner information of unmanned aerial vehicles. All procedures are completed online from DIPS-REG (Drone/UAS Information Platform System) (MLIT) operated by MLIT. Registration in English is also possible.Registration must be done for each drone aircraft (multiple applications can be made at the same time), and must be indicate "registration ID" on the aircraft obtained by registration. The target is all unmanned aerial vehicles that weigh 100g or more including battery (excluding weight of removable accessories other than battery). However, registration is not required when flying only indoors. This system came into effect on June 20, 2022. Registration is already available from December 20, 2021.
Validity period
The validity period is 3 years from new registration, and if you want to use the drone after that, you need to complete renewal procedure. If you renew from one month before the expiration date to the expiration date, expiration date will be extended by 3 years. If you renew earlier than this, it will be treated as a "change" and expiration date will be 3 years from that renewal date.
Registration fee
The fee required for registration varies depending on the method of identity verification, 900 yen (about USD8.00) when using "My Number Card (for Japanese citizen only)" online (890 yen after the second aircraft), and 1,450 yen (about USD13.00) when using "driver's license" or "passport" online (1,050 yen after the second aircraft), and 2,400 yen (about USD21.00) by "mailing documents" (2,000 yen after the second aircraft). You can pay by credit card, ATM, or online banking. The fee is the same for new registrations and renewals.
In addition, the "after the second aircraft" charges apply only when multiple aircraft are registered at the same time in one application. Even if the owner is the same, if you apply in two batches, both will be treated as the "first aircraft".
However, non-Japanese citizens can only use a "passport" for identity verification, and only a credit cards can be used for payment on the English web site.
Information required for registration
Registration requires information such as owner's name, reading (phonetic spelling of name), address, date of birth, phone number, email address, as well as drone manufacturer's name, UA model(product name), and serial number. For self-made aircraft or those that do not have a serial number, such as FPV drones / racing drones , you will also need to enter aircraft weight, maximum takeoff weight, dimensions, and aircraft image.
For self-made products, manufacturer name, product name, and serial number can be set by the applicant (owner). For example, material provided by MLIT (Japanese PDF) give following examples. The manufacturer name shall be the name of the person who made or set up, the UA model shall be the manufacturer's surname + number, and the serial number shall be the manufacturer's initials 2 letters + year of manufacture + alphanumericals. The serial number must be within 20 digits of the combination of uppercase letters and numbers.
 For DJI drones that use
DJI Mini 3 / DJI Mini 3 Pro Drone Description and Specifications
DJI Mini 2 instructions. 4K aerial video mini drone weighing 249g
DJI Mavic Mini / 2.7K aerial video mini drone weighing 249g
Install remote ID function
Aircraft registered in "DIPS-REG (drone registration system)" after June 20, 2022 are required to be equipped with remote ID function (a function to wirelessly broadcast registration ID, etc. to the surroundings). The flight method will be restricted without remote ID function. In other words, it is only permitted to fly over the area notified to MLIT after taking necessary measures, or to fly while moored on the ground with a wire.
However, aircraft registered by June 19, 2022 was exempt from installing this remote ID function. The above restrictions do not occur. See below for details.
How to indicate "registration ID"

Related information
Information on these registrations is detailed in Unmanned aerial vehicle registration procedure (Japanese PDF:MLIT) e.t.c. . But unfortunately, English documentations are poorly maintained.
Unmanned aerial vehicle registration system (Japanese:MLIT)
Unmanned aerial vehicle registration procedure (Japanese PDF:MLIT)
Frequently asked questions (PDF:MLIT)

With FPV drone / Racing drone and small, lightweight FPV drone camera, you can make a 4K video aerial drone with a takeoff weight of less than 100 grams . You can enjoy flying without being restricted by the new rules shown above.
Overview of registration procedure
All registration procedures are completed online. Do it in the following order.- Get an account for the DIPS-REG (drone registration system). Register owner information here.
- Log in to the DIPS-REG and complete the new drone registration procedure. Register identity verification information, owner information, aircraft information, and user information. The initial values of owner information and user information are copied from the account information.
- Pay the registration fee. With credit card, this can be done online from the DIPS-REG.
- When the examination is over, you will receive an email, so check your "registration ID". This is also confirmed from the DIPS-REG.
Manufacturer name can be specified as "Manufactured UA"
As of February 2022, manufacturer names that can be specified as "Manufactured UA" are as follows. If you want to register products from other manufacturers, you need to register them as "Amature-Buil UA/Others" .ACSL Ltd. , Aero G Lab , Aero Japan Corporation , Aerosense Inc. , AileLinX,inc. , Autel Robotics , Autonomous Control Systems Laboratory Ltd. , DENSO Corporation , DJI , DJI/KUBOTA Corporation , DJI/TOPCON , Drone shop URANIA , DroneWorkSystem Co.,Ltd. , EAMS ROBOTICS CO LTD , FLIGHTS Inc. , Freefly Systems , G-Force Inc , GoPro Inc , IRAP , KYOSHO Corporation , Maruyama , Mazex Co.,Ltd. , NTT e-Drone Technology , Nileworks , PRODRONE , PowerVision , ROBOTIX JAPAN Co.,Ltd. , Skydio Inc. , SkymatiX Inc. , Sony Group Corporation , SpiralTech Co.,Ltd. , TEAD CO.,LTD. , Teledyne FLIR , Thunder TIGER Corp. , Toko Tekko Co.,LTD. , TokyoDronePlus , XAG CO.,LTD. , YOSHIMURA.WORKS , Yamaha Motor Co.,Ltd , enRoute Co.,Ltd. ,
Get an account for DIPS-REG
If you don't have an account for DIPS-REG yet, get one first. Open
DIPS-REG (MLIT)
. Then you will see a screen like this.
Open
DIPS-REG (MLIT)
. Then you will see a screen like this.
Click "Login and account creation".
DIPS-REG (drone registration system)
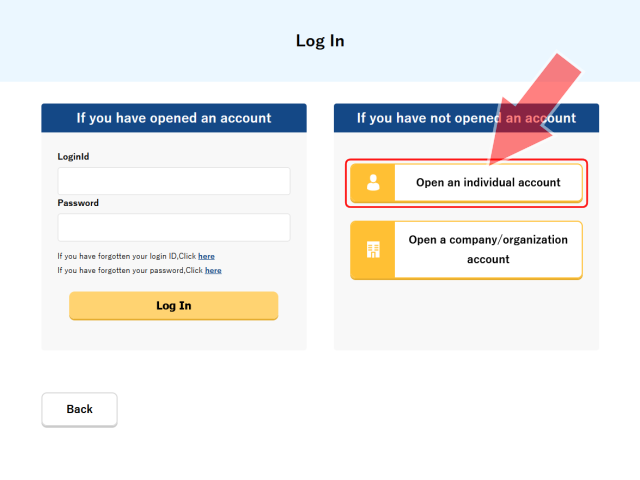 Click "Open an individual account".
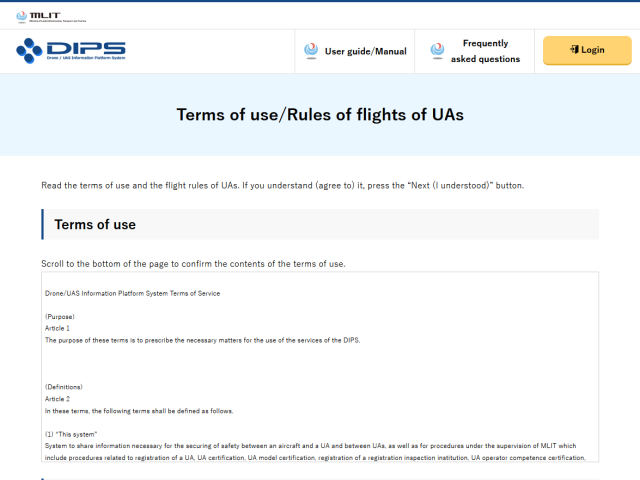 First of all, you will be asked to confirm the terms of use and the rules of flights of unmanned aerial vehicles.
Please scroll the screen to check the contents.
First of all, you will be asked to confirm the terms of use and the rules of flights of unmanned aerial vehicles.
Please scroll the screen to check the contents.
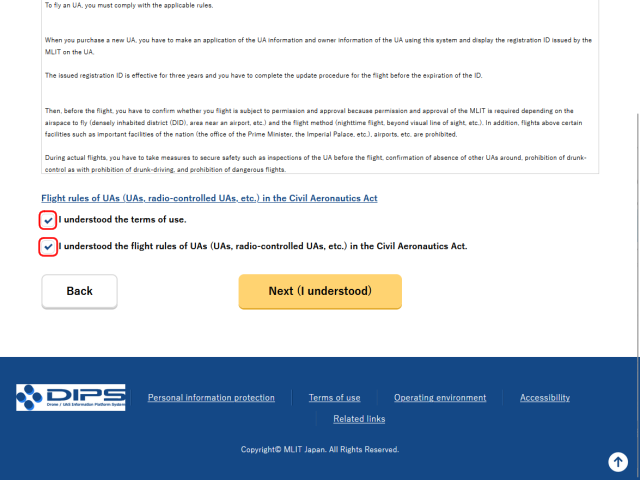 Scroll through both windows to see the terms of use and the rules for flying unmanned aerial vehicles.
Then check two checkboxes in this figure and click "Next".
You cannot check checkboxes unless you scroll windows to the end and click "Flight rules of UAs (UAs, radio-controlled UAs, etc.) in the Civil Aeronautics Act".
Scroll through both windows to see the terms of use and the rules for flying unmanned aerial vehicles.
Then check two checkboxes in this figure and click "Next".
You cannot check checkboxes unless you scroll windows to the end and click "Flight rules of UAs (UAs, radio-controlled UAs, etc.) in the Civil Aeronautics Act".
Drone flight rule in Japan and other countries
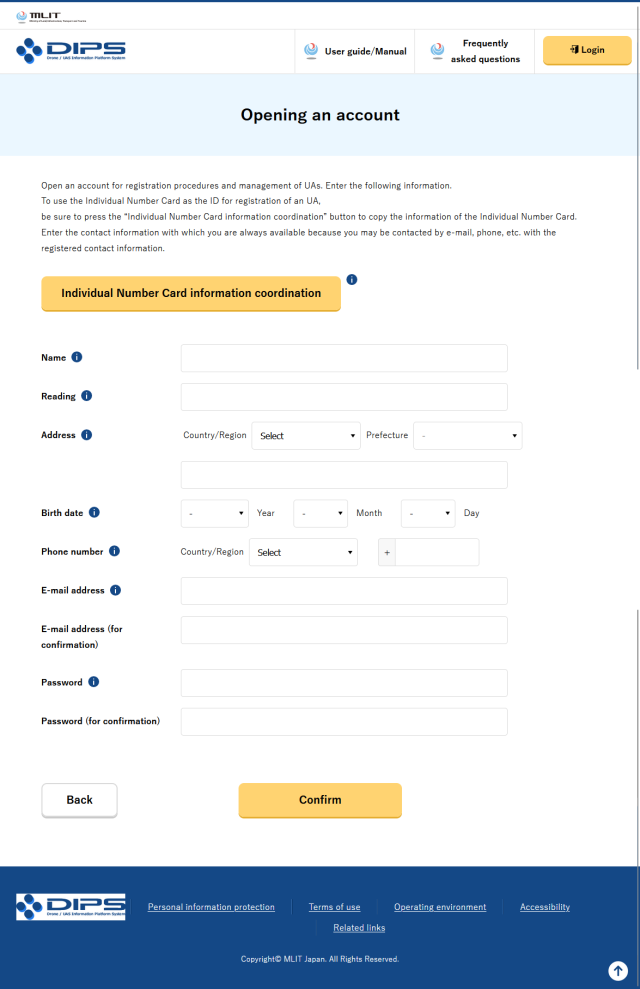 Next, the basic information input screen is displayed.
Click "i" mark on each item to display the details of the input method. Please refer to this explanation when entering.
Contact phone number and email address must be from a mobile device that you can contact while flying the drone.
Password created here will be required when logging in to DIPS-REG in the future. Please do not forget.
Unfortunately, in the "Reading" field, you need to enter the pronunciation of your name in Japanese KATAKANA. Please refer to this page and enter it.
How to get Japanese katakana and hiragana for alphabet pronunciation
| Name | Steve | Jobs | ||||||
|---|---|---|---|---|---|---|---|---|
| Convert to Roman letters representing readings (combinations of consonants and vowels) |
su | te | i | bu | jyo | bu | su | |
| Convert from Roman letters to KATAKANA | ス | テ | イ | ブ | ジョ | ブ | ス | |
How to get Japanese katakana and hiragana for alphabet pronunciation
 Next is the confirmation screen of the input contents.
If there are no problems, click "Open".
Next is the confirmation screen of the input contents.
If there are no problems, click "Open".
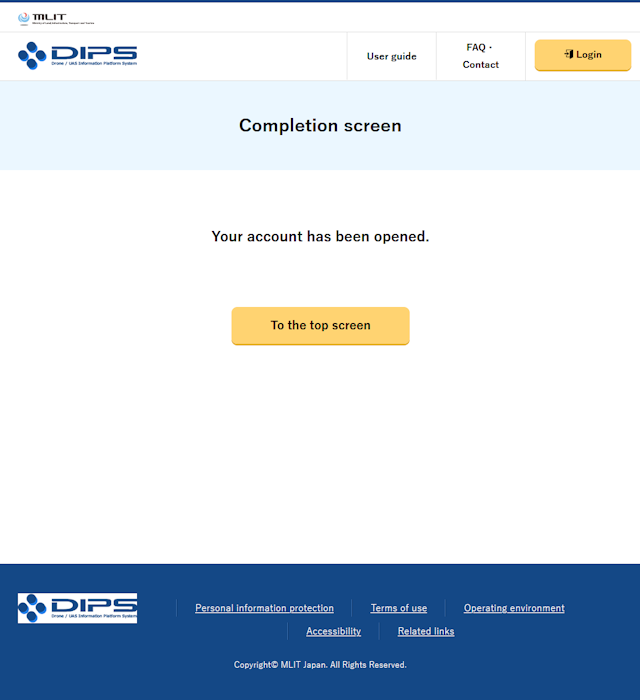 When you see a screen like this, your account registration is complete.
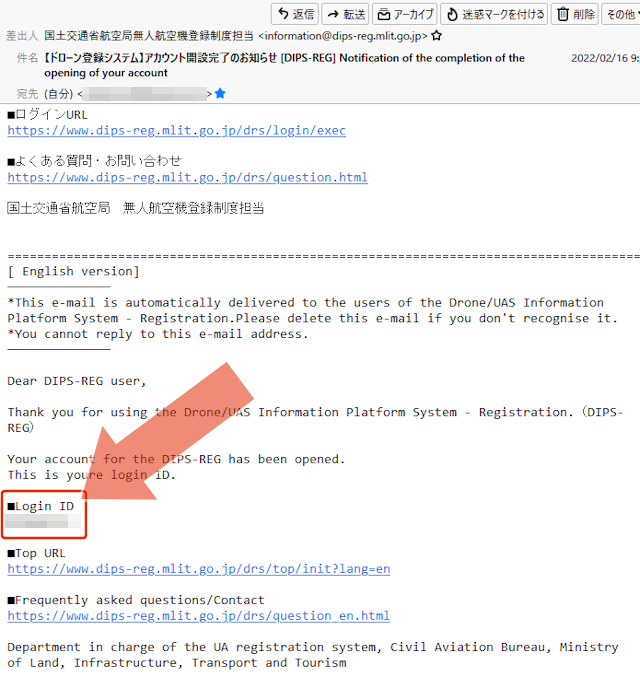 Then, an email with the title "Notification of the completion of the opening of your account" will be sent to the registered email address.
Your login ID is written in the body of the email.
The login ID written here will be required when logging in to DIPS-REG in the future.
Please do not forget.
Then, an email with the title "Notification of the completion of the opening of your account" will be sent to the registered email address.
Your login ID is written in the body of the email.
The login ID written here will be required when logging in to DIPS-REG in the future.
Please do not forget.
Log in to DIPS-REG
 Open
DIPS-REG (MLIT)
. Then you will see a screen like this.
Open
DIPS-REG (MLIT)
. Then you will see a screen like this.
Click "Log in" button.
DIPS-REG (drone registration system)
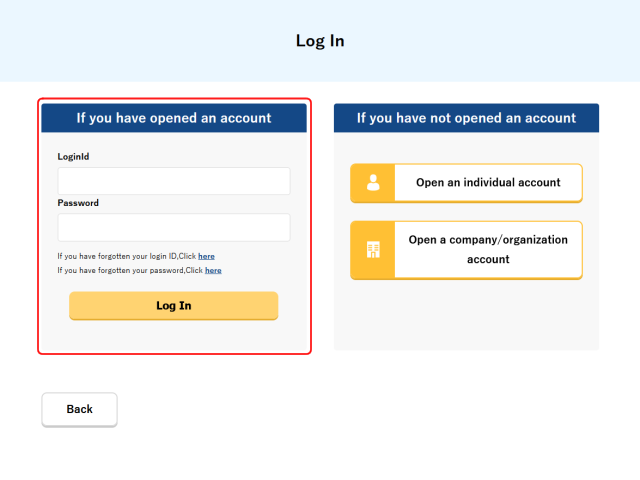 Enter your "Login ID" and "Password" in the "If you have opened an account" field on the left side of the screen, and click the "Log In" button.
For "Login ID", use the one written in "Notification of the completion of the opening of your account" email.
Not your email address. Please be careful.
Enter your "Login ID" and "Password" in the "If you have opened an account" field on the left side of the screen, and click the "Log In" button.
For "Login ID", use the one written in "Notification of the completion of the opening of your account" email.
Not your email address. Please be careful.
 If you successfully log in, your name will be displayed in the top right corner of the screen.
Click "Click here for registration application etc." button.
Or scroll this screen.
If you successfully log in, your name will be displayed in the top right corner of the screen.
Click "Click here for registration application etc." button.
Or scroll this screen.
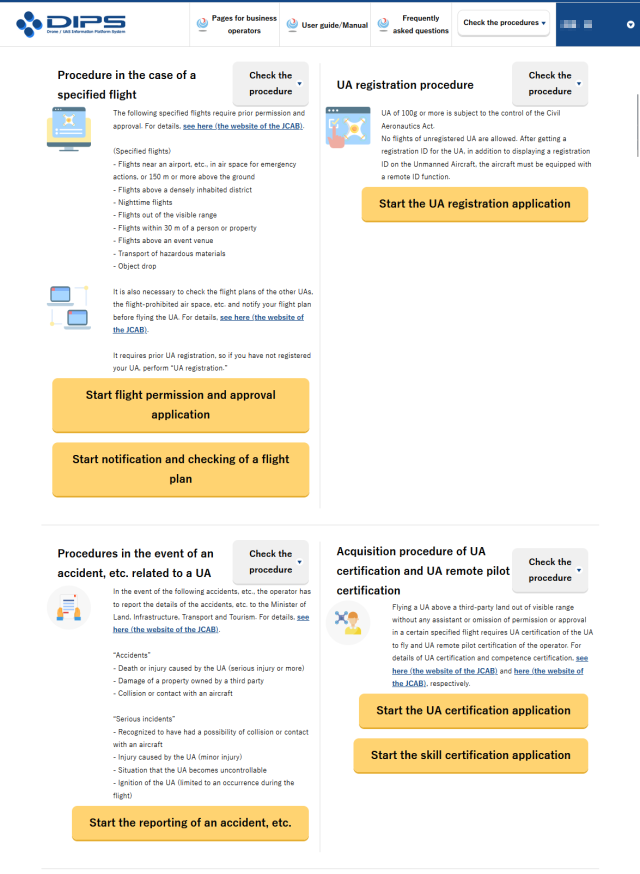 A menu like this will then be displayed.
To register a new aircraft, click the "Start the UA registration application" button at the top right of the screen.
A menu like this will then be displayed.
To register a new aircraft, click the "Start the UA registration application" button at the top right of the screen.
In addition, on this screen, you can also apply for "Specific Flights (flights outside the drone flight rules )" or apply for obtaining "UA certification" and "UA remote pilot certification" that are required when conducting some specific flights.
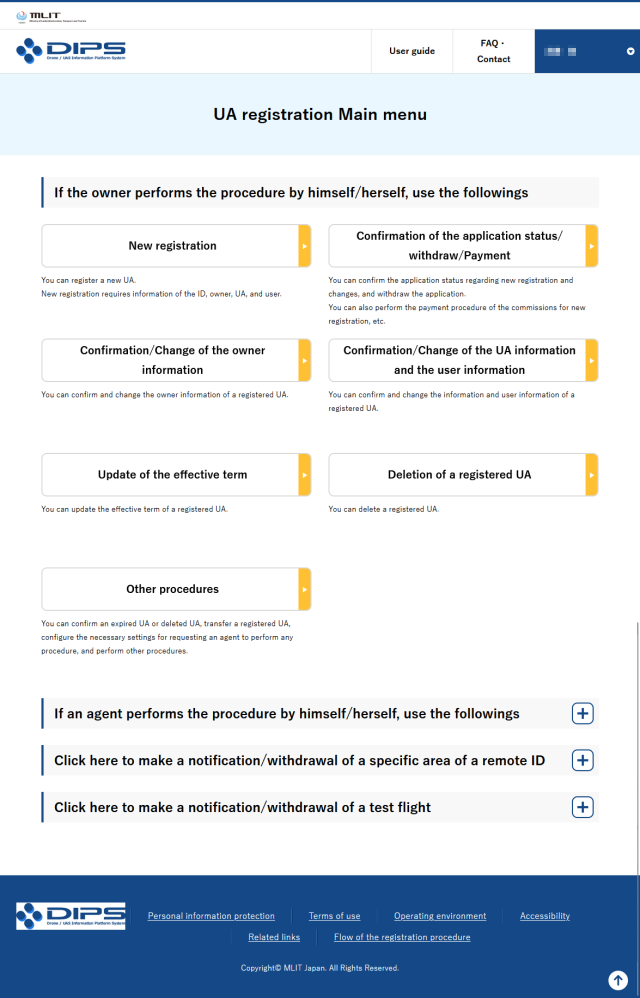 Next, a menu like this will be displayed.
To register a new aircraft, click the "New Registration" button at the top left of the screen.
Next, a menu like this will be displayed.
To register a new aircraft, click the "New Registration" button at the top left of the screen.
On this screen, you can also check the status and make payments after applying for registration, check and change owner/user/device information, update the application, etc.
Register a new drone
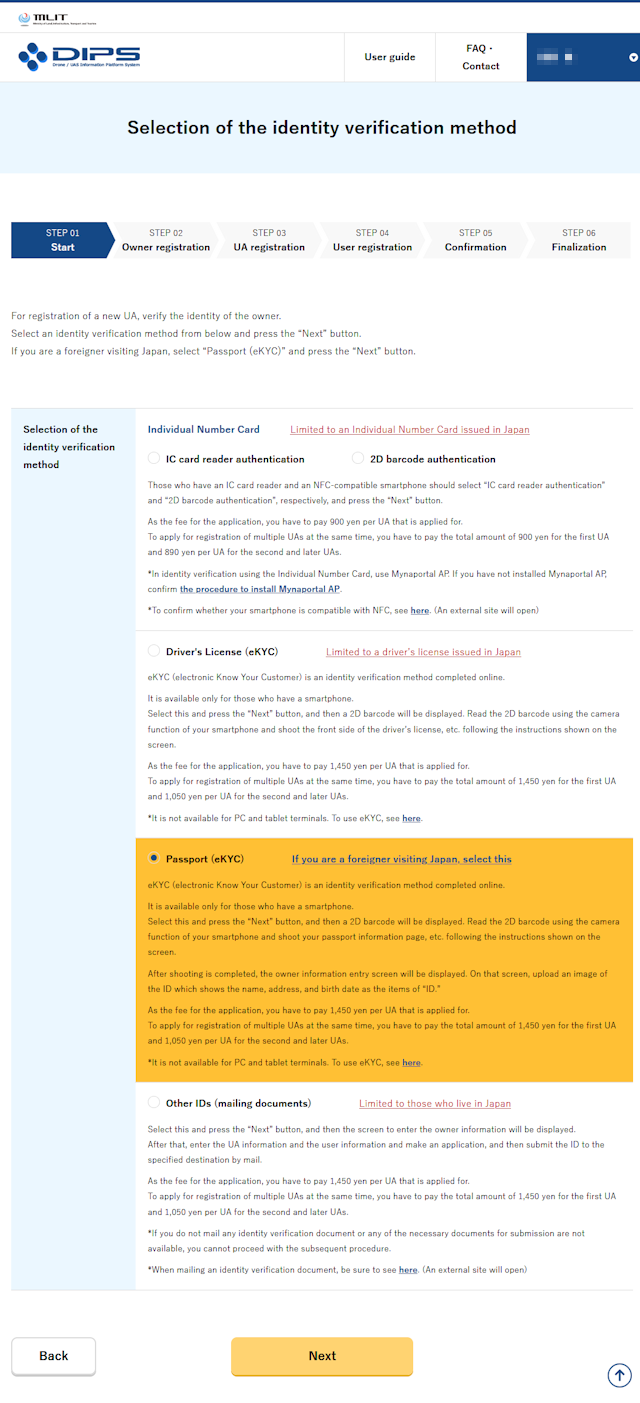 Click the "New Registration" button from the main menu to display this screen.
First select the method of identity verification.
Click the "New Registration" button from the main menu to display this screen.
First select the method of identity verification.
You can choose to show your "My Number Card," "driver's license," or "passport" online, or "mail documents."
Note: If you are not a Japanese citizen, you will need to select "Passport".
The fee required for registration varies depending on the method of identity verification, 900 yen (about USD8.00) when using "My Number Card" online (890 yen after the second aircraft), and 1,450 yen (about USD13.00) when using "driver's license" or "passport" online (1,050 yen after the second aircraft), and 2,400 yen (about USD21.00) by "mailing documents" (2,000 yen after the second aircraft).
Here, I will try to register online using a "Passport". Click the "○" to the left of "passport" to mark it, then click the "Next" button at the bottom of the screen.
 Then a new browser window will open with QR code.
Take a picture of this screen with your smartphone and scan the QR code.
Then a new browser window will open with QR code.
Take a picture of this screen with your smartphone and scan the QR code.
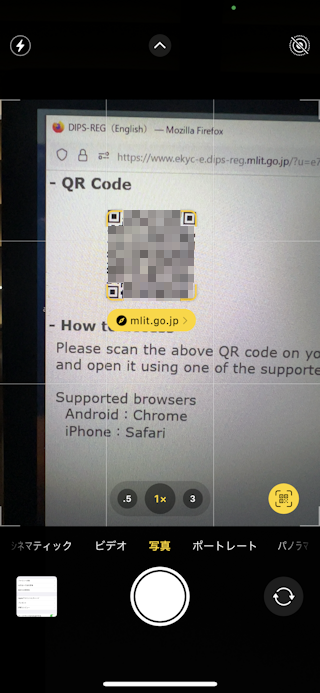 In case of iPhone, if you shoot with
How to read a QR code (two-dimensional bar code) with iPhone camera (Japanese)
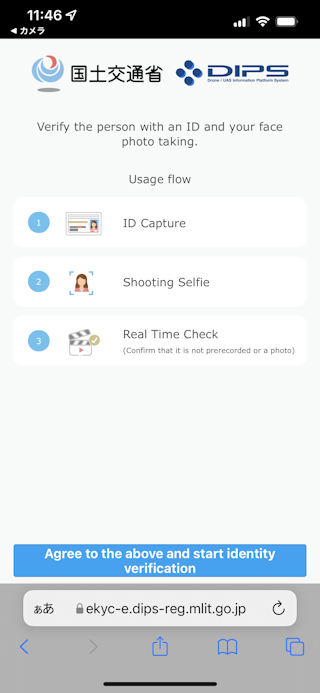 Then browser
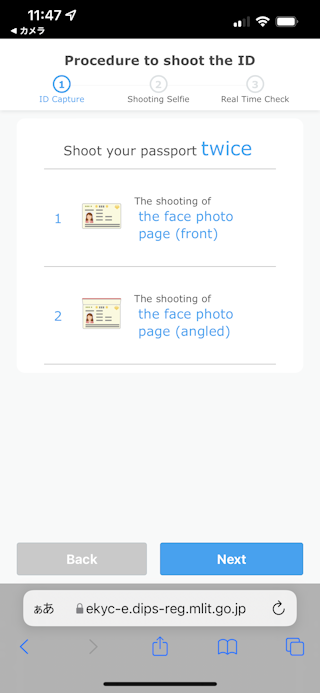 The screen looks like this.
This is a brief description of the shooting procedure.
Tap blue "Next" button.
The screen looks like this.
This is a brief description of the shooting procedure.
Tap blue "Next" button.
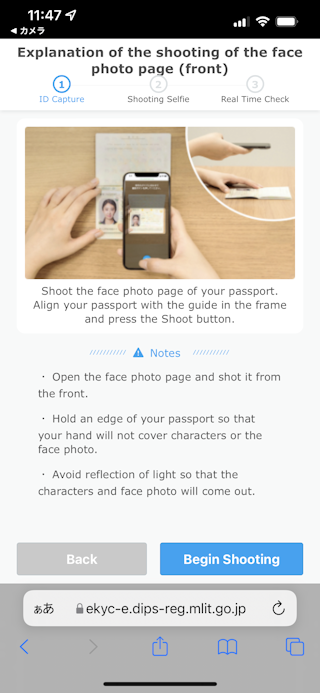 The first is to take a picture of the surface of "Passport".
An explanation of the shooting method is displayed.
After reading the explanation, tap blue "Begin shooting" button.
The first is to take a picture of the surface of "Passport".
An explanation of the shooting method is displayed.
After reading the explanation, tap blue "Begin shooting" button.
 Warning "Requesting access to the camera" is displayed.
Tap "Allow".
Warning "Requesting access to the camera" is displayed.
Tap "Allow".
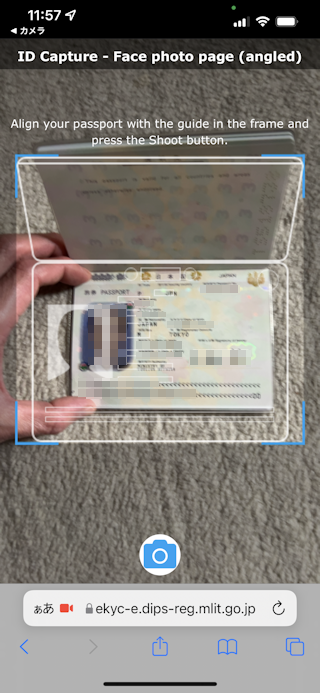
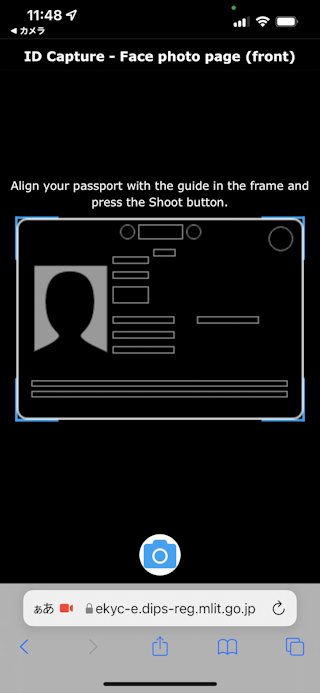 Then, the screen will switch to the camera screen, so hold your smartphone over your passport according to the guide on the screen.
Tap the camera icon at the bottom center of the screen to take a picture.
Then, the screen will switch to the camera screen, so hold your smartphone over your passport according to the guide on the screen.
Tap the camera icon at the bottom center of the screen to take a picture.
However, shooting is very difficult. The image will not be recognized unless it meets a number of conditions such as subject size, brightness, and reflection. In my case, I tried about 20 times while changing the location, and finally succeeded in shooting.
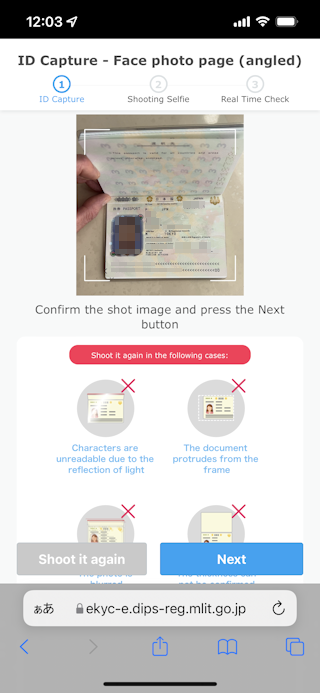
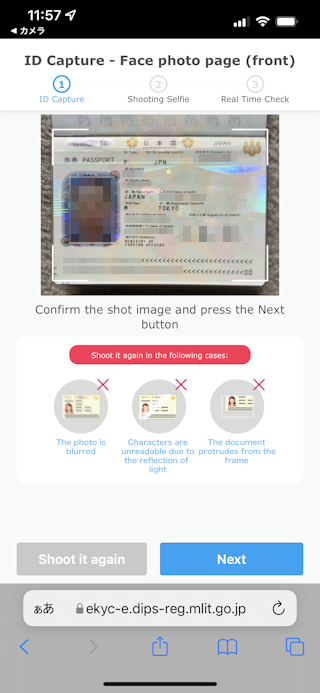 Your passport will be automatically recognized.
If there is no problem, tap blue "Next" button.
Your passport will be automatically recognized.
If there is no problem, tap blue "Next" button.
 Next is shooting from an oblique direction.
An explanation of the shooting method is displayed.
After reading the explanation, tap blue "Begin shooting" button.
Next is shooting from an oblique direction.
An explanation of the shooting method is displayed.
After reading the explanation, tap blue "Begin shooting" button.
 Then, the screen will switch to the camera screen, so hold your smartphone over your passport according to the guide on the screen.
Tap the camera icon at the bottom center of the screen to take a picture.
Then, the screen will switch to the camera screen, so hold your smartphone over your passport according to the guide on the screen.
Tap the camera icon at the bottom center of the screen to take a picture.
However, this shooting is very difficult too. In my case, I tried about 20 times again while changing the location, and finally succeeded in shooting.
 Your passport will be automatically recognized.
If there is no problem, tap blue "Next" button.
Your passport will be automatically recognized.
If there is no problem, tap blue "Next" button.
 Next is taking a photo of your face.
An explanation of the shooting method is displayed.
After reading the explanation, tap blue "Begin shooting" button.
Next is taking a photo of your face.
An explanation of the shooting method is displayed.
After reading the explanation, tap blue "Begin shooting" button.
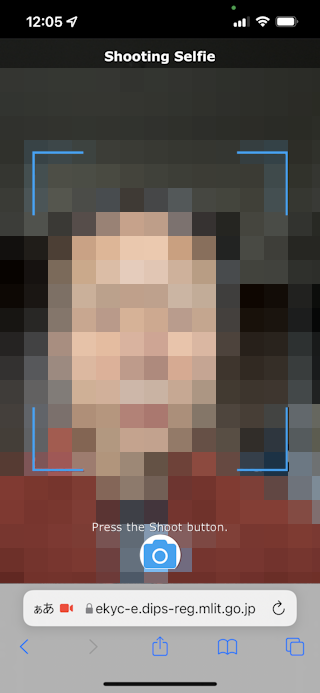 Then you will see a screen like this.
Align your face with the frame and tap the camera icon at the bottom center of the screen to take a picture.
Then you will see a screen like this.
Align your face with the frame and tap the camera icon at the bottom center of the screen to take a picture.
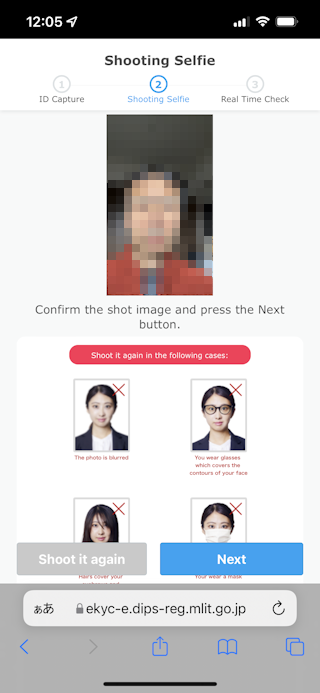 The shooting result is displayed.
If there is no problem, tap blue "Next" button.
The shooting result is displayed.
If there is no problem, tap blue "Next" button.
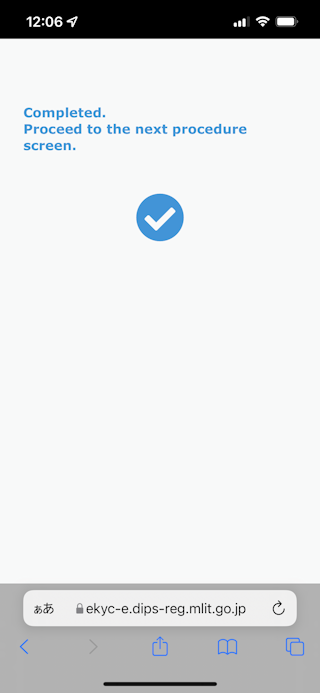 When you see a screen like this, your identity verification documents are ready.
From here on, you don't need a smartphone.
You can close the browser on your smartphone.
When looking at the original (computer) browser screen ...
When you see a screen like this, your identity verification documents are ready.
From here on, you don't need a smartphone.
You can close the browser on your smartphone.
When looking at the original (computer) browser screen ...
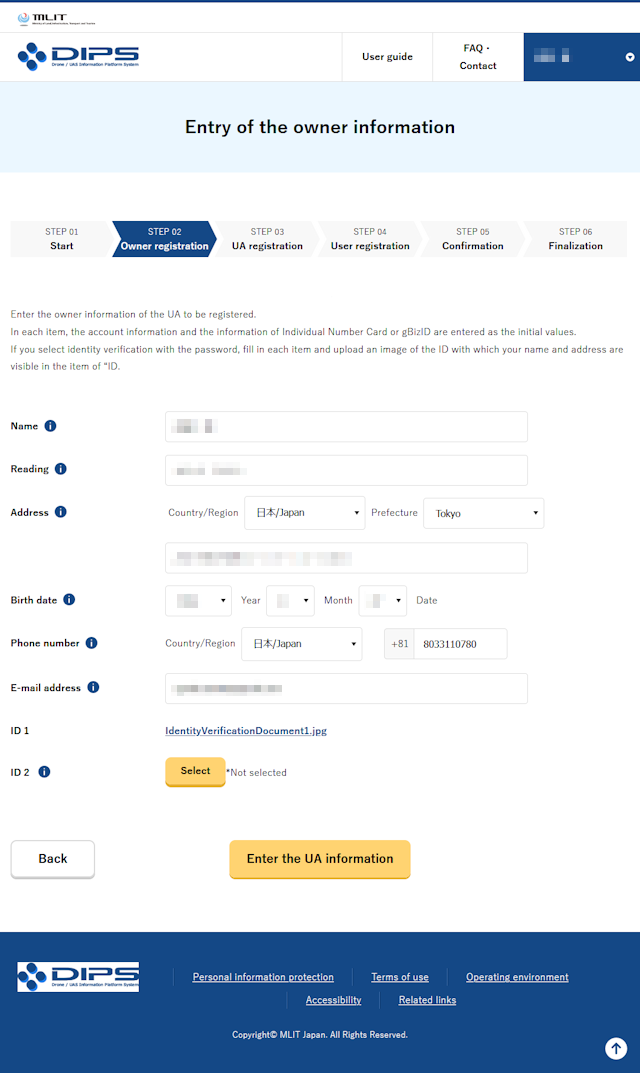 The screen has changed to the input screen for owner information of drone to be registered.
The contents of the account information have been copied here.
If there is no problem, click yellow "Enter the UA information" button.
The screen has changed to the input screen for owner information of drone to be registered.
The contents of the account information have been copied here.
If there is no problem, click yellow "Enter the UA information" button.
 When you select passport as identity verification document, you will need to submit another image of document with your name, address, and birthday on it.
For example, you can use an international driver's license or your own country's driver's license.
It is necessary to upload images in PDF, JPEG, PNG format of 2MB or less.
When you select passport as identity verification document, you will need to submit another image of document with your name, address, and birthday on it.
For example, you can use an international driver's license or your own country's driver's license.
It is necessary to upload images in PDF, JPEG, PNG format of 2MB or less.
Click the "Select" button in the "ID2" field to select the image of the document saved on your computer.
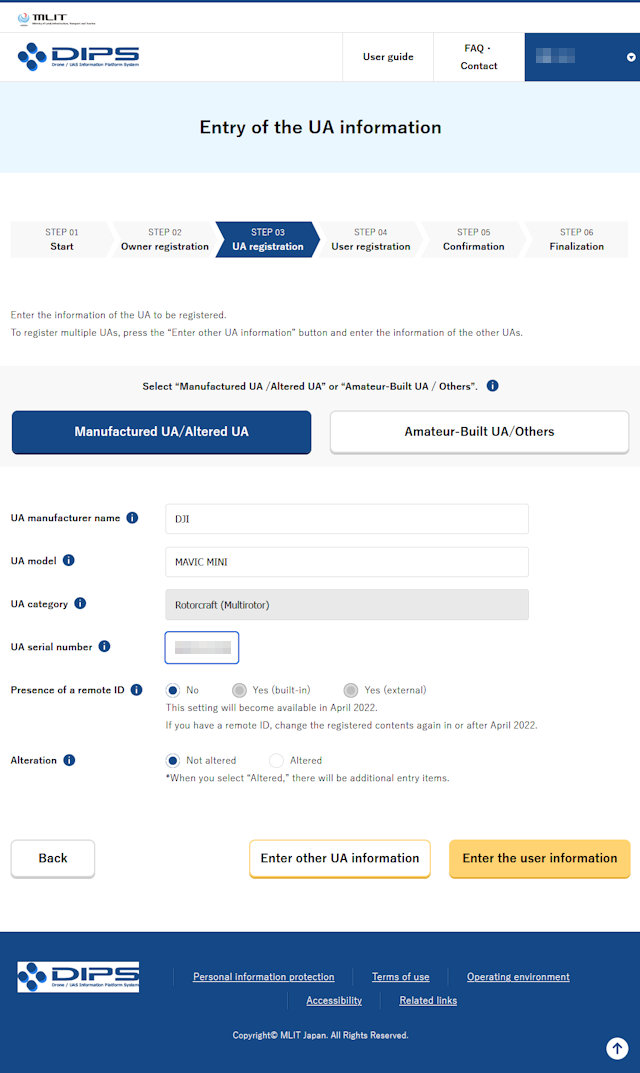 Enter information of drone to be registered here.
To register a commercial product, click "Manufactured UA/Altered UA" button.
Select "UA manufacturer name" and "UA model" from the drop-down list.
Then, "Aircraft type" will be set automatically.
Enter information of drone to be registered here.
To register a commercial product, click "Manufactured UA/Altered UA" button.
Select "UA manufacturer name" and "UA model" from the drop-down list.
Then, "Aircraft type" will be set automatically.
For "UA serial number", omit symbol characters from the serial number provided by manufacturer or written on the aircraft, and enter by only half-width alphanumerical.
After entering all the items, click yellow "Enter the user information" at the bottom right of the screen.
Click "i" mark on each item to display the details of the input method. Please refer to this explanation when entering.
The input method for each of these items is explained in detail in Unmanned aerial vehicle registration procedure (Japanese PDF:MLIT) .
Unmanned aerial vehicle registration procedure (Japanese PDF:MLIT)
If the manufacturer name of your drone does not appear in "UA manufacturer name" field on the above screen, or if you want to register your own build aircraft such as FPV drones / racing drones , select "Amateur-Built UA/Others". See Register "Amateur-Built UA/Others" for more information.
Register "Amateur-Built UA/Others"
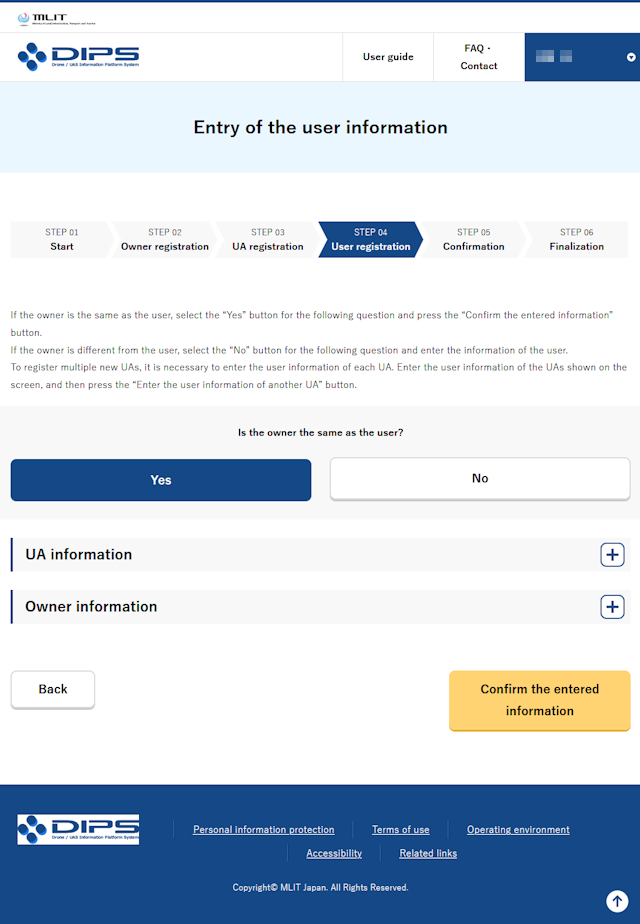 Next, register the drone user information.
If the owner and user are the same, click blue "Yes" button and then yellow "Confirm the entered information" button.
Next, register the drone user information.
If the owner and user are the same, click blue "Yes" button and then yellow "Confirm the entered information" button.
 If owner and user are different, click "No" button on the screen above and enter the user information.
Items required for user information are name, reading, address, telephone number, and email address.
No identity verification documents are required.
If owner and user are different, click "No" button on the screen above and enter the user information.
Items required for user information are name, reading, address, telephone number, and email address.
No identity verification documents are required.
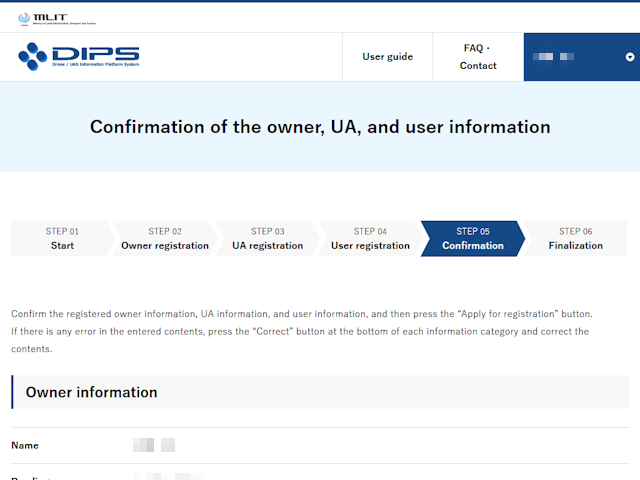 Then a screen like this will appear, and you can check the information you have entered so far.
Please review if there are any mistakes.
If you scroll this screen ...
Then a screen like this will appear, and you can check the information you have entered so far.
Please review if there are any mistakes.
If you scroll this screen ...
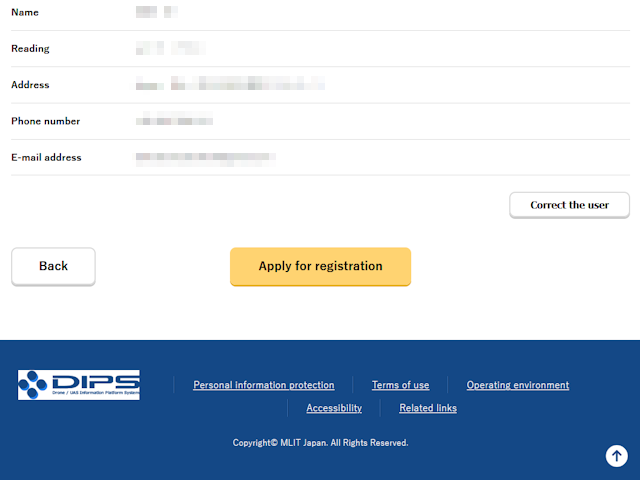 The yellow "Apply for registration" button will appear.
Click this if you are satisfied.
The yellow "Apply for registration" button will appear.
Click this if you are satisfied.
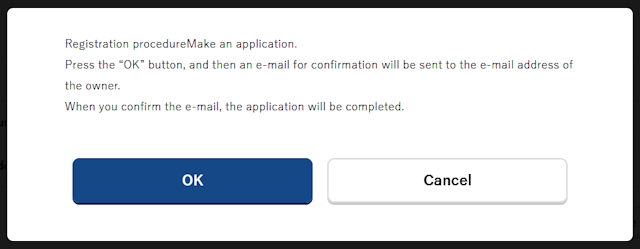 The screen changes like this.
Click blue "OK" button.
The screen changes like this.
Click blue "OK" button.
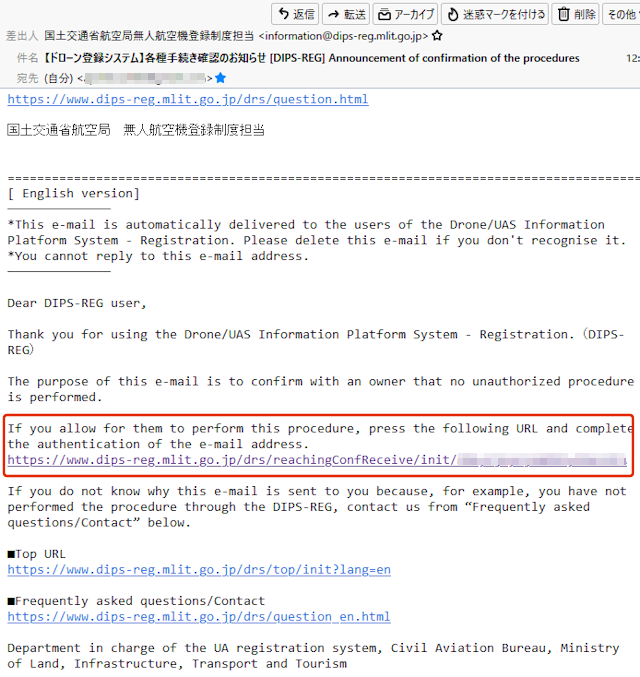 Then, an email with the title "Announcement of confirmation of the procedures" will be sent to the registered email address.
Click the confirmation URL written in the body of the email to complete the registration.
Then, an email with the title "Announcement of confirmation of the procedures" will be sent to the registered email address.
Click the confirmation URL written in the body of the email to complete the registration.
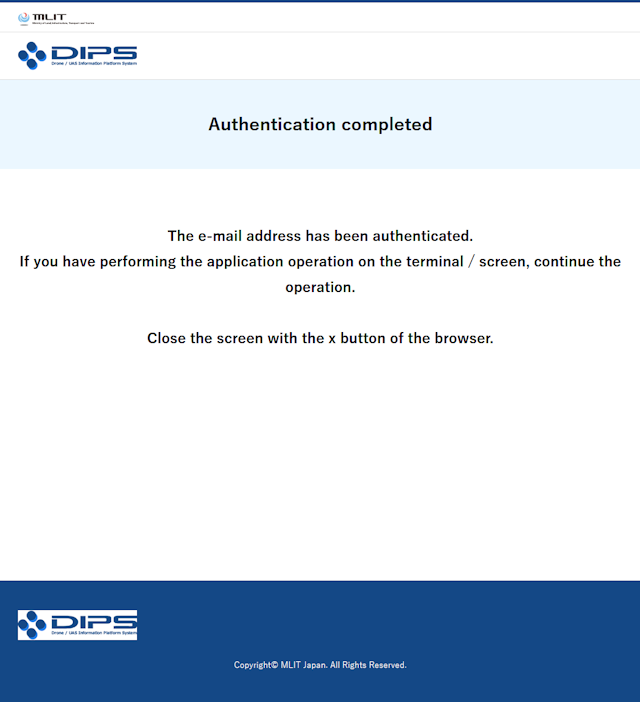 Looking at the screen of the original browser, it looks like this.
You can close this screen.
Looking at the screen of the original browser, it looks like this.
You can close this screen.
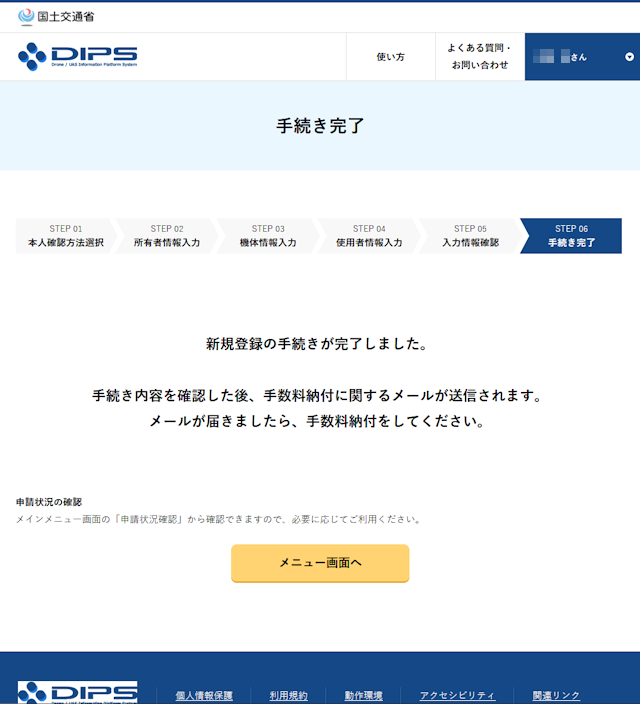 The screen of the first browser looks like this.
Click the "Go to Menu Screen" button to return to the menu.
Then wait for an email to inform you of the payment of the fee.
The screen of the first browser looks like this.
Click the "Go to Menu Screen" button to return to the menu.
Then wait for an email to inform you of the payment of the fee.
Pay the application fee
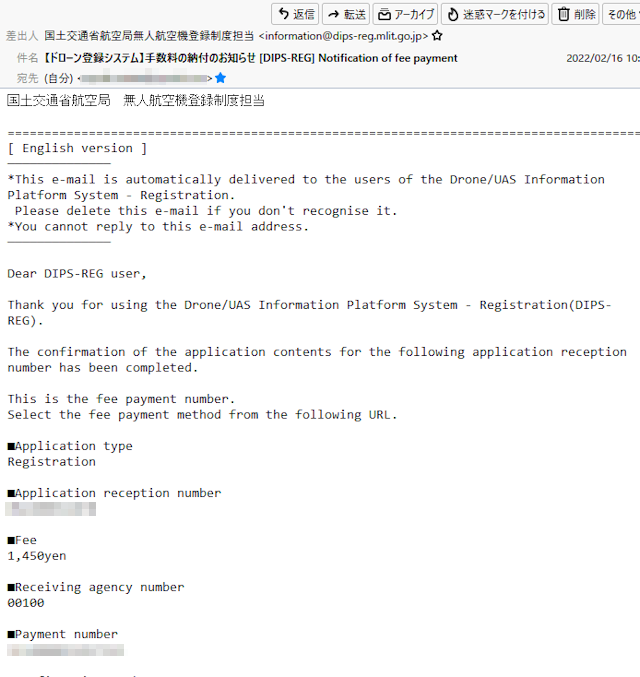 Once you have confirmed your application, you will receive an email with the title "Notification of fee payment".
This time, I received this email about 12 minutes after the application procedure was completed (when apply on weekdays).
If you apply on weekend, confirmation will end after Monday.
Once you have confirmed your application, you will receive an email with the title "Notification of fee payment".
This time, I received this email about 12 minutes after the application procedure was completed (when apply on weekdays).
If you apply on weekend, confirmation will end after Monday.
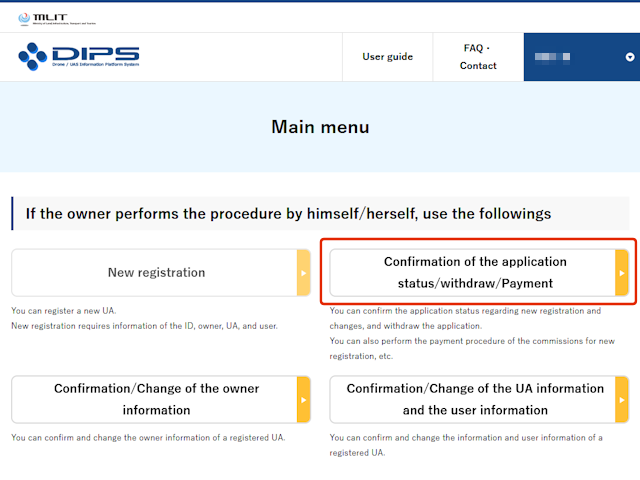 To process the payment, log in to
DIPS-REG (MLIT)
and click "Confirmation of the application status / withdraw / Payment" button from the main menu.
To process the payment, log in to
DIPS-REG (MLIT)
and click "Confirmation of the application status / withdraw / Payment" button from the main menu.
DIPS-REG (drone registration system)
 A list of application status is displayed.
If "Application status" field indicates "Fees Payment", you can proceed to the payment procedure.
Click "Payment" button.
A list of application status is displayed.
If "Application status" field indicates "Fees Payment", you can proceed to the payment procedure.
Click "Payment" button.
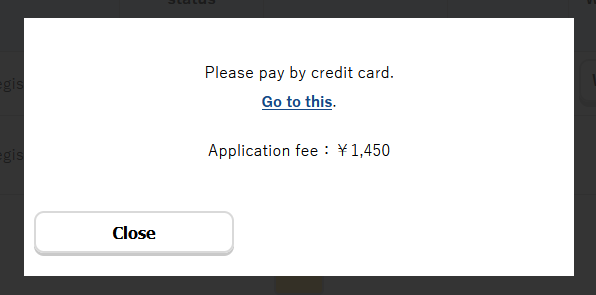 Then you will see a screen like this.
Select the payment method from "credit card", "ATM", and "Internet banking".
However, only credit card payments can be used on English page.
Click "Go to this".
Then you will see a screen like this.
Select the payment method from "credit card", "ATM", and "Internet banking".
However, only credit card payments can be used on English page.
Click "Go to this".
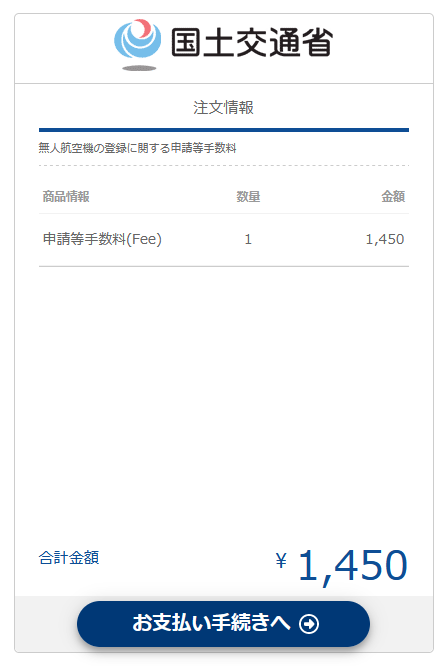 Then you will see a screen like this.
Click where it says "お支払い手続きへ (Go to payment procedure)" at the bottom blue area.
Then you will see a screen like this.
Click where it says "お支払い手続きへ (Go to payment procedure)" at the bottom blue area.
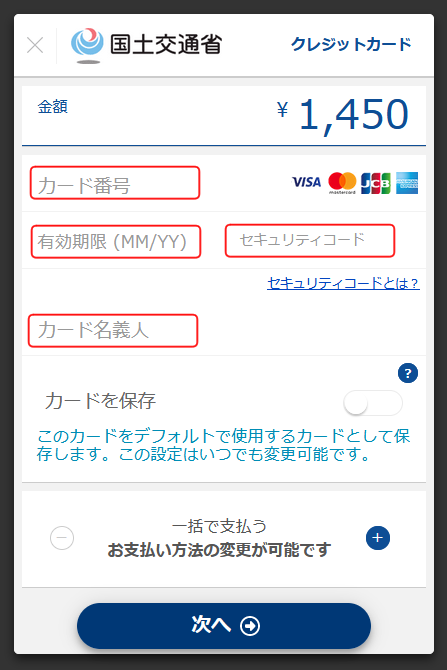 Enter your credit card number at "カード番号" field, expiration date (MM / YY) at "有効期限" field, and security code at "セキュリティコード" field.
The payment method is set to "一括で支払う (Pay in one lump sum)", but you can change it.
By clicking the "+" and "-" buttons, you can change to "ボーナス一括払い (bonus lump sum payment)", "リボルビング払い (revolving payment)", and "3回払い (3 installments)".
Then click "次へ (Next)" at the bottom blue area.
Enter your credit card number at "カード番号" field, expiration date (MM / YY) at "有効期限" field, and security code at "セキュリティコード" field.
The payment method is set to "一括で支払う (Pay in one lump sum)", but you can change it.
By clicking the "+" and "-" buttons, you can change to "ボーナス一括払い (bonus lump sum payment)", "リボルビング払い (revolving payment)", and "3回払い (3 installments)".
Then click "次へ (Next)" at the bottom blue area.
 Then, confirmation screen is displayed.
After confirming the contents, click "この内容で支払う (Pay with this contents)" at the bottom blue area.
Then, confirmation screen is displayed.
After confirming the contents, click "この内容で支払う (Pay with this contents)" at the bottom blue area.
 If you see a screen like this, payment is complete.
Click "完了 (Finish)" at the bottom blue area.
If you see a screen like this, payment is complete.
Click "完了 (Finish)" at the bottom blue area.
 Then you will see a screen like this.
This window can be closed.
Then you will see a screen like this.
This window can be closed.
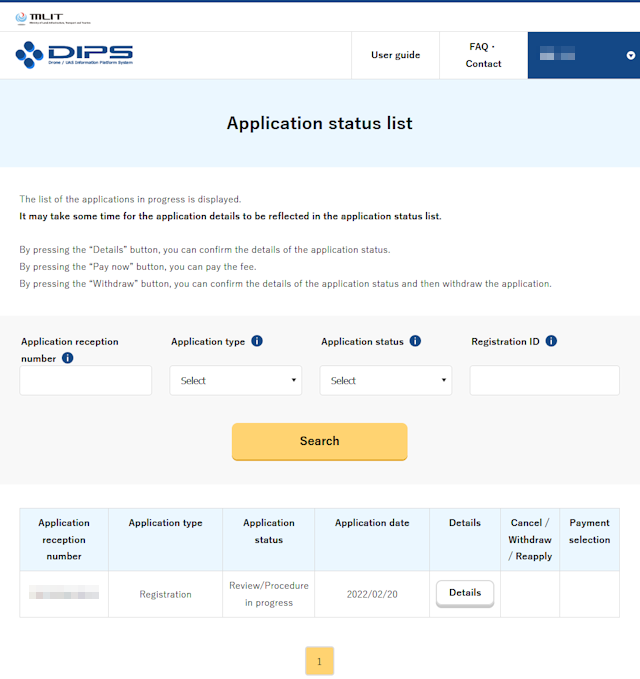 When you return to the original screen, it looks like this.
In "Application status" column, "Review/Procedure in progress" is displayed.
Wait for the examination to finish.
When you return to the original screen, it looks like this.
In "Application status" column, "Review/Procedure in progress" is displayed.
Wait for the examination to finish.
Confirm examination result / Obtain registration ID
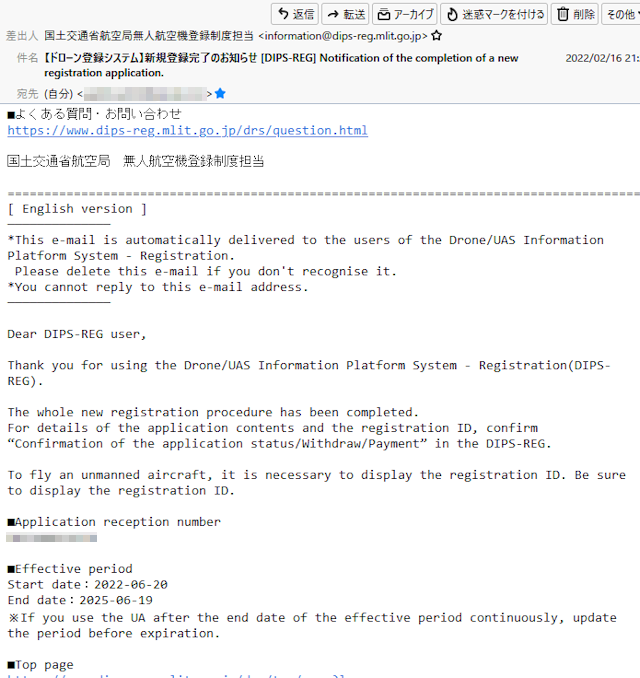 After the examination, you will receive an email with the title "Notification of the completion of a new registration application".
This time, I received this email about 10 hours after the fee payment was completed.
After the examination, you will receive an email with the title "Notification of the completion of a new registration application".
This time, I received this email about 10 hours after the fee payment was completed.
The email will indicate the expiration date of the application. Please check it.
To check the examination result, log in to
DIPS-REG (MLIT)
and click "Confirmation of the application status / withdraw / Payment" button from the main menu.
DIPS-REG (drone registration system)
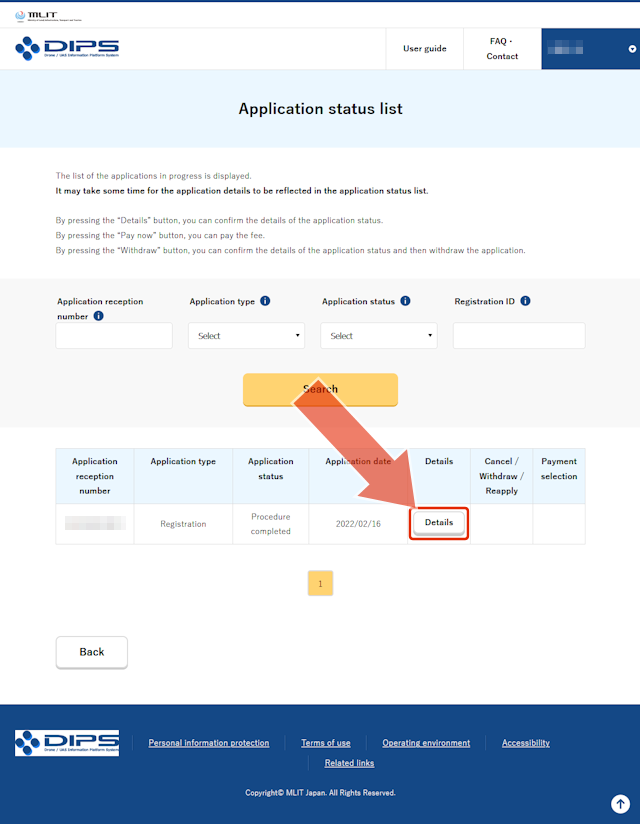 A list of application status is displayed.
If "Application status" column is "Procedure completed", you can get "Registration ID".
Click "Details" button.
A list of application status is displayed.
If "Application status" column is "Procedure completed", you can get "Registration ID".
Click "Details" button.
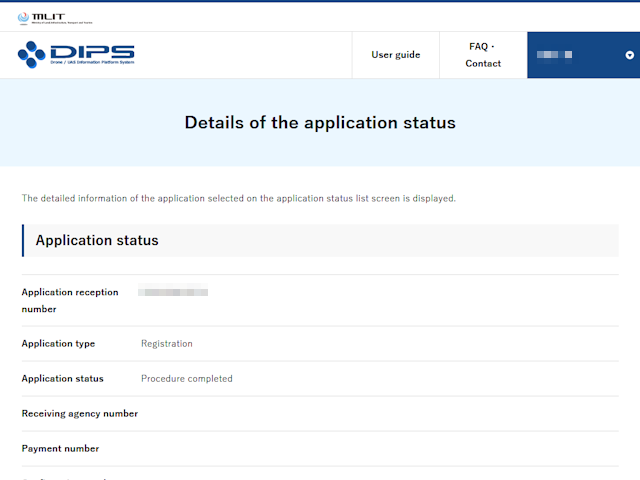 The details of the application will be displayed.
When you scroll the screen ...
The details of the application will be displayed.
When you scroll the screen ...
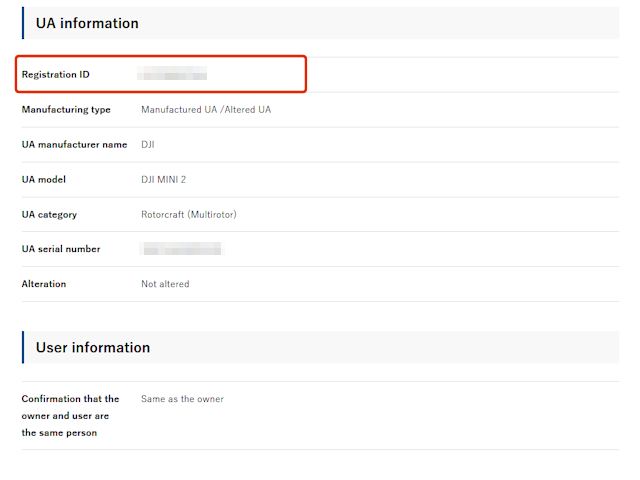 In "UA Information" column, there is an item called "Registration ID" that starts with "JU".
You need to indicate this on your drone body.
Details on how to indicate are explained in
Unmanned aerial vehicle registration procedure (Japanese PDF:MLIT)
.
In "UA Information" column, there is an item called "Registration ID" that starts with "JU".
You need to indicate this on your drone body.
Details on how to indicate are explained in
Unmanned aerial vehicle registration procedure (Japanese PDF:MLIT)
.
Unmanned aerial vehicle registration procedure (Japanese PDF:MLIT)
Suehiro Bridge - The only active railway bridge that can be moved
Watch on YouTube
Drone Aerial View MavicMini Saipan Aqua Resort Club
Watch on YouTube
Japanese first Antarctic observation ship "Soya"
Watch on YouTube
Drone shooting Odaiba Gundam Unicorn 4K
Watch on YouTube
Register "Amateur-Built UA/Others"
 FPV drones / racing drones
are registered as "Amateur-Built UA/Others".
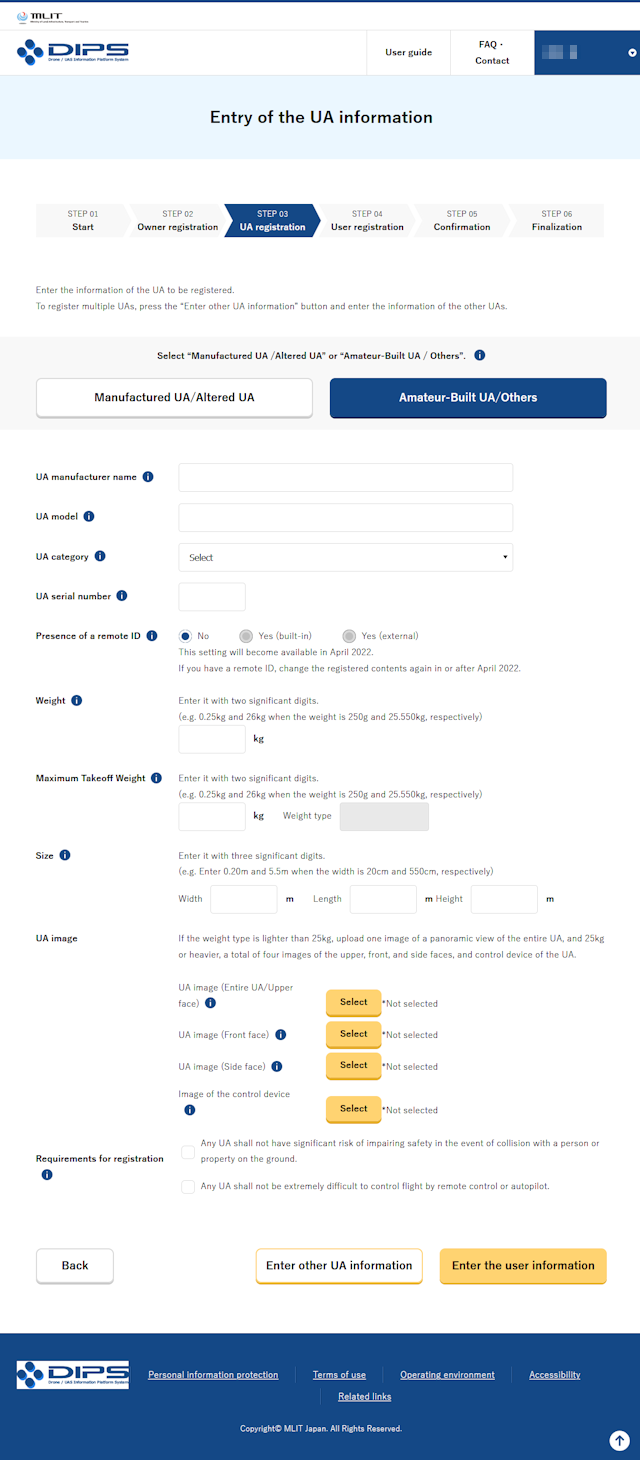
Click "Amateur-Built UA/Others" button on the aircraft information input screen to display this.
Let's look at them in order.
FPV drones / racing drones
are registered as "Amateur-Built UA/Others".
Click "Amateur-Built UA/Others" button on the aircraft information input screen to display this.
Let's look at them in order.
 As shown at the beginning of this page,
for self-made drones or those for which a serial number is not defined,
such as
FPV drones
, applicant (owner) can set "UA manufacturer name", "UA model", "UA serial number" by himself / herself.
As shown at the beginning of this page,
for self-made drones or those for which a serial number is not defined,
such as
FPV drones
, applicant (owner) can set "UA manufacturer name", "UA model", "UA serial number" by himself / herself.
For example, material provided by MLIT (Japanese PDF) give following examples.
UA manufacturer name shall be the name of the person who made or set up (your name).
UA model shall be the manufacturer's surname + number.
UA category you can select from the drop-down list. You can choose from "Airplane", "Rotorcraft (Helicopter)", "Rotorcraft (Multirotor)", "Rotorcraft (Others)", "Glider", and "Airship".
Unmanned aerial vehicle registration procedure (Japanese PDF:MLIT)
Frequently asked questions (PDF:MLIT)
 This section can also be set by the applicant (owner).
The material provided by MLIT (Japanese PDF)
gives an example of 2 initials of the manufacturer + year of manufacture + alphanumeric characters.
The serial number must be within 20 digits of the combination of only uppercase letters and numbers.
Please note that spaces, symbols, and lowercase letters are not allowed.
This section can also be set by the applicant (owner).
The material provided by MLIT (Japanese PDF)
gives an example of 2 initials of the manufacturer + year of manufacture + alphanumeric characters.
The serial number must be within 20 digits of the combination of only uppercase letters and numbers.
Please note that spaces, symbols, and lowercase letters are not allowed.
You can read explanation shown in this figure by hovering mouse cursor over "i" mark.
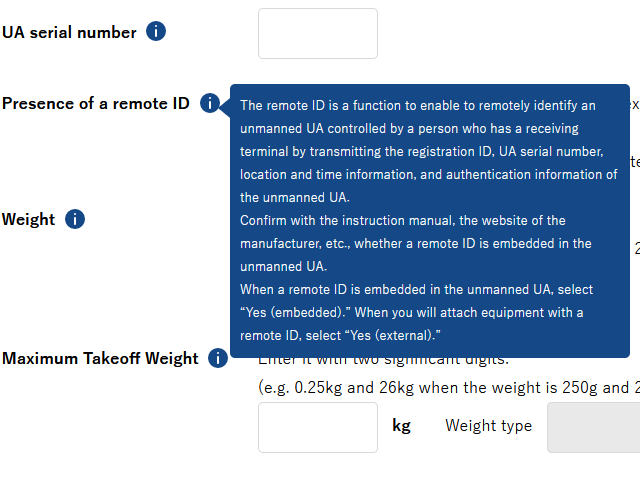 Enter the presence or absence of a remote ID transmitter and the "manufacturer name," "model," and "serial number" of the remote ID transmitter.
In order to freely fly an aircraft with a takeoff weight of 100g or more outdoors, it is essential to install a remote ID transmitter.
Enter the presence or absence of a remote ID transmitter and the "manufacturer name," "model," and "serial number" of the remote ID transmitter.
In order to freely fly an aircraft with a takeoff weight of 100g or more outdoors, it is essential to install a remote ID transmitter.
You can also register the remote ID transmitter information later as a additional.
For more information, see How to install a remote ID transmitter on a drone (for Japan) .
How to install a remote ID transmitter on a drone (for Japan)
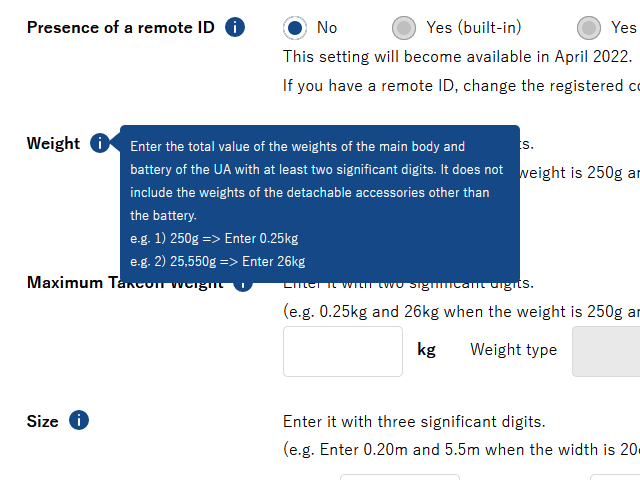 Enter the weight of the aircraft including battery in kilograms with two or more significant digits.
For example, for 200g, you need to enter "0.20(kg)" instead of "0.2(kg)".
This weight does not include the weight of removable accessories other than battery.
Weights such as propeller guards, optional aerial cameras, and marker lights can be excluded if they are easily removable.
Enter the weight of the aircraft including battery in kilograms with two or more significant digits.
For example, for 200g, you need to enter "0.20(kg)" instead of "0.2(kg)".
This weight does not include the weight of removable accessories other than battery.
Weights such as propeller guards, optional aerial cameras, and marker lights can be excluded if they are easily removable.
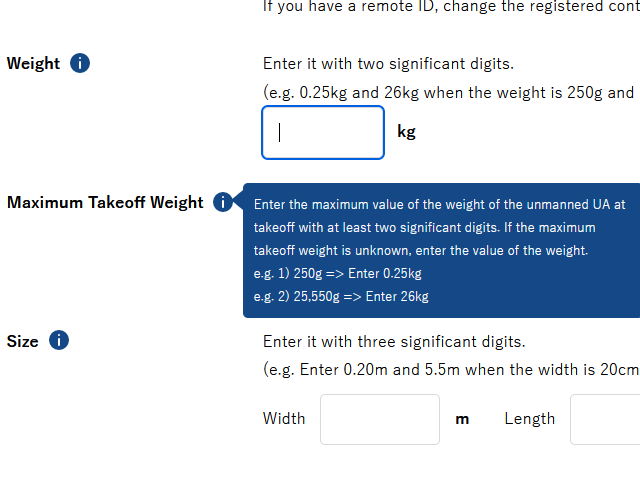 Enter maximum takeoff weight in kilograms with two or more significant digits.
If the maximum takeoff weight cannot be determined, enter same value as the aircraft weight above.
Enter maximum takeoff weight in kilograms with two or more significant digits.
If the maximum takeoff weight cannot be determined, enter same value as the aircraft weight above.
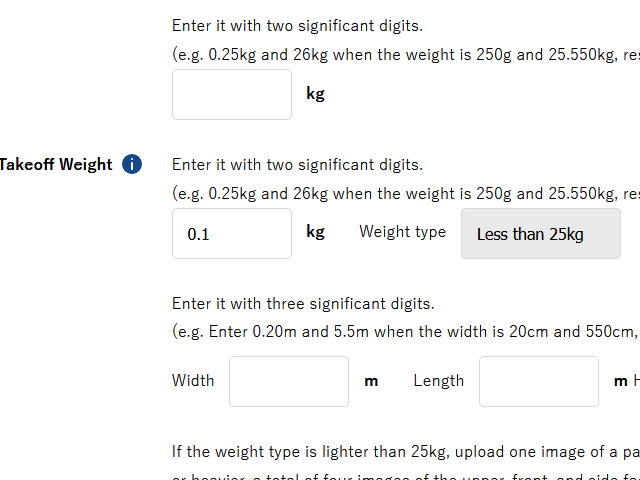 The "Weight type" field is automatically set according to the maximum takeoff weight you have entered.
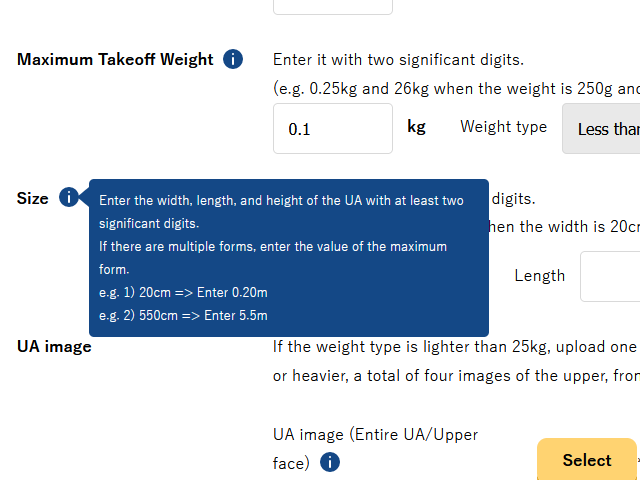 Enter maximum total width, maximum total length, and maximum total height of the aircraft in meters with two or more significant digits.
For example, if the height is 4cm, you need to enter the value here as "0.040(m)" instead of "0.04(m)".
Enter maximum total width, maximum total length, and maximum total height of the aircraft in meters with two or more significant digits.
For example, if the height is 4cm, you need to enter the value here as "0.040(m)" instead of "0.04(m)".
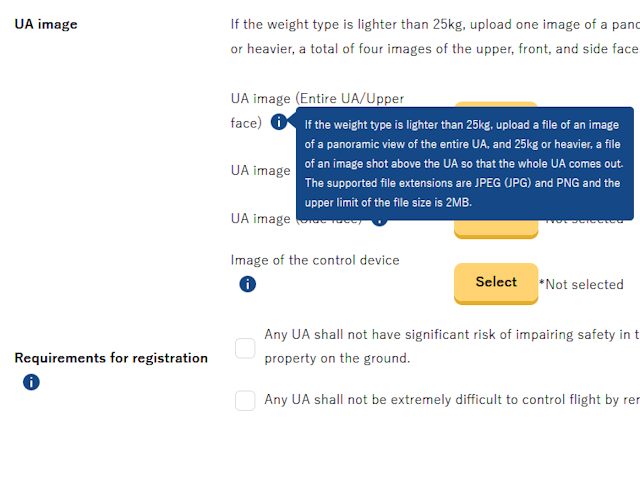 Upload image file of the aircraft to be registered in JPEG or PNG format with a size of 2MB or less.
If the weight type is less than 25 kg, upload one whole image, and if it is 25 kg or more, upload three images: top, front, and side.
Upload image file of the aircraft to be registered in JPEG or PNG format with a size of 2MB or less.
If the weight type is less than 25 kg, upload one whole image, and if it is 25 kg or more, upload three images: top, front, and side.
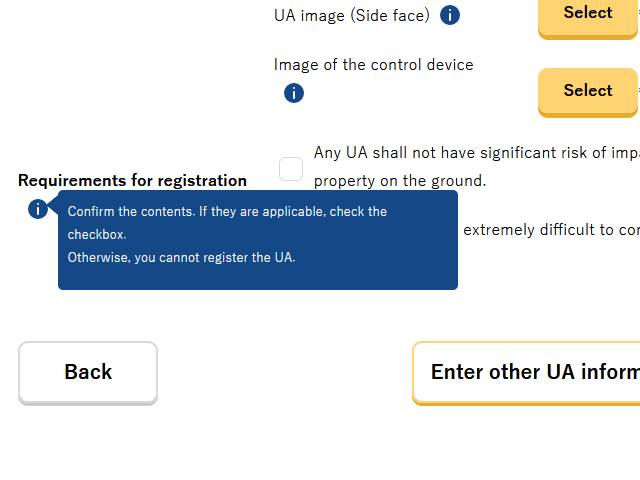 Self-check and self-report on the safety capability of the aircraft to be registered.
"Any UA shall not have significant risk of impairing safety in the event of collision with a person or property on the ground."
"Any UA shall not be extremely difficult to control flight by remote control or autopilot."
Check two of them.
You cannot apply unless you check both items.
Self-check and self-report on the safety capability of the aircraft to be registered.
"Any UA shall not have significant risk of impairing safety in the event of collision with a person or property on the ground."
"Any UA shall not be extremely difficult to control flight by remote control or autopilot."
Check two of them.
You cannot apply unless you check both items.
You can read Frequently asked questions (PDF:MLIT) to see what kind of aircraft the above two items specifically indicate.
Frequently asked questions (PDF:MLIT)
Related links
Overview of unmanned aerial vehicle registration system (PDF:MLIT)
Unmanned aerial vehicle registration system (Japanese:MLIT)
DIPS-REG (drone registration system) (MLIT)
Flow chart of the UA registration procedure (MLIT)
Frequently asked questions (PDF:MLIT)
DIPS:Drone/UAS Information Platform System (Japanese:MLIT)