


BETAFPV Pavo Pico Walksnail Avatar Edition - Full HD Aerial Photography Micro Drone Under 100g
BETAFPV Pavo Pico is an FPV drone with a takeoff weight of less than 100g that is compatible with digital FPV systems . This time, I installed Walksnail Avatar digital FPV and assembled a full HD aerial photography CineWhoop.What is BETAFPV Pavo Pico?

Model variety
The BETAFPV Pavo Pico series has two types of Air Units (camera, VTX) : DJI O3 version and Walksnail Avatar/Caddx Vista/Runcam Link version, and two types of receivers: ELRS version and TBS version. Furthermore, there are two types of FC: "F4 1-2S 12A AIO FC V3" (initial lot) and "F4 2-3S 20A AIO FC V1" (second lot and later). Models from the second lot onwards are slightly heavier (plus 1.35g ~ 2.27g, depending on the Air Unit installed), so please pay attention to the takeoff weight. Please note that Air Unit is sold separately.
-
BETAFPV Pavo Pico Brushless Whoop Quadcopter

BETAFPV 2023/05/27 USD104.99(DJI O3)/ USD99.99(Walksnail)
Wheelbase: 80.8mm / Battery: 2S / Weight: 71.2g(DJI O3)/ 65.88g (Walksnail)
Digital FPV CineWhoop Pavo Pico with takeoff weight less than 100g. Air unit is sold separately and can be equipped with DJI O3 Air Unit or Caddx Vista, or newly released Walksnail Avatar HD Pro with 32GB memory. The battery is 2S, wheelbase is 80.8mm, and propeller size is 45mm. Weight is 71.2g for DJI O3 and 65.88g for Walksnail Avatar, excluding battery. Takeoff weights including 450mAh battery are 99.4g and 94.08g respectively.

 (US)
(UK)
(US)
(UK)
-
Walksnail Avatar HD Pro Kit
CADDX 2023/03 USD159.00(single antenna)/ USD169.00(dual antenna
The Avatar HD system uses H.265 code, an industry-leading technology, to provide 1080p FPV image quality with ultra-low latency. Support 1080P/60FPS, 720P/120FPS. Featuring a 1/1.8 inch Sony Starvis Ⅱ sensor, this camera delivers excellent night vision that's just as clear as day.
 (US)
(UK)
(US)
(UK)
Introducing BETAFPV Pavo Pico
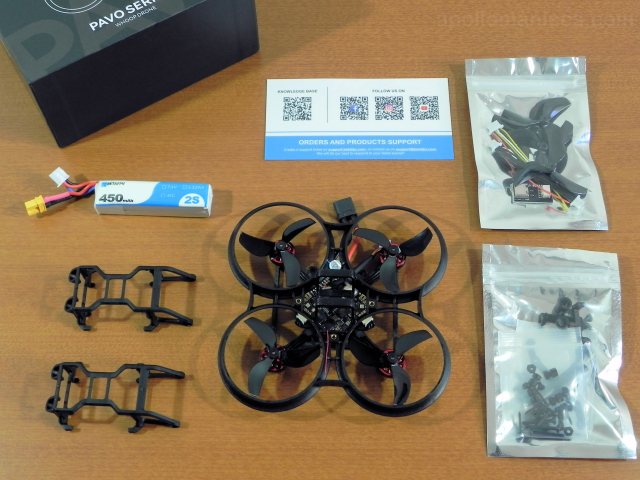 This photo shows the packaging box and all included items.
From the left: battery, two frames for Air Unit, Pavo Pico, a set of spare propellers, electrical parts, and a set of screws.
This photo shows the packaging box and all included items.
From the left: battery, two frames for Air Unit, Pavo Pico, a set of spare propellers, electrical parts, and a set of screws.
The 4Pin connector for Walksnail Avatar is already soldered to the FC. Simply plug in the connector to connect. When using Caddx Vista/Runcam Link, the included 6Pin connector must be soldered to the FC.
A #0 Phillips screwdriver and a 1.5mm Allen key (hexagonal wrench) are required for assembly. Neither is included in the product, so you'll have to prepare it yourself.
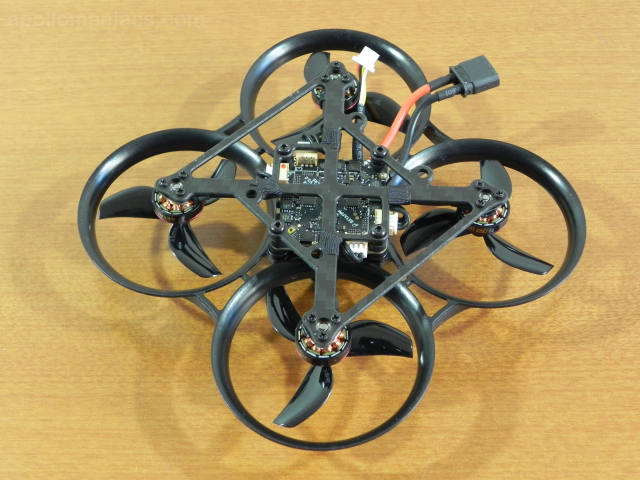 This is the top of the drone.
Place the frame that incorporates the Air Unit on top of this.
The drone and Air Unit are connected with just 4 screws and a power cable, so they can be easily replaced.
This is the top of the drone.
Place the frame that incorporates the Air Unit on top of this.
The drone and Air Unit are connected with just 4 screws and a power cable, so they can be easily replaced.
The cable with the white connector sticking out at the back is the power cable for the Air Unit. No soldering required and can be connected directly to the Walksnail Avatar HD Pro Kit.
 This is the bottom of the drone.
A 2S 450mAh battery from BETAFPV can be installed in the battery holder.
By cutting the battery holder, you can secure batteries made by other companies with Velcro tape.
The battery connector is XT30.
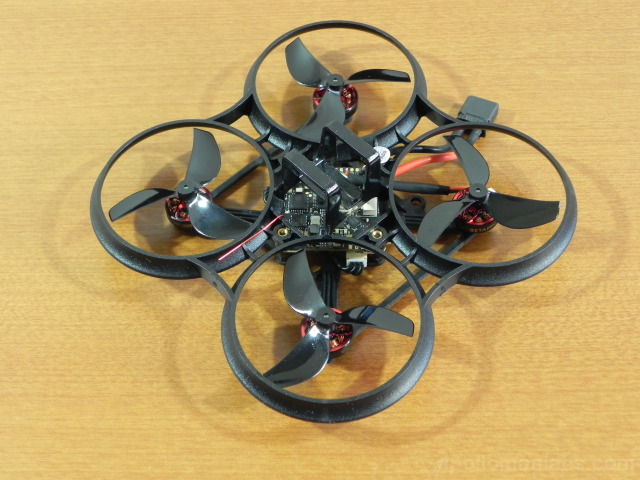
Completed with Walksnail Avatar HD Pro Kit installed.
This is the bottom of the drone.
A 2S 450mAh battery from BETAFPV can be installed in the battery holder.
By cutting the battery holder, you can secure batteries made by other companies with Velcro tape.
The battery connector is XT30.
Completed with Walksnail Avatar HD Pro Kit installed.
 What I got this time is the early lot model of the Walksnail Avatar version, which is equipped with an
ExpressLRS (ELRS) receiver
.
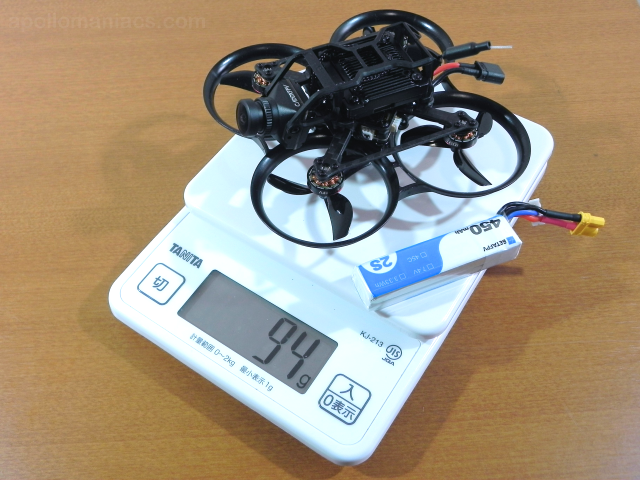
Weight including battery is 94g.
In this state, this drone becomes a Cine Whoop capable of shooting 1080p full HD video.
You can also shoot 4K video with mounting the
RunCam Thumb Pro camera
.
What I got this time is the early lot model of the Walksnail Avatar version, which is equipped with an
ExpressLRS (ELRS) receiver
.
Weight including battery is 94g.
In this state, this drone becomes a Cine Whoop capable of shooting 1080p full HD video.
You can also shoot 4K video with mounting the
RunCam Thumb Pro camera
.
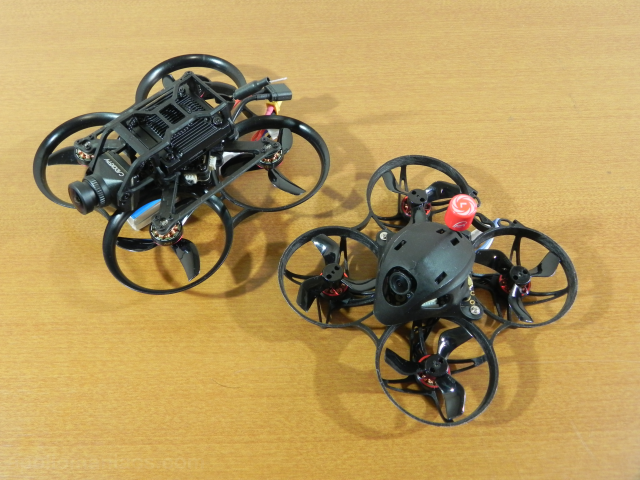 This is a comparison with the Meteor75 (1S HD Digital VTX) Walksnail version from the same BETAFPV company.
They are almost the same size.
This is a comparison with the Meteor75 (1S HD Digital VTX) Walksnail version from the same BETAFPV company.
They are almost the same size.
The Meteor75 Digital VTX version was slightly underpowered compared to the weight of the aircraft, and the actual flight time was about 2 minutes. Pavo Pico can fly for about 4 minutes and 40 seconds.
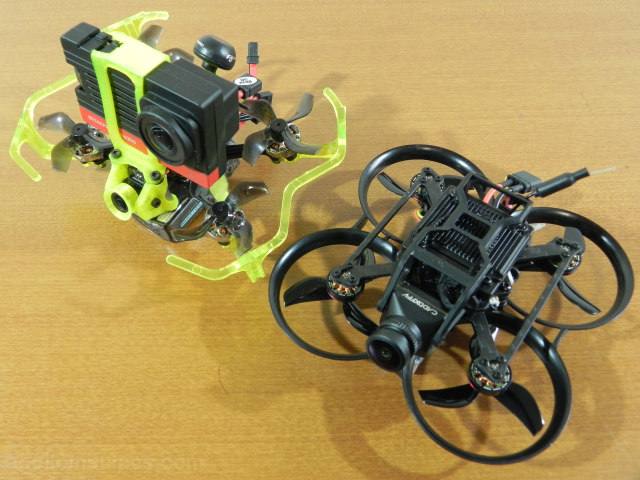 Comparison with
Firefly Baby Quad
(equipped with BETAFPV SMO 4K camera).
This one is also about the same size.
But Pavo Pico flies quieter and smoother.
Comparison with
Firefly Baby Quad
(equipped with BETAFPV SMO 4K camera).
This one is also about the same size.
But Pavo Pico flies quieter and smoother.
How to assemble BETAFPV Pavo Pico
For BETAFPV Pavo Pico, Air Unit (camera, VTX) is sold separately. You need to install it yourself.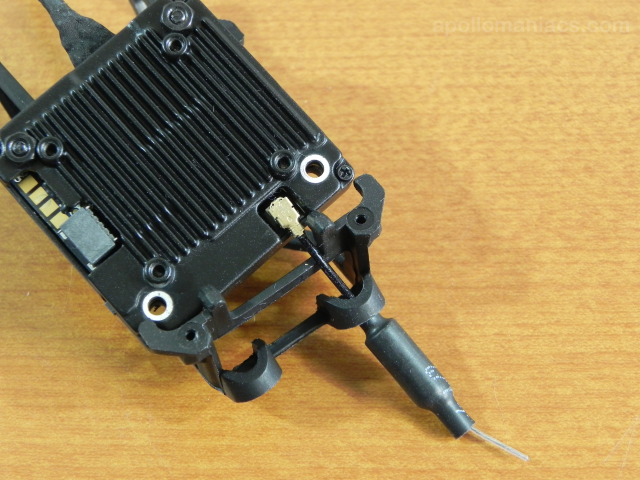 First, attach the antenna to the Walksnail Avatar HD Pro Air Unit.
Use the Copper Tube Antenna included with Pavo Pico.
The Walksnail Avatar version of Pavo Pico comes with one antenna.
If you get the dual antenna version of Walksnail Avatar, you will need to purchase an additional antenna.
First, attach the antenna to the Walksnail Avatar HD Pro Air Unit.
Use the Copper Tube Antenna included with Pavo Pico.
The Walksnail Avatar version of Pavo Pico comes with one antenna.
If you get the dual antenna version of Walksnail Avatar, you will need to purchase an additional antenna.
When installing the antenna, first pass the antenna cable through the antenna fixing hole in the Air Unit frame as shown in the photo.
 Secure the base of the antenna by screwing the metal plate included with the Air Unit.
Place the Walksnail Avatar HD Pro Air Unit in the Air Unit frame with the antenna connector facing downwards, as shown in the photo.
Secure the base of the antenna by screwing the metal plate included with the Air Unit.
Place the Walksnail Avatar HD Pro Air Unit in the Air Unit frame with the antenna connector facing downwards, as shown in the photo.
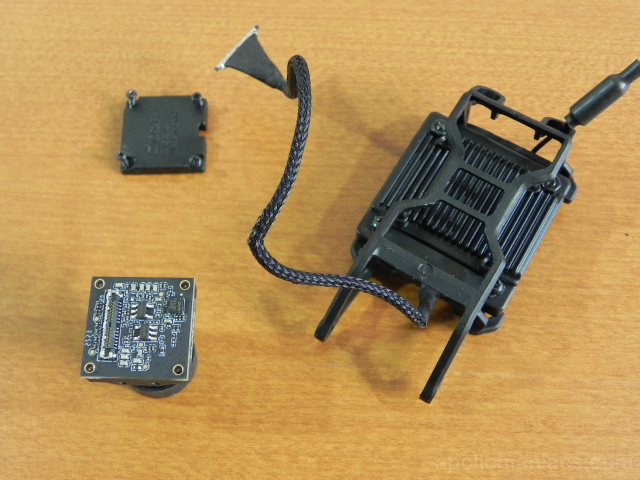 When installing the camera, you will also need to route the camera cable through the Air Unit frame.
Remove the back cover of the camera and disconnect the cable.
Simply pull the cable upwards to remove it from the socket.
When installing the camera, you will also need to route the camera cable through the Air Unit frame.
Remove the back cover of the camera and disconnect the cable.
Simply pull the cable upwards to remove it from the socket.
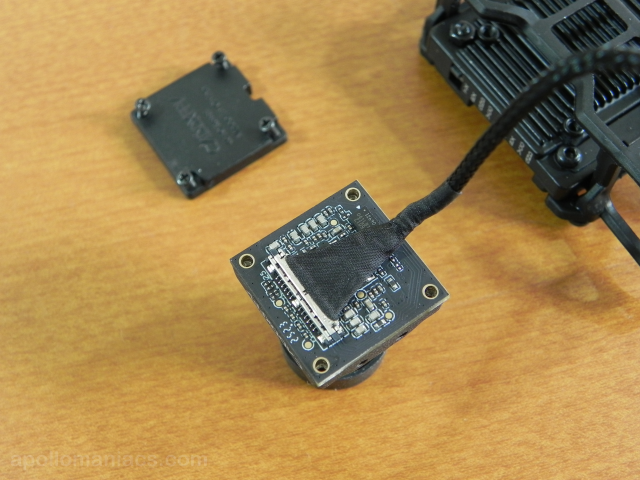 After passing the camera cable through the frame, reattach it to the camera.
Carefully push the camera cable into the socket and close the back cover.
After passing the camera cable through the frame, reattach it to the camera.
Carefully push the camera cable into the socket and close the back cover.
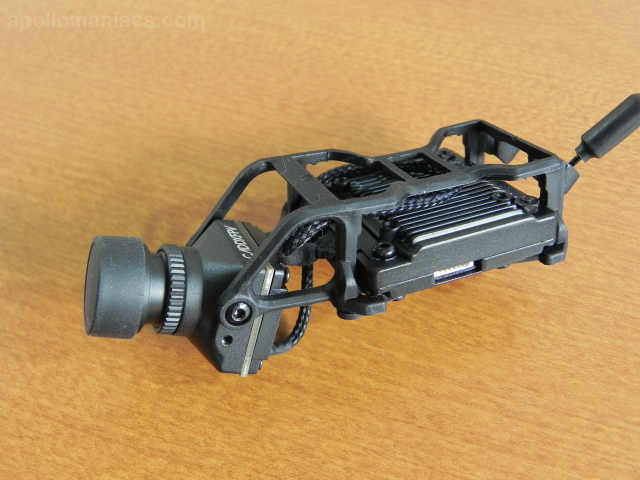 Screw the camera body to the frame as shown in the photo.
The screws used are the shortest hex nuts (1.5mm) included with Pavo Pico.
Since the camera cable is long, it can be rolled up and stored inside the Air Unit frame.
Screw the camera body to the frame as shown in the photo.
The screws used are the shortest hex nuts (1.5mm) included with Pavo Pico.
Since the camera cable is long, it can be rolled up and stored inside the Air Unit frame.
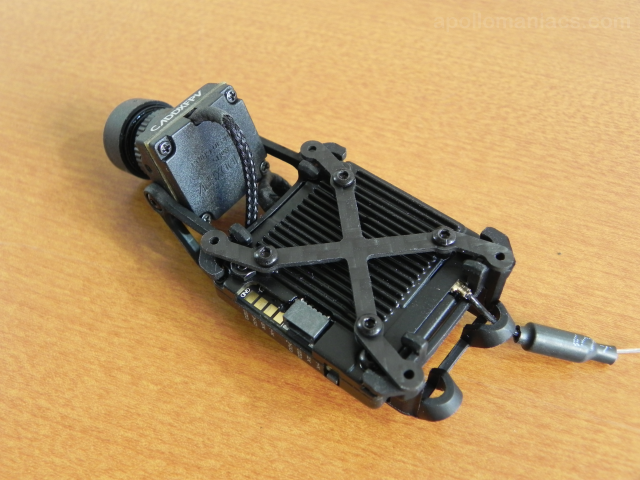 Screw the X-shaped carbon frame (VTX Mounting Plate) included with Pavo Pico to the Air Unit as shown in the photo.
The screws used are the shortest hex nuts (1.5mm), which are also included with Pavo Pico.
There seems to be no distinction between the front and rear, or the top and bottom surface of the carbon frame.
Screw the X-shaped carbon frame (VTX Mounting Plate) included with Pavo Pico to the Air Unit as shown in the photo.
The screws used are the shortest hex nuts (1.5mm), which are also included with Pavo Pico.
There seems to be no distinction between the front and rear, or the top and bottom surface of the carbon frame.
 Move the power cable for Air Unit (white connector) coming out of the main body frame to the position shown in the photo.
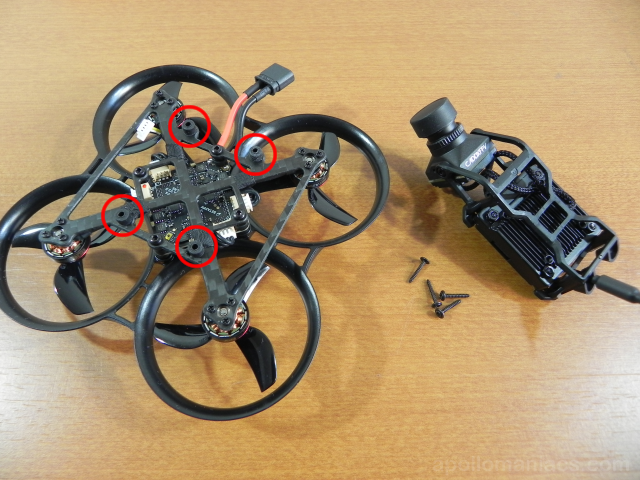
Attach the rubber bushing that comes with Pavo Pico to the hole indicated by the red circle in the photo. Then attach the Air Unit to the main frame using the wood screws shown in the photo.
Insert the wood screws from the bottom of the drone and screw them into the Air Unit frame through the holes in the rubber bushing and carbon frame.
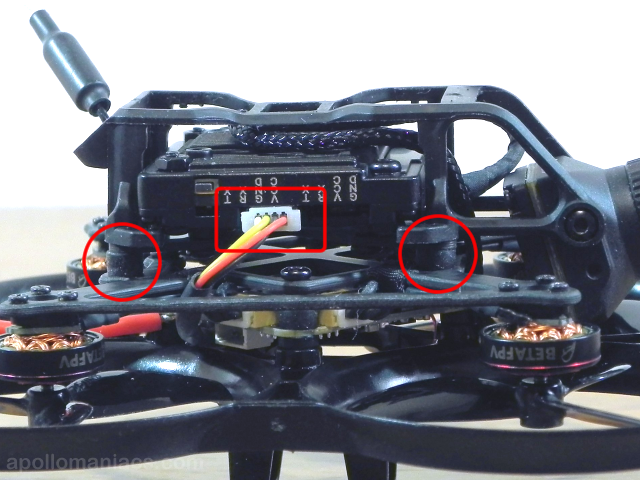 Screw the Air Unit to the main body frame via the rubber bushing as shown in the red circle in the photo.
And finally plug the white connector of the power cable into the Air Unit socket.
It is now complete
Screw the Air Unit to the main body frame via the rubber bushing as shown in the red circle in the photo.
And finally plug the white connector of the power cable into the Air Unit socket.
It is now complete
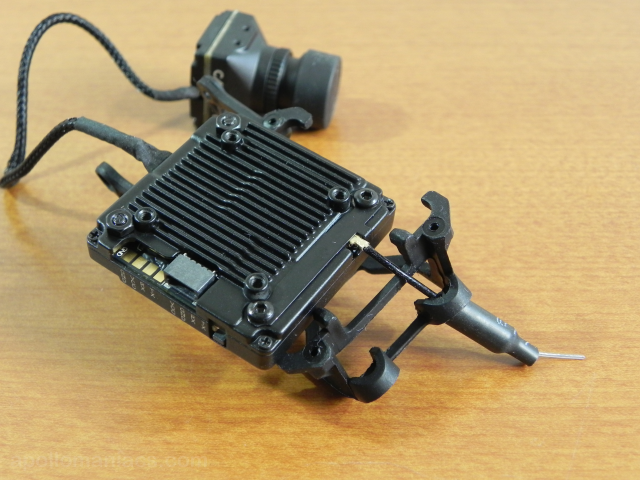
The connector of Walksnail Avatar VTX is JST-SH 4 pin (1.0mm pitch).
BETAFPV Pavo Pico flight preparation
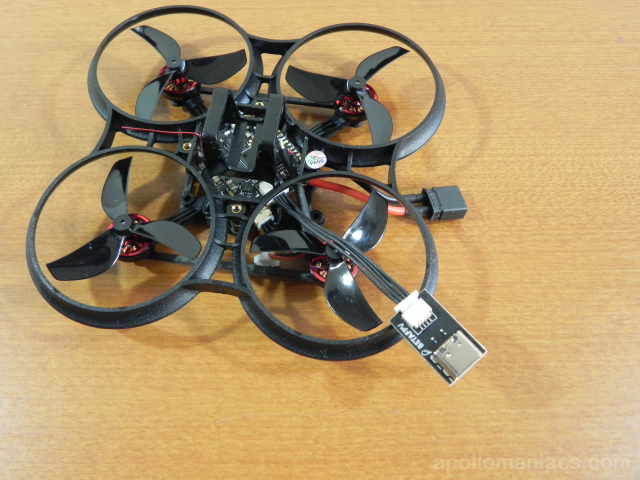 To access the flight controller, you need to connect the included USB connector unit (USB Parameter Adjustment Cable).
The connector is located deep within the main body frame, so you will need a flat head screwdriver or tweezers to attach/remove the cable.
The USB connector is Type-C.
To access the flight controller, you need to connect the included USB connector unit (USB Parameter Adjustment Cable).
The connector is located deep within the main body frame, so you will need a flat head screwdriver or tweezers to attach/remove the cable.
The USB connector is Type-C.
However, the FC settings are almost complete and there is not much to be done.
 The FC firmware is Betaflight 4.4.1. No particular update is required.
The device name is BEFH/BETAFPVF40S(STM32F40S).
The FC firmware is Betaflight 4.4.1. No particular update is required.
The device name is BEFH/BETAFPVF40S(STM32F40S).
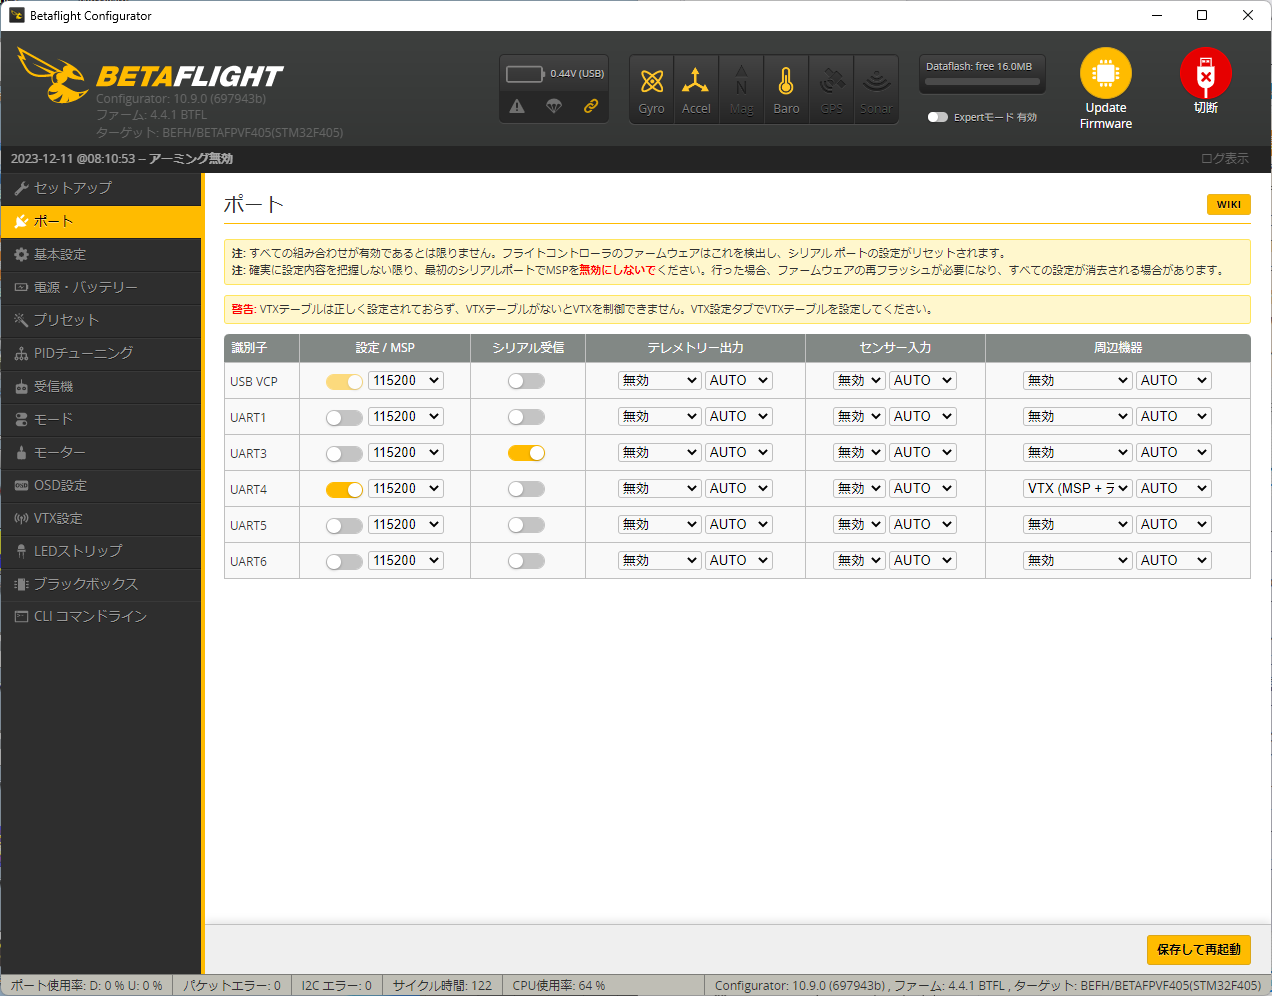
The port settings are like this. The ELRS receiver is connected to UART3 and the digital VTX is connected to UART4.
Also, although "Permanently enable Airmode" on the "Configuration" screen was turned on, the aircraft sometimes bounced around during takeoff and landing. It is best to set the Air mode to a 3-position switch .
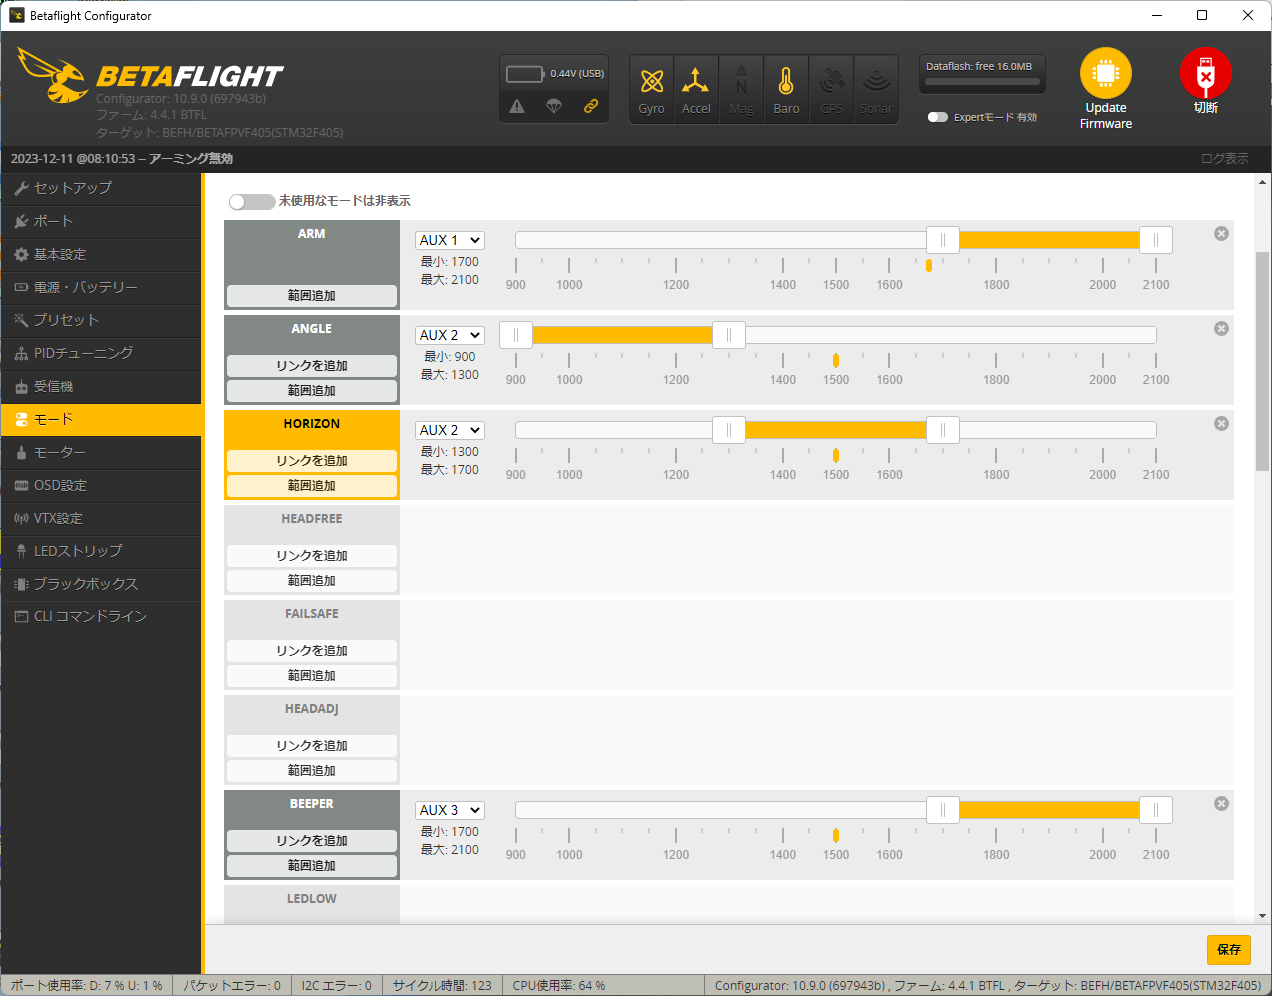 The mode settings are as shown in this figure.
ARM is set to AUX 1 and flight mode is set to AUX 2.
Also, BEEPER is already set for AUX 3. You can use it just by turning on the DShot beacon.
The mode settings are as shown in this figure.
ARM is set to AUX 1 and flight mode is set to AUX 2.
Also, BEEPER is already set for AUX 3. You can use it just by turning on the DShot beacon.
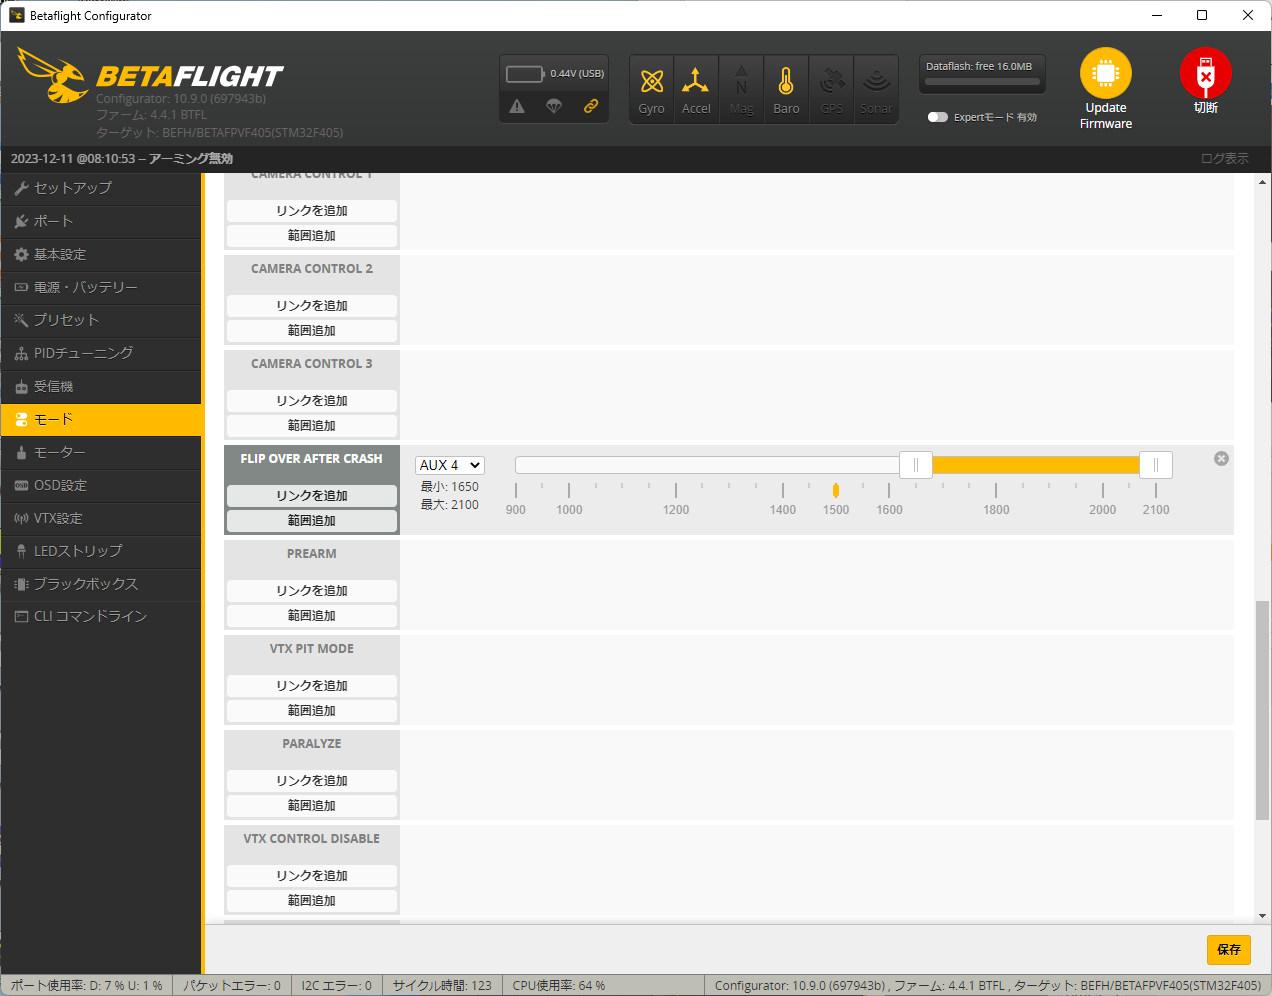 AUX 4 is set to turtle mode.
Nothing else is assigned.
AUX 4 is set to turtle mode.
Nothing else is assigned.
Please change the channel of each mode according to your radio settings.
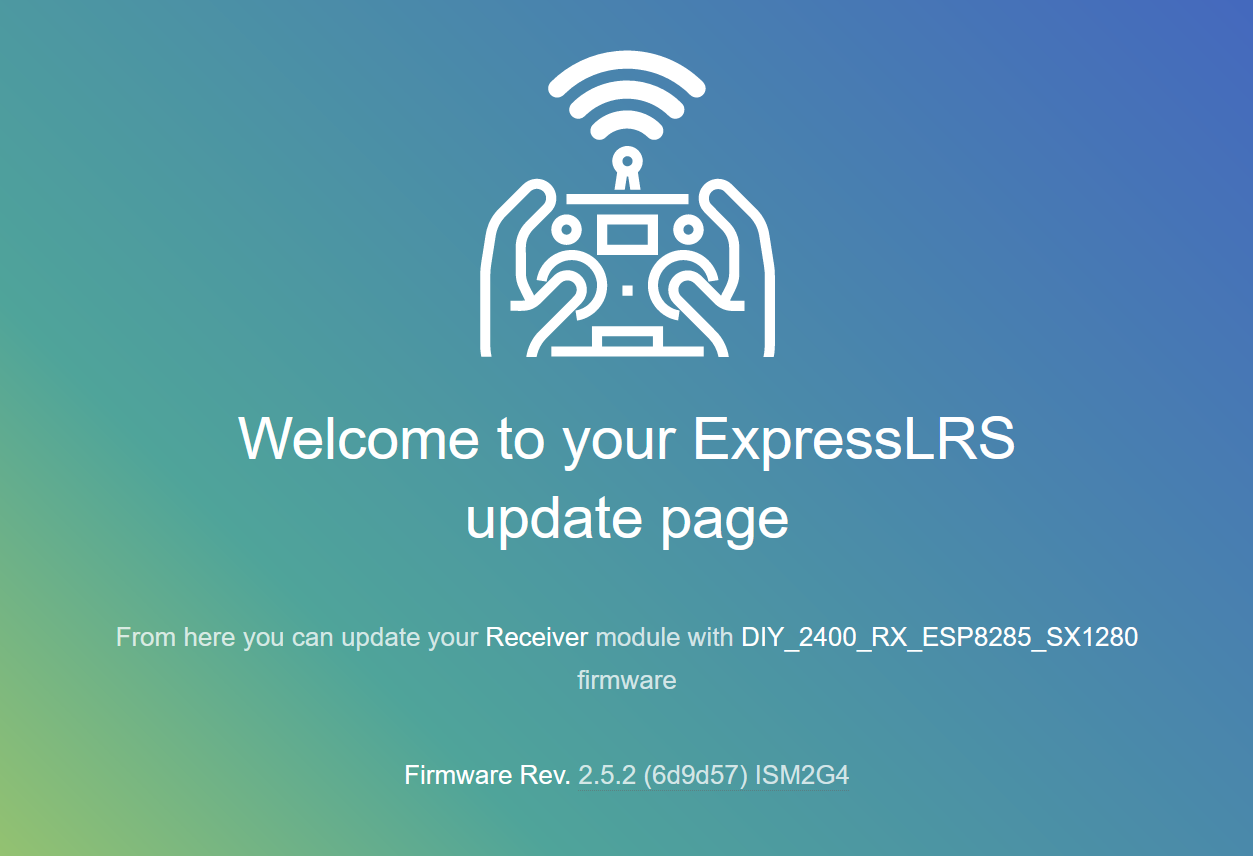 The firmware of the ELRS receiver installed in "F4 1-2S 12A AIO FC V3" is version 2.5.2.
Although it is an AIO type FC, the ELRS receiver is internally connected serially to the UART port.
You can update the version using Wi-Fi.
When you connect power to the FC and wait about 60 seconds, it will enter Wi-Fi mode and one of the green LEDs on the FC board will blink rapidly.
The firmware of the ELRS receiver installed in "F4 1-2S 12A AIO FC V3" is version 2.5.2.
Although it is an AIO type FC, the ELRS receiver is internally connected serially to the UART port.
You can update the version using Wi-Fi.
When you connect power to the FC and wait about 60 seconds, it will enter Wi-Fi mode and one of the green LEDs on the FC board will blink rapidly.
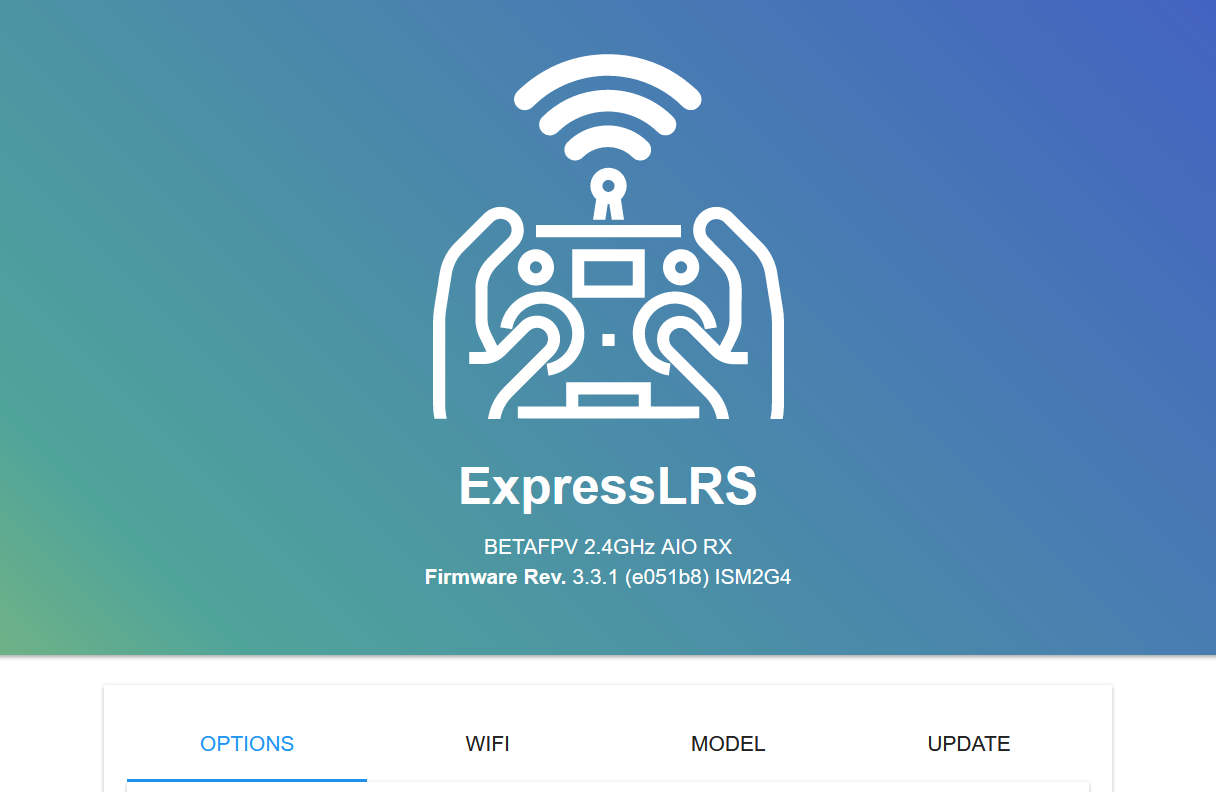 I was able to upgrade to version 3.3.1.
The device name specified when building firmware is "BETAFPV 2.4GHz AIO RX".
I was able to upgrade to version 3.3.1.
The device name specified when building firmware is "BETAFPV 2.4GHz AIO RX".
 No special settings are required for Air unit.
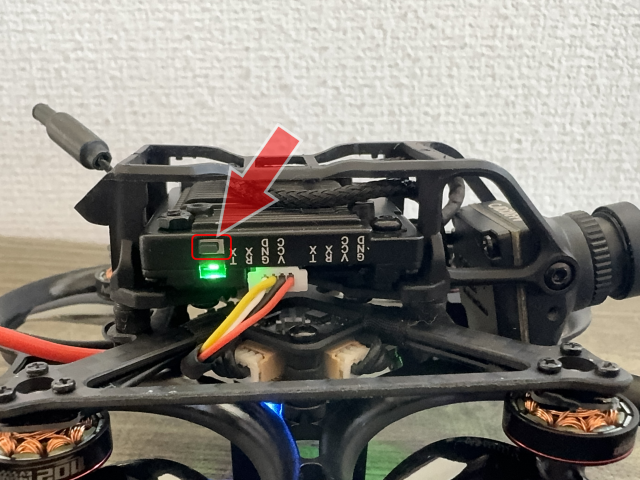
Bind to goggles/VRX using the bind button indicated by the arrow in the figure.
No special settings are required for Air unit.
Bind to goggles/VRX using the bind button indicated by the arrow in the figure.
However, on my aircraft, all the OSD characters were shifted too far to the right in the goggles. It was necessary to adjust the display position using [Display] - [OSD Position] in the settings menu of Walksnail Avatar VRX (goggles).
For information on how to set up Walksnail Avatar HD Pro, see How to use Walksnail Avatar VRX .
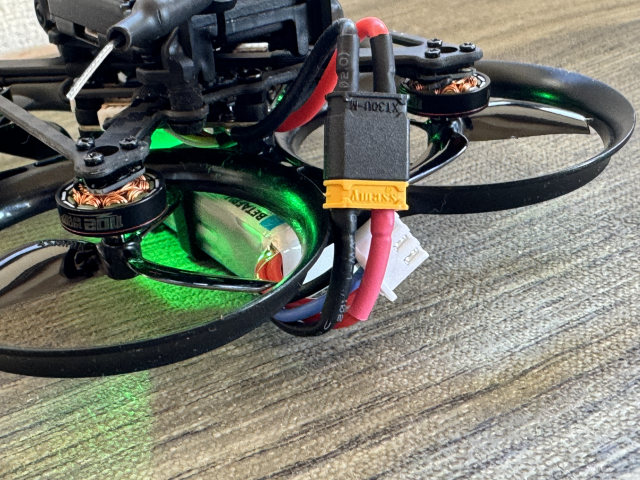 When installing the battery into the aircraft, pay attention to the white JST-XH connector.
If you leave it free, it may get caught in the propeller.
I think it would be a good idea to hold it in place with the XT-30 cable, as shown in the photo.
When installing the battery into the aircraft, pay attention to the white JST-XH connector.
If you leave it free, it may get caught in the propeller.
I think it would be a good idea to hold it in place with the XT-30 cable, as shown in the photo.
For this reason, I immediately broke one of the propellers...
BETAFPV Pavo Pico Mini Review
flight performance
As you can see in the video below, the flight performance is high and you can fly as easily as a regular 75mm TinyWhoop. It has a small turning radius, so you can enjoy flying not only outdoors but also at home. It has a gentler flying feel than the Firefly Baby Quad , and I think it will be easier to handle even for relatively inexperienced pilots. The motor sound is the same as the 75mm TinyWhoop, and it's not particularly noisy. It was also able to fly for 4 minutes and 40 seconds with a new battery.
BETAFPV Pavo Pico Specifications
| item | description |
|---|---|
| Manufacturer | BETAFPV |
| Flight Time | 4min |
| Wheelbase | 80.8mm |
| Props | Gemfan 45mm-3B black propeller |
| Motors | 1102 | 14000kv red and black (2022) |
| Weight |
71.2g (DJI O3), 66.02g (Vista), 65.88g (Avatar) (First batch),
73.47g (DJI O3), 67.37g (Vista), 68.14g (Avatar)(Since second batch) |
| Frame | Pavo Pico Brushless Whoop Frame |
| FC & ESC | F4 1-2S 12A AIO FC V3(First batch), F4 2-3S 20A AIO FC V1(Since second batch) |
| HD VTX | Support DJI O3 Air Unit, Caddx Vista Kit / RUNCAM Link / Walksnail Avatar HD Pro Kit installation |
| RX Version | Serial ELRS/TBS |