


 How to use Jumper T-Pro
Here, we will introduce and explain how to use Jumper T-Pro OpenTX radio.
このページを日本語で見る
Table of contents
-
Jumper T-Pro Radio Transmitter Hall Gimbal 2.4G

Jumper USD129.99
On-board firmware:OpenTX
JP4-in-1 Multi-protocol module included. DSM2/X, FrSKY, SFHSS, Flysky, Flysky AFHDS2A, Hubsan and more. OpenTX/EdgeTX firmware. Hall sensor gimbals. ELRS Nano / TBS CRSF Nano compatible module bay on the rear side. USB-C internal charging. Up to 16 channels of output (depending on the receiver).
 (US)
(UK)
(US)
(UK)
Introducing Jumper T-Pro
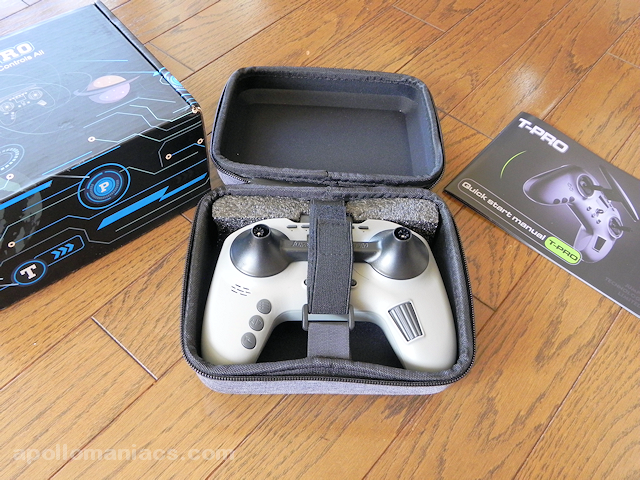 This is Jumper T-Pro package.
When you open colorful box (Upper left of the photo), you will see a soft case containing the radio.
The radio is firmly protected by stick guard and velcro tape in soft case.
Quick start manual is shown in the upper right of the photo.
It covers 20 pages with the basics of how to use it.
This manual can also be downloaded from
Jumper T-Pro official site
.
This is Jumper T-Pro package.
When you open colorful box (Upper left of the photo), you will see a soft case containing the radio.
The radio is firmly protected by stick guard and velcro tape in soft case.
Quick start manual is shown in the upper right of the photo.
It covers 20 pages with the basics of how to use it.
This manual can also be downloaded from
Jumper T-Pro official site
.
Jumper T-Pro official site (Jumper)
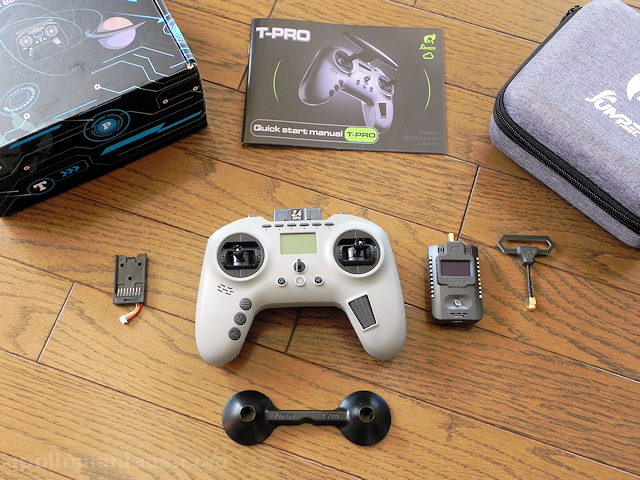 This is all that comes with Jumper T-Pro.
The product I got this time is a set that includes AION-2.4TX-NANO
ExpressLRS (ELRS)
transmitter with built-in 4IN1 multi-protocol transmitter.
Left side of radio is NANO module bay adapter.
Right side of radio is ELRS transmitter and its antenna.
This is all that comes with Jumper T-Pro.
The product I got this time is a set that includes AION-2.4TX-NANO
ExpressLRS (ELRS)
transmitter with built-in 4IN1 multi-protocol transmitter.
Left side of radio is NANO module bay adapter.
Right side of radio is ELRS transmitter and its antenna.
Batteries, strap, USB Type-C cable and microSD card are not included. You have to prepare yourself.
How to use ExpressLRS (ELRS) / Long-distance, high-speed communication protocol
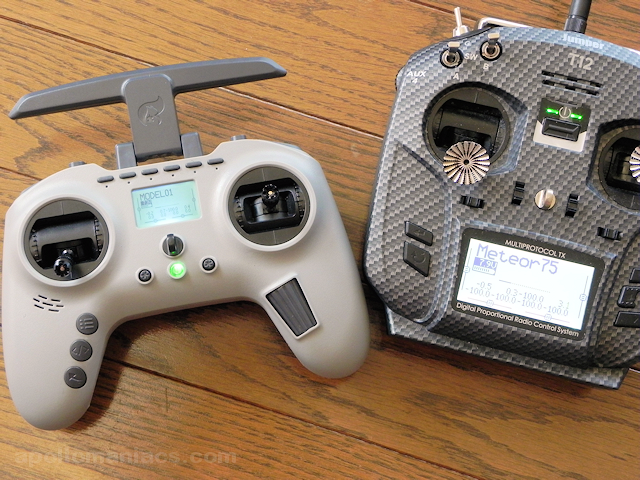 This is comparison with
Jumper T12 Pro
.
Body size is small, but size of gimbal and its installation interval are almost the same.
LCD display resolution (128x64) is the same too, but screen size is so small that it is difficult to read characters.
This is comparison with
Jumper T12 Pro
.
Body size is small, but size of gimbal and its installation interval are almost the same.
LCD display resolution (128x64) is the same too, but screen size is so small that it is difficult to read characters.
Power button is shining green in the center. Left and right of the power button are trim buttons. The trim button is made like a joystick and can be operated by tilting it up, down, left and right. To boot the radio in DFU/Bootloader Mode, tilt this trim button inward and press the power button.
The gimbal stick end screw has a diameter of 3 mm.
How to use Jumper T12 Pro
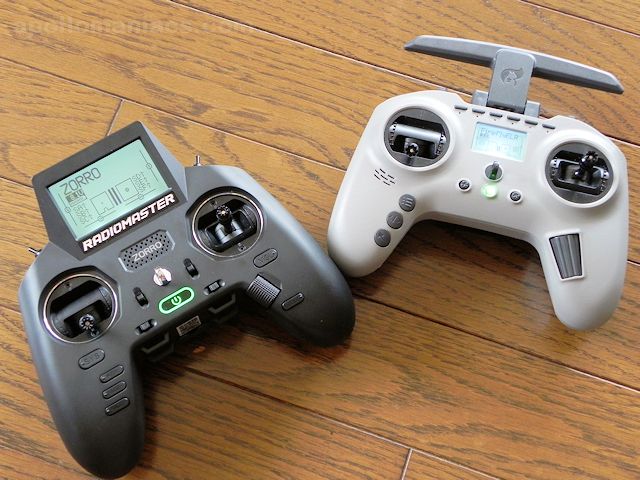 And here is a comparison with
RadioMaster Zorro
.
One size smaller and lighter than RadioMaster Zorro, and is convenient to carry.
Battery capacity is also larger, but screen is too small.
Good design and cool, but the overall design is simple.
There are few switches, but enough to fly FPV drone.
I think that it is most suitable for FPV drone beginners.
And here is a comparison with
RadioMaster Zorro
.
One size smaller and lighter than RadioMaster Zorro, and is convenient to carry.
Battery capacity is also larger, but screen is too small.
Good design and cool, but the overall design is simple.
There are few switches, but enough to fly FPV drone.
I think that it is most suitable for FPV drone beginners.
How to use RadioMaster Zorro
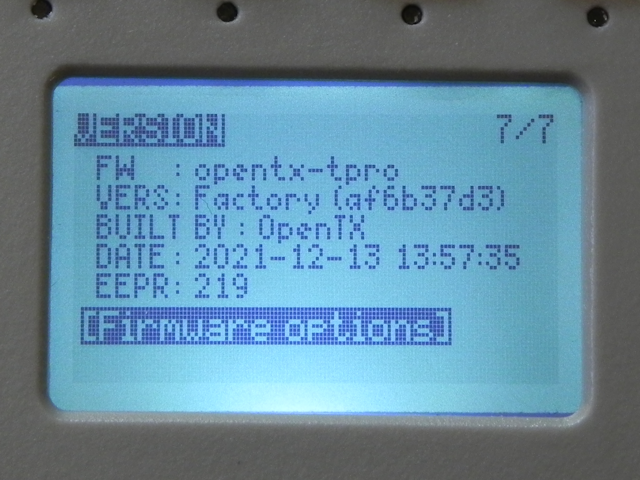 Pre-installed version of OpenTX is the Factory Setup version, as shown in the figure.
When I checked it in DFU/Bootloader Mode screen, it was OpenTX 2.3.14.
Pre-installed version of OpenTX is the Factory Setup version, as shown in the figure.
When I checked it in DFU/Bootloader Mode screen, it was OpenTX 2.3.14.
How to update radio firmware
Battery setting and charging
 Set Jumper T-Pro battery in the grip part.
Remove grip cover with flat-blade screwdriver to reveal the battery box.
Insert one 18650 type lithium-ion battery on each side.
Set Jumper T-Pro battery in the grip part.
Remove grip cover with flat-blade screwdriver to reveal the battery box.
Insert one 18650 type lithium-ion battery on each side.
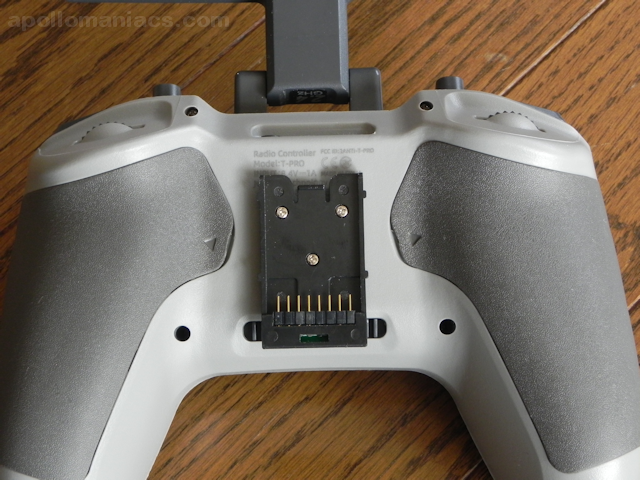
Three holes around the Jumper logo seal in the center are screw holes for attaching NANO module bay adapter. NANO module is installed via the adapter.
Buy 18650 type battery (Amazon.com)
Buy 18650 type battery (Amazon.co.uk)
 This radio has the ability to charge battery.
When you use USB Type-C cable to connect to a commercially available USB AC adapter, green lamp will light up like this and charging will start.
It is convenient because it is charged even when connecting to PC and playing
FPV drone simulator
.
This radio has the ability to charge battery.
When you use USB Type-C cable to connect to a commercially available USB AC adapter, green lamp will light up like this and charging will start.
It is convenient because it is charged even when connecting to PC and playing
FPV drone simulator
.
It takes about 12 hours to fully charge, depending on the capacity of the battery. The lamp goes out when charging is complete. Since the area around the USB connector of housing is very narrow, it may not be possible to insert it depending on the cable. Use a cable whose connector is as thin as possible.
Module bay
 This is a picture of the accessory NANO (JR Lite) module bay adapter attached.
Socket for inserting the adapter cable is sank in the back of radio's body case, so you will have to pull the cable when removing it.
To avoid damaging the connector, it seems better not to install / remove the adapter frequently.
It may be good to glue the connector cable around with a
glue gun (Amazon.com)
.
This is a picture of the accessory NANO (JR Lite) module bay adapter attached.
Socket for inserting the adapter cable is sank in the back of radio's body case, so you will have to pull the cable when removing it.
To avoid damaging the connector, it seems better not to install / remove the adapter frequently.
It may be good to glue the connector cable around with a
glue gun (Amazon.com)
.
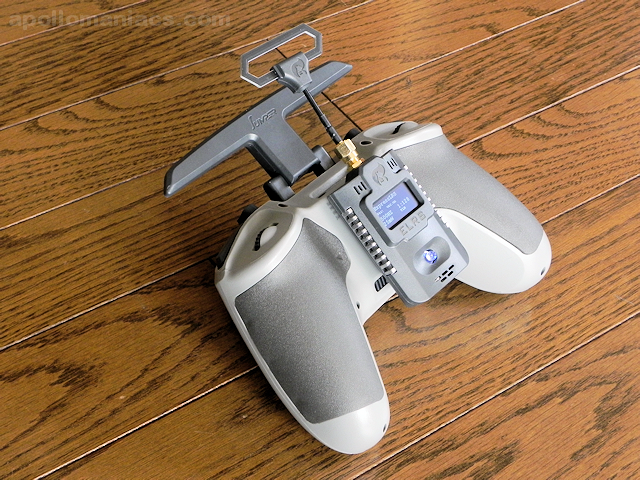 This is a picture of NANO module AION-2.4TX-NANO ExpressLRS (ELRS) transmitter attached.
Get a microSD card image
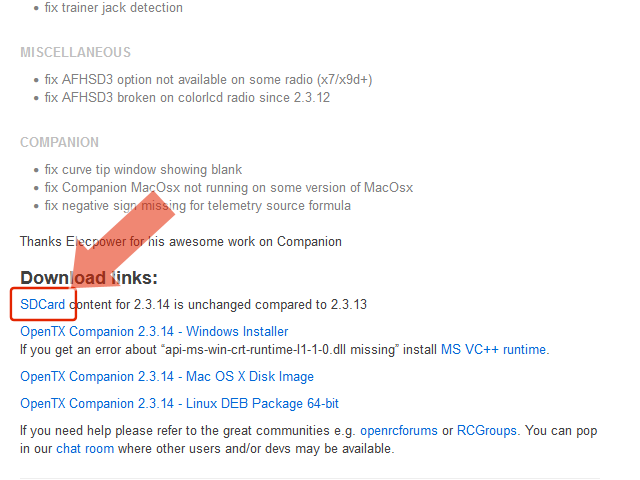 The microSD card image for Jumper T-Pro is not distributed.
Therefore, download the data that matches the screen resolution of the radio and its OpenTX version from
OpenTX official site
.
The microSD card image for Jumper T-Pro is not distributed.
Therefore, download the data that matches the screen resolution of the radio and its OpenTX version from
OpenTX official site
.
For the procedure to prepare the microSD card, see How to prepare microSD card for OpenTX radio .
How to prepare microSD card for OpenTX radio
OpenTX Downloads page (OpenTX)
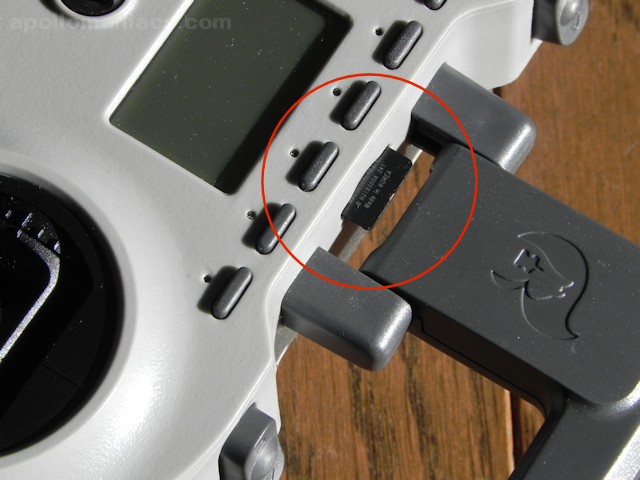 Insert the microSD card under the antenna like this.
Insert it face down (card terminal up, label down).
It's so narrow that you'll need tweezers or a screwdriver when you want to take it out.
Insert the microSD card under the antenna like this.
Insert it face down (card terminal up, label down).
It's so narrow that you'll need tweezers or a screwdriver when you want to take it out.
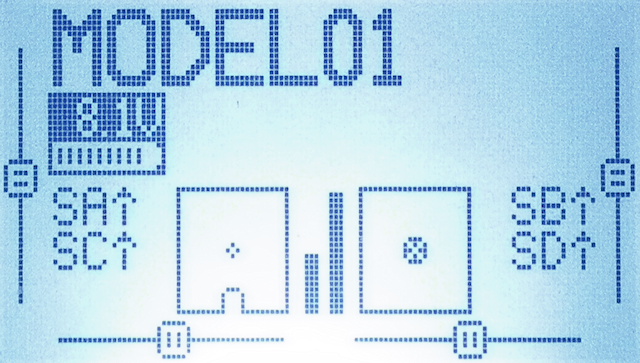
Screen navigation
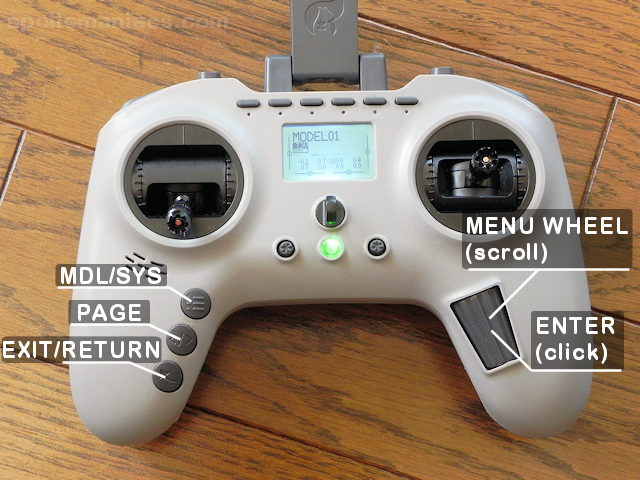 To operate OpenTX with Jumper T-Pro, use the four switches shown in the figure.
Operations and functions are shown in the table below.
To operate OpenTX with Jumper T-Pro, use the four switches shown in the figure.
Operations and functions are shown in the table below.
If you press and hold [ENTER] [PAGE] keys, different menu screens will be called.
| Name of control | Function | Description |
|---|---|---|
| ENTER | Decide / Confirm | Confirm the change / input. Or select an item. Click [MENU WHEEL] to operate as [ENTER] button. |
| EXIT/RETURN | Cancel / Back | Cancel the change / input. Or return to the previous screen. |
| PAGE | Screen switching | In the setting screen consisting of multiple pages, move to the next page / previous page. Click [PAGE] key to switch to the next page, and long press to switch to the previous page. |
| CURSOR | Move cursor / selected position | Move the cursor. Turn [MENU WHEEL] to move cursor. |
| MODEL/SYSTEM | Calling MODEL / RADIO menu | Call the MODEL / RADIO(SYSTEM) menu. Click [MDL/SYS] key to bring up MODEL menu, and press and hold it to bring up RADIO(SYSTEM) menu. |
- Change screen
- Press [PAGE] key on the main screen to switch between four main screens and "CHANNELS MONITOR" screen.
- Change contents
- You can switch contents of each main screen by turning scroll wheel on the main screen.
- Telemetry screen
- Press and hold [PAGE] key on the main screen to display Telemetry screen.
- Statistics / DEBUG screen
- Press and hold scroll wheel on the main screen and select "Statistics" menu to display Statistics screen. If you press [PAGE] key here, you can switch to "DEBUG" screen.
Switches
 Jumper T-Pro is equipped with a function switch, which is rare for handheld type radios.
After
upgrading OpenTX
to 2.3.15, you can set switch SW1 - SW6 as a function switch by specifying "2POS" on [SETUP] screen of each MODEL.
See below for details.
Jumper T-Pro is equipped with a function switch, which is rare for handheld type radios.
After
upgrading OpenTX
to 2.3.15, you can set switch SW1 - SW6 as a function switch by specifying "2POS" on [SETUP] screen of each MODEL.
See below for details.
| Name | Location | Type | Description |
|---|---|---|---|
| SA | Top of left hand | 3 position | Type can be set in [RADIO]-[HARDWARE]-[Switches] fields. Type can be selected from 3POS / 2POS / Toggle / None. |
| SB | Top of right hand | ||
| SC | Top of right hand | 2 position | |
| SD | Top of left hand | ||
| S1 | Top of left hand | Pot | Type can be set in [RADIO]-[HARDWARE]-[Pots] fields. Type can be selected from Pot / Multipos (Multi-position switch) / Pot w. Det (Pot with detent) / None. |
| S2 | Top of right hand | ||
| SW1 - SW6 | Above LCD display. The left end is SW1. | 2 position | Type can be set for each model in [MODEL]-[SETUP]-[Function Switches] fields. Type can be selected from 2POS / Toggle / None. |
Yaw gimbal failure
Two months after purchase, Yaw gimbal behaves strangely. Sometimes suddenly Yaw axis becomes very unresponsive. When I look at "CHANNELS (MIXERS) MONITOR" screen of OpenTX, I can see that output does not follow even if I move the stick. (See YouTube video below) I tried calibrating sticks many times, but the phenomenon did not improve. I am currently contacting Jumper support. What kind of response will they do ... 04/29 Two weeks after the inquiry. No reply after receiving an email confirming the serial number a week ago. The reaction is very bad. 05/06 3 weeks from inquiry. I send emails every week, but no reply from support. It's a pity that the response is so bad. 05/10 Finally, support has replied that they will ship an alternative gimbal this week. I patiently wait for it to arrive. 05/12 Support contacted me to ship a replacement gimbal and I got Tracking #.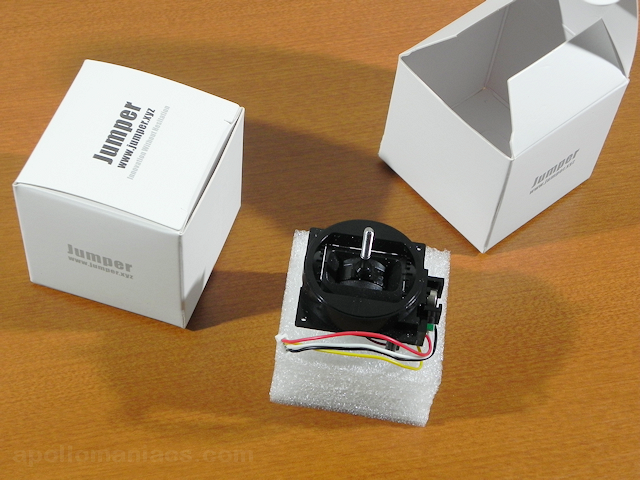 2022/08/01 About three and a half months have passed since the inquiry, and the replacement gimbal has finally arrived by sea mail.
They sent me two, one for the left and one for the right.
There is no part number on the box, and no instructions are included.
As far as I can see in the picture, it seems to be a different product from
Original JumperRC P10310 Gimbal Replacement Parts (Banggood)
on the market.
2022/08/01 About three and a half months have passed since the inquiry, and the replacement gimbal has finally arrived by sea mail.
They sent me two, one for the left and one for the right.
There is no part number on the box, and no instructions are included.
As far as I can see in the picture, it seems to be a different product from
Original JumperRC P10310 Gimbal Replacement Parts (Banggood)
on the market.
When I compare it again, this radio uses a gimbal that is one size smaller than RadioMaster Zorro, TX12 series, and Jumper T12 series. The wiring method is also different from these radios (cables for two axes are combined into one connector), so these gimbals cannot be used. Perhaps the strange failure this time is also caused by this special wiring configuration.
I will try to exchange it soon.
Jumper T-Pro Yaw Gimbal malfunction
Watch on YouTube
Gimbal replacement method
Here, We will explain the procedure to replace Jumper T-Pro gimbal. However, this task is not so easy. In the worst case, it may damage the radio. This site does not mean that we recommend replacing the gimbal. Please do it at your own risk.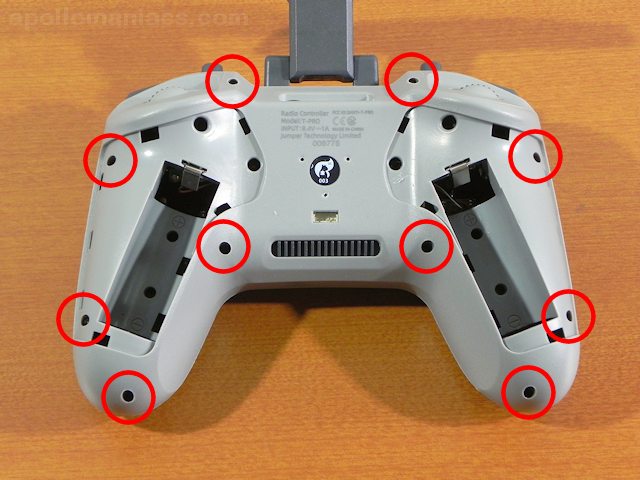 First, remove microSD card and batteries, and remove 10 screws circled in red in the figure.
These 10 screws are all the same size.
First, remove microSD card and batteries, and remove 10 screws circled in red in the figure.
These 10 screws are all the same size.
Except for top two screws, it is difficult to remove screws from back cover, so it may be better to remove them together with the back cover.
 Then open the back cover upwards.
If you pull the back cover too much, dial (Pot: Potentiometer) connector will come off from the board, so be careful.
Then open the back cover upwards.
If you pull the back cover too much, dial (Pot: Potentiometer) connector will come off from the board, so be careful.
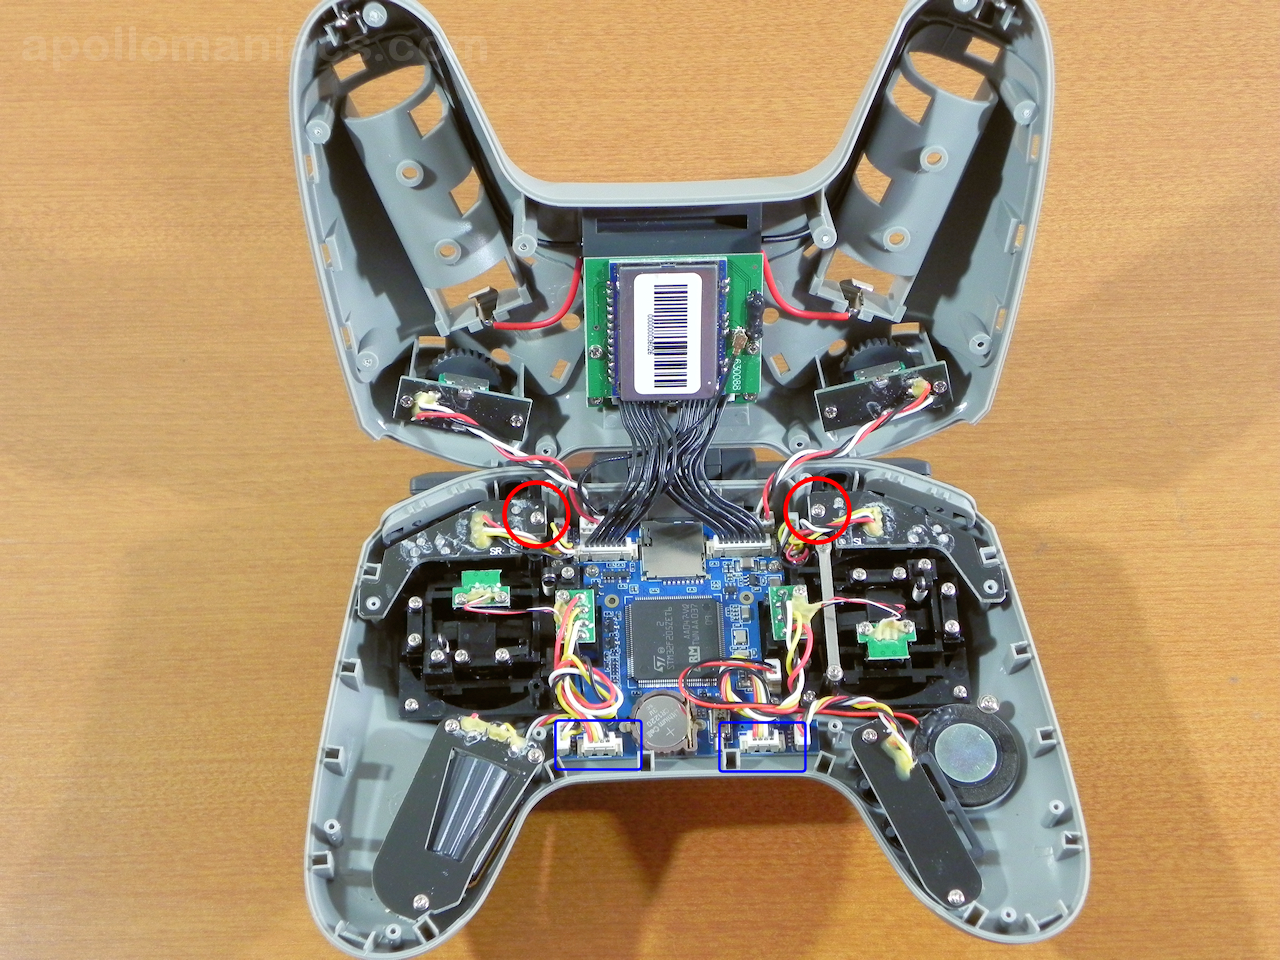
Next, remove the board on which SA and SB switches are attached. These boards can be removed by removing two screws circled in red in the figure.
By the way, the two connectors enclosed in blue frame are gimbal connectors. One gimbal is connected to the board with only one connector.
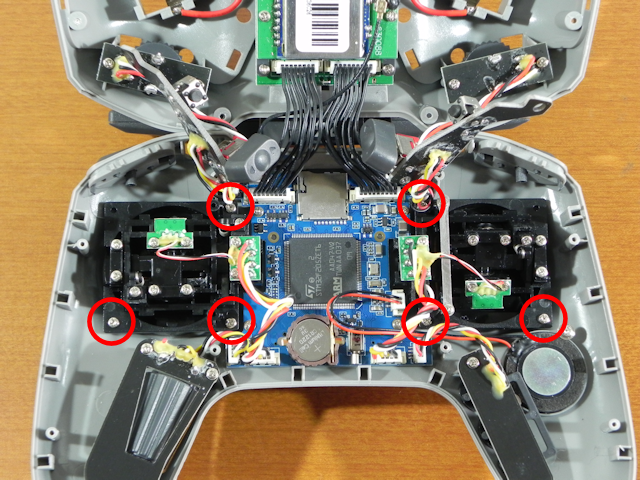 Gimbals can be removed by removing 6 screws circled in red in the figure.
One gimbal is fixed with 3 screws.
Gimbals can be removed by removing 6 screws circled in red in the figure.
One gimbal is fixed with 3 screws.
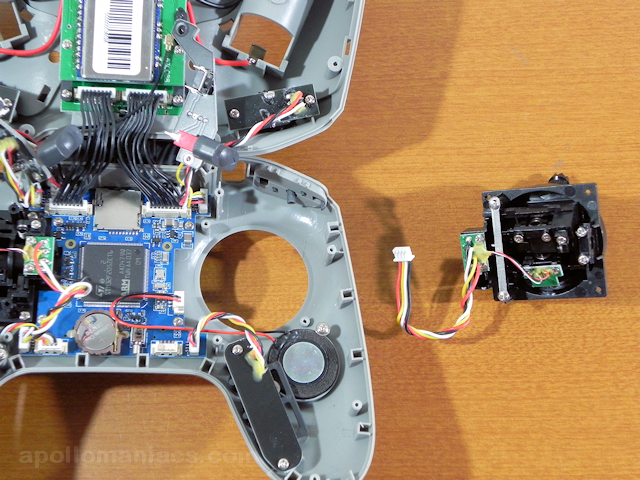 Here is a photo with the gimbal removed.
All you have to do is assemble in the reverse order of disassembly.
Here is a photo with the gimbal removed.
All you have to do is assemble in the reverse order of disassembly.
The point to note when assembling is the mounting screws. The radio's housing is small and the screws are difficult to insert, so it may be dropped into the main unit case. Use tweezers, etc., to attach it carefully. Gimbal mounting screws are screwed into the gimbal first, and then attached to the housing together with the gimbal.
Screws dropped into the case may stick to gimbal's hall sensor magnets. If you lose a screw, the first thing to check is to take a close look at the gimbal.
And just before closing the back cover, check that the dial (Pot: Potentiometer) connector is not disconnected from the board, and adjust the stick tension.
If the back cover doesn't fit snugly, the cable is stuck somewhere. Please reinsert it carefully.
Let it sit for a while, and if nothing seems to be wrong, turn on the radio. If OpenTX starts successfully, it is completed.
 Make sure all sticks, switches and dials (Pot:Potentiometer) are responding correctly on Input Monitor screen.
Then
calibrate the gimbal
.
Make sure all sticks, switches and dials (Pot:Potentiometer) are responding correctly on Input Monitor screen.
Then
calibrate the gimbal
.
Stick (Gimbal) calibration