There are several ways to bind ExpressLRS transmitter and receiver.
And the setting method differs depending on whether you are using external receiver or FC (Flight Controller) built in receiver.
Here's how to bind the ExpressLRS transmitter and receiver together.
Match the firmware versions of transmitter and receiver
To bind ELRS transmitter and receiver, both ELRS firmware major versions (first number) must match.
For example, ELRS 3.x.x and ELRS 2.x.x transmitter and receiver bindings are not guaranteed.
If necessary, upgrade the firmware of the transmitter and receiver.
However, the minor version (second number) and patch version (third number) do not have to match.
There are two ways to bind, one is to use "watchword" called "Binding Phrase" and the other is to bind manually.
Use Binding Phrase
Set the same "Binding Phrase" for both transmitter and receiver.
Then just turn on their power and they will be bound automatically.
ELRS transmitter can be bound to any receiver that matches "Binding Phrase".
This means that one receiver (drone) can bind to multiple radios.
If you set the same Binding Phrase to all the transmitters and receivers you have, you can bind by simply turning on the transmitter and receiver you want to use.
This is convenient for people who have multiple radios.
Enter the Binding Phrase in Latin alphabets.
Set a unique phrase so that you do not suffer from other users.
Bind manually
As with common protocols like FrSky, first put the receiver into bind mode, then press [ENTER] on the transmitter with [Bind] menu.
Using external ELRS receiver
Procedure when using external type receiver with the receiver cabled to FC UART port.
How to set Binding Phrase
Build firmware with Binding Phrase and write it to receiver.
It is set in
ExpressLRS Configurator
build option "BINDING_PHRASE" field.
See below for details.
Alternatively, if the receiver supports Wi-Fi mode and has ELRS version 3.x or later firmware, when you connect to the receiver from your PC, a screen like this will open.
You can also specify Binding Phrase and other parameters from this screen.
For the procedure for connecting to the receiver from a computer, see below.
To put receiver into bind mode, turn the receiver (drone) on and off (battery installation / removal) three times in a row.
When the receiver enters bind mode, the LED will repeat high speed "blinking twice".
However, you cannot manually enter bind mode if the receiver has a Binding Phrase set.
You can read the lighting pattern of the LED attached to the receiver and its meaning on
LED Status (expresslrs.org)
page of the ELRS official site.
Procedure for using receiver built into AIO (All In One) type FC, which connected to FC by SPI.
Check receiver settings
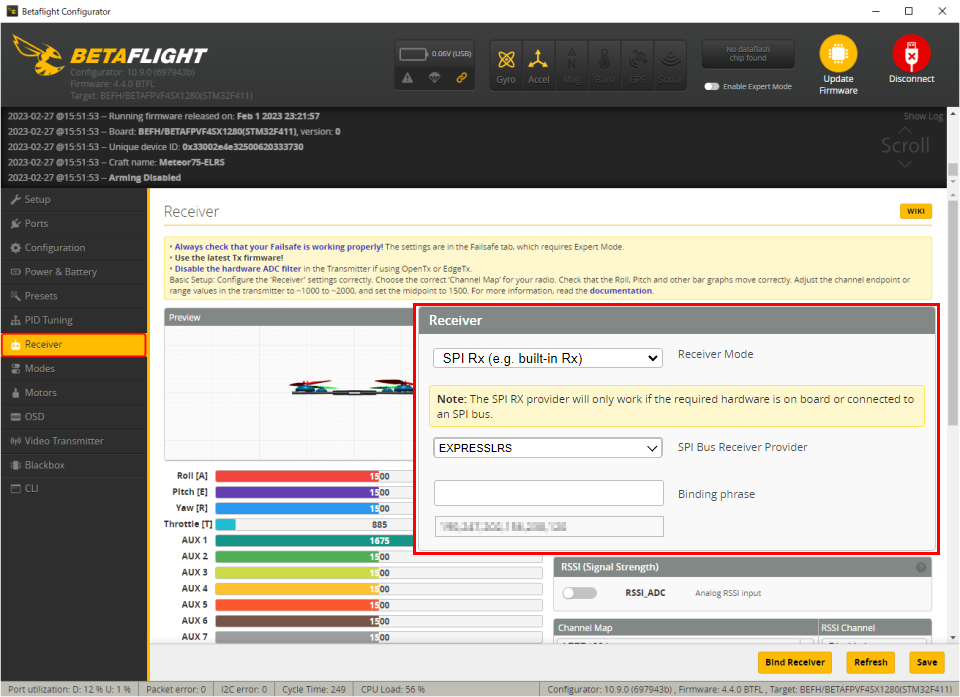
Connect drone to your computer and open "Receiver" screen in
Betaflight Configurator
.
Then check and set "Receiver" field in the upper right of this screen.
Select "SPI Rx" in "Receiver Mode" field, select "EXPRESSLRS" in "SPI Bus Receiver Provider" field, and click "Save" button at the bottom right of the screen.
How to set Binding Phrase
Use
Betaflight Configurator
to type command on the CLI screen.
Binding Phrase is converted to a 6-byte hash value called "UID byte" and stored inside the firmware.
Connect drone (FC) to your computer and type
set expresslrs_uid = 246,137,113,221,86,15
save
from the Betaflight Configurator CLI command line.
Alternatively, enter Binding Phrase in "Binding Phrase" field on "Receiver" screen of
Betaflight Configurator
and click "Save" button at the bottom right of the screen.
(Betaflight Configurator Ver.10.9.0 or later)
"UID byte" can be generated using "UID Byte Generator" on
SPI Receivers (expresslrs.org)
page of ELRS official site.
Enter the phrase in the text box labeled "Binding Phrase" and the results will be displayed in the "UID Bytes" field below it.
How to manually enter bind mode
There are following methods to put FC built in receiver into bind mode.
Use the method you like.
However, you cannot manually enter bind mode if the receiver has a Binding Phrase (UID byte) set.
Follow the instructions below to erase "UID byte" in advance.
Betaflight Configurator bind button
Connect drone (FC) to your computer and click "Bind Receiver" button on "Receiver" screen of Betaflight Configurator.
Betaflight Configurator CLI command
Connect drone (FC) to your computer and type "bind_rx" in Betaflight Configurator CLI command line.
FC bind button
Push bind button mounted on FC board with a screwdriver with a fine tip.
Check manufacturer's website for location of the bind button.
Erase "UID byte"
Connect drone (FC) to your computer and type "set expresslrs_uid = 0" in Betaflight Configurator CLI command line, then type "save".
Then "UID byte" will be erased and FC will restart. After this, put it into bind mode using one of the above three methods.
When the receiver enters bind mode, the LED will repeat high speed "blinking twice".
You can read the lighting pattern of the LED attached to the receiver and its meaning on
LED Status (expresslrs.org)
page of the ELRS official site.
Build the firmware with Binding Phrase and write it to the transmitter.
It is set in
ExpressLRS Configurator
build option "BINDING_PHRASE" field.
See below for details.
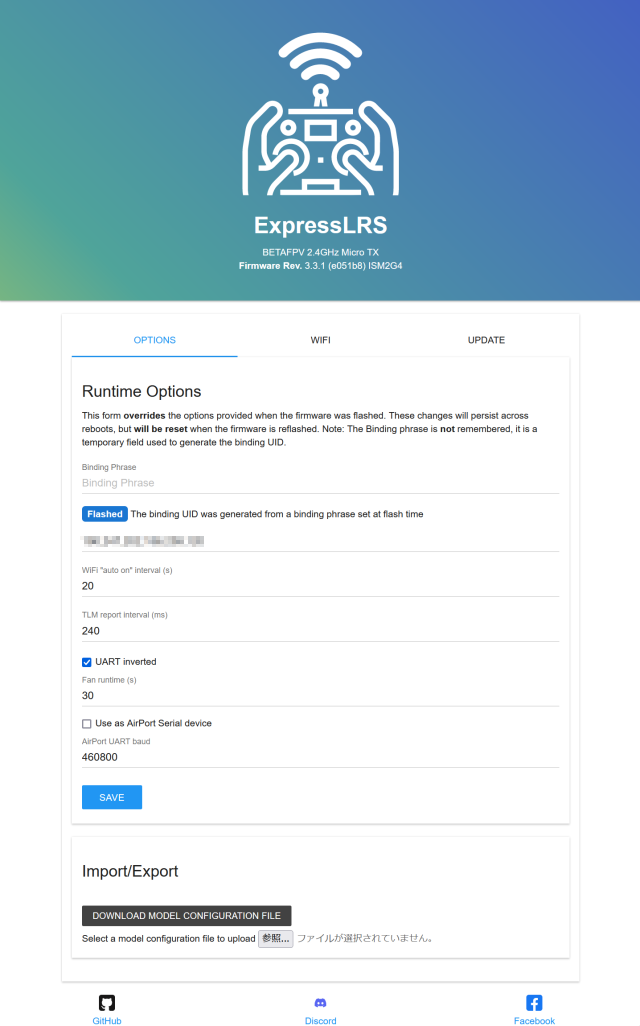
Alternatively, if the transmitter supports Wi-Fi mode and has ELRS version 3.x or later firmware, when you connect to the transmitter from your PC, a screen like this will open.
You can also specify Binding Phrase and other parameters from this screen.
For the procedure for connecting to the transmitter from a computer, see below.
After that, turn on radio, then connect battery to the receiver (drone), and they will be bound.
If binding is successful, LED on the receiver will switch from blinking to always on.
If the receiver goes into WiFi mode (LED flashes fast), remove battery and try again.
How to manually bind to receiver
After putting receiver in bind mode, do the following on transmitter.
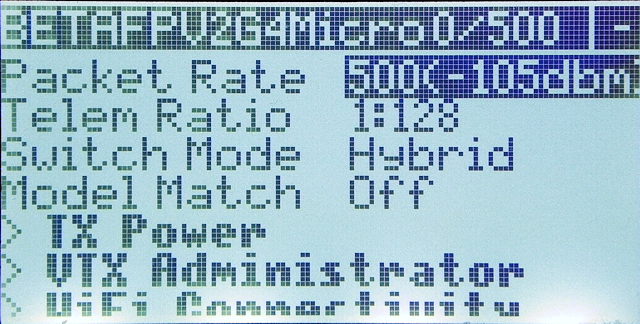
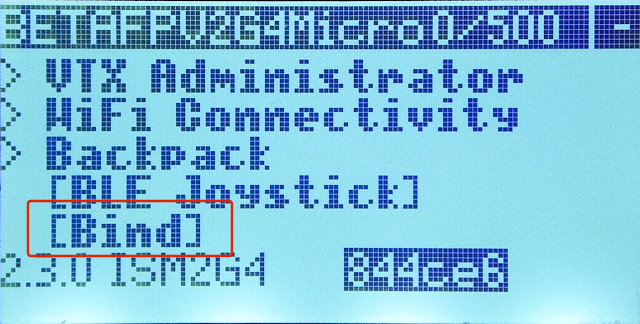
Launch Express LRS Lua script on the transmitter.
Then you will see a screen like this.
Scroll this screen.
Then a menu labeled [Bind] will appear.
Move cursor here and press [ENTER] button.
If binding is successful, LED of the receiver will stop blinking and will be lit all the time.
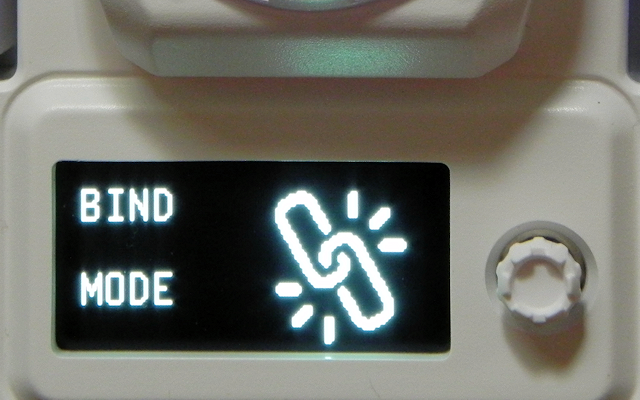
For transmitters with a display and joystick, you can bind transmitter alone.
Press and hold joystick to display item selection screen.
Move joystick up and down to bring up "BIND MODE" screen, then click on the joystick.
Then, "PRESS TO SEND BIND REQUEST" is displayed on the screen, so click the joystick again.
Then binding process will start.
To cancel the process, tilt joystick to the left.
ELRS system has a function to temporarily lend drones with Binding Phrase set to others.
You can put the receiver into bind mode by manipulating the transmitter's ExpressLRS Lua script while leaving your Binding Phrase setting intact.
Please see the following page for details.
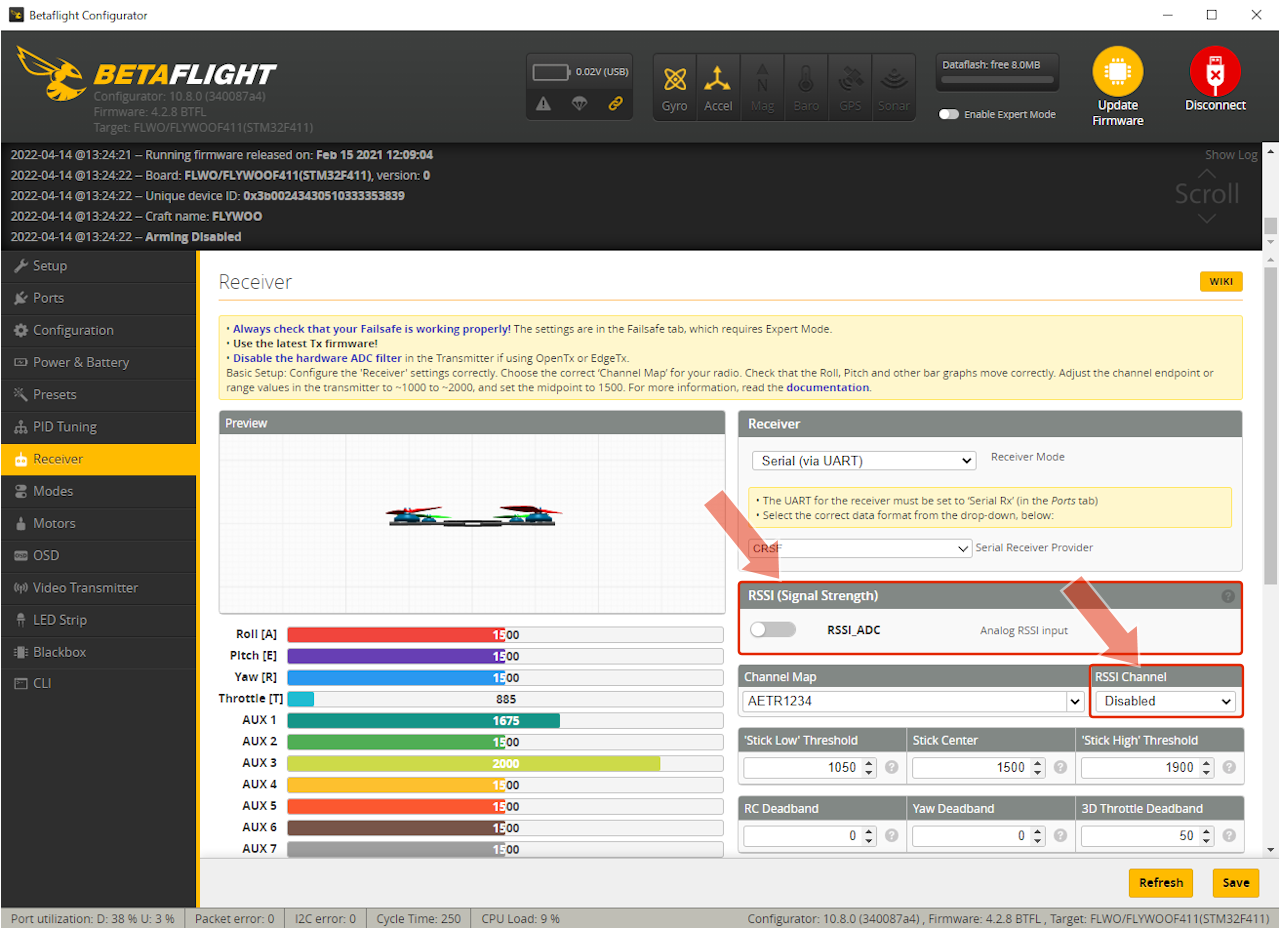
To display RSSI and Link Quality values on OSD screen, first turn off "RSSI Channel" and "RSSI_ADC" on "Receiver" screen of Betaflight Configurator.
This has an initial value of OFF.
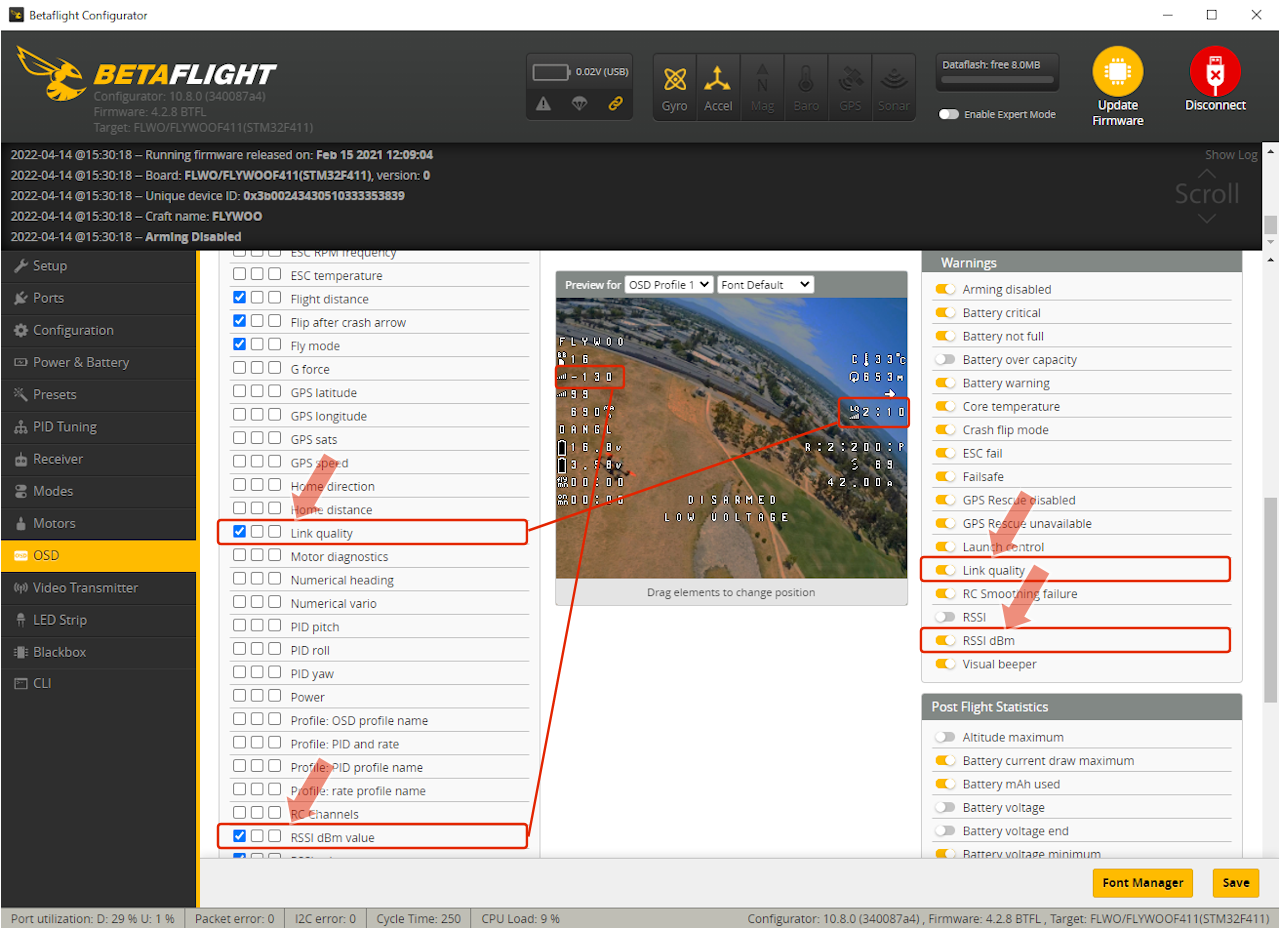
Turn on "Link Quality" and "RSSI dBm" on "OSD" menu screen of Betaflight Configurator.
For more information on how to check link status between transmitter and receiver, and how to receive telemetry data, you can read
Pre-first Flight Check (expresslrs.org)
page on the ELRS official site.


 How to Bind ExpressLRS Transmitter and Receiver
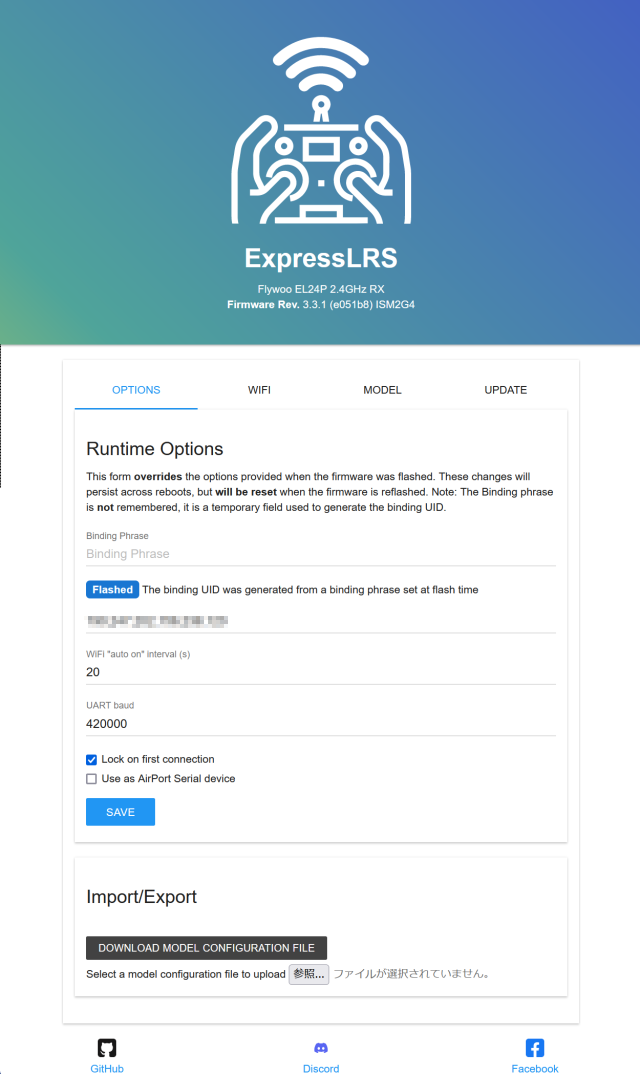 Alternatively, if the receiver supports Wi-Fi mode and has ELRS version 3.x or later firmware, when you connect to the receiver from your PC, a screen like this will open.
You can also specify Binding Phrase and other parameters from this screen.
Alternatively, if the receiver supports Wi-Fi mode and has ELRS version 3.x or later firmware, when you connect to the receiver from your PC, a screen like this will open.
You can also specify Binding Phrase and other parameters from this screen.
 Connect drone to your computer and open "Receiver" screen in
 "UID byte" can be generated using "UID Byte Generator" on
SPI Receivers (expresslrs.org)
page of ELRS official site.
Enter the phrase in the text box labeled "Binding Phrase" and the results will be displayed in the "UID Bytes" field below it.
"UID byte" can be generated using "UID Byte Generator" on
SPI Receivers (expresslrs.org)
page of ELRS official site.
Enter the phrase in the text box labeled "Binding Phrase" and the results will be displayed in the "UID Bytes" field below it.


 Alternatively, if the transmitter supports Wi-Fi mode and has ELRS version 3.x or later firmware, when you connect to the transmitter from your PC, a screen like this will open.
You can also specify Binding Phrase and other parameters from this screen.
Alternatively, if the transmitter supports Wi-Fi mode and has ELRS version 3.x or later firmware, when you connect to the transmitter from your PC, a screen like this will open.
You can also specify Binding Phrase and other parameters from this screen.
 Launch Express LRS Lua script on the transmitter.
Then you will see a screen like this.
Scroll this screen.
Launch Express LRS Lua script on the transmitter.
Then you will see a screen like this.
Scroll this screen.
 Then a menu labeled [Bind] will appear.
Move cursor here and press [ENTER] button.
Then a menu labeled [Bind] will appear.
Move cursor here and press [ENTER] button.
 For transmitters with a display and joystick, you can bind transmitter alone.
Press and hold joystick to display item selection screen.
Move joystick up and down to bring up "BIND MODE" screen, then click on the joystick.
Then, "PRESS TO SEND BIND REQUEST" is displayed on the screen, so click the joystick again.
Then binding process will start.
For transmitters with a display and joystick, you can bind transmitter alone.
Press and hold joystick to display item selection screen.
Move joystick up and down to bring up "BIND MODE" screen, then click on the joystick.
Then, "PRESS TO SEND BIND REQUEST" is displayed on the screen, so click the joystick again.
Then binding process will start.
 To display RSSI and Link Quality values on OSD screen, first turn off "RSSI Channel" and "RSSI_ADC" on "Receiver" screen of Betaflight Configurator.
This has an initial value of OFF.
To display RSSI and Link Quality values on OSD screen, first turn off "RSSI Channel" and "RSSI_ADC" on "Receiver" screen of Betaflight Configurator.
This has an initial value of OFF.
 Turn on "Link Quality" and "RSSI dBm" on "OSD" menu screen of Betaflight Configurator.