


 How to update ExpressLRS receiver firmware
ExpressLRS is a protocol under development, so it is being upgraded frequently.
Here, we will show you how to update the firmware of the Express LRS receiver.
このページを日本語で見る
Table of contents
- Two types of receiver connection form
- Updating from version 2.x to 3.x: Resolving Not Enough Space error
- Update ELRS receiver built into FC
- Update external ELRS receiver
- Via USB: Check FC settings
- Via USB: Build and update receiver firmware
- Via WiFi: Build receiver firmware
- Via WiFi: Switch receiver to WiFi mode
- Via WiFi: Connect your computer to receiver
- Via WiFi: Update receiver firmware
- Update failed! Escape from Bricking
Two types of receiver connection form
There are two types of connection between FC and ELRS receiver. One is the receiver built into AIO (All In One) type FC, where FC and receiver are connected by SPI. And the other is an external type receiver with the receiver cabled to FC UART (serial) port. The firmware update method also differs according to these connection types.Note: From 2022 onwards, even AIO type FC products with receivers internally connected via UART (serial) are available on the market. In this case, update using the procedure for external type receivers.
In addition, it is expected that SPI connection receivers will not be supported in the future. Please note that such FC can no longer be used.
Updating from version 2.x to 3.x: Resolving Not Enough Space error

This step is only required when updating over Wi-Fi. Not required if via USB(UART).
You can check the detailed firmware update procedure by opening [Receivers]-[Updating Receivers]-[(receiver model name)] screen from Quick Start guide screen on the ExpressLRS official site.
If there is a note on the receiver model name screen as shown in the figure on the right, you need to upgrade to version 2.5.1 or later first.
Quick Start | Getting Started (ExpressLRS)
Update ELRS receiver built into FC

In this case, ELRS receiver firmware is included in FC firmware. Use
Combinations of Betaflight and ELRS versions are shown in the table below.
| Betaflight Version | Built-in SPI ELRS Rx FW Version |
|---|---|
| 4.4.x | 3.x |
| 4.3.x | 2.x |
SPI Receivers (expresslrs.org)
ExpressLRS over SPI - sx1280 and sx1276 support (betaflight github)
Installing and using Betaflight Configurator for beginners
How to set build options
To set build options such as "Binding Phrase" on the FC built-in receiver, enter it from command line on Betaflight Configurator CLI screen. Remember to enter "save" command after entering these commands.
set expresslrs_uid = 246,137,113,221,86,15set expresslrs_rate_index = [INDEX]set expresslrs_domain = ISM2400Update external ELRS receiver
What I will explain here is: Procedure for updating external type receiver with the receiver cabled to FC UART (serial) port.Basics of update method
Update is done using
External receivers can be updated using a USB cable (Betaflight Passthrough), Wifi, STLink unit or USB-TTL serial converter (FTDI). However, depending on the product, the methods that can be used are limited. Please check receiver manufacturer's website.
When using a USB cable, first connect receiver to FC's UART port. Then, in
When using Wifi, receiver acts as an Wifi access point. If you turn on only receiver (drone) without starting radio and wait for about 60 seconds (time depends on the firmware setting), the receiver will be in Wifi mode. Connect your computer to the receiver via Wifi and upload firmware from your browser. There are two types of ELRS receivers, one that uses STM32 chip and one that uses ESP8285 chip, but the receiver that uses STM32 chip does not have a WiFi function.
When using STLink or USB to TTL Serial Converter (FTDI), first connect STLink unit or USB to TTL Serial Converter (FTDI) and receiver with wire. Then connect it to your computer's USB connector and use ExpressLRS Configurator to update. Select "STLink" for "Flashing Method" when using STLink unit, and select "UART" when using USB-TTL serial converter.
Buy STLink V2 (Amazon.com)
Buy STLink V2 (Amazon.co.uk)
Buy USB to TTL Serial Converter (Amazon.com)
Buy USB to TTL Serial Converter (Amazon.co.uk)
When firmware has not been written
To set up ELRS receiver with no firmware written to it, you must first write Bootloader. You can read about this on Receiver Wiring page of ELRS official site.
Receiver Wiring (expresslrs.org)
Via USB: Check FC settings
When using BetaflightPassthrough, check settings related to connection between FC and ELRS receiver in Betaflight Configurator.
Configuring FC (expresslrs.org)
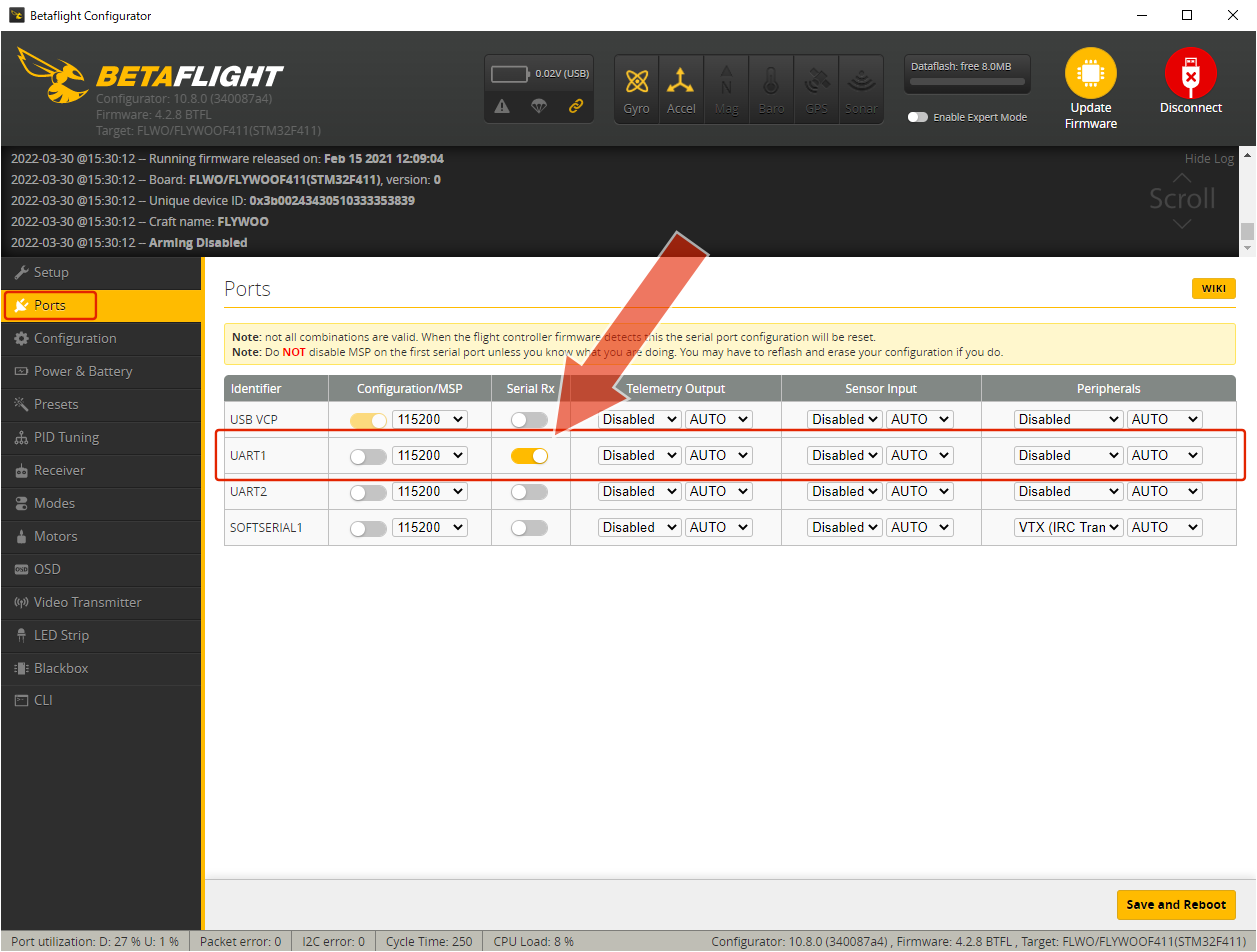 After connecting FC and ELRS receiver, use
Then, make sure that "Serial Rx" field of the UART (port 1 in the example shown) to which the ELRS receiver is connected is ON.
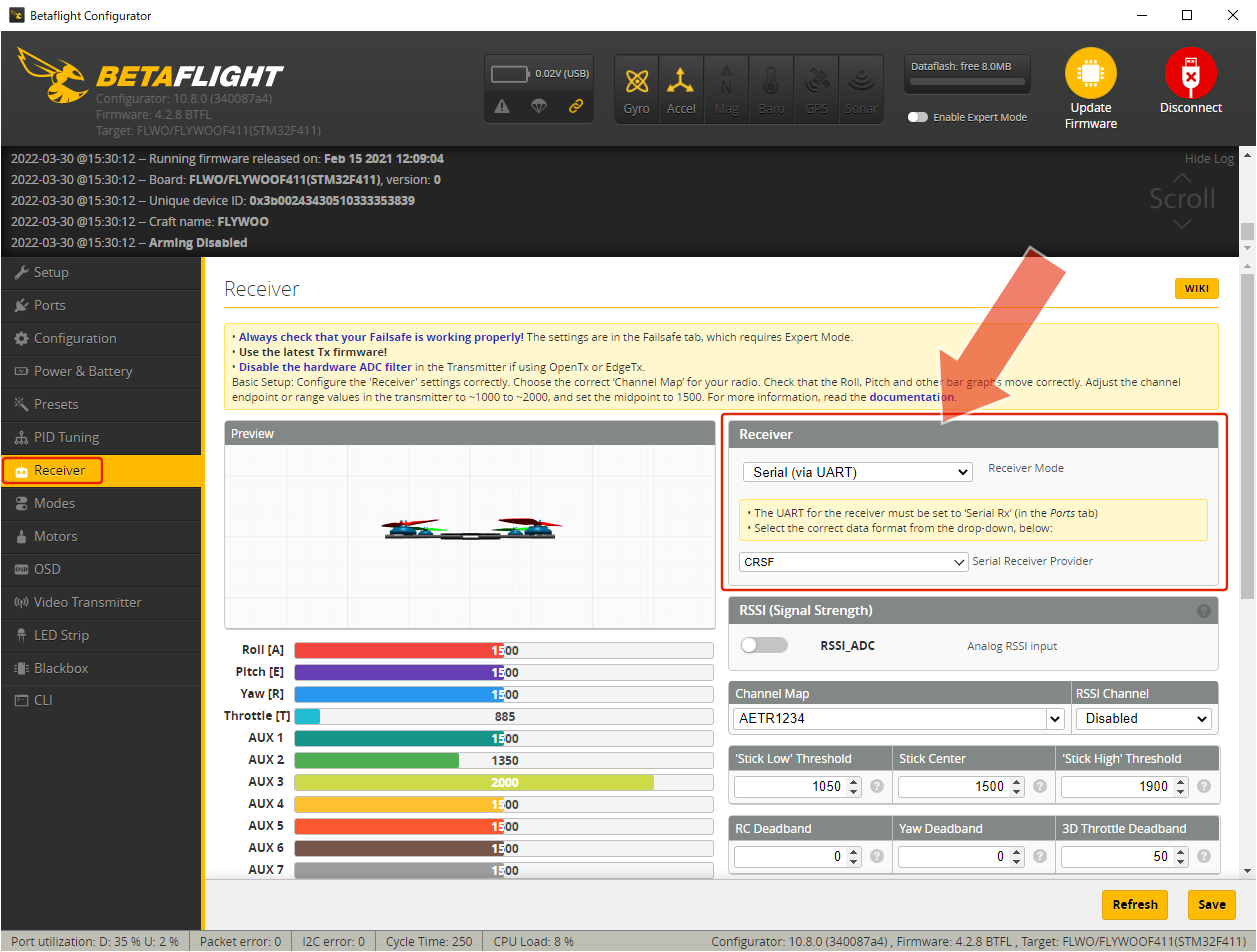 Next, open "Receiver" screen and check that Receiver Mode field is "Serial (via UART)" and Serial Receiver Provider field is "CRSF".
Via USB: Build and update receiver firmware
In addition, software that uses COM port should be closed in advance, such as
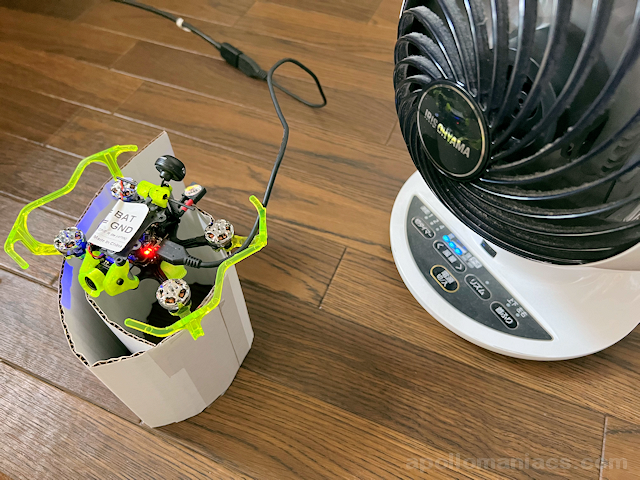
Also, if you connect drone to your computer and leave it for a while, VTX may run away with heat. Place a small fan near the drone and work while cooling.
How to install ExpressLRS Configurator
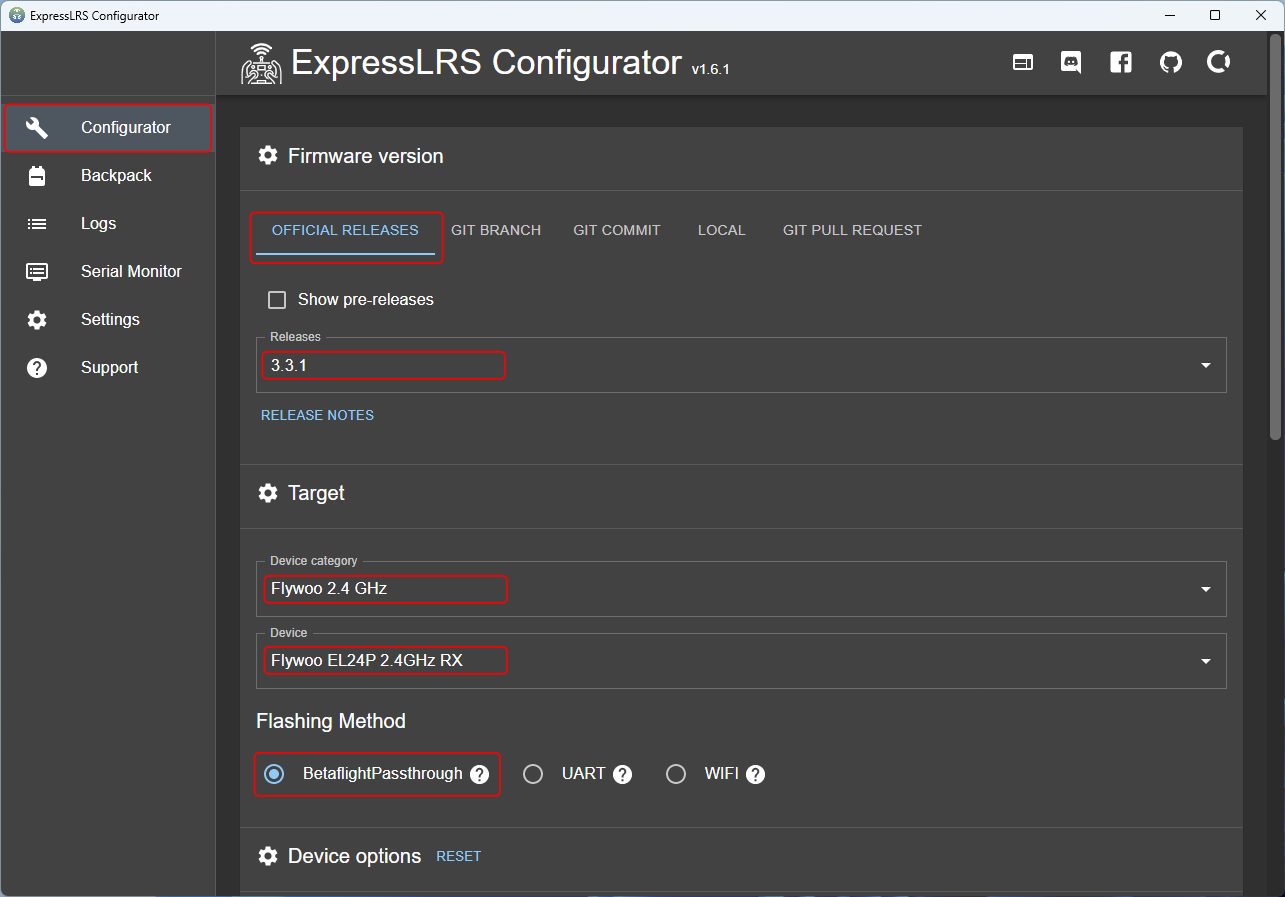 Start ExpressLRS Configurator and select "Configurator" from the left menu and "OFFICIAL RELEASES" from the Top menu.
In "Releases" field, select the firmware version to install. The latest version is selected as the initial value.
In "Device category" and "Device" fields, select the target device. For receivers, device name should contain "RX".
In "Flashing Method" field, specify how to write the firmware. Select "BetaflightPassthrough" when using USB.
If you don't know the device name to select, try accessing receiver from your computer with in WiFi mode. Then you can see target device name and current ELRS version. For more information, see Via WiFi: Connect your computer to receiver . However, some receiver do not have WiFi mode.
 You can select options by scrolling the screen.
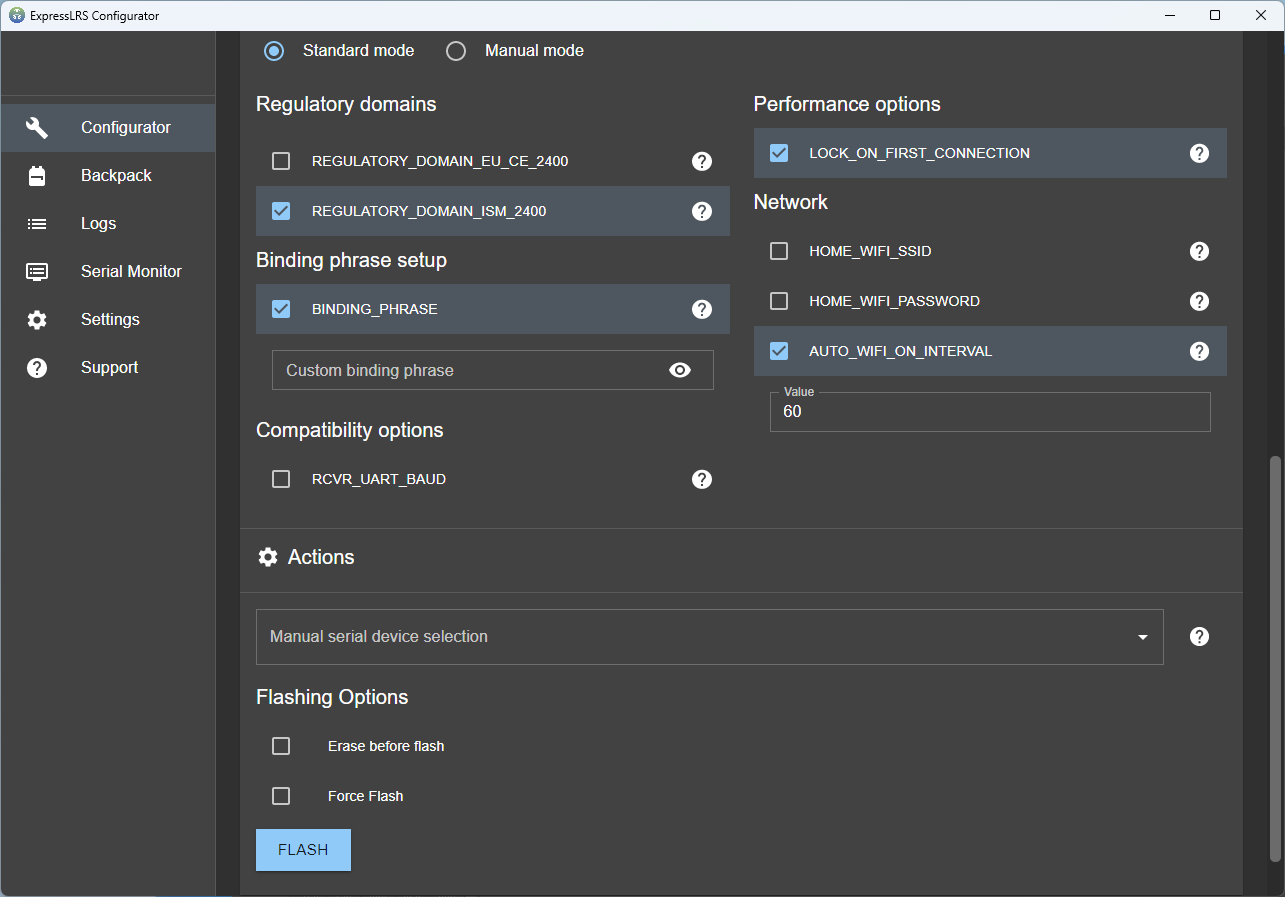
Regulatory domains
Select "EU_CE_2400" when using 2.4GHz band in the EU area, and select "ISM_2400" when using it outside the EU area.
Binding phrase setup
Where "Custom binding phrase" is written, specify "Binding Phrase", which is the "watchword" used to bind transmitter and receiver. If you set the same phrase for both transmitter and receiver, it will be automatically bound just by turning on the power. If you uncheck "BINDING_PHRASE", you can bind manually without using "Binding Phrase".
Network
In the "AUTO_WIFI_ON_INTERVAL" field, you can specify the time from power on to switching to Wi-Fi mode. The unit is seconds, and the initial value is 60 seconds.
You can read more about other options on the following pages of the ExpressLRS official site.
Firmware Options (expresslrs.org)
User Defines Explained (expresslrs.org)
How to Bind ExpressLRS Transmitter and Receiver
Depending on the product, it may be necessary to switch to bootloader mode when updating the firmware for the first time after purchase using BetaflightPassthrough. Check the manufacturer's website.
If there is a Boot terminal on the receiver board, bridge it, then connect FC to USB connector (or battery) to boot. Then receiver will switch to bootloader mode. LED of the receiver will be lit all the time, and the firmware can be updated.
If there is a Bind / Firmware Upgrade button on receiver board, hold down the button and connect FC to USB connector (or battery) to boot. If you keep pressing the button, receiver will switch to bootloader mode. LED of the receiver will be lit all the time, and you can update the firmware.
These operations are required only the first time when rewriting the factory pre-installed firmware.
For detailed product-specific instructions, open Quick Start page on the ELRS official site and select [Receivers]-[Updating Receivers]-[(Product Name)] from the menu.
If you are updating via WiFi , you do not need to do this.
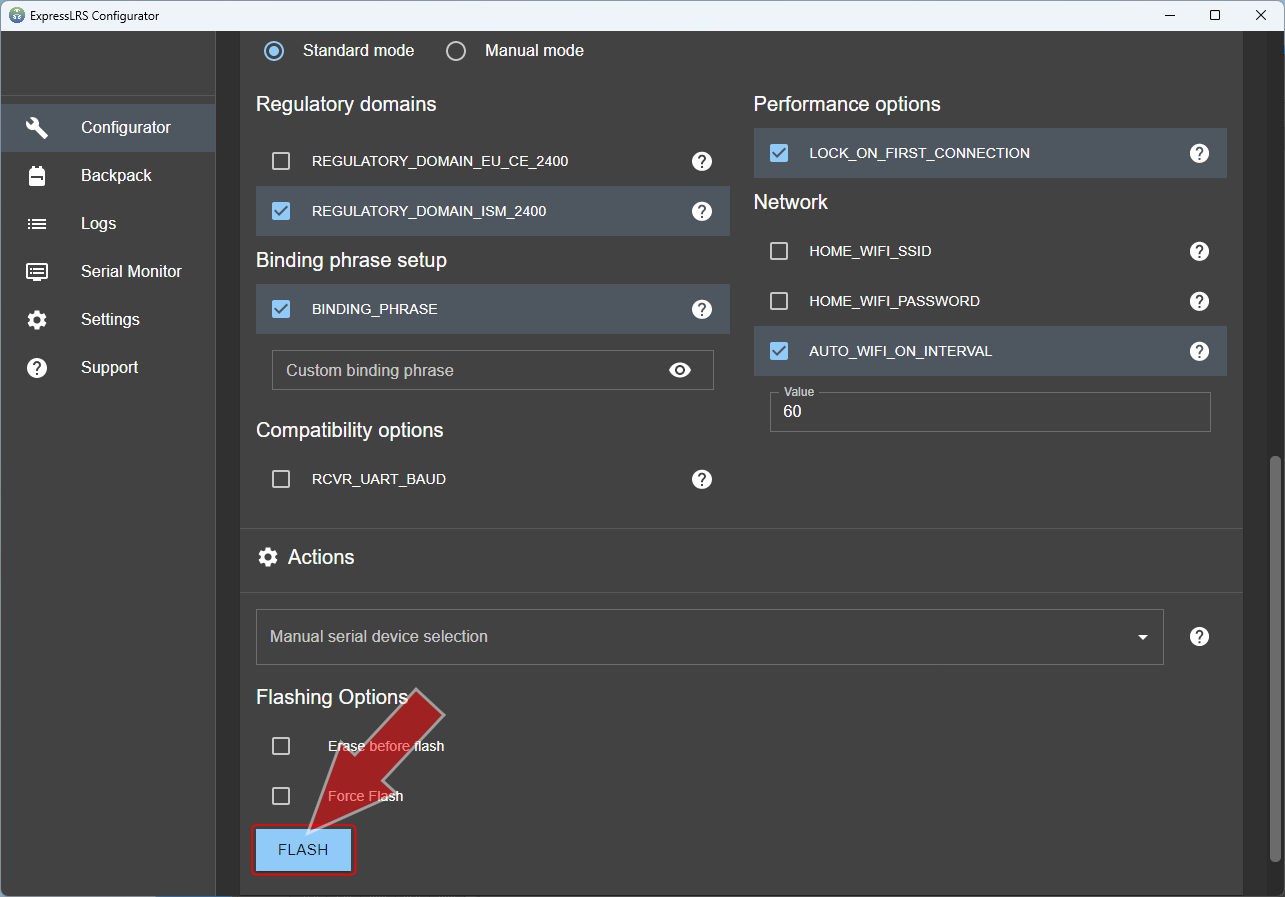 After selecting options, scroll screen and click "FLASH" button.
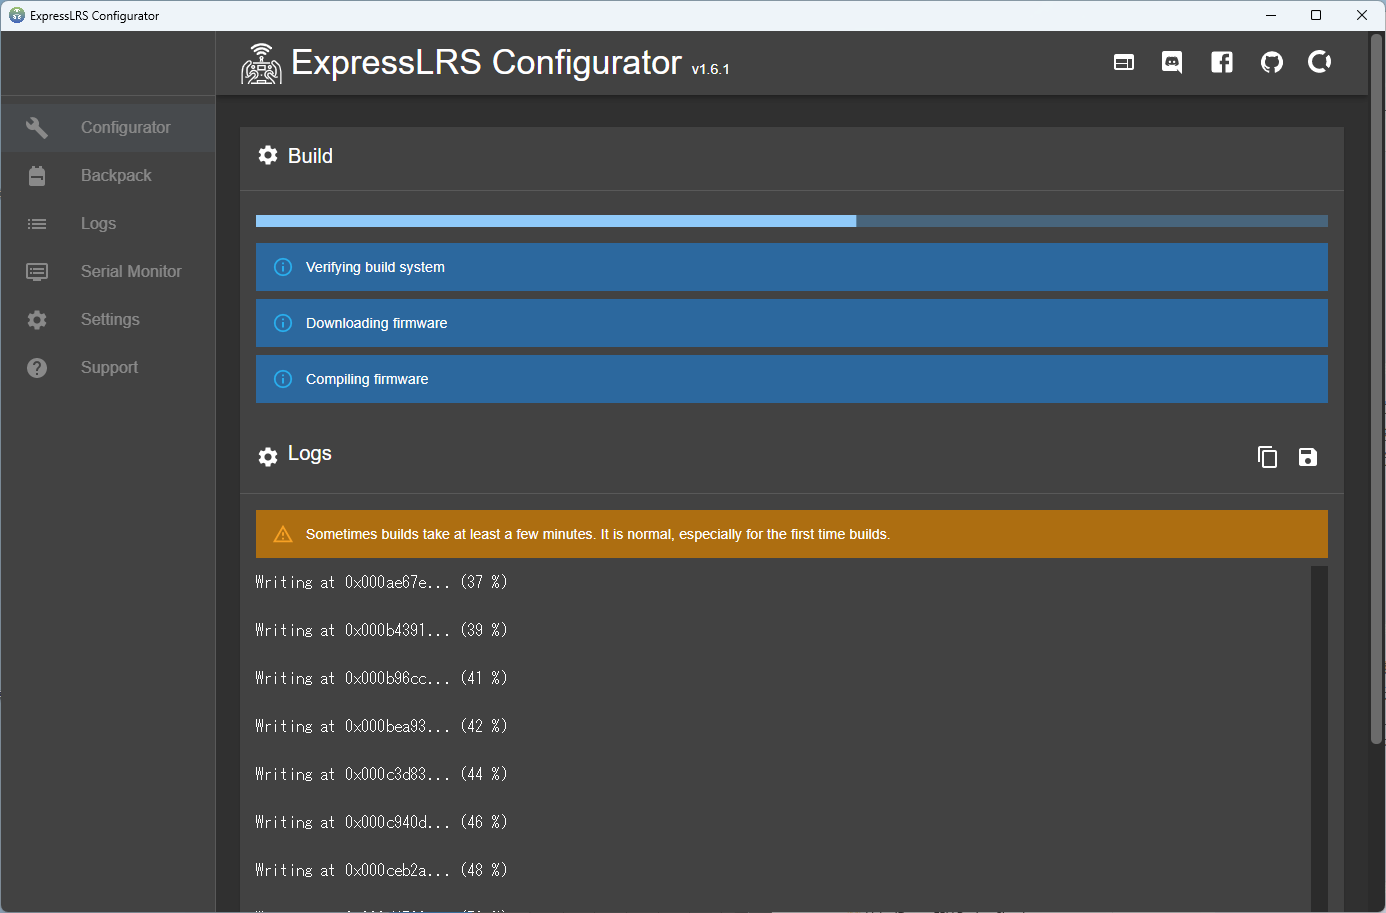 Then the firmware source code will be downloaded, build and write to the receiver will start.
It will take a few minutes to a dozen minutes to complete.
Then the firmware source code will be downloaded, build and write to the receiver will start.
It will take a few minutes to a dozen minutes to complete.
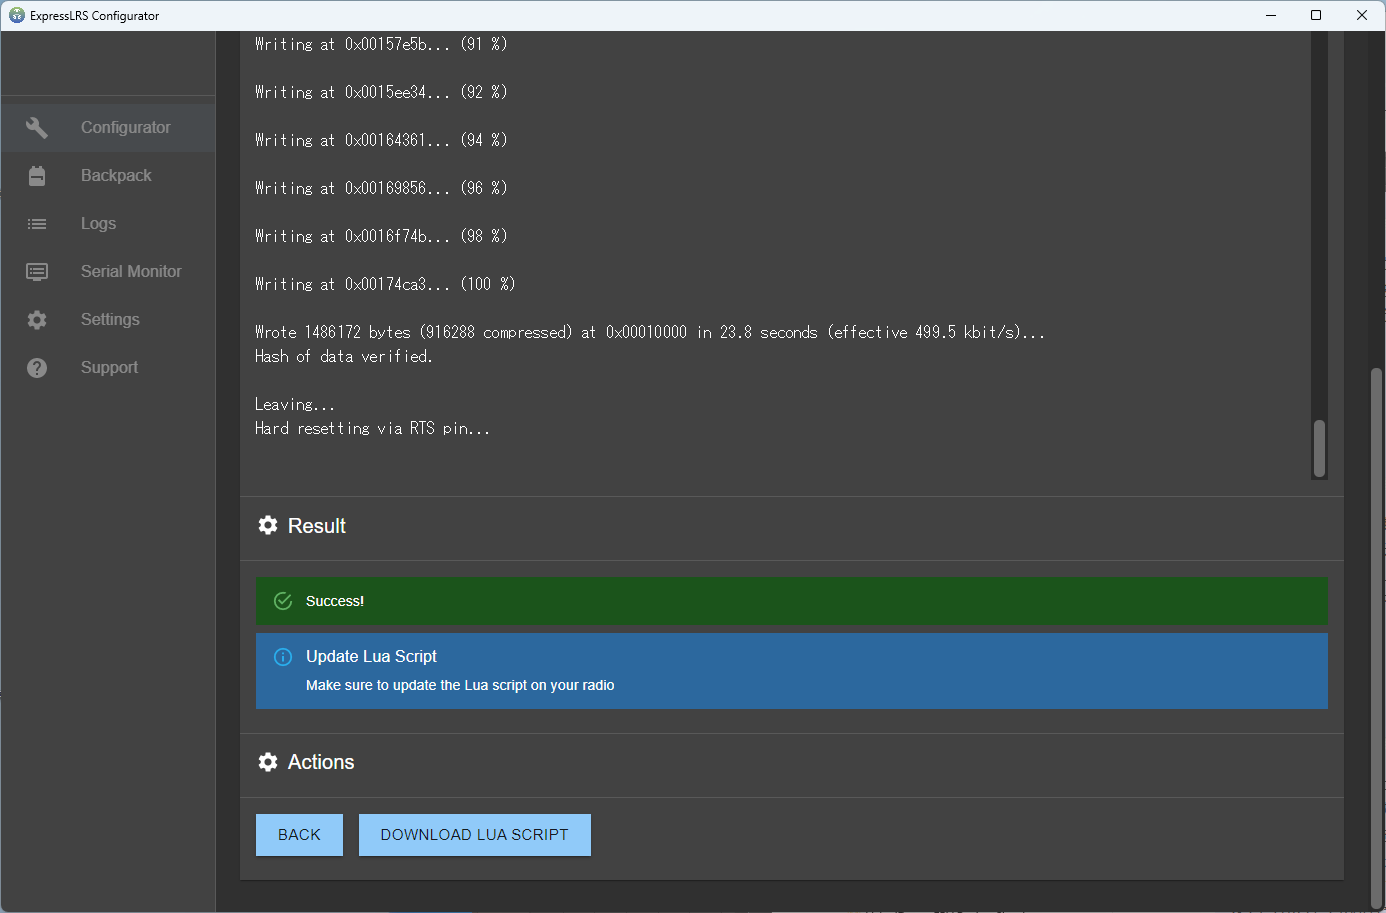 If the writing is successful, "Success!" Will be displayed on a green background as shown in this figure.
Power OFF -> ON the receiver (FC) and restart.
If the writing is successful, "Success!" Will be displayed on a green background as shown in this figure.
Power OFF -> ON the receiver (FC) and restart.
And now the firmware update is complete.
Via WiFi: Build receiver firmware
Build receiver firmware using ExpressLRS Configurator on your computer in the same way as the procedure via BetaflightPassthrough (USB)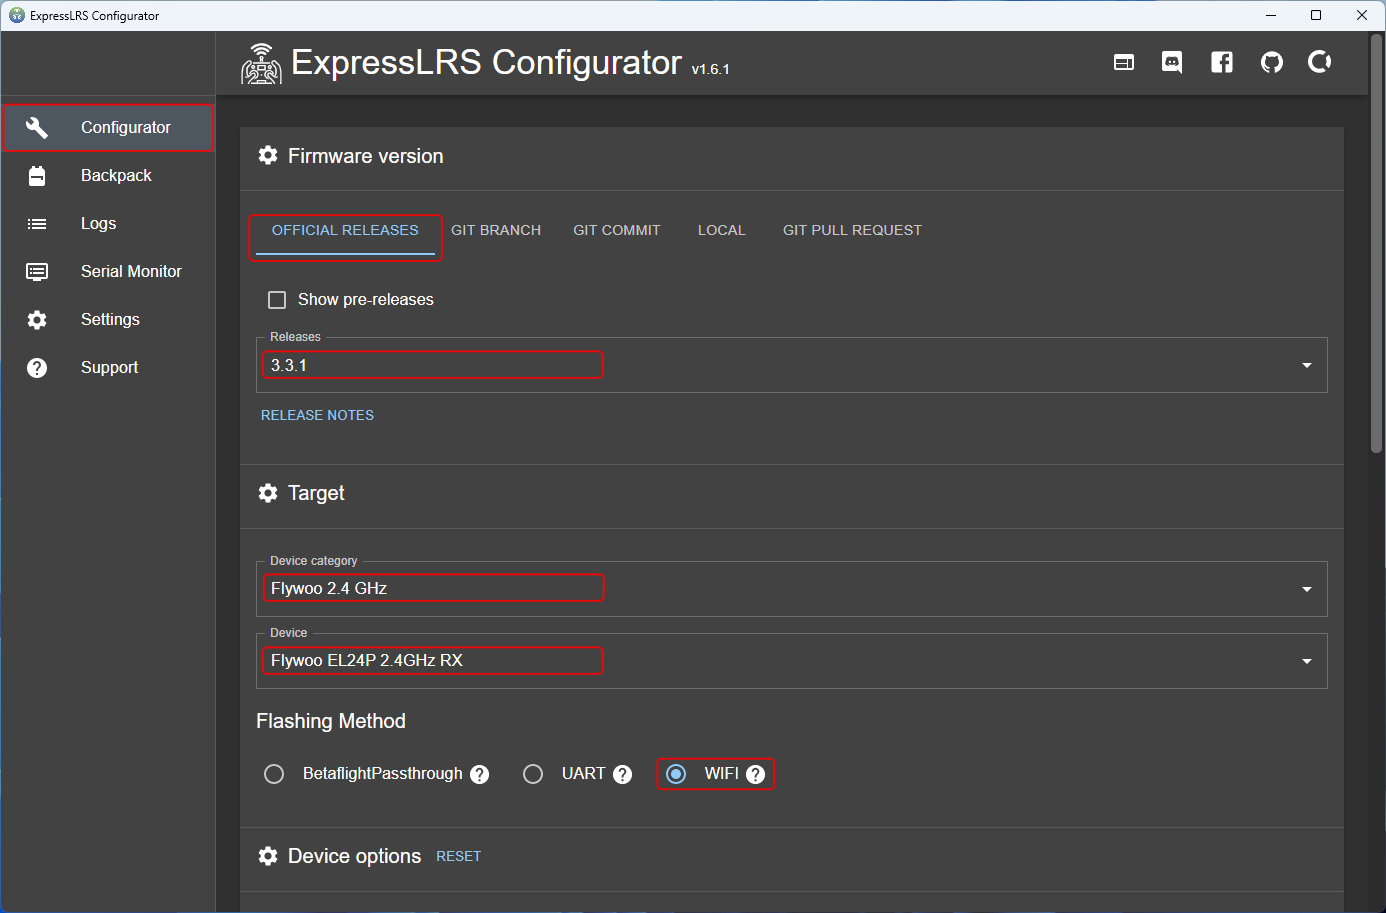 Start ExpressLRS Configurator and select "Configurator" from the left menu and "OFFICIAL RELEASES" from the Top menu.
In "Releases" field, select the firmware version to install. The latest version is selected as the initial value.
In "Device category" and "Device" fields, select the target device. For receiver, device name should contain "RX".
In "Flashing Method" field, specify how to write the firmware. Select "WiFi" when using WiFi.
Also, specify the options in the same way as for the procedure via USB .
Firmware Options (expresslrs.org)
User Defines Explained (expresslrs.org)
If you don't know the device name to select, try accessing receiver from your computer with in WiFi mode. Then you can see target device name and current ELRS version. For more information, see Via WiFi: Connect your computer to receiver . However, some receiver do not have WiFi mode.
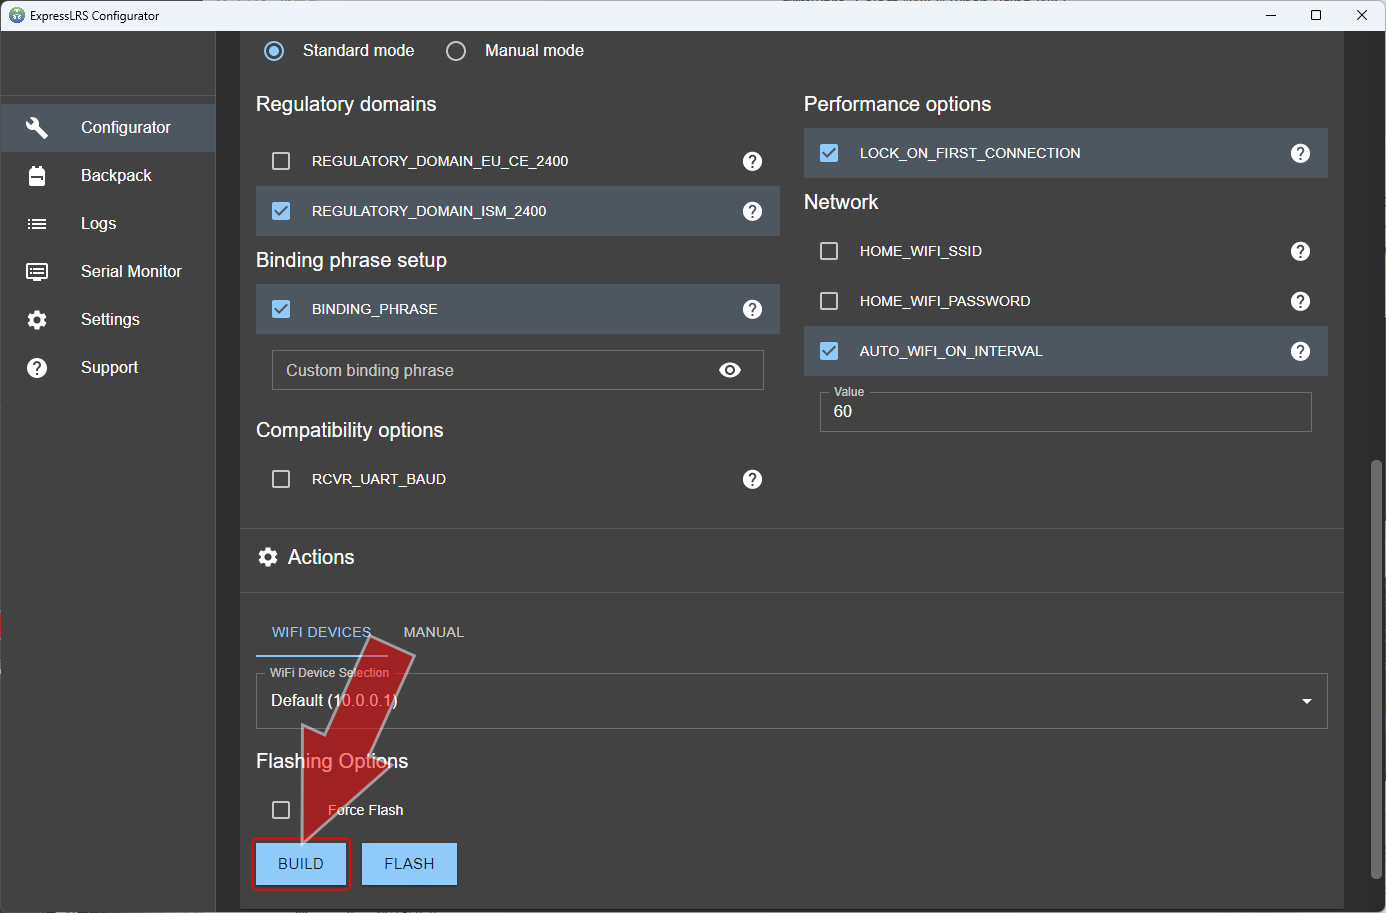 After selecting options, scroll screen and click "BUILD" button.
If you have written firmware with the options "HOME_WIFI_SSID" and "HOME_WIFI_PASSWORD" in the past, the transmitter will be connected to your home LAN when it goes into WiFi mode. In this case, you can click "BUILD & FLASH" button to build and write the firmware at once.
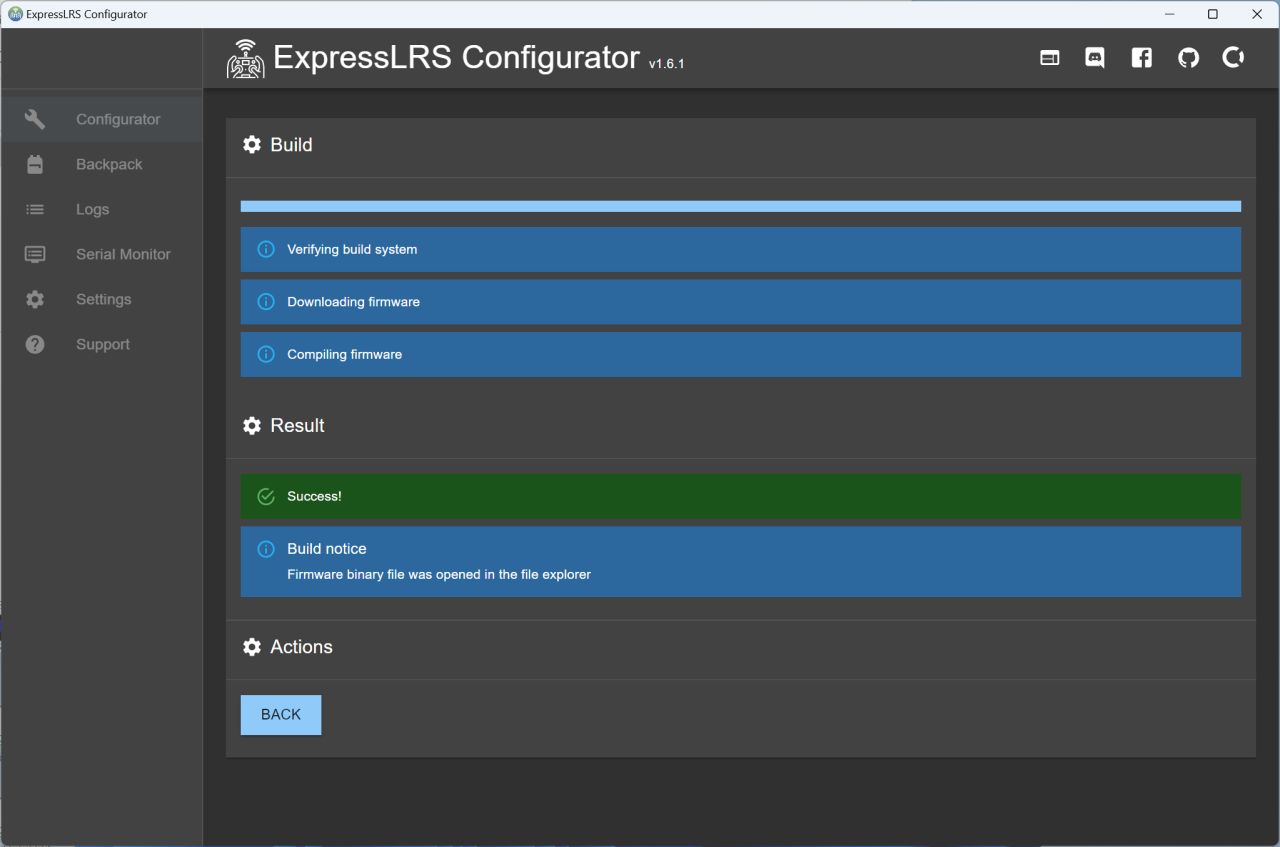 If the build is successful, you will see "Success!" on a green background, as shown in this figure.
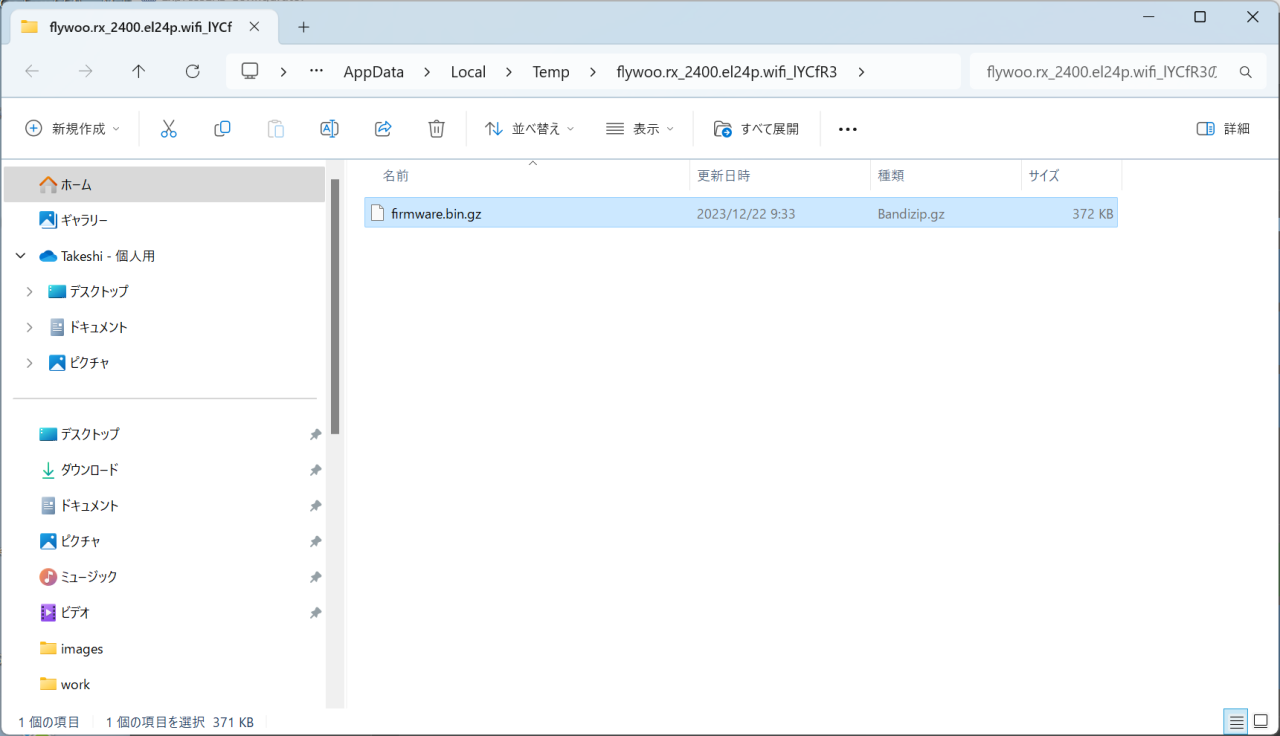 Then Explorer will start and the folder containing completed firmware binary file will open.
A file called "firmware.bin.gz" is stored here.
Then Explorer will start and the folder containing completed firmware binary file will open.
A file called "firmware.bin.gz" is stored here.
Leave this explorer screen unclosed for later writing to the receiver. The firmware storage folder will be created under "C:\Users\[Username]\AppData\Local\Temp".
Via WiFi: Switch receiver to WiFi mode
If you turn on the drone and leave it for a while, VTX may run away with heat. Place a small fan near the drone and work while cooling.
You can read the lighting pattern of the LED attached to the receiver and its meaning on LED Status (expresslrs.org) page of the ELRS official site.
LED Status (expresslrs.org)
Via WiFi: Connect your computer to receiver
 When ELRS receiver goes into WiFi mode, an access point named "ExpressLRS RX" will appear.
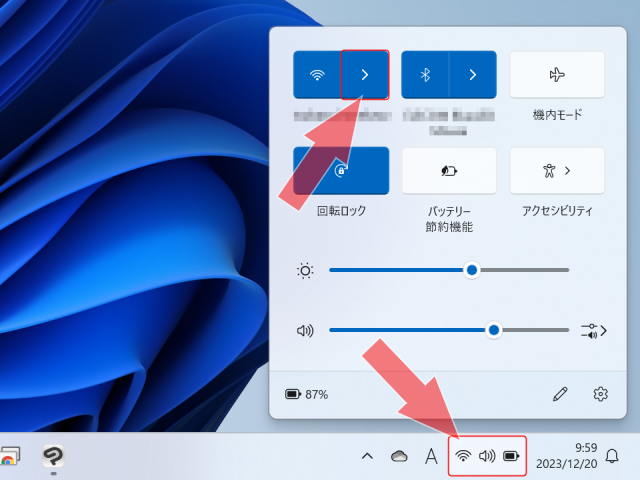
Open WiFi connection screen on your computer.
When ELRS receiver goes into WiFi mode, an access point named "ExpressLRS RX" will appear.
Open WiFi connection screen on your computer.
WiFi signal of the ELRS receiver is very weak, so place your computer near the receiver.
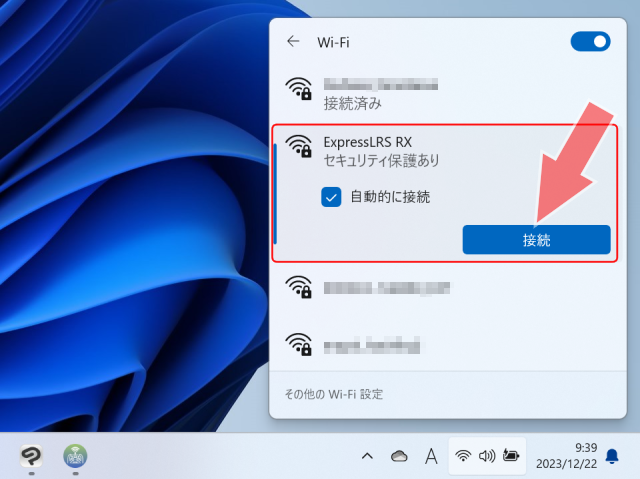 Select "ExpressLRS RX" from the list and click "Connect".
 Then you will be asked for the network security key (password), so enter "expresslrs" and click "Next".
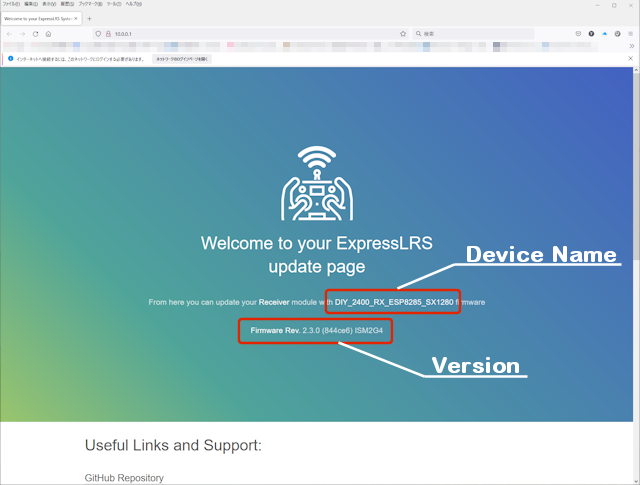
 When your PC can connect to the receiver without any problems, browser will automatically start and IP address "10.0.0.1" will open.
Alternatively, start browser yourself and type "10.0.0.1" in the address bar.
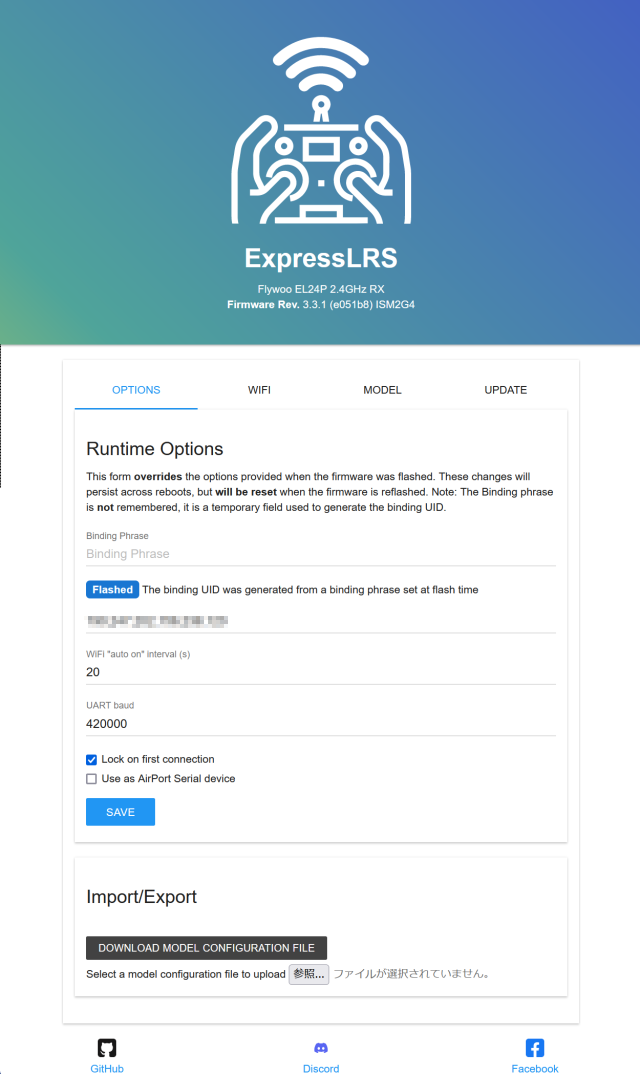
In case of ELRS version 3.x, the screen will look like this.
When your PC can connect to the receiver without any problems, browser will automatically start and IP address "10.0.0.1" will open.
Alternatively, start browser yourself and type "10.0.0.1" in the address bar.
In case of ELRS version 3.x, the screen will look like this.
There are four screens on the receiver, and you can switch screens by clicking [OPTIONS], [WIFI], [MODEL], and [UPDATE] in the center of the screen.
On [OPTIONS] screen, you can change Binding Phrase (UID byte), the time to switch to WiFi mode (seconds), UART baud rate, etc., and download these configuration as a file.
On [WIFI] screen, you can switch between using the receiver's WiFi function as an access point mode or connecting to your home LAN. You can also temporarily switch to access point mode while remembering your home LAN connection settings.
On [MODEL] screen, you can set ON/OFF for parameter "Model Match" and for telemetry.
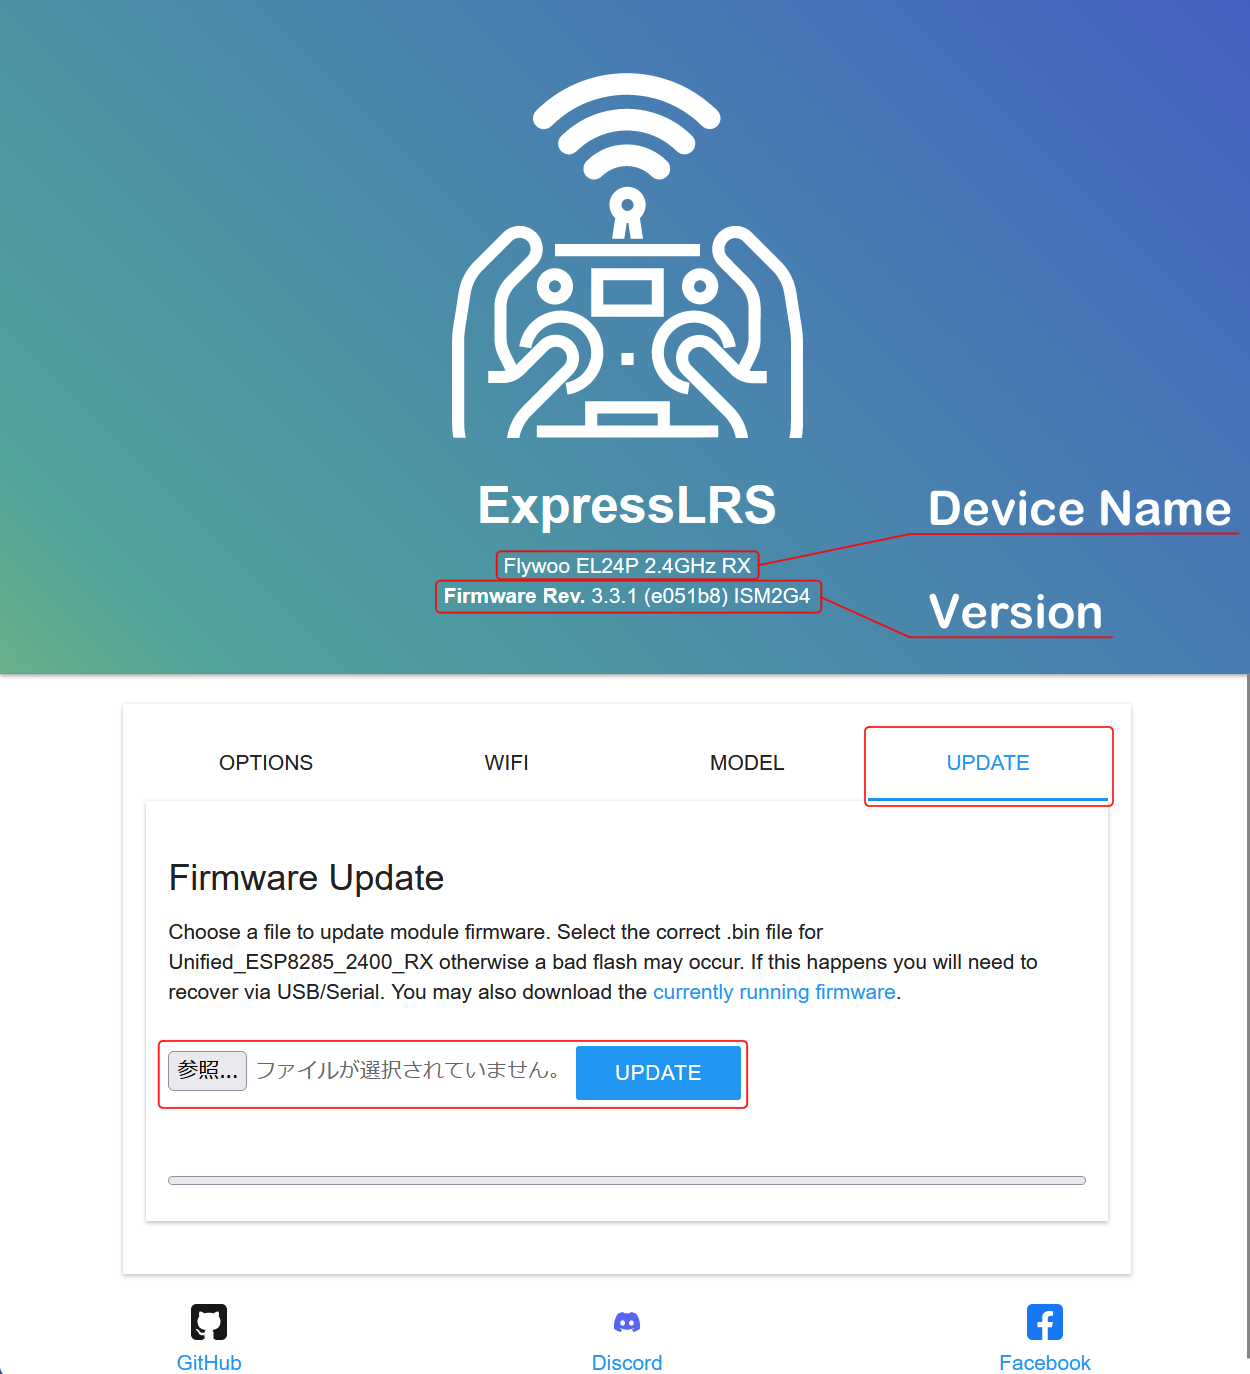 On [UPDATE] screen,
you can check target device name of the receiver firmware.
You can also update the firmware by dragging and dropping the firmware binary file to the [Browse] button on this screen.
On [UPDATE] screen,
you can check target device name of the receiver firmware.
You can also update the firmware by dragging and dropping the firmware binary file to the [Browse] button on this screen.
Click on the words "currently running firmware" to download the firmware currently written to the receiver to your computer.
 In case of ELRS version 2.x, the screen looks like this.
All information is displayed on one screen.
In case of ELRS version 2.x, the screen looks like this.
All information is displayed on one screen.
The target device name and current receiver firmware version are displayed at the top of the screen. By scrolling the screen, you can update the firmware or set various options.
Via WiFi: Update receiver firmware
Open [UPDATE] screen on the browser of ELRS receiver (Ver.3.x).
Or scroll the ELRS receiver browser screen (Ver.2.x).
Then "Firmware Update" column will appear
 You can update firmware by clicking "Browse" button, specifying the binary file of the built firmware, and pressing "Update" button.
You can directly specify the file by dragging and dropping the firmware binary file to "Browse" button from the explorer opened when build is completed.
You can update firmware by clicking "Browse" button, specifying the binary file of the built firmware, and pressing "Update" button.
You can directly specify the file by dragging and dropping the firmware binary file to "Browse" button from the explorer opened when build is completed.
 Press "Update" button to start updating the receiver firmware.
It takes tens of seconds to minutes to update.
Press "Update" button to start updating the receiver firmware.
It takes tens of seconds to minutes to update.
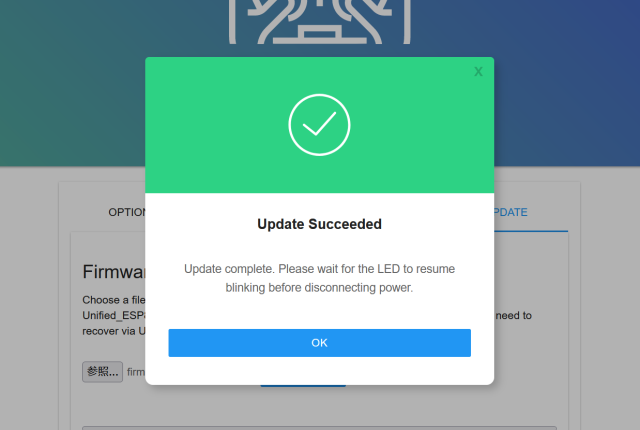 If the update is successful, you will see "Update Succeeded" like this.
Power OFF -> ON the FC (receiver) and restart.
If the update is successful, you will see "Update Succeeded" like this.
Power OFF -> ON the FC (receiver) and restart.
And now the firmware update is complete.
Update failed! Escape from Bricking
If firmware update fails and receiver stops working, the hardware is still intact. If you can rewrite firmware, you can escape from bricking.If your receiver has an ESP8285 chip, you can rehash the firmware using ExpressLRS Configurator by switching it to bootloader mode.
If there is a Boot terminal on the receiver board, bridge it, then boot the receiver. Then receiver will switch to bootloader mode. LED of the receiver will be lit all the time, and the firmware can be updated.
If there is a Bind / Firmware Upgrade button on receiver board, hold down the button and boot the receiver. If you keep pressing the button, receiver will switch to bootloader mode. LED of the receiver will be lit all the time, and you can update the firmware.
In either case , receiver with ESP8285 chip has a GPIO0 pin somewhere on the board. After grounding this (connecting to GND), boot the receiver. Then receiver will switch to bootloader mode. LED of the receiver will be lit all the time, and the firmware can be updated.
Then write firmware using BetaflightPassthrough procedure or USB-TTL serial converter (FTDI) procedure. See below for details.
Unbricking (expresslrs.org)
Troubleshooting (expresslrs.org)