


 How to use iSDT Q6 Nano / Small LiPo/NiCd Battery Charger

- What is iSDT Q series
- Batteries supported by iSDT Q6 Nano
- Introducing iSDT Q6 Nano
- Power supply / AC adapter for iSDT Q6 Nano
- Battery charging mode
- Connection with battery
- How to calculate charge current
- Basics of operation method
- Start charging
- End of charging
- Check / change system setting values
- How to update the firmware
-
iSDT Q6 Nano 8A 200W DC 2-6S Lipo Battery Balance Charger

iSDT 2020-07 USD35.00
New generation of pocket chargers: 200 W high power / max. 9A charging current / battery for 2 ~ 6S. IPS Screen:Low power consumption: 2.4” IPS screen,Auto-brightness adjustable, 178° visible angle,Display clear and distinct ,Even in varies hard environment or angles,As well as in strong sunshine.

 (US)
(UK)
(US)
(UK)
-
iSDT Q8 Max 30A 1000W DC 2-8S Lipo Battery Balance Charger
iSDT 2020-07 USD99.00
New Generation of Pocket Charger:1000W high power,Max 33A charging current,support 2~8S battery. Lights off in the dark,introducing the dark mode.scOS 2.0 new dark mode feature.Suitable for low light scenario,System will adjust the interface in dark tone,Reduce light damage to user’s eyes.While remaining the iconic and comfortable charging display style.
(US)
(UK)
What is iSDT Q series
iSDT Q series are small charger for hobby, compatible with lithium ion, lithium polymer, NiCd, NiMH, lead-acid batteries, etc., made by iSDT in Shenzhen, China, which mainly develops chargers and power supplies. In addition to charging, it is equipped with various functions such as discharging, charging for long-term storage, and complete discharging for disposal. It can also be used as a DC power supply to which the output voltage and current can be specified.iSDT Q6 Nano introduced here is a compact model that supports 6S battery and has a maximum output of 200W and fits comfortably in the palm of your hand. In addition, Q8, which supports 8S battery and 500W output, and Q8 Max, which also supports 8S battery and 1000W output, are on sale. These require a separate AC adapter for power supply. A high-power AC adapter is required for fast charging.
The manual for this charger can be downloaded from iSDT website .
Batteries supported by iSDT Q6 Nano
The following types of batteries can be charged.| types | Number of cells / voltage |
|---|---|
| LiPo (Lithium polymer) | 1-6 cells |
| LiFe (Lithium ferrite) | 1-6 cells |
| LiIon (Lithium ion) | 1-6 cells |
| LiHV (Lithium high voltage polymer) | 1-6 cells |
| NiMH (Nickel metal hydride) | 1-16 cells |
| NiCd (NiCad) | 1-16 cells |
| Pb (Lead-acid battery) | 1-12 cells |
Introducing iSDT Q6 Nano
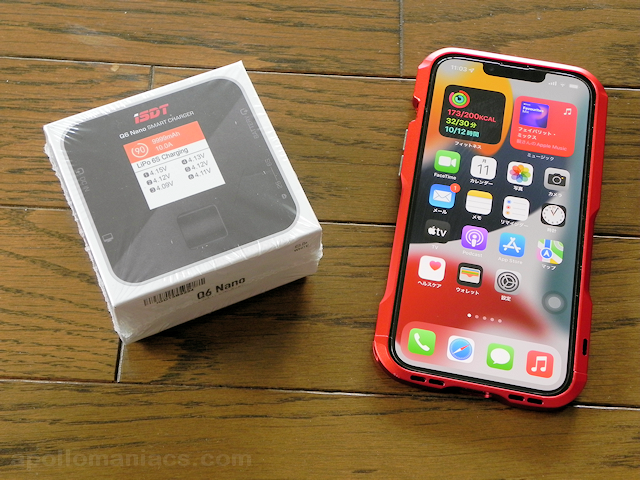 Arrives in a box like this. This is a size comparison with iPhone.
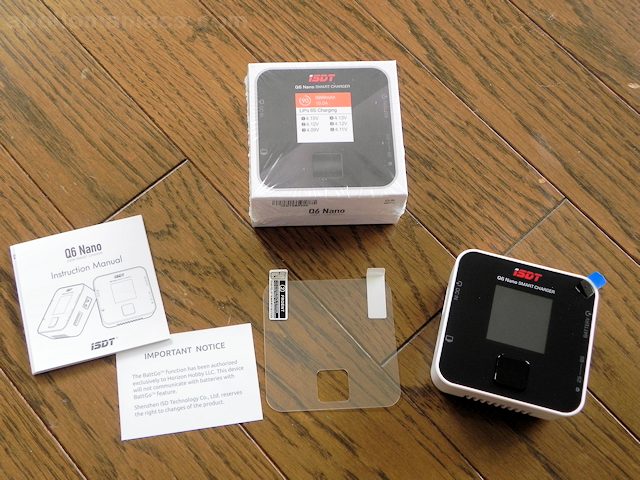 Here is a list of the contents.
From the left, instruction manual, memo to the effect that BattGo will not be supported in the future, and a screen protector.
Cables and connectors are not included at all.
You will need to prepare the cable for connecting to the AC adapter and battery separately.
Compared the size of the charger with iPhone.
Here is a list of the contents.
From the left, instruction manual, memo to the effect that BattGo will not be supported in the future, and a screen protector.
Cables and connectors are not included at all.
You will need to prepare the cable for connecting to the AC adapter and battery separately.
Compared the size of the charger with iPhone.
A protective film is attached to the screen. Before you start using it, pull on the blue tab to remove the protective film.
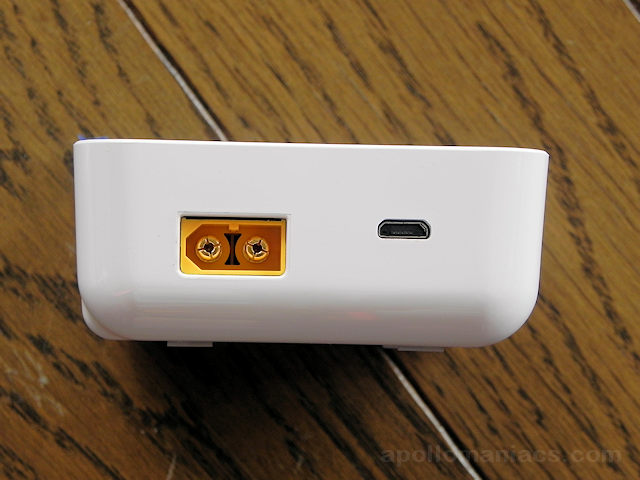 The photo on the left side of the charger.
The connector on the left is XT60 connector (input) for connecting the power supply. As a power source, AC adapter or battery can be used.
The connector on the right is a microUSB Type-B connector for connecting to a personal computer. Used when updating the firmware.
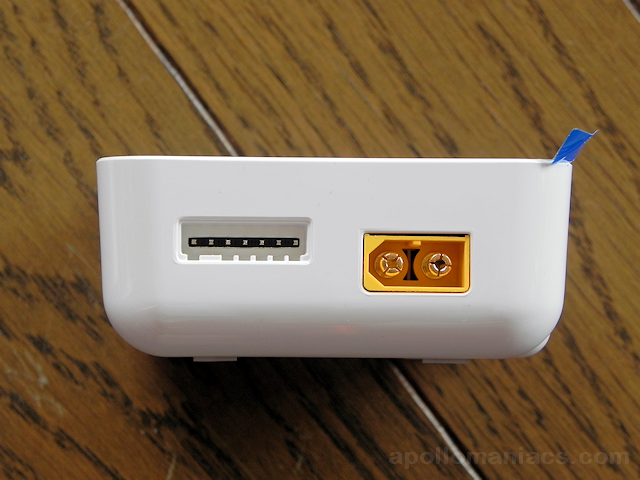 The right side.
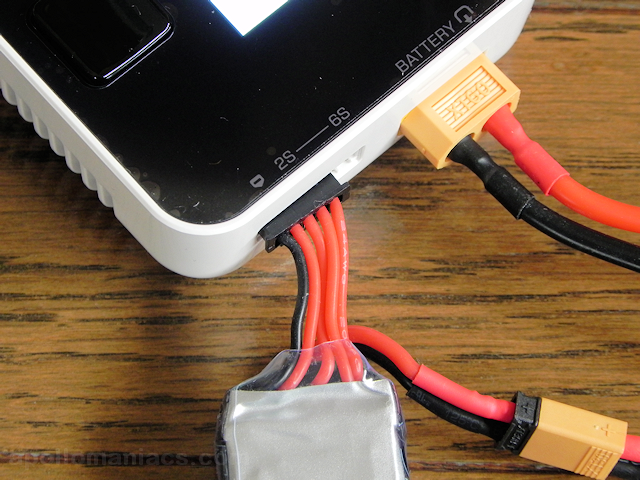
The connector on the right is XT60 connector (output) for charging battery. Connect only here for 1-cell batteries and batteries that do not require balanced charging.
The connector on the left is JST-XH type connector for balanced charging. Batteries that require balanced charging connect to both right XT60 connector and here. The leftmost pin is negative terminal. Insert battery balance connector left-aligned with the protruding side down.
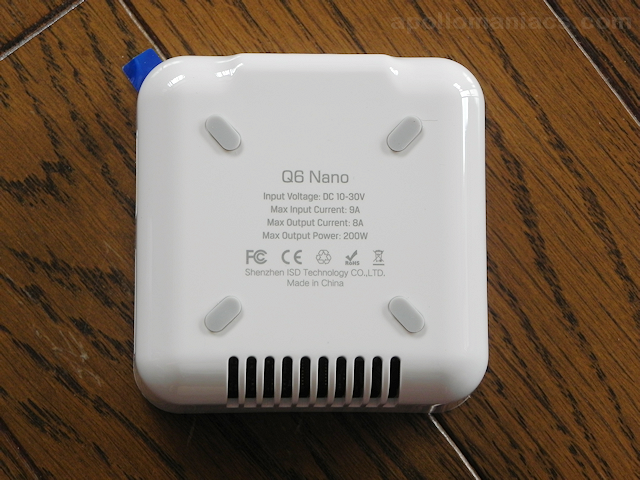 This is the back side photo.
There is an air cooling fan on the upper side and exhaust slits on the lower side.
This is the back side photo.
There is an air cooling fan on the upper side and exhaust slits on the lower side.
Power supply / AC adapter for iSDT Q6 Nano
iSDT Q6 Nano has a maximum input voltage of 10 to 30V and a maximum input current of 9A. To get the most out of the iSDT Q6 Nano, you need to have a power supply with an output of 230W or higher. Prepare a regulated power supply as shown below.-
inShareplus 12V 20A 240W, DC Universal Regulated Switching Power Supply
inShareplus USD25.99
Universal Input: 100-240V AC; Output: 12V DC 20A Widely used in Industrial automation, LED display, CCTV, Radio, Computer Project, LED Strip Lights, 3D Printer etc. Circuit Short Protection, Overload Protection and Over Voltage Protection Ensures the Safety of Using This Power Supply
(US)
(UK)
Note: When using a power supply of less than 230W, change "Max Input Power" on the charger setting screen .
-
Anker USB C Charger 20W, 511 Charger (Nano Pro), PIQ 3.0 Durable Compact Fast Charger
Anker USD13.99
20W USB-C charging gives you the power you need to charge up your iPhone to 50% in just 25 minutes—that’s up to 3 times faster than your old 5W charger. Equipped with our all-new ActiveShield️ safety system to offer enhanced protection. Features a Dynamic Temperature Sensor which actively monitors temperature, and a Power Tuner Chip which adjusts power output to safeguard your connected device.
(US)
(UK)
-
Toolkitrc SC100 Type-C to XT60 Charging Cable 5.0-20V 100W
Toolkitrc USD10.99
Used with any compatible High Power USB-C Power supply or wall wart as a power source for chargers with XT60 DC Input. Input:USBC 5.0-20V MAX 5A. Protocol:PD2.0 PD 3.0 QC 2.0. Output:XT60 5.0-20V MAX 5A.
(US)
(UK)
Battery charging mode
There are five charging modes in this charger.| mode | function |
|---|---|
| Charge |
Charge the battery.
When charging a multi-cell battery, also connect the battery's balanced charging connector to the charger.
The battery will then be charged while balancing each cell.
If the balanced charging connector is not connected, you will hear a beep.
You can specify 0.1 to 8.0A for the charging current. For an explanation of "cell" and "balance" of battery, see Drone Battery Knowledge / How to long-lasting and reviving . |
| Discharge |
Discharges an overcharged battery for long-term storage.
You can specify 0.1 to 1.0A for the discharge current. |
| DC Power | You can use the charger as a DC power supply. It can be used as a power supply to output any voltage and current. You can specify 2.0 to 30.0V for output voltage and 0.2 to 5.0A for output current. However, be careful not to specify output power that exceeds the capacity of input power supply. |
| Strage |
Charges or discharges the battery for long-term storage.
Battery will be charged or discharged until it reaches the target voltage ("Storage voltage" column in the table below).
For explanation of long-term battery storage, see Drone Battery Knowledge / How to long-lasting and reviving . |
| Destroy |
Completely discharge to dispose of the battery when it is no longer needed.
Battery will be discharged until the voltage reaches 0V.
You can specify 0.1 to 1.0A for the discharge current. |
| NiCd/MH | Pb | LiFe | LiIon | LiPo | LiHv | |
|---|---|---|---|---|---|---|
| Rated voltage | 1.20V | 2.00V | 3.20V | 3.60V | 3.70V | 3.80V |
| Full charge voltage | 1.40V | 2.40V | 3.65V | 4.10V | 4.20V | 4.35V |
| Storage voltage | x | x | 3.30V | 3.70V | 3.80V | 3.85V |
| Discharge voltage | 1.10V | 1.90V | 2.90V | 3.20V | 3.30V | 3.40V |
| Preset voltage | 0.90V | 1.80V | 2.60V | 2.90V | 3.00V | 3.10V |
| Balance charge | x | x | ○ | ○ | ○ | ○ |
| Supported cell count | 1~16S | 1~12S | 1~6S | 1~6S | 1~6S | 1~6S |
| Max. charging current | 8.0A | 8.0A | 8.0A | 8.0A | 8.0A | 8.0A |
Connection with battery
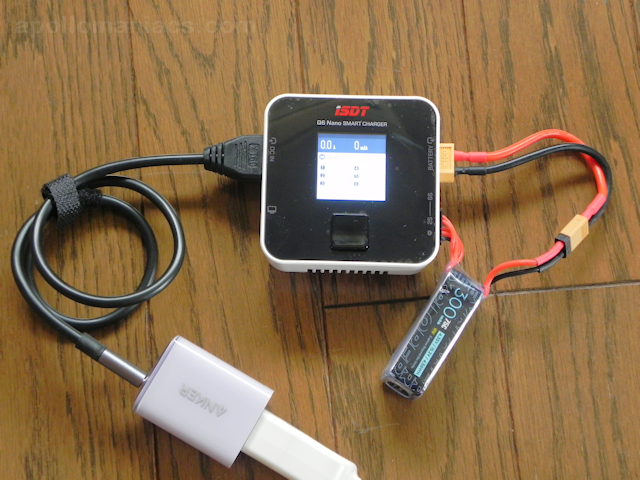 Connection with multi-cell lithium battery is as shown in this photo.
With any simple charger, only JST-XH connector for balanced charging is connected, but with this charger, another one, the battery output connector, is connected to the charger via XT60 connector.
If only balanced charging connector is connected, an error will occur and charging will not be possible.
Connection with multi-cell lithium battery is as shown in this photo.
With any simple charger, only JST-XH connector for balanced charging is connected, but with this charger, another one, the battery output connector, is connected to the charger via XT60 connector.
If only balanced charging connector is connected, an error will occur and charging will not be possible.
The AC adapter used this time is Anker 521 Charger (output 40W)
 When installing / removing the battery, be careful not to accidentally touch the connectors and short-circuit them.
To avoid a short circuit, it's a good idea to connect both battery connectors to the charger first, and then connect the charger to the AC adapter to boot.
When installing / removing the battery, be careful not to accidentally touch the connectors and short-circuit them.
To avoid a short circuit, it's a good idea to connect both battery connectors to the charger first, and then connect the charger to the AC adapter to boot.
The connector for balanced charging has a negative pole on the far left. Insert the connector so that the negative battery cable (usually black) matches the leftmost pin.
If you don't have a cable that fits your battery, you'll have to prepare it yourself.
-
XT30 XT-30 to XT60 XT-60 Male Female RC Connector Adapter
OliRC USD10.99
Convert battery with XT30 to XT60 (XT60 to XT30) on ESC / charger. XT30 to XT60 Connector Adapter Cable. Quantity: 4pcs
(US)
(UK)
-
RC Lipo Battery Charger Adapter Connector Splitter Wire 8 in 1 Octopus Convert Cable to XT60 Plug
HTRC USD9.99
8 in 1 RC Charger Leads: Reduce multiple charge leads, save money. Input Connectors: XT60 Plug, suitable for many kinds of rc battery chargers. Out Connectors: TRX, Tamiya, Tamiya mini, EC3, JST, Futaba(female), XT60, T-Plug.
(US)
(UK)
How to calculate charge current
Maximum charge current that can be passed from charger to battery is calculated from the battery capacity (mAh) and the charge / discharge capacity (C) of the battery. For example, a battery labeled "2S-300mAh, 30C/60C" can carry a maximum charge current of 0.3 (A) x 30 (C) = 9 (A). And in this case, it takes about 1/30 hours (= 2 minutes) to fully charge. Be sure to charge below this maximum current.Also, when powering charger from AC adapter, pay attention to the maximum output of connected AC adapter. Charge with smaller of the maximum output current of AC adapter and the maximum charging current of battery.
However, if you charge with the maximum current, battery will heat up and deteriorate. It is recommended to charge with a sufficiently lower current with a margin. It depends on the C value of the battery, but it is safe to charge at around 1-2A at most.
Note: When charging a battery with unknown C value, set charging current of charger assuming C value of 1 or less to avoid dangers such as ignition. For example, when charging a 300mAh battery with an unknown C value, set the charging current to 0.3A or less. In this case, it will take about 1 hour to charge.
For the basic knowledge of LiPo battery, see Drone Battery Knowledge / How to long-lasting and reviving .
Basics of operation method
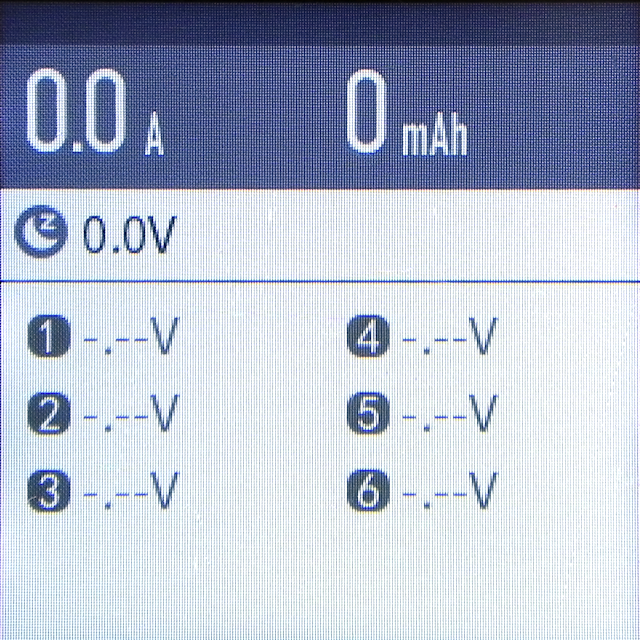 At first, connect the power supply to the charger without connecting the battery and start it.
Then you will see a screen like this.
At first, connect the power supply to the charger without connecting the battery and start it.
Then you will see a screen like this.
All you need to do is one button at the bottom of the display. Press the top of the button to scroll the screen up. Press the bottom of the button to scroll down the screen. Press the center of the button to "OK" the selected item.
However, pressing the center of the button is difficult and can scroll up and down.
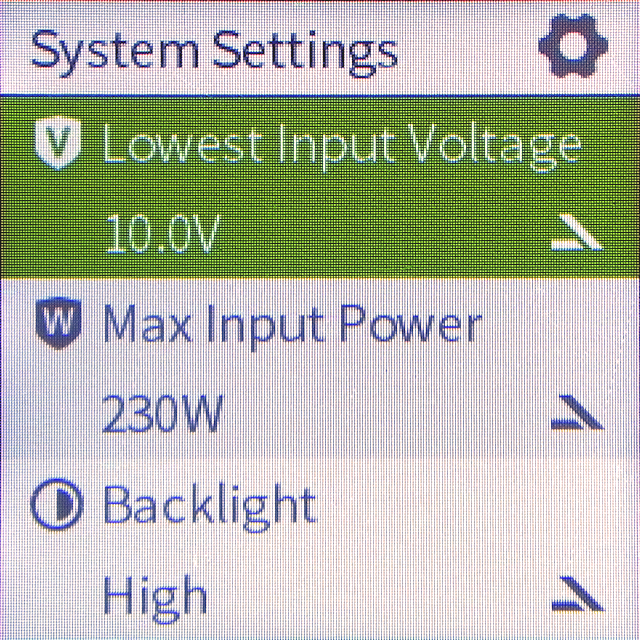
Before you start using, press and hold the center of the button to check or change the system settings of the charger . In particular, set "Lowest Input Voltage" and "Max Input Power" accurately.
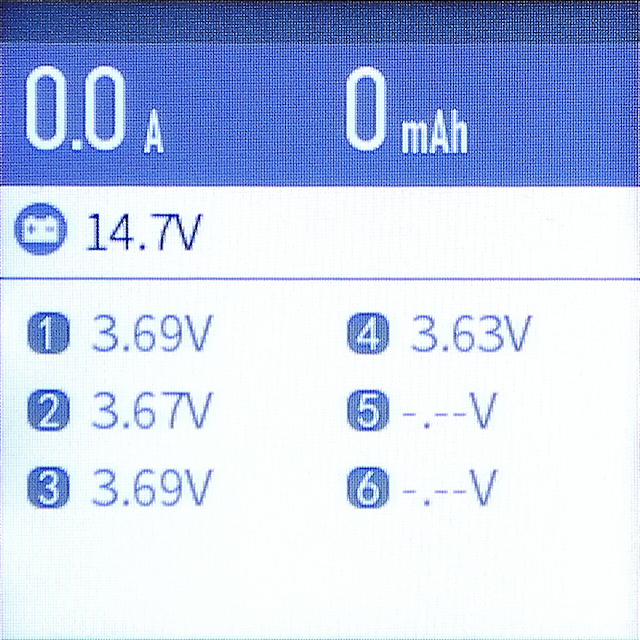 When battery is properly connected and the charger is started, the number of cells is automatically recognized and the total voltage of the battery and the voltage of each cell are displayed.
 If you press the bottom of the button on the screen above, you will see a screen like this.
Various statuses are displayed.
If you press the bottom of the button on the screen above, you will see a screen like this.
Various statuses are displayed.
 When you press the top of the button, you will see a screen like this.
Charging task setting screen is displayed.
When you press the top of the button, you will see a screen like this.
Charging task setting screen is displayed.
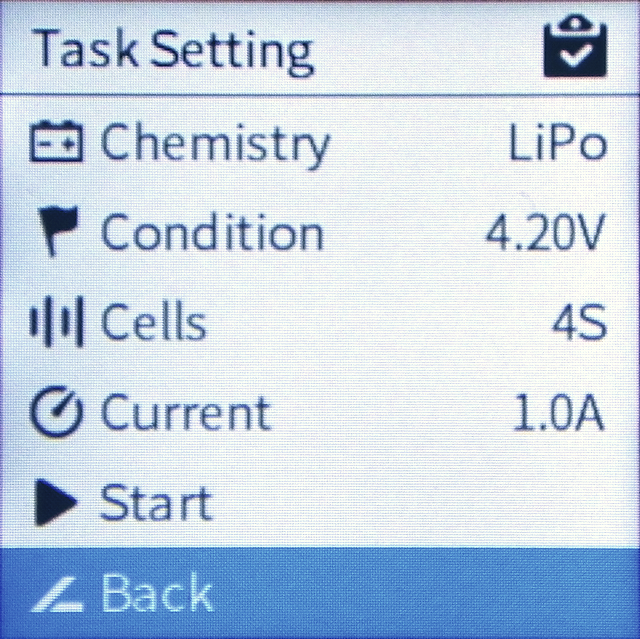 Scroll down the charging task setting screen and select "Back" to return to the original screen.
Start charging
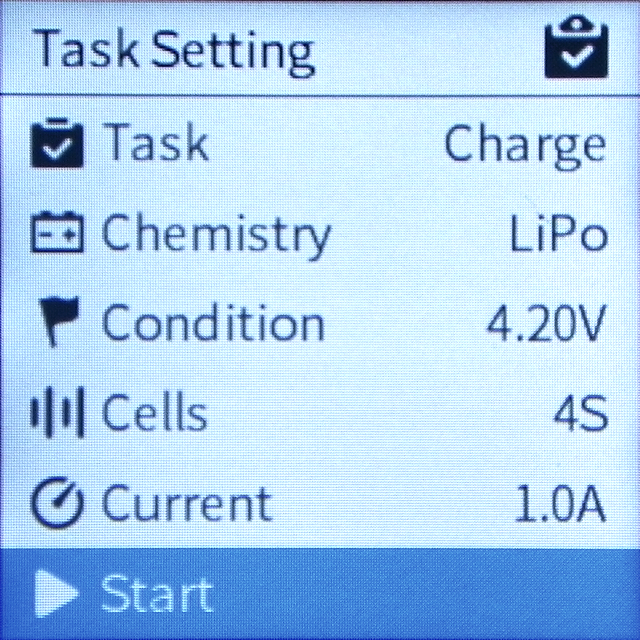
After connecting battery and starting the charger, press the top of the button.
Then, charging parameters are displayed like this.
Set the parameters correctly according to the battery to be charged.
Press the top or bottom of the button to select a menu, then press the center of the button to "OK". The following items can be checked and set.
| item name | description |
|---|---|
| Task | Specify the charging mode. You can choose from Charge, Discharge, Strage, DC Power, and Destroy. |
| Chemistry | Specify the battery type. You can choose from LiHv, LiPo, LiIon, LiFe, Pb, NiHM / Cd. |
| Condition |
Specify the charging target voltage for each cell.
For LiPo batteries, 4.10 to 4.30V can be set in 0.01V increments.
Note: Do not change this value from the specified value (the value in "Full charge voltage" column of "Charging Parameters" table above) unless you have a specific reason to do so. Otherwise, the battery will be overcharged and may overheat or ignite. |
| Cells | Specifies the number of battery cells to charge. This value is automatically determined by the charger. If the judgment value is incorrect, check that balance charging cable is not broken and then set it manually. For LiPo battery, 1 ~ 6S can be set. |
| Current | Specify the charging current. You can set 0.1 to 8.0A in 0.1A units. Set an appropriate value according to the calculation method of charging current . Otherwise, power supply, battery or charger may generate heat or ignite. |
| Start | Charging will start. |
| Back | Return to startup screen. |
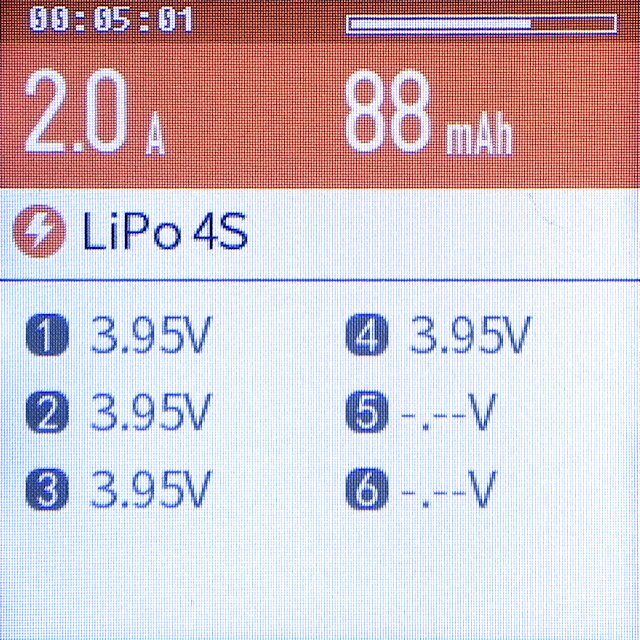 Select "Start" from the menu and press the center of the button to start charging.
The elapsed time and progress bar are displayed at the top of the screen.
The second line shows the current charging current and the amount of charge (mAh) that has been injected into the battery so far.
The third line shows the battery type and the number of cells.
At the bottom, the voltage of each cell is displayed.
Select "Start" from the menu and press the center of the button to start charging.
The elapsed time and progress bar are displayed at the top of the screen.
The second line shows the current charging current and the amount of charge (mAh) that has been injected into the battery so far.
The third line shows the battery type and the number of cells.
At the bottom, the voltage of each cell is displayed.
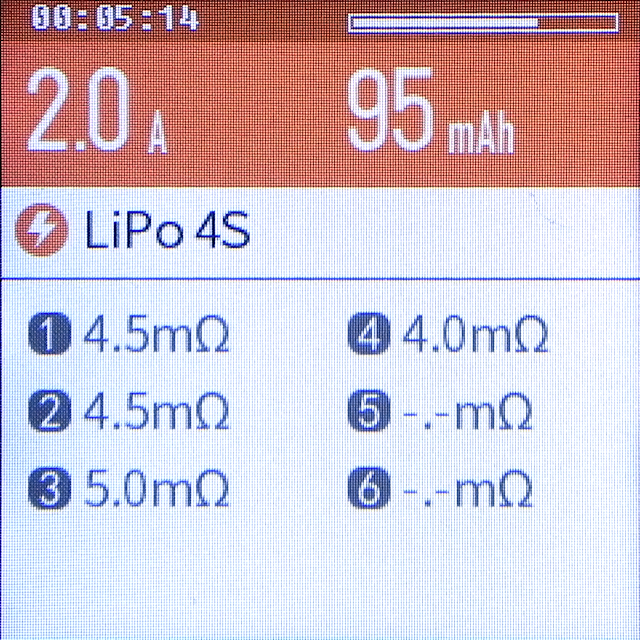 You can check the internal resistance of the battery by pressing the bottom edge of the button once while charging.
As the battery deteriorates, the internal resistance value increases.
By checking the internal resistance value on a regular basis, the deterioration status can be grasped.
You can check the internal resistance of the battery by pressing the bottom edge of the button once while charging.
As the battery deteriorates, the internal resistance value increases.
By checking the internal resistance value on a regular basis, the deterioration status can be grasped.
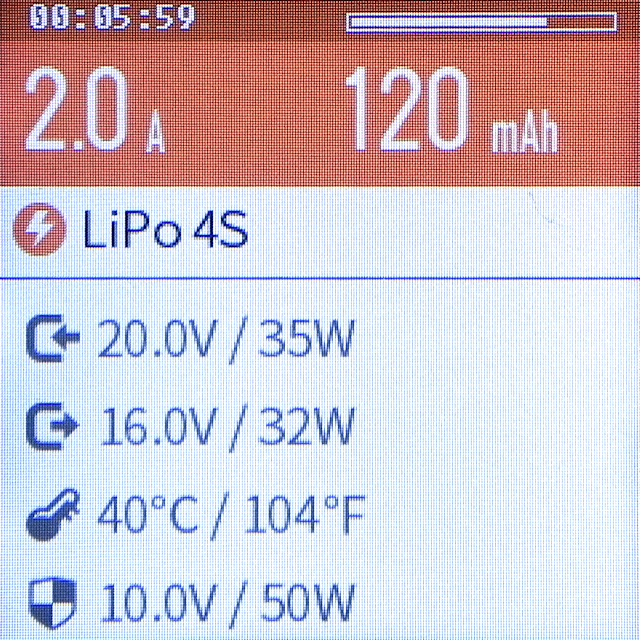 If you press the bottom edge of the butto twice while charging, you will see a screen like this.
Various statuses are displayed.
Press the top edge of the button to return to the original screen.
If you press the bottom edge of the butto twice while charging, you will see a screen like this.
Various statuses are displayed.
Press the top edge of the button to return to the original screen.
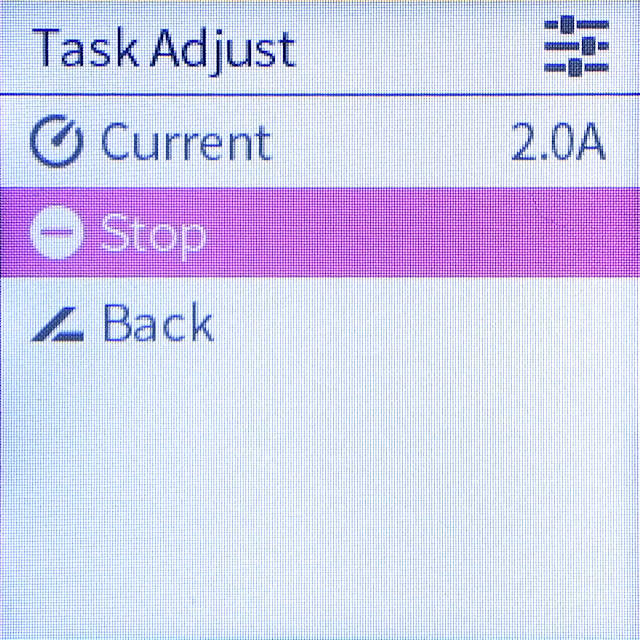 If you press and hold the center of the button while charging, you will see a screen like this.
You can change the charging current by selecting "Current" menu.
You can stop charging by selecting "Stop" menu.
Select "Back" menu to return to the original screen.
If you press and hold the center of the button while charging, you will see a screen like this.
You can change the charging current by selecting "Current" menu.
You can stop charging by selecting "Stop" menu.
Select "Back" menu to return to the original screen.
End of charging
 Near the end of charging, you will hear a single beep and the color at the top of the screen will turn green.
And the charging current gradually decreases.
Near the end of charging, you will hear a single beep and the color at the top of the screen will turn green.
And the charging current gradually decreases.
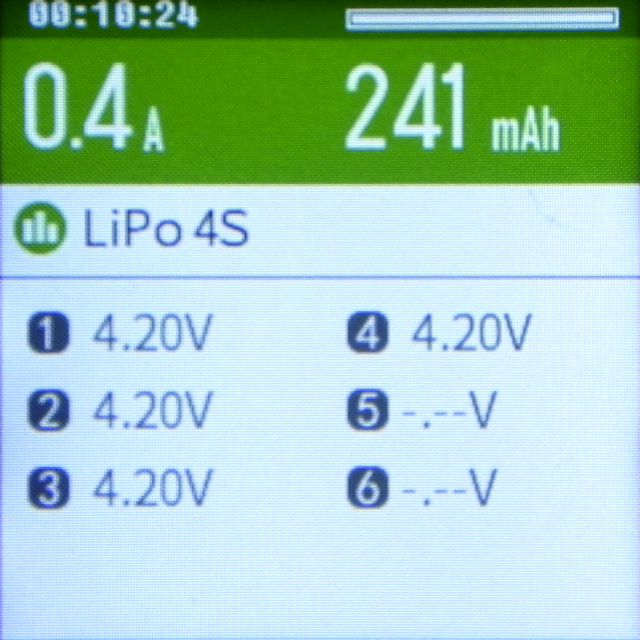
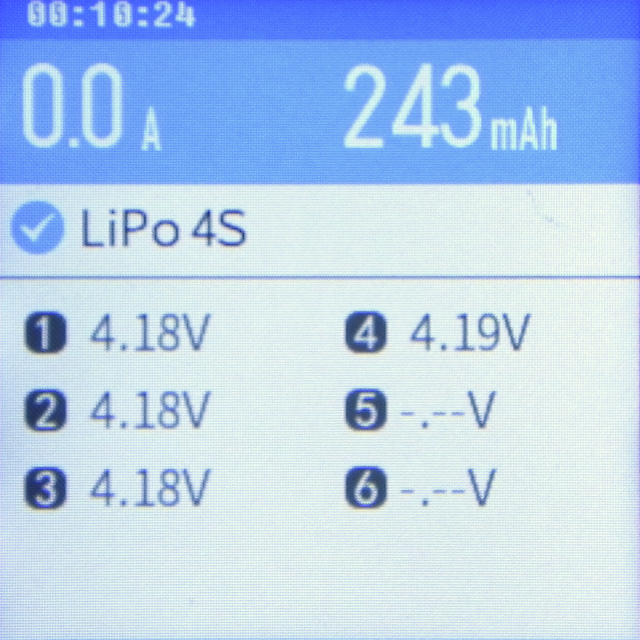 When charging is complete, you will hear two beeps and the color at the top of the screen will turn blue.
The charging current will be 0.0A.
When charging is complete, you will hear two beeps and the color at the top of the screen will turn blue.
The charging current will be 0.0A.
When installing / removing the battery, be careful not to accidentally touch the connectors and short-circuit them. If you do not continue to charge another battery, it is safe to unplug the charger before removing the battery.
Check / change system setting values
Start the charger without connecting battery.
Then you will see a screen like this.
Press and hold the center of the button.
 Then the setting screen opens.
Press the top or bottom of the button to select a menu, then press the center of the button to "OK".
The following items can be checked or set.
Then the setting screen opens.
Press the top or bottom of the button to select a menu, then press the center of the button to "OK".
The following items can be checked or set.
| item name | description |
|---|---|
| Lowest Input Voltage | When the input voltage drops below this value, all tasks are aborted and a warning is displayed. When using a battery for the input power supply, set it to avoid over-discharging the input battery. 10.0 to 24.0V can be set in 1.0V increments. |
| Max Input Power | Specifies the maximum power of input power supply. Set a value less than input power supply. Be sure to set this value when the output of the power supply used is lower than 230W. Otherwise, the power supply may be overloaded and charging may become unstable. 50 ~ 230W can be set in 10W increments. |
| Backlight | Specifies the brightness of the backlight. You can choose from Low, Middle, and High. |
| Volume | Specify the volume of the operation sound and warning sound. You can hear warning sound even if you turn this Off. You can choose from Off, Low, Middle, High. |
| Completion Tone | Specify how to sound the notification sound when charging is completed. You can choose from Single and Repeat. |
| Language | Specify the menu display language. You can choose from English, Chinese (simplified / traditional), Japanese, German, French, and Spanish. |
| Keep Trickle | Specify whether to perform trickle charging after charging is completed. You can choose from Off and On. |
| Self-test | Perform a self-diagnosis of the charger. The test will be completed in a few seconds. If there is no problem, "All test passed!" Will be displayed at the end. |
| Calibration | Calibrate the charger. You can adjust the input voltage, output voltage, and measured value of each cell voltage. If you connect battery to the charger and then select this menu, voltage of each cell will be displayed on the screen. You can adjust the value by selecting each item and pressing the center button. Finally, select "Save" menu to save the adjustment values. |
| System info | Displays system information (version) of the charger. |
| Back | Return to startup screen. |
How to update the firmware
iSDT chargers can update the firmware (built-in basic software). Updating will fix bugs or add new features. To update the firmware, use software "ISD Go" provided by iSDT.
"ISD Go" is compatible with Windows, Mac and Andriod.
Download from
iSDT's support page
.
To update the firmware, use software "ISD Go" provided by iSDT.
"ISD Go" is compatible with Windows, Mac and Andriod.
Download from
iSDT's support page
.
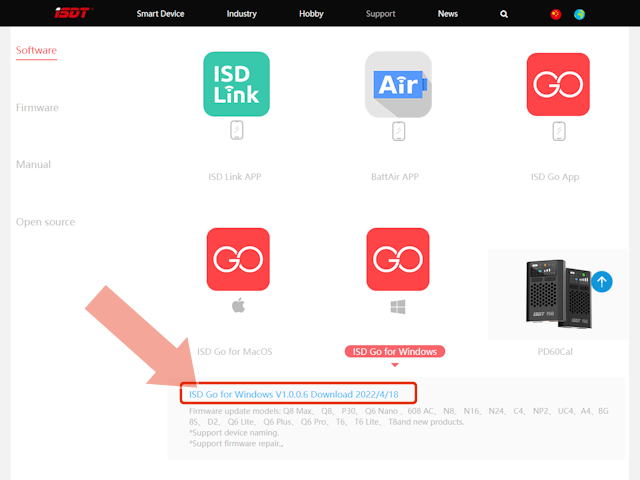 For example, if you click "ISD Go for Windows" icon, the version information, release date, and target charger list of the "ISD Go" Windows version will be displayed as shown in this figure.
You can download it by clicking on the blue text that says "ISD Go for Windows Vx.x.x.x Download".
You can get a compressed file of about 500kb named "ISD Go.zip".
Unzip this in any folder.
For example, if you click "ISD Go for Windows" icon, the version information, release date, and target charger list of the "ISD Go" Windows version will be displayed as shown in this figure.
You can download it by clicking on the blue text that says "ISD Go for Windows Vx.x.x.x Download".
You can get a compressed file of about 500kb named "ISD Go.zip".
Unzip this in any folder.
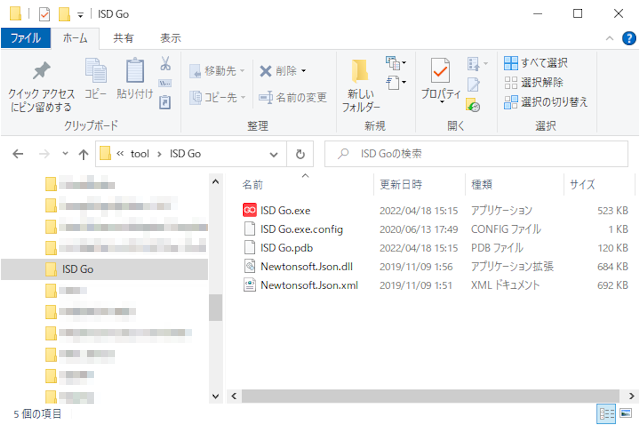 Then such a file will be expanded.
Click "ISD Go.exe" to start it.
Then such a file will be expanded.
Click "ISD Go.exe" to start it.
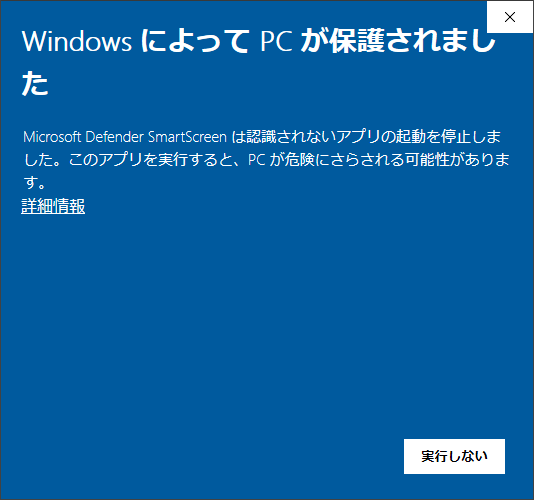 Then, the warning "Windows has protected your PC" is displayed like this.
This is a warning that appears when you start software that has not been authenticated by Microsoft.
This is a protection function to prevent accidental installation of virus software.
Then, the warning "Windows has protected your PC" is displayed like this.
This is a warning that appears when you start software that has not been authenticated by Microsoft.
This is a protection function to prevent accidental installation of virus software.
Click "Details".
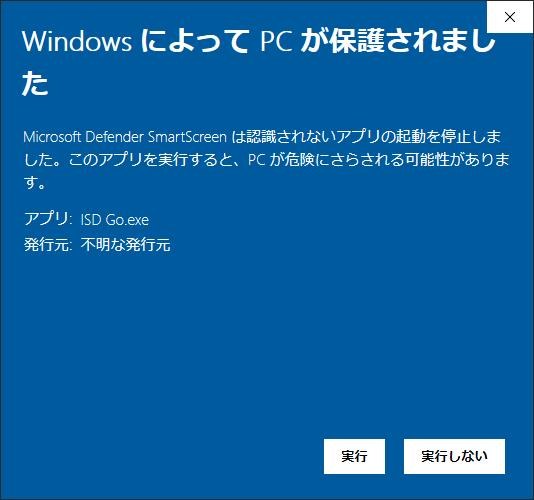 Then you will see a screen like this.
Click "Run".
Then you will see a screen like this.
Click "Run".
Note: Never run untrusted exe files. Do not run anything other than programs downloaded directly from iSDT official site. Otherwise, it may be contaminated with viruses etc.
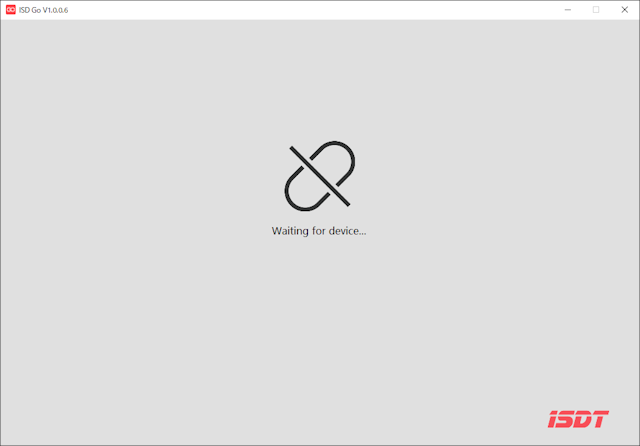 "ISD Go" will start.
 Connect the charger and computer with a USB cable and wait for a while.
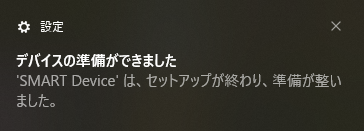
Then a dialog box like this will be displayed at the bottom right of the screen.
At this time, it is not necessary to connect the power supply to the charger.
Connect the charger and computer with a USB cable and wait for a while.
Then a dialog box like this will be displayed at the bottom right of the screen.
At this time, it is not necessary to connect the power supply to the charger.
There are two types of USB cables: "For data communication" where all terminals are connected, and "For charging" where only power supply terminals are connected. You need to use "For data communication" to make the computer recognize the charger. Please note that some cables attached to bonus of mobile phone or charger, battery are "For charging".
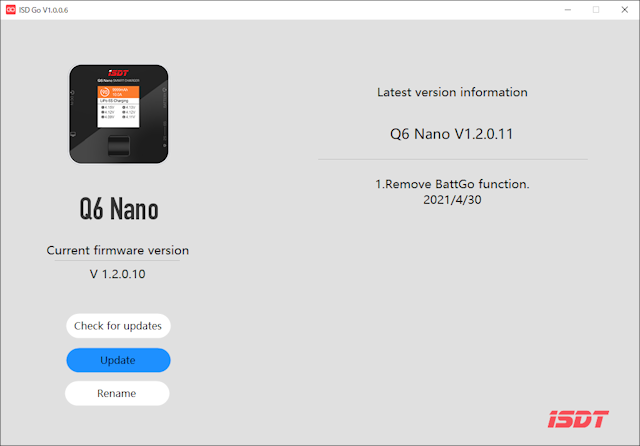 "ISD Go" will recognize the charger and you will see a screen like this.
The left side of the screen shows the current firmware version of the charger.
The latest firmware version and changes are displayed on the right side of the screen.
"ISD Go" will recognize the charger and you will see a screen like this.
The left side of the screen shows the current firmware version of the charger.
The latest firmware version and changes are displayed on the right side of the screen.
You can check for the latest version by clicking "Check for updates". If there is the latest version, "Please click Update!" will be displayed. If the update is not required, "The device is already the latest firmware." is displayed.
Click "Update" to update.
 Click "Update" to start updating the firmware immediately.
The update takes only a few seconds.
Click "Update" to start updating the firmware immediately.
The update takes only a few seconds.
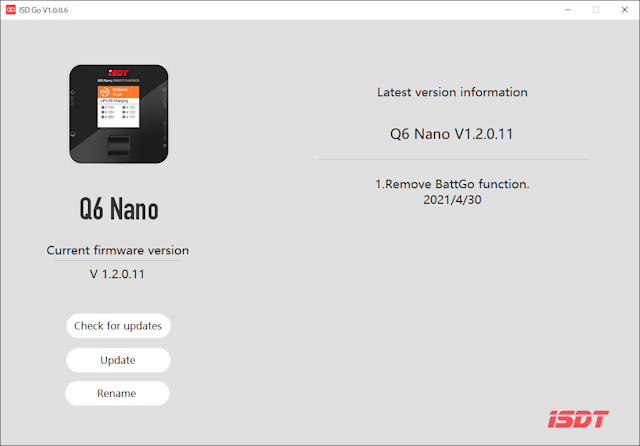 The charger will restart when the update is complete.
Then the new version will be displayed on the "ISD Go" screen.
And the update is complete.
The charger will restart when the update is complete.
Then the new version will be displayed on the "ISD Go" screen.
And the update is complete.
How to use the charger
This site explains how to use the following chargers. Please click the image.BC-4S15D

iSDT Q6 Nano

SkyRC iMAX B6 Series
