


 How to play VelociDrone FPV drone racing simulator
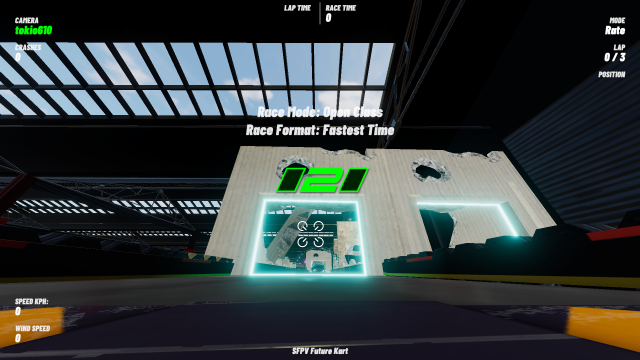
![VelociDrone Scenery [Future Hanger]-[VRL7 Track 1]](ardrone/velocidrone/velocidrone_scene_0003.png "VelociDrone Scenery [Future Hanger]-[VRL7 Track 1]")
A software called “VelociDrone” has been released as a typical Racing drones / FPV drones / Tiny Whoops simulator. Here, we will explain the procedure from purchasing, downloading, installing on Windows PC, and how to fly VelociDrone.
このページを日本語で見る
Table of contents
- Variations of FPV drone simulator
- What you need to play VelociDrone
- License purchase, download and installation
- Download User Manual
- Replacement / change of PC / Use on multiple PCs
- Initial startup and radio / controller settings
- First flight: basics of how to play
- Change settings, tuning, speeding up, image quality adjustment
- Display operation method: Help screen
- Play internet radio as BGM
- Learn how to fly FPV drone
- Introducing VelociDrone Sceneries
- Challenge time attack ・ Compete with ghost drone ・ Upload to bulletin board
- Replay ghost flight data
- Compete with rivals: how to play in NEMESIS mode
- How to play Weekly time trial
- View and analyze flight paths: to fly faster
- Play multiplayer online
- List of keyboard shortcuts
Variations of FPV drone simulator
Currently, there are three types of famous FPV drone simulators:
VelociDrone
FPV Freerider
The Drone Racing League Simulator
All of them are real and full-scale software that is preferred by drone racers.
In addition, there are the following simulators.
FPV Air 2 (steam)
Liftoff (steam)
RotorRush
FPV drone racing simulator VelociDrone - Scene : Industrial Wasteland / Track : VOC S1 Race 1
Watch on YouTube
What you need to play VelociDrone

How to choose a radio / transmitter | Introduction to FPV drone for beginner
Buy USB gamepad for Windows (Amazon.com)
Required graphics performance
It is recommended to add a video card because VelociDrone uses 3D graphics. At a minimum, need a GPU equivalent to Intel HD 530 (Installed from intel 6th generation Core processors shipped in 2015), and video card must have graphics performance compatible with DirectX 11.0 and Shader Model 5. Nvidia GTX1050ti (released in 2016) class or higher video card is recommended. If you install a high-performance video card, you can enjoy high image quality and smooth movement. However, it is not a heavy 3D game, so if you have a video card performance released around 2015 (eg GeForce GTX960 / Radeon R9 380 class), you can play for the time being. High-performance PCs released around 2020 or later can be played without a video card.
License purchase, download and installation
 Procedure from purchasing the license to installing it on your computer for VelociDrone is explained on the following page.
Download User Manual
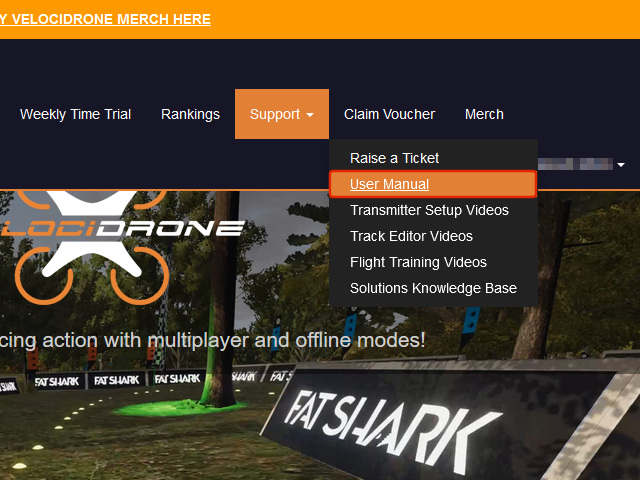 You can download English user manual in PDF format by selecting [Support]-[User Manual] from the menu on
VelociDrone official site
.
You can read a description of VelociDrone's features that cannot be covered on this page.
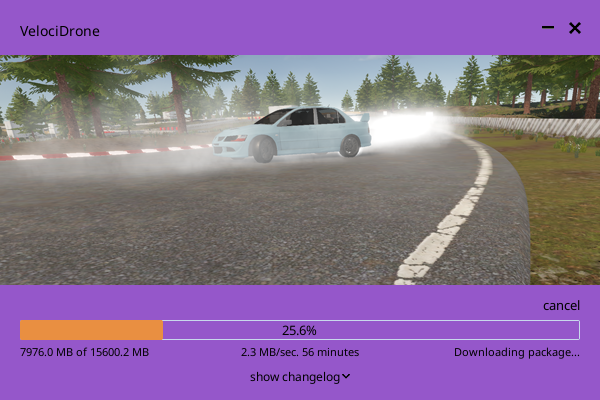
However, the file size is close to 9MB, and it takes several minutes to a dozen minutes to download.
You can download English user manual in PDF format by selecting [Support]-[User Manual] from the menu on
VelociDrone official site
.
You can read a description of VelociDrone's features that cannot be covered on this page.
However, the file size is close to 9MB, and it takes several minutes to a dozen minutes to download.
VelociDrone also publishes Solutions Knowledge Base page where you can read answers to frequently asked questions. It answers a number of questions, from installation and controller settings to known issues and how to enjoy the race.
Replacement / change of PC / Use on multiple PCs
 VelociDrone can only be purchased with one license per user account and can be used with only one computer.
If you want to use on two or more computers at the same time, you need to create as many accounts as you want and purchase individually.
VelociDrone can only be purchased with one license per user account and can be used with only one computer.
If you want to use on two or more computers at the same time, you need to create as many accounts as you want and purchase individually.
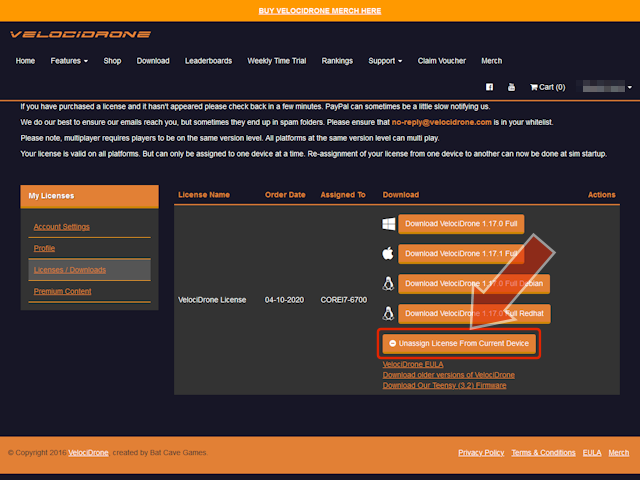
When replacing / changing a computer, click "Unassign License From Current Device" on the "My Licenses" screen in the figure in advance to cancel the link with the current computer. Then, copy the entire VelociDrone installation folder from the original computer to the new computer and launch VelociDrone from there. Transfer your license by following the on-screen instructions when starting up your new computer for the first time.
Please note that if you transfer only the license and perform a new installation on a new computer, the drone settings, course favorite information, flight records, etc. set on the original computer will not be transferred.
Initial startup and radio / controller settings
 After installing VelociDrone, set license and radio / controller when you start software for the first time.
This procedure is explained on the following page.
After installing VelociDrone, set license and radio / controller when you start software for the first time.
This procedure is explained on the following page.
First flight: basics of how to play
 Let's make a maiden flight anyway.
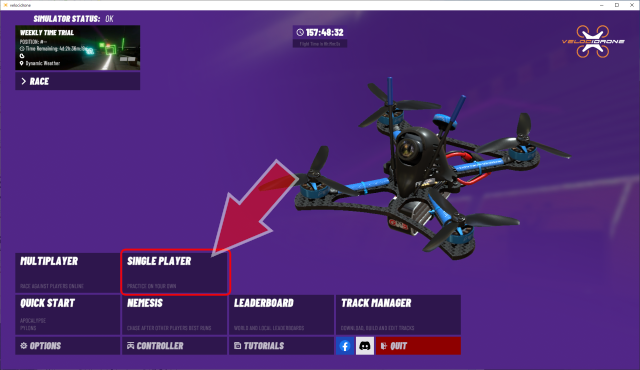
Click “SINGLE PLAYER” from the top menu screen.
Let's make a maiden flight anyway.
Click “SINGLE PLAYER” from the top menu screen.
If you click "QUICK START", the flight will start immediately with the last drone and track you flew last time.
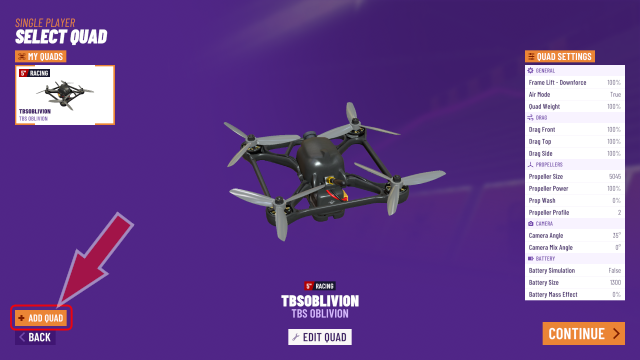 First, select drone you want to use for your flight from the field on the left side of the screen.
But initially there is only one drone in the field on the left side of the screen. Click “ADD QUAD” at the bottom left of the screen.
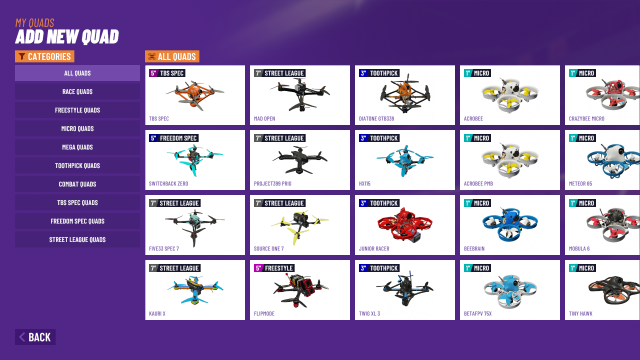 Then a list of new drones that can be added will be displayed.
If you have purchased a license for the optional content “Micro Class Quads”, Tiny Whoops name will appear.
Here, I chose Beta75x from BetaFPV.
Then a list of new drones that can be added will be displayed.
If you have purchased a license for the optional content “Micro Class Quads”, Tiny Whoops name will appear.
Here, I chose Beta75x from BetaFPV.
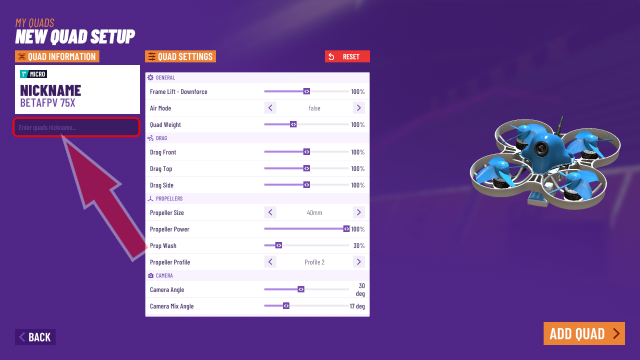 When you select a drone, you will see a screen like this.
You can name your drone whatever you like in the text box on the left of the screen.
In the "QUAD SETTINGS" column in the center of the screen, you can adjust the parameters of the drone.
Click "ADD QUAD" at the bottom right of the screen to add the drone.
When you select a drone, you will see a screen like this.
You can name your drone whatever you like in the text box on the left of the screen.
In the "QUAD SETTINGS" column in the center of the screen, you can adjust the parameters of the drone.
Click "ADD QUAD" at the bottom right of the screen to add the drone.
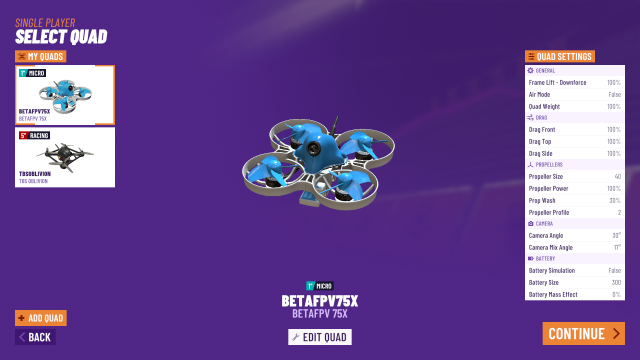 A drone has been added to the field on the left side of the screen.
From here, select the drone you want to use for this flight and click “CONTINUE” at the bottom right of the screen.
A drone has been added to the field on the left side of the screen.
From here, select the drone you want to use for this flight and click “CONTINUE” at the bottom right of the screen.
You can add multiple drones of the same model to the field on the left side of the screen by changing the settings.
Also, on the right side of the screen, parameters of the selected drone are displayed. When you click "EDIT QUAD" button at the bottom center of the screen, drone setting screen "QUAD SETTINGS (model-specific)" is displayed and you can change them. For details on these parameters, see How to change VelociDrone settings Tuning, speeding up, image quality adjustment .
How to change VelociDrone settings Tuning, speeding up, image quality adjustment
If you just fly in a straight line, the answer is yes. Drones with larger motors and larger propellers can fly faster.
However, there are places on the race course where you need to slip through narrow gates, make sharp turns or turn around. Large drones that are not good at making sharp turns are at a disadvantage in such places. For this reason, on many courses, the size of the drone (motor, propeller) alone does not determine the ranking. The drone you are used to is the one that can fly faster.
On the other hand, on an extremely wide course that includes the entire city, or on an extremely narrow course such as in a house or in a corner of a hut, the size of the drone has a big impact on the game. Larger drones are more advantageous for wide courses, and smaller drones are more advantageous for narrow courses.
If you can use three types of drones, 65mm, 75mm, and 3 inches, you can fly fast and well on most courses.
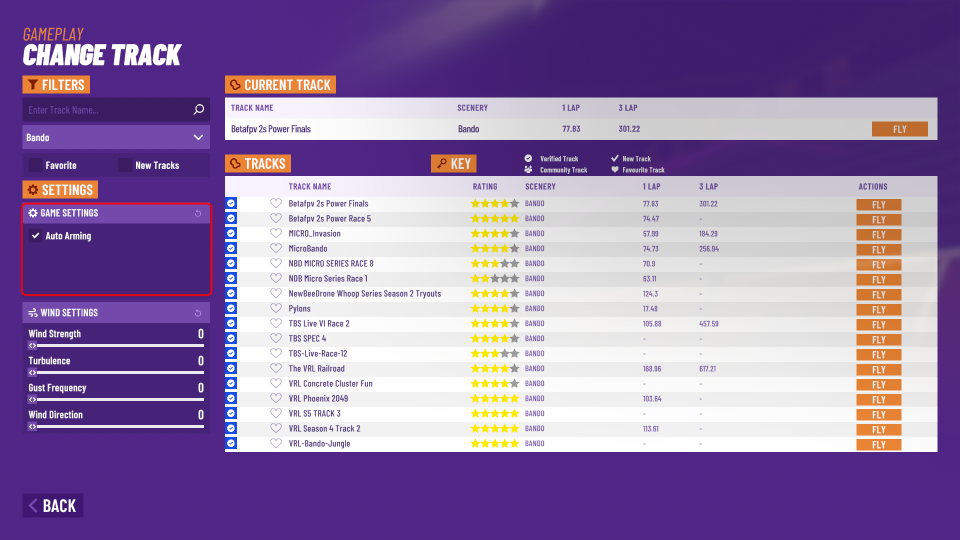
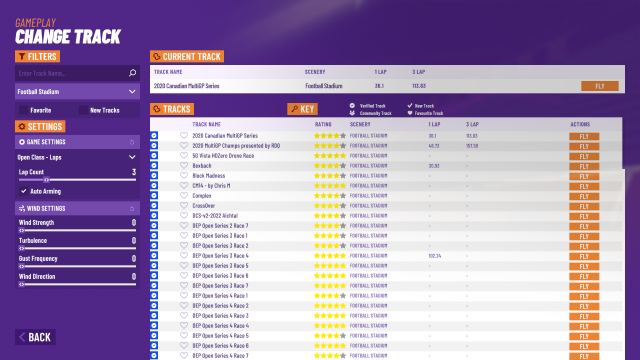 Next is the selection of scene.
The currently selected track (race course) is displayed in the "CURRENT TRACK" column.
Initially, “Football Stadium” is selected.
You can select another location (scene) in the drop-down list labeled “Football Stadium” at the top left of the screen.
In the list in "TRACKS" column center of the screen, you can select track (race course) set for that location.
You can select wind strength, turbulence, gust frequency, wind direction, etc. with the slide bar at "SETTING" column bottom left of the screen.
Click
Next is the selection of scene.
The currently selected track (race course) is displayed in the "CURRENT TRACK" column.
Initially, “Football Stadium” is selected.
You can select another location (scene) in the drop-down list labeled “Football Stadium” at the top left of the screen.
In the list in "TRACKS" column center of the screen, you can select track (race course) set for that location.
You can select wind strength, turbulence, gust frequency, wind direction, etc. with the slide bar at "SETTING" column bottom left of the screen.
Click
By clicking the heart mark on the left of the track name, you can register it as a "favorite". Velocidrone has a large number of tracks available. If you come across a track you like, put a check here to remember.
On the scene selection screen, if you enter a keyword in the search box at the top of the screen, you can filter tracks that include that keyword in the name. Also, if you click "Favorite", you can filter tracks marked as "Favorite". You can also filter new tracks added in the last two weeks by clicking "New Tracks".
 Click
Click
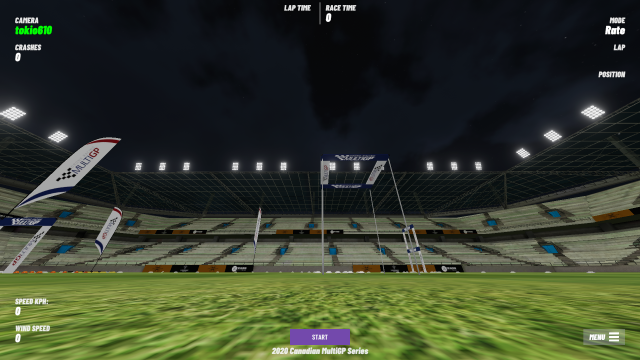 This is start screen at “Football Stadium”.
You can fly by operating stick of the controller.
First of all, please enjoy your flight freely.
If you're new to FPV drones, you'll be amazed at the sticks that are too sensitive.
This is start screen at “Football Stadium”.
You can fly by operating stick of the controller.
First of all, please enjoy your flight freely.
If you're new to FPV drones, you'll be amazed at the sticks that are too sensitive.
This track is too difficult for beginners. " Introducing VelociDrone Sceneries" introduces scene suitable for beginners' practice. Please refer.
Introducing VelociDrone's scene for beginners
If the image is not displayed correctly, try following operations.
Switch viewpoint: [F] key
Change camera angle (usually around 30 degrees): [Page Up] / [Page Down] or [-] / [=] keys
Change lens / Field of view (FOV) (usually around 120 degrees): [Insert] / [Delete] or [[] / []] keys
Reset position: [R] key
For other functions that can be operated with the keyboard, see List of keyboard shortcuts .
List of keyboard shortcuts
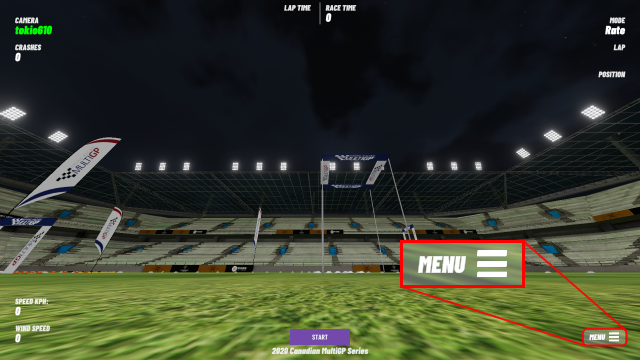 You can call the menu screen by clicking "MENU" on the bottom right of the flight screen.
Alternatively, you can call menu screen by pressing [Esc] key.
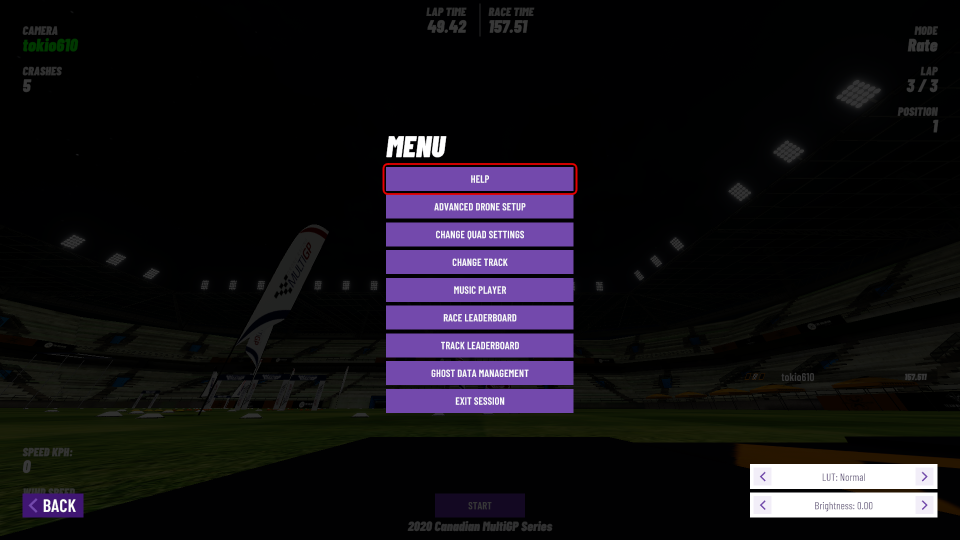
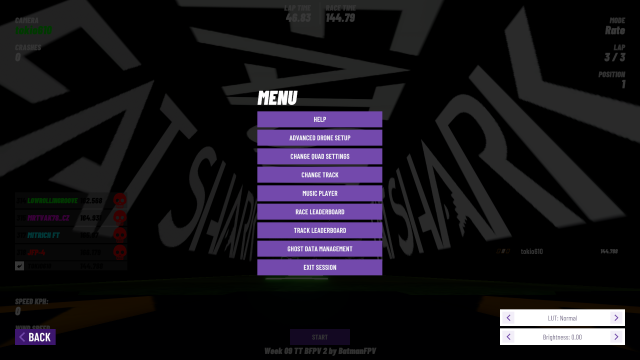
 This is the menu screen.
You can return to the original screen by clicking "BACK" at the bottom left of the screen.
This is the menu screen.
You can return to the original screen by clicking "BACK" at the bottom left of the screen.
By clicking "CHANGE TRACK" on the menu screen, you can switch scenes and tracks. You will be returned to the scene selection screen introduced above.
Even if you switch scene and track, the position of the drone does not change from the original location (coordinates). For this reason, immediately after switching tracks, you may be thrown into an empty space. In such a case, you can move to the start point (starting grid) of the selected track by pressing [R] key on the keyboard.
 If you click "EXIT SESSION" at the bottom of the menu screen above, you will see a screen like this.
Click "YES" to return to the top menu screen.
If you click "EXIT SESSION" at the bottom of the menu screen above, you will see a screen like this.
Click "YES" to return to the top menu screen.
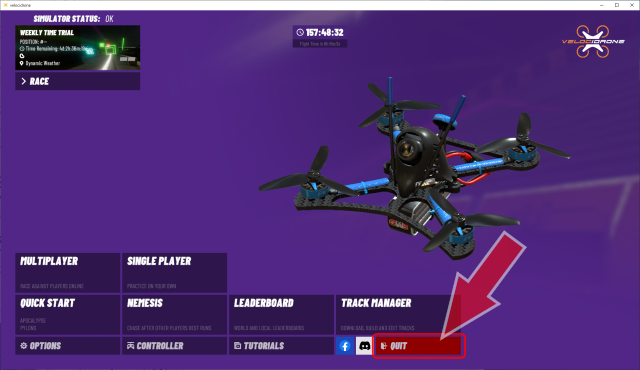 Click the red "QUIT" on the top menu screen to exit the software.
Change settings, tuning, speeding up, image quality adjustment
 VelociDrone's option setting screen has a large number of setting items, and you can set various play screen settings such as resolution and frame rate.
You can also switch flight modes and change drone settings.
This procedure is explained on the following page.
VelociDrone's option setting screen has a large number of setting items, and you can set various play screen settings such as resolution and frame rate.
You can also switch flight modes and change drone settings.
This procedure is explained on the following page.
Display operation method: Help screen
 To display how to operate (
List of keyboard shortcuts
)
screen,
click "MENU" at the bottom right of the play screen, and select "HELP" from the displayed menu screen.
To display how to operate (
List of keyboard shortcuts
)
screen,
click "MENU" at the bottom right of the play screen, and select "HELP" from the displayed menu screen.
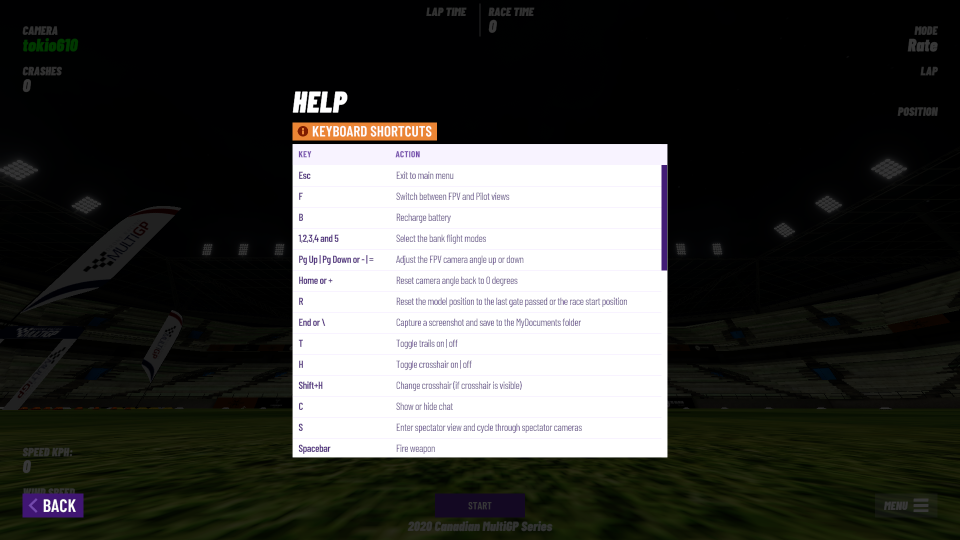 Then help screen will be displayed.
For example
Then help screen will be displayed.
For example
[PageUp][PageDown]: Move the camera angle up and down.
[R]: Move to start position or the position of the last gate passed
[End] or [\]: Store screen captures in the Documents folder
[F]: Switch to a camera from FPV or from line of sight.
[S]: Switch to a camera from spectator's point of view.
[Insert][Delete]: Change the FOV (angle of view) of the camera.
[A]: Start / abort the time attack.
[M]: Show stick operation.
List of keyboard shortcuts
Play internet radio as BGM
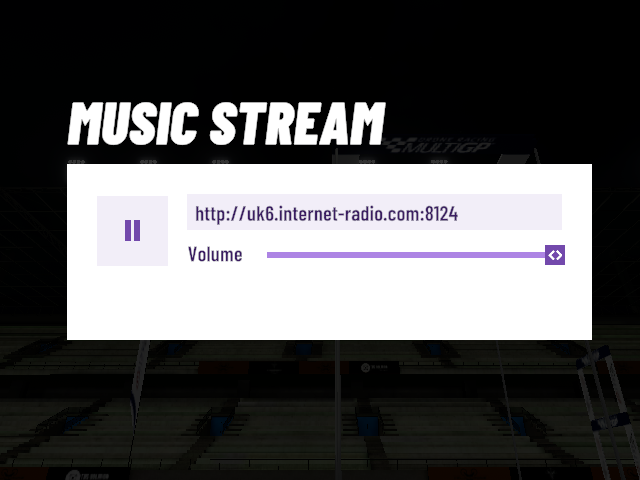 VelociDrone has a built-in internet radio player.
Click "MENU" at the bottom right of the play screen, and select "MUSIC PLAYER" from the displayed menu screen.
Then the Internet radio player screen as shown in the figure will be displayed.
VelociDrone has a built-in internet radio player.
Click "MENU" at the bottom right of the play screen, and select "MUSIC PLAYER" from the displayed menu screen.
Then the Internet radio player screen as shown in the figure will be displayed.
You can switch stations by entering URL of streaming service you want to hear in the text box and clicking [Change] button.
For example, if you want to select a broadcast station from Internet Radio (https://www.internet-radio.com/) , save the link labeled ".m3u" to the left of the broadcast station name locally. Then open obtained "live.m3u" file with a text editor, you can find URL of the broadcasting station.
Internet Radio (https://www.internet-radio.com/)
Learn how to fly FPV drone
VelociDrone's official YouTube channel publishes many tutorial videos. By watching the videos that start with the name "Flight Training", you can learn how to fly from the basic operation.
VelociDrone's official YouTube channel
Flight Training - part 1
Watch on YouTube
Introducing VelociDrone Sceneries
 VelociDrone has a large number of scene / tracks, but beginners are wondering where to start because there are no indicators such as difficulty.
We will mainly introduce scene that is suitable for beginners' practice in
Introducing VelociDrone's scene for beginners
page.
VelociDrone has a large number of scene / tracks, but beginners are wondering where to start because there are no indicators such as difficulty.
We will mainly introduce scene that is suitable for beginners' practice in
Introducing VelociDrone's scene for beginners
page.
VelociDrone - Mini Warehouse - Micro Premium Pack
Watch on YouTube
Challenge time attack ・ Compete with ghost drone ・ Upload to bulletin board
Once you get used to the flight to some extent, try the time attack. In Time Attack, you lap your favorite track as many times as you like (up to 10 laps) and measure your lap time and total flight time. You can also upload your flight time to Veloci Drone's Race Results Bulletin Board: LEADERBORD and you can compete with your past lap times (ghost drones).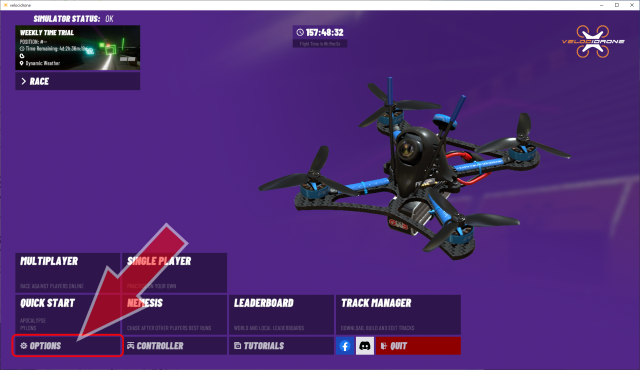 First of all, let's make various settings for the time attack.
Select "OPTIONS" from the menu.
First of all, let's make various settings for the time attack.
Select "OPTIONS" from the menu.
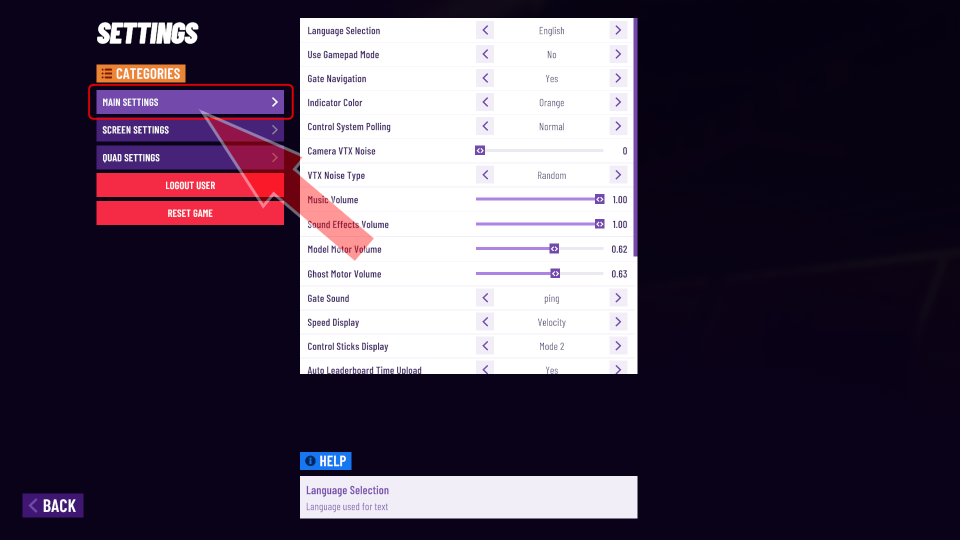 On the [MAIN SETTINGS] screen, you can make settings related to time attack as listed below.
For details, please refer to Changing VelociDrone Settings : Explanation of SETTINGS Screen, Tuning, Higher Speed, Higher Quality .
How to change VelociDrone settings Tuning, speeding up, image quality adjustment
- Gate Navigation
- set to "Yes", arrow and drone icon will indicate the position of next gate to go to.
- Indicator Color
- you can choose the color of drone icon that indicates the next gate to go to from four colors: White, Yellow, Cyan, and Orange.
- Gate Sound
- you can select the sound when you clear gate from three types: none, swoosh, and ping. Ping is easy to understand and recommended.
- Auto Leaderbord Time Upload
- set to "Yes", when "Single Class" is selected in the GAME SETTINGS column and you update your fastest flight time, it will be automatically uploaded to LEADERBORD.
- Lap Time Announcement
- you can select how to display the time when you finish one lap of the track from Lap Time or Lap Delta Time.
- Single Player Race Countdown
- allows you to specify how to count down at the start of race.
- Voice Announcements
- set to "Yes", your time and ranking will be read out by voice every time you go around the track.
- End of Race Statistics
- you can choose how to display the results after race.
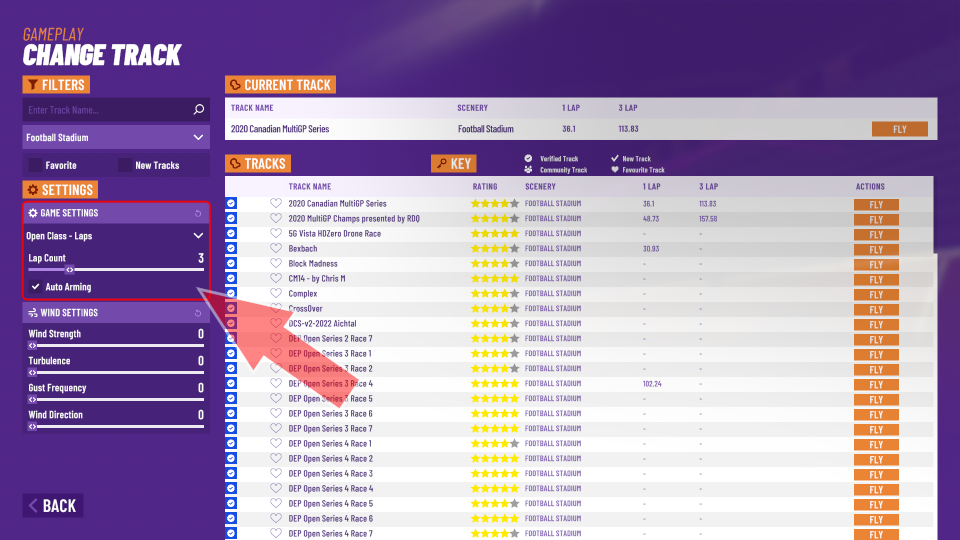 After completing above settings, select "SINGLE PLAYER" from menu screen and select drone and track to be used for the race.
Number of race laps and GAME SETTINGS are specified at the top left of the screen when selecting a track.
If the track you choose is too long and your drone's battery isn't enough, try reducing the number of laps.
After completing above settings, select "SINGLE PLAYER" from menu screen and select drone and track to be used for the race.
Number of race laps and GAME SETTINGS are specified at the top left of the screen when selecting a track.
If the track you choose is too long and your drone's battery isn't enough, try reducing the number of laps.
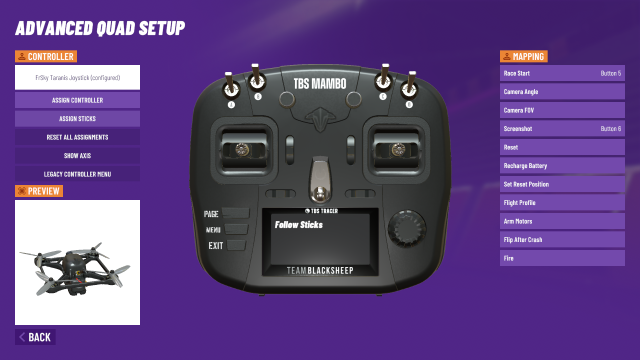
See Initial settings of VelociDrone Initial startup and radio / controller settings for how to assign "Arm Motors" and "Flip After Clash" to controller switches.
Initial settings of VelociDrone Initial startup and radio / controller settings
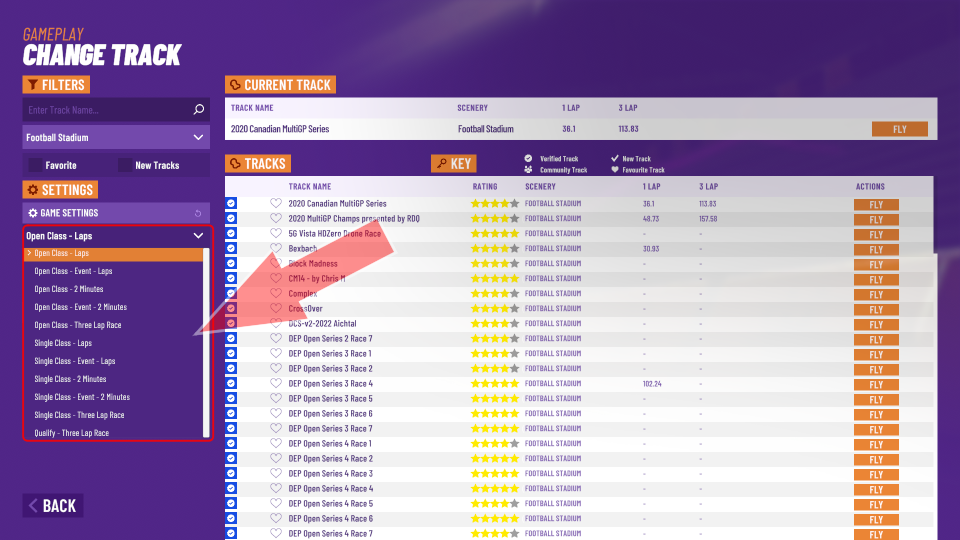
| Keyword | Description |
|---|---|
| Open Class | All quad setup parameters are allowed to be changed. But you cannot upload your race time to LEADERBORD. |
| Single Class | Drag and weight sliders are all set to a single defined level for all competitors in the session. Battery simulation is forcibly enabled and propeller will be damaged in the event of crash. PID controller settings are allowed and all other quad modifications are allowed. The times of the players who have achieved good results can be uploaded to LEADERBORD. |
| Event Mode | After one crash, the player will be red flagged at the next gate and excluded from the race. The player can continue to fly, but subsequent gate passes are not counted. The ranking is determined by number of laps completed, number of gates passed, and time. |
| Laps | Winner is the player who finishes specified number of laps (1-10 laps) in the fastest time. As a result, the best time for one lap will be uploaded to "single lap (best lap)" LEADER BORD. |
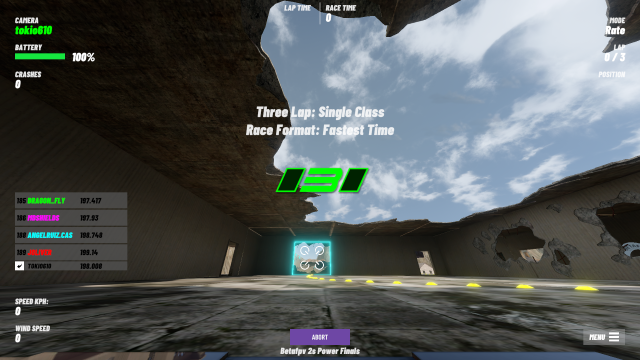
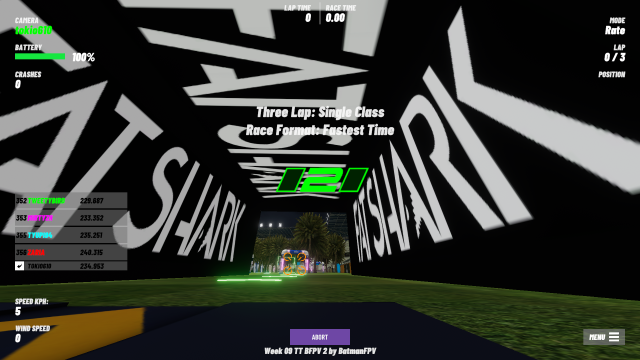
| Three Lap |
Compete for 3 laps per race.
When you race in Single Class, the results will be uploaded to "three lap" LEADERBORD with total time of 3 laps.
Even if number of laps is set to 3 in the above "Laps" mode, the time will not be uploaded to "three lap" LEADERBORD, but the best time for one lap will be uploaded to "single lap (best lap)" LEADERBORD. increase. |
| 2 Minutes | The one who completes the most laps is the winner. If two or more players complete the same number of laps then it's the fastest time to complete those laps that wins. |
 If you want to upload your flight time to Veloci Drone's Race Results Bulletin Board: LEADERBORD or want to know your ranking there, select "Single Class" in GAME SETTINGS field.
However, in "Single Class", battery simulation is enabled, so flight time is limited.
For beginners, it is recommended to select "Open Class".
If you want to upload your flight time to Veloci Drone's Race Results Bulletin Board: LEADERBORD or want to know your ranking there, select "Single Class" in GAME SETTINGS field.
However, in "Single Class", battery simulation is enabled, so flight time is limited.
For beginners, it is recommended to select "Open Class".
If you want to make a good result in LEADERBORD, it is recommended to do a time attack with [Single Class]-[Laps], which has few players. On the other hand, if you want to become famous, get good results in [Single Class]-[Three Lap], which has many players.
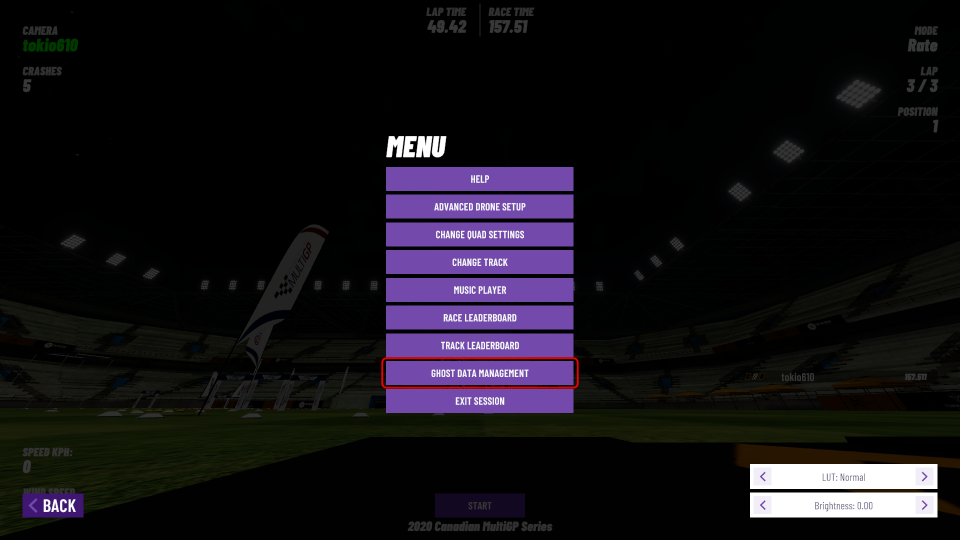 Click "MENU" at the bottom right of the play screen and select "GHOST DATA MANAGEMENT" from the displayed menu screen to make settings related to saving race records.
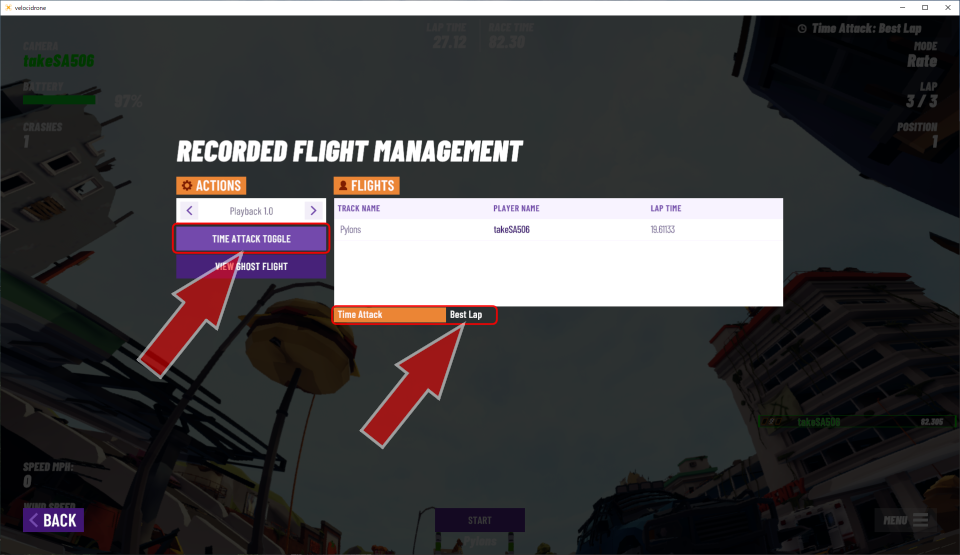 Every time you click [TIME ATTACK TOGGLE], [OFF]-[BEST LAP]-[PREVIOUS LAP] is displayed at the bottom center of the screen.
In [BEST LAP], your best lap flight path will be displayed as a ghost, and in [PREVIOUS LAP], your last flight path will be displayed as a ghost drone at the next race. You can compete with your past lap times. When competitors are displayed, race gets hot.
Note that the [TIME ATTACK TOGGLE] setting is reset every time you start the game or switch scene (it becomes [OFF]). If you want to save / play your past flights on each track, reset them before each flight.
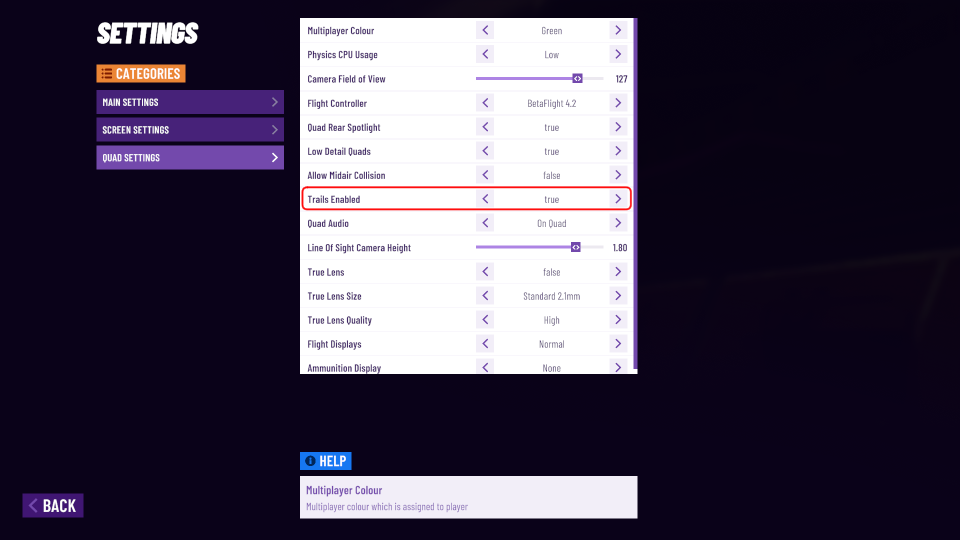 When you select [BEST LAP] or [PREVIOUS LAP] on the above screen, it is recommended to set "Trails Enabled" to "true" on the [OPTIONS]-[QUAD SETTINGS] screen.
Ghost drone has a "tail" in the flight path, making it easier to see where the ghost is.
When you select [BEST LAP] or [PREVIOUS LAP] on the above screen, it is recommended to set "Trails Enabled" to "true" on the [OPTIONS]-[QUAD SETTINGS] screen.
Ghost drone has a "tail" in the flight path, making it easier to see where the ghost is.
How to change VelociDrone settings Tuning, speeding up, image quality adjustment
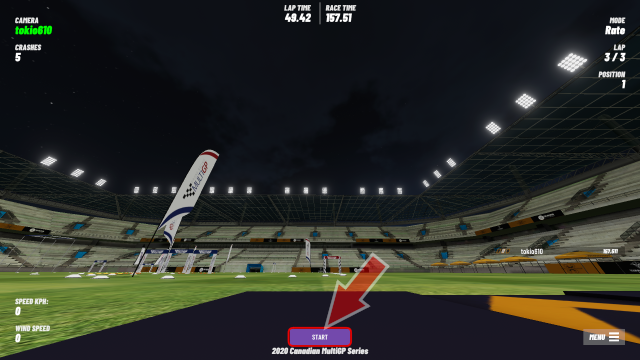 Click
Click
Then, you can interrupt the race by clicking
 The countdown will begin, then race will start.
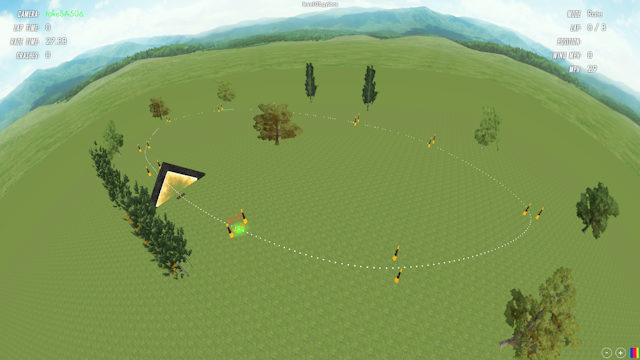
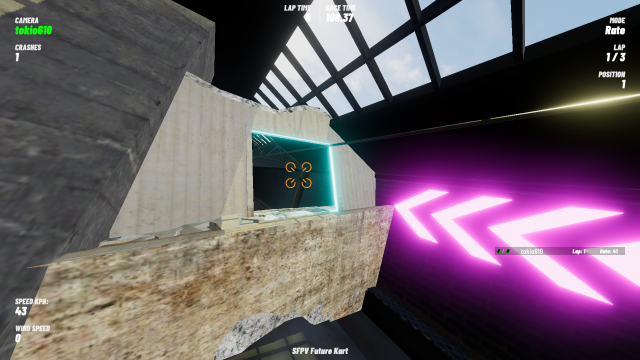 Arrows and drone icons will show you where to go next.
When the drone icon is red, it is "back side". Turn to the other side.
Arrows and drone icons will show you where to go next.
When the drone icon is red, it is "back side". Turn to the other side.
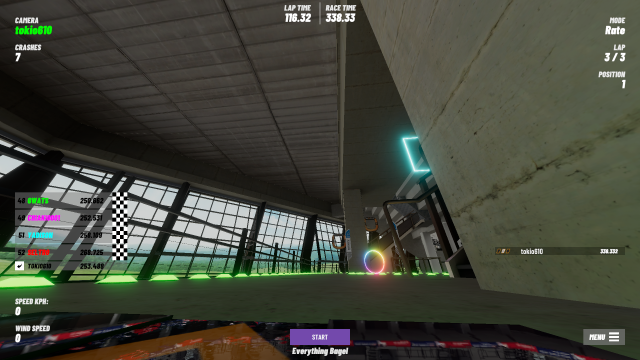
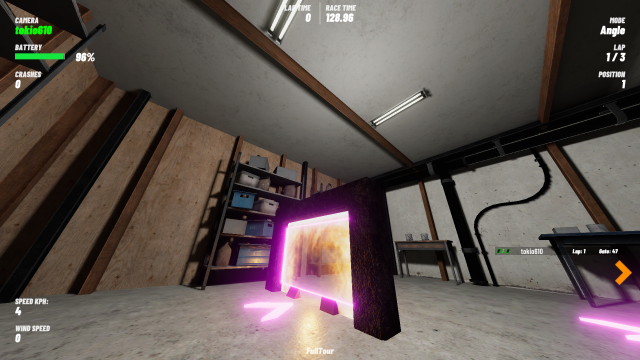 The gate with blue or yellow "haze" as shown in this figure is "Recharge gate".
If you go through this gate while battery simulation is on, the battery will be fully charged and propeller damage will be healed.
The gate with blue or yellow "haze" as shown in this figure is "Recharge gate".
If you go through this gate while battery simulation is on, the battery will be fully charged and propeller damage will be healed.
"Recharge gate" may be located outside race track. If you're racing with small capacity battery drone, try to look for "Recharge gate".
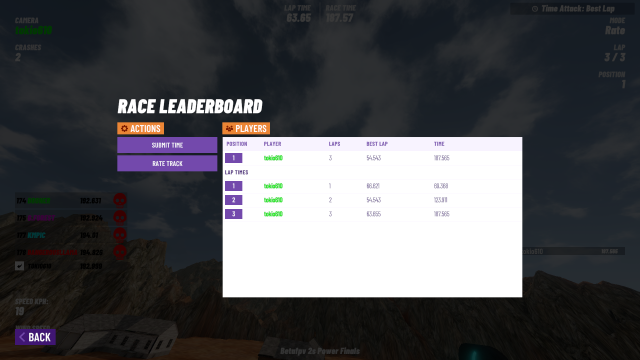
 At the end of the race, lap time and total time will be displayed on "RACE LEADERBORD".
This screen can be redisplayed at any time after the race by clicking "MENU" at the bottom right of the play screen and clicking "RACE LEADERBORD" from the displayed menu screen.
At the end of the race, lap time and total time will be displayed on "RACE LEADERBORD".
This screen can be redisplayed at any time after the race by clicking "MENU" at the bottom right of the play screen and clicking "RACE LEADERBORD" from the displayed menu screen.
If you race in "Single Class" mode and set your best time, your record will be posted on LEADERBORD. After this screen, "LEADERBORD UPDATE" screen will be displayed, showing your ranking and time in LEADERBORD.
However, if [OPTIONS]-[MAIN SETTINGS]-[Auto Leaderbord Time Upload] is specified as "No", your time will not be automatically uploaded to LEADERBORD. Instead, "SUBMIT TIME" button will appear to the top left of the screen as shown in this figure. Click this and your record will be posted on LEADERBORD.
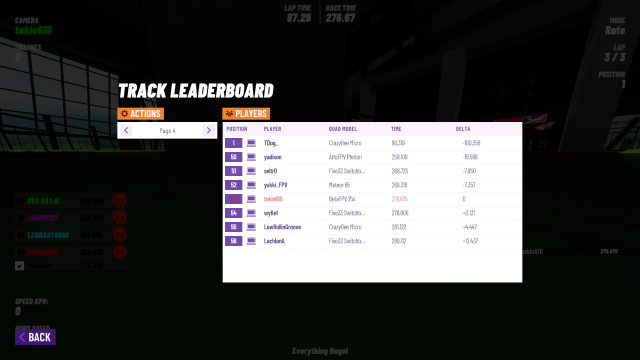
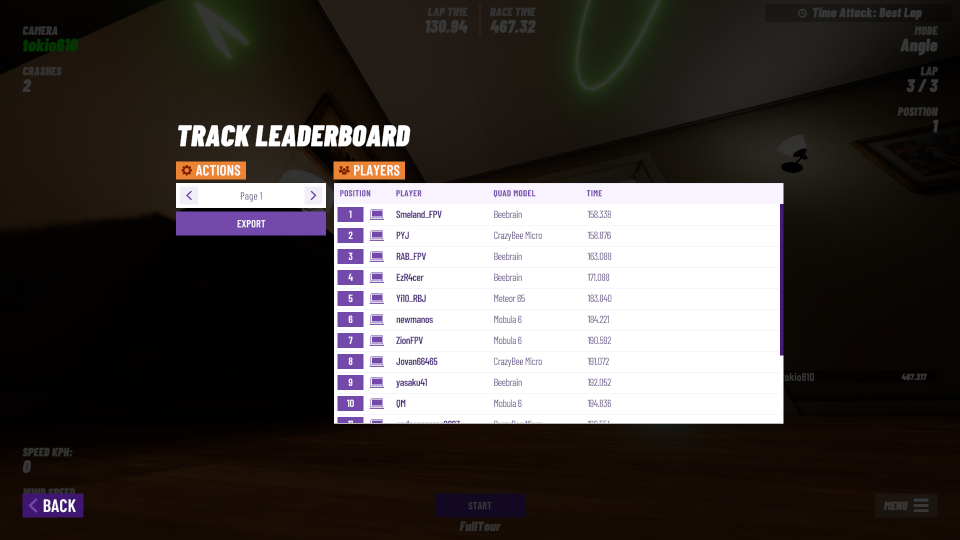 Click "MENU" at the bottom right of the play screen and select "TRACK LEADERBORD" from the displayed menu screen, you will see a screen like this.
Top 15 players for currently selected track LEADERBORD are displayed.
Click "MENU" at the bottom right of the play screen and select "TRACK LEADERBORD" from the displayed menu screen, you will see a screen like this.
Top 15 players for currently selected track LEADERBORD are displayed.
Click [<][>] button in "Page" column at the top left of the screen to display a list of previous 15th / next 15th players.
When you click the [EXPORT] button, information list of top 100 LEADERBORD will be saved as a CSV text file in "Documents" folder.
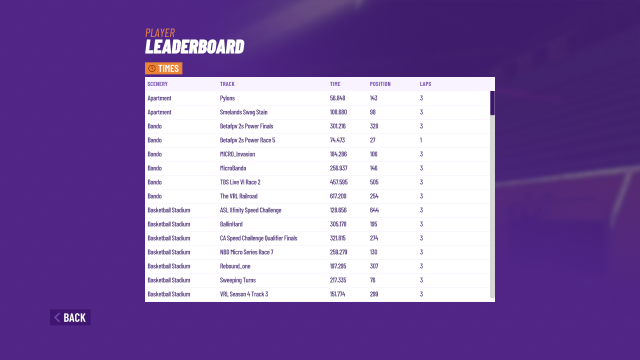 If you click "LEADERBORD" menu from top menu screen, you will see a screen like this.
Your records in LEADERBORD will be displayed in chronological order.
You can see scene, track, time, ranking and laps you have recorded so far.
If you click "LEADERBORD" menu from top menu screen, you will see a screen like this.
Your records in LEADERBORD will be displayed in chronological order.
You can see scene, track, time, ranking and laps you have recorded so far.
At first, let's fly leisurely to learn the course. After flying about 2 races / 6 laps, you will learn the course, then optimize the flight course while increasing the speed. After flying about 5 - 6 races / 15 - 20 laps, I think you can set highest record of the day. After that, you will get tired and your concentration will decrease, so you will not get a better record no longer. Let's take a break.
Replay ghost flight data
You can replay flight data that you have flown in the past.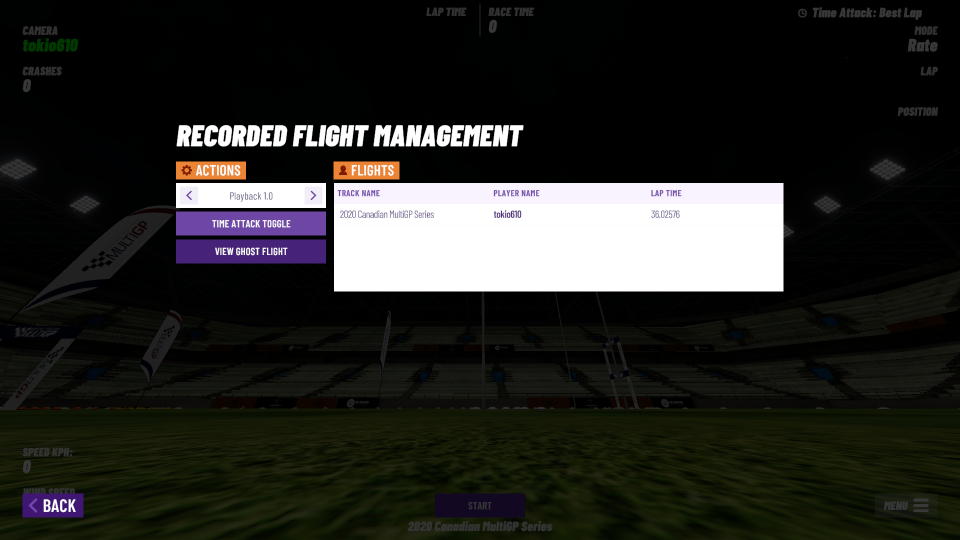 Once you have specified [BEST LAP] or [PREVIOUS LAP] in [TIME ATTACK TOGGLE] menu and finished the race, your flight route will be saved for each track.
Click "MENU" at the bottom right of the play screen and click "GHOST DATA MANAGEMENT" from the displayed menu screen to see this screen.
Once you have specified [BEST LAP] or [PREVIOUS LAP] in [TIME ATTACK TOGGLE] menu and finished the race, your flight route will be saved for each track.
Click "MENU" at the bottom right of the play screen and click "GHOST DATA MANAGEMENT" from the displayed menu screen to see this screen.
If you click [VIEW GHOST FLIGHT] button here, you can play back your saved flight path. You can change the playback speed by clicking [<][>] button in "Playback" column.
For some tracks, [VIEW DEMO FLIGHT] menu is displayed here. You can watch a professional demo flight.
Compete with rivals: how to play in NEMESIS mode
In NEMESIS mode, you can compete with other players' best time data uploaded to VelociDrone's LEADERBORD. Data for up to 4 players close to your time will be downloaded and you can race with them.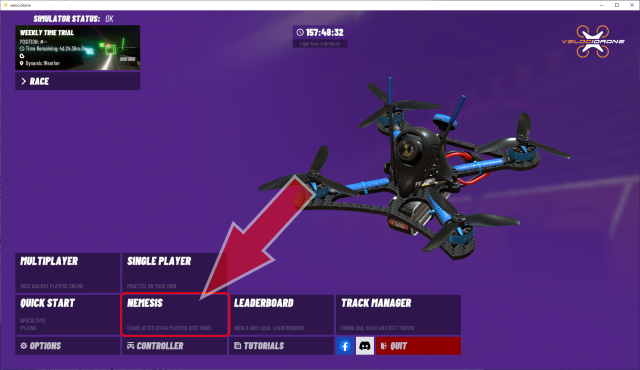 First of all, let's practice the scenes and tracks you want to fly in advance in "SINGLE PLAYER" mode.
After practicing enough and getting ready, select "NEMESIS" from the menu.
First of all, let's practice the scenes and tracks you want to fly in advance in "SINGLE PLAYER" mode.
After practicing enough and getting ready, select "NEMESIS" from the menu.
 Select the drone to use in the race.
Then adjust the drone parameters from the EDIT QUAD menu as needed.
However, NEMESIS mode races will be held in "Single Class - Three Lap".
So, some parameters are immutable.
Select the drone to use in the race.
Then adjust the drone parameters from the EDIT QUAD menu as needed.
However, NEMESIS mode races will be held in "Single Class - Three Lap".
So, some parameters are immutable.
 Next, select the scene / track you want to race, and click
 Switches to the screen of the specified scene and track.
Start the race.
Switches to the screen of the specified scene and track.
Start the race.
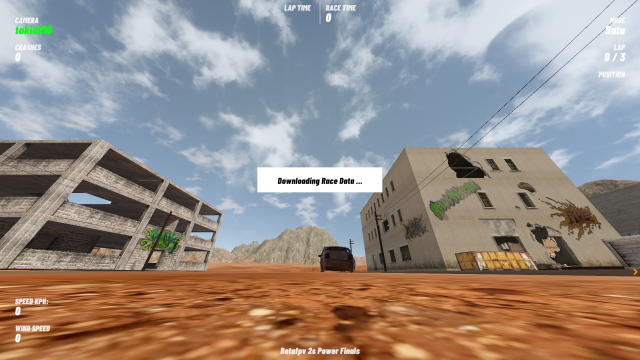
If you leave your time in "Three Lap" LEADERBORD of this track in advance, the data of your enemy player will start downloading based on that time.
If you have no time left, measure your time first. Please do a time attack by yourself normally.
Then, when you start the race for the second time, the data of your nemesis player will start downloading. The download may take a few minutes.
Even in NEMESIS mode, when you open "GHOST DATA MANAGEMENT" screen, you can specify [BEST LAP] or [PREVIOUS LAP] for [TIME ATTACK TOGGLE]. If you specify this, you can also participate in the race with your own past data (Ghost drone).
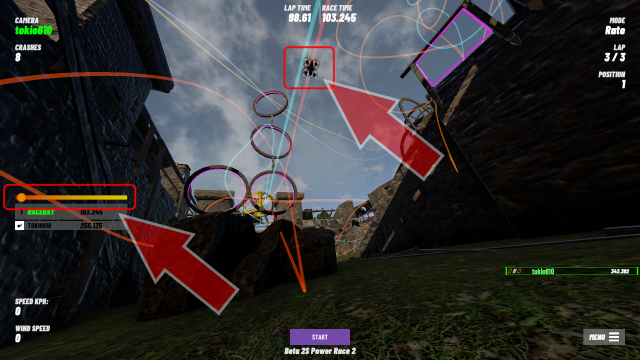
 And finally the race start with the nemesis.
On the left side of the screen, the nicknames, times, and rankings of up to 4 enemy players are displayed.
Since the GAME SETTINGS is "Single Class", battery simulation is enabled.
A bar graph showing the remaining battery level is displayed in the upper left.
And finally the race start with the nemesis.
On the left side of the screen, the nicknames, times, and rankings of up to 4 enemy players are displayed.
Since the GAME SETTINGS is "Single Class", battery simulation is enabled.
A bar graph showing the remaining battery level is displayed in the upper left.
 After completing the specified number of laps, "RACE LEADERBORD" will be displayed and your time will be displayed.
 Then return to the race start screen.
On the left side of the screen,
If you see a
If you finish faster than all players, new competitor data will be automatically downloaded based on the results of this race. Let's repeat the race and raise your ranking in LEADERBORD.
 When you set your personal best time and are posted on LEADERBORD, "TRACK LEADERBORD" will be displayed like this, and your ranking and time on LEADERBORD will be displayed.
If you click "BACK" at the bottom left of the screen...
 A menu appears.
Select "EXIT SESSION" to end the NEMESIS mode.
A menu appears.
Select "EXIT SESSION" to end the NEMESIS mode.
Click "BACK" at the bottom left of the screen to return to the race screen. You can challenge the race again.
Once you play in NEMESIS mode, the GAME SETTINGS will remain "Single Class" (battery simulation enabled) the next time you play in normal "SINGLE PLAYER" mode.
If necessary, switch back to "Open Class - Laps" e.t.c..
How to play Weekly time trial
Occasionally "Weekly time trial" is held where you can compete with other players' data in a given scene / track. It seems that it is often used to introduce newly added tracks. Similar to NEMESIS mode, you can compete with data for up to 4 players close to your time uploaded to VelociDrone's LEADERBORD.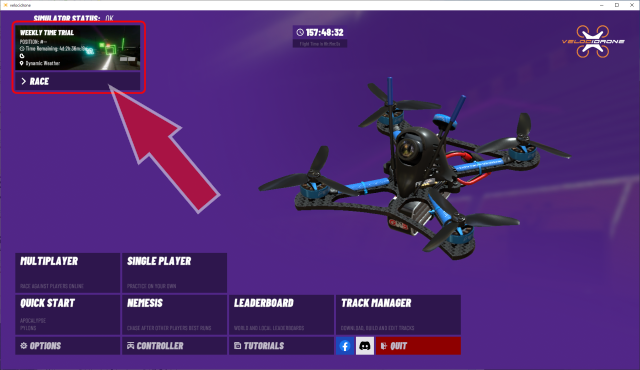 Enter "Weekly time trial" from the upper left of the menu screen.
Here you can see the scene and track name used in current time trial, date and time left until the end, and your ranking.
Enter "Weekly time trial" from the upper left of the menu screen.
Here you can see the scene and track name used in current time trial, date and time left until the end, and your ranking.
First of all, let's practice this scene and track in "SINGLE PLAYER" mode in advance. After practicing enough and getting ready, you can join the time trial by clicking "RACE" in the upper left corner.
At the start of the Weekly time trial, drone selection screen will not be displayed. The drone used here is the one you were using until just before.
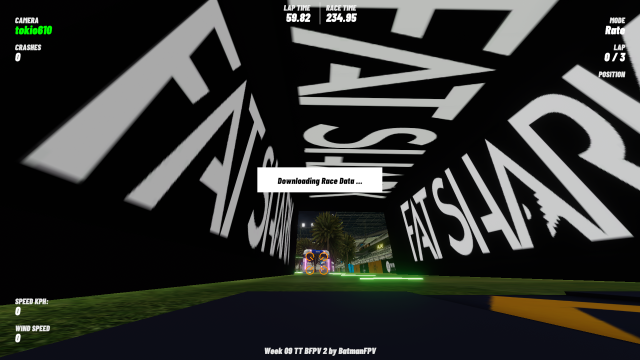 Click "RACE" to switch to the screen of specified scene and track.
Start the race.
Click "RACE" to switch to the screen of specified scene and track.
Start the race.
If you leave your time in LEADERBORD of this track in advance, the data of players competing with you will start downloading based on that time.
If you have no time left, measure your time first. Please do a time attack by yourself normally.
Then, when you start the race for the second time, the data of players competing with you will start downloading. The download may take a few minutes.
Even in "Weekly time trial", when you open "GHOST DATA MANAGEMENT" screen, you can specify [BEST LAP] or [PREVIOUS LAP] for [TIME ATTACK TOGGLE]. If you specify this, you can also participate in the race with your own past data (Ghost drone).
 And finally the race start.
On the left side of the screen, the nicknames, times, and rankings of the four competing players are displayed.
Since GAME SETTINGS is "Single Class", battery simulation is enabled.
A bar graph showing the remaining battery level is displayed in the upper left.
And finally the race start.
On the left side of the screen, the nicknames, times, and rankings of the four competing players are displayed.
Since GAME SETTINGS is "Single Class", battery simulation is enabled.
A bar graph showing the remaining battery level is displayed in the upper left.
 After completing the specified number of laps, "RACE LEADERBORD" will be displayed and your time will be displayed.
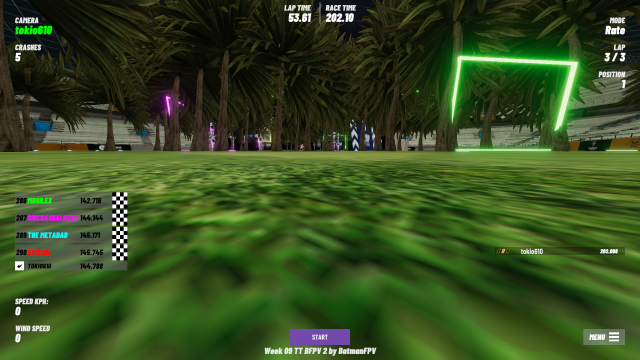 Then return to the race start screen.
On the left side of the screen,
If you see a
If you finish faster than all players, new competitor data will be automatically downloaded based on the results of this race. Let's repeat the race and raise your ranking in LEADERBORD.
 When you set your personal best time and are posted on LEADERBORD, "TRACK LEADERBORD" will be displayed like this, and your ranking and time on LEADERBORD will be displayed.
If you click "BACK" at the bottom left of the screen...
A menu appears.
Select "EXIT SESSION" to end the Weekly time trial.
Click "BACK" at the bottom left of the screen to return to the race screen. You can challenge the race again.
Once you play Weekly time trial mode, the GAME SETTINGS will remain "Single Class" (battery simulation enabled) the next time you play in normal "SINGLE PLAYER" mode.
If necessary, switch back to "Open Class - Laps" e.t.c..
FPV drone racing simulator VelociDrone - Scene : Football Stadium / Track : Week16TT-CM18 by ChrisM
Watch on YouTube
View and analyze flight paths: to fly faster
In NEMESIS mode or Weekly time trial mode, you can view flight path, check flight position at any time of yourself and other players, and reproduce the flight.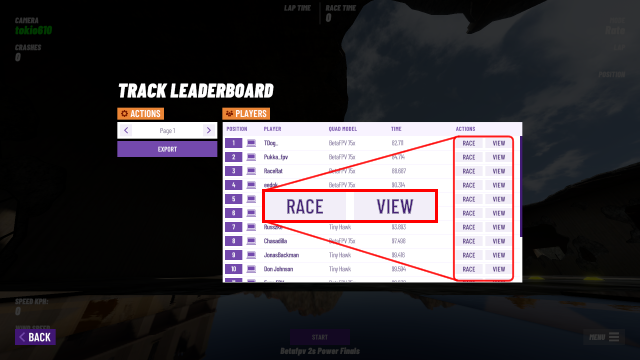 In NEMESIS mode or Weekly time trial mode,
click "MENU" at the bottom right of the play screen and select "TRACK LEADERBORD" from the displayed menu screen, you will see a screen like this.
LEADERBORD for currently selected track is displayed, and [Race] and [View] buttons are displayed at the right end of each player name.
In NEMESIS mode or Weekly time trial mode,
click "MENU" at the bottom right of the play screen and select "TRACK LEADERBORD" from the displayed menu screen, you will see a screen like this.
LEADERBORD for currently selected track is displayed, and [Race] and [View] buttons are displayed at the right end of each player name.
Click [Race] button to download that player's data and race one-on-one with you.
Click [View] button to recreate that player's flight.
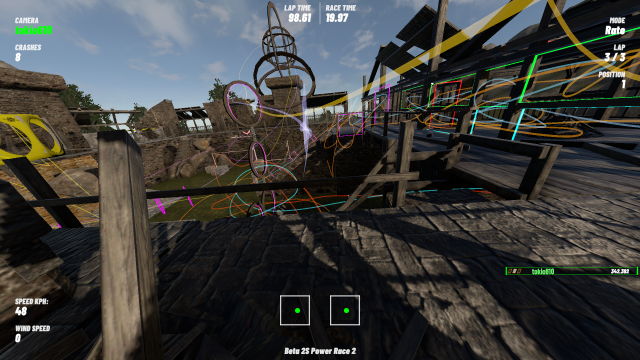
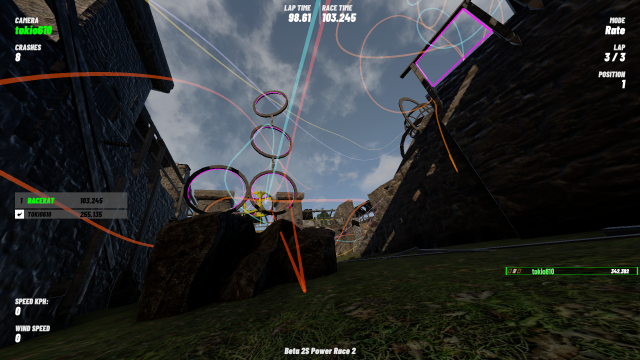 After downloading the data of any player by clicking [Race] or [View] button on the above screen, each time you press [F1] key, flight path of that player's first lap is displayed / hidden.
You can also view the flight path of your first lap by pressing [F2] key after racing NEMESIS mode or Weekly time trial mode.
Then press [F2] twice to see the flight path for your last lap.
You can also display flight paths of two people at the same time.
And you can also re-race while displaying these flight paths.
Even if you load data from another player, screen will continue to show the flight path of the player you initially viewed, unless you press [F1] key.
After downloading the data of any player by clicking [Race] or [View] button on the above screen, each time you press [F1] key, flight path of that player's first lap is displayed / hidden.
You can also view the flight path of your first lap by pressing [F2] key after racing NEMESIS mode or Weekly time trial mode.
Then press [F2] twice to see the flight path for your last lap.
You can also display flight paths of two people at the same time.
And you can also re-race while displaying these flight paths.
Even if you load data from another player, screen will continue to show the flight path of the player you initially viewed, unless you press [F1] key.
List of keyboard shortcuts
 After racing one-on-one, if you press [F3] key while displaying your flight path, a slider will appear in the center left of the screen.
By moving this slider, you can see the flight position and attitude of two player's drone at any time during the race.
Left edge of the slider indicates start of race and right edge indicates end of lap.
As shown in this figure, drones are displayed at the position corresponding to the timing specified by the slider.
After racing one-on-one, if you press [F3] key while displaying your flight path, a slider will appear in the center left of the screen.
By moving this slider, you can see the flight position and attitude of two player's drone at any time during the race.
Left edge of the slider indicates start of race and right edge indicates end of lap.
As shown in this figure, drones are displayed at the position corresponding to the timing specified by the slider.
 In LEADERBORD of NEMESIS mode or Weekly time trial mode, click [View] button of any player to display this screen.
You can recreate that player's flight by clicking [VIEW NEMESIS FLIGHT].
You can change the playback speed by clicking [<][>] button in "Playback" column.
In LEADERBORD of NEMESIS mode or Weekly time trial mode, click [View] button of any player to display this screen.
You can recreate that player's flight by clicking [VIEW NEMESIS FLIGHT].
You can change the playback speed by clicking [<][>] button in "Playback" column.
 As shown in this figure, flight of the loaded player is reproduced with the operation of sticks.
Watching top players flight is a good way to fly faster.
As shown in this figure, flight of the loaded player is reproduced with the operation of sticks.
Watching top players flight is a good way to fly faster.
Play multiplayer online
You can play multiplayer battles on the server operated by VelociDrone. Online match will be held in which other players participate in "session" started by "Host (organizer)". Up to 7 people can participate in the race at the same time in one session, and up to 32 people including spectators can participate. Any VelociDrone user can be Host and start a session. You can also enjoy online racing with your private friends by using "Private session" function. There are no additional costs other than network communication costs to play multiplayer matches.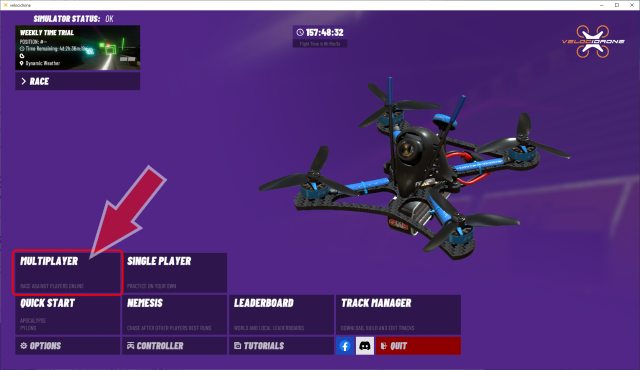 To play multiplayer match, select "MULTIPLAYER" from the menu.
Then drone selection screen will appear.
Select drone you want to use in the race and click "CONTINUE" at the bottom right of the screen.
To play multiplayer match, select "MULTIPLAYER" from the menu.
Then drone selection screen will appear.
Select drone you want to use in the race and click "CONTINUE" at the bottom right of the screen.
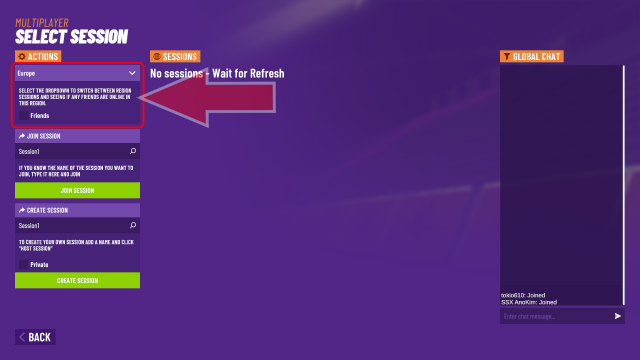 When you select a drone, you will see a screen like this.
The box labeled "GLOBAL CHAT" on the right side of the screen is the chat screen. You can chat with VelociDrone players around the world.
When you select a drone, you will see a screen like this.
The box labeled "GLOBAL CHAT" on the right side of the screen is the chat screen. You can chat with VelociDrone players around the world.
First, select the region of the server you want to connect to from the drop-down menu just below the place labeled "ACTIONS" on the upper left of the screen. You can select the region from "America", "Europe", "Asia", "Japan", "Australia", "Canada", "South America", "Korea", and "Russia". To ensure network speed, you should choose the region closest to where you live. If you are a player living in Japan, it is recommended to select "Japan". You can only participate in races held in the selected region.
 When you select a region, a list of public sessions held on the selected server is displayed in the center of the screen.
The number of participants, host player name, session name, track and race mode are displayed.
You can join the race by clicking [JOIN SESSION] button.
When you select a region, a list of public sessions held on the selected server is displayed in the center of the screen.
The number of participants, host player name, session name, track and race mode are displayed.
You can join the race by clicking [JOIN SESSION] button.
However, if the session already has 7 participants, you will participate as an spectator. You can enter the race when another player leaves or host player switches you from a spectator to a race participant.
If you check "Friends" under the region name, only sessions held by players you are friends with will be displayed. If you check this, the Private sessions held by your friend players will also be displayed.
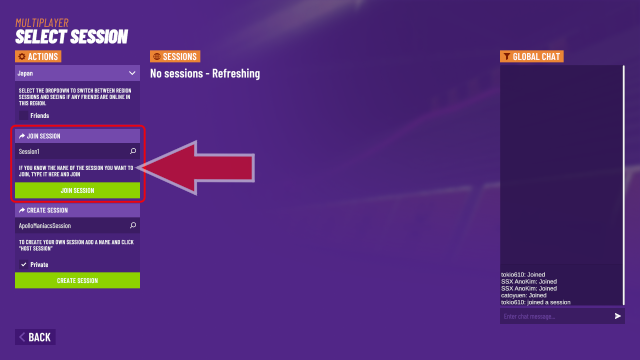 If you know the name of the session you want to join, you can directly specify the session name to join.
In "JOIN SESSION" field on the left center of the screen, enter the session name in the text box and click the [JOIN SESSION] button.
From here you can join "Private session" where you can race with your private friends.
If you know the name of the session you want to join, you can directly specify the session name to join.
In "JOIN SESSION" field on the left center of the screen, enter the session name in the text box and click the [JOIN SESSION] button.
From here you can join "Private session" where you can race with your private friends.
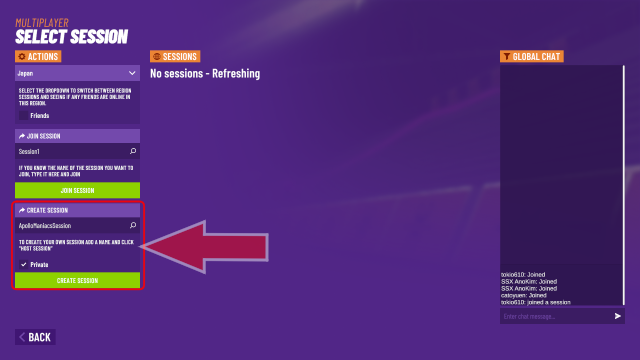 To start a new session, use "CREATE SESSION" field at the bottom left of the screen.
Enter session name you think of in the text box and click [CREATE SESSION] button to start.
To start a new session, use "CREATE SESSION" field at the bottom left of the screen.
Enter session name you think of in the text box and click [CREATE SESSION] button to start.
If the session name you entered already exists, you will be warned, so think of a different session name and re-enter it. If you do not specify session name, session name with a random number added to string "Session" is automatically generated.
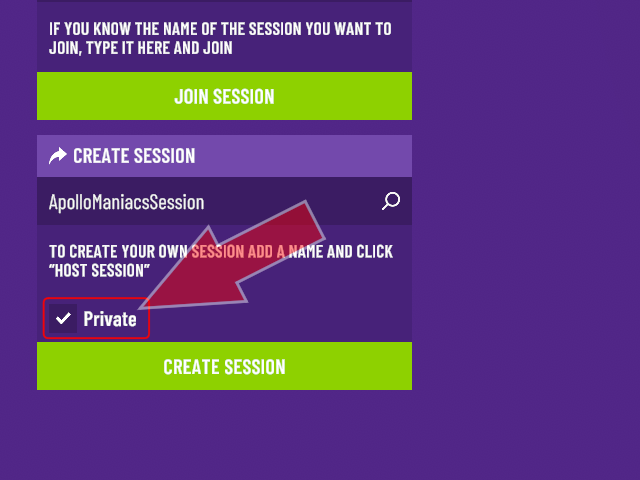 If you check "Private" when starting a new session, the session will start as a "Private session" that is not displayed in the session list.
Private sessions can only be attended by people who know the session name or who have registered you as a friend.
You can organize a private race by naming your Private session with your friends.
If you check "Private" when starting a new session, the session will start as a "Private session" that is not displayed in the session list.
Private sessions can only be attended by people who know the session name or who have registered you as a friend.
You can organize a private race by naming your Private session with your friends.
If you set "Hide My ID from Friends" in the [MAIN SETTINGS] menu to "true", your session will not be displayed in the session list of the player who has registered you as a friend. Only people you give the session name to can participate in the race.
How to change VelociDrone settings Tuning, speeding up, image quality adjustment
Only the host player can select scenes / tracks.
When the host player clicks [CREATE SESSION] button, the screen looks like this.
Select the scene, track, race mode, number of laps, etc. as you did in "SINGLE PLAYER" mode.
Then click
 Select a scene / track (host player) or click [Join Session] button (other players) to see this screen.
Only host player can start the race. Race begins when the host player clicks
 You can call the menu screen by clicking "MENU" on the bottom right of the flight screen.
Alternatively, you can call menu screen by pressing [Esc] key.
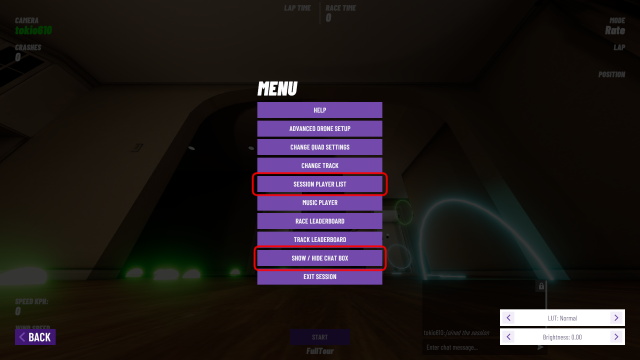
You can show or hide chat window each time you click "SHOW / HIDE CHAT BOX".
Host player can also change the scene / track by clicking "CHANGE TRACK".
In addition, even when no player is participating, host player can enjoy time attack alone. Host player can wait while flying alone until another player joins.
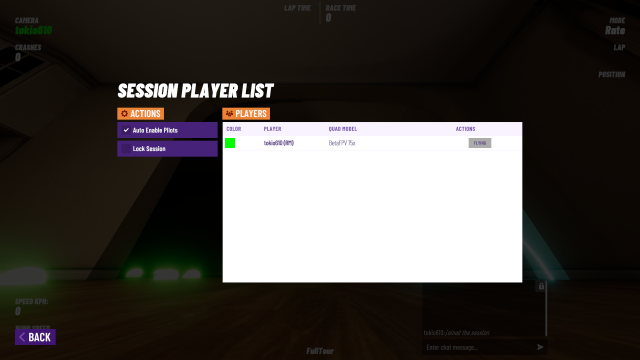 Click "SESSION PLAYER LIST" on the menu screen above to see a list of players currently participating in the session.
Following buttons are displayed to the right of each player name except yourself.
However, only [Friend] button is displayed on the screens of players other than host player.
Click "SESSION PLAYER LIST" on the menu screen above to see a list of players currently participating in the session.
Following buttons are displayed to the right of each player name except yourself.
However, only [Friend] button is displayed on the screens of players other than host player.
You can kick a player out of the session by clicking [Kick] button. You can exclude players with bad manners.
Click [Friend] button to register the player as your friend.
Click [Mgr] button to transfer the host player's authority to that player.
Click the colored square on the far left of the list to change the display color of that player on the race screen.
Each time you click [Flying] button, you can switch that player to a race participant or spectator.
In the "ACTIONS" column on the left of the screen, if you check [Auto Enable Pilots] , players who have participated in the session will be automatically added to the race participants until the number reaches 7. If unchecked here, host player will control player's switch to race participants or spectators.
Checking [Lock Session] restricts the player's participation in the session. After that, new players will not be able to participate.
If host player goes offline for some reason, a new host player will be automatically selected from remaining players.
List of keyboard shortcuts
- Esc Key : Return to menu
- When you press [ESC] key, you will exit the current scene and return to top menu.
- F Key : Viewpoint switching
- Each time you press [F]key, viewpoint switches between FPV camera and line of sight camera.
- B Key : Battery charging
- When you press [B] key while battery simulation is enabled, battery will be fully charged. However, this feature cannot be used during race.
- 1,2,3,4 and 5 Keys : Flight mode switching
- When you press [1]-[5] keys, flight mode is switched. When [Beta Flight] is selected in [Flight Controller] of [QUAD SETTINGS] menu, flight mode will be switch to Angle mode by [1] Key, Horizon mode by [2] Key, Rate mode by [3] Key.
- Pg Up | Pg Down Keys or - | = Keys : Change camera angle
- When you press [Page Up] / [Page Down] or [-] / [=] keys, angle of drone's FPV camera will be raised or lowered. It seems that it is often set to about 30 degrees in commercial products. For tracks that can fly at high speeds, the larger the angle, the better the view of the surroundings.
- Home Key or + Key: Camera angle reset
- When you press [Home] or [+] key, angle of drone's FPV camera will be reset to 0 degrees (horizontal).
- R Key : Move / Reset Position
- When you press [R] key before the start of race, drone will move to the starting grid. During the race, if you press [R] key when crashes, the drone will move to the last gate you passed.
- End Key or Backslash Key : Screen capture
- When you press [End] or [\] key, game screen is captured and saved in PNG format under the "Documents" folder. However, menu screen cannot be captured.
- T Key : Flight path
- Each time you press [T] key, light "tail" that indicates drone's flight path is shown or hidden.
- H Key : Crosshair cursor
- Each time you press [H] key, crosshair cursor appears or disappears in the center of the screen. This function is mainly for Combat game mode (optional content).
- Shift H Key : Crosshair cursor design
- When crosshair cursor is displayed, you can press [Shift] + [H] keys to switch the cursor design.
- C Key : Chat
- Each time you press [C] key, chat screen will be shown or hidden.
- S Key : Spectator view
- When you press [S] key, the camera switches to multiple Spectator cameras along the track. If you press [F] key at this time, you will be returned to FPV camera or line of sight camera.
- Spacebar : Fire
- In multiplayer mode, this works the same as [P] key described below. Weapons are fired in Combat game mode (optional content).
- P Key : Player camera switching
- While using FPV camera or line of sight camera in multiplayer mode, each time you press [P] key, your camera is switched to another player's FPV camera or line of sight camera one after another. You can also switch to that player's camera by clicking on the player's name at the bottom of the screen. Press [F] to return to your FPV camera or line of sight camera.
- Insert | Delete Keys or [ | ] Keys : Switching lens / Field of view (FOV)
- When you press [Insert] / [Delete] or [[] / []] keys, the lens of FPV camera is switched, or the field of view (FOV) is changed. When [True Lens] in [QUAD SETTINGS] menu is [true], lens is switched, and when [false], FOV is changed. FOV is usually around 115 to 127 degrees.
- 0 Key : Screen display
- Each time you press [0 (zero)] key, various numbers displayed on race screen will be displayed or hidden.
- V Key : Reset Field Of View (FOV)
- If you press [V] key when [True Lens] in [QUAD SETTINGS] menu is [false], field of view (FOV) will be reset to 80 degrees. Nothing happens when [True Lens] in [QUAD SETTINGS] menu is [true].
- A Key : Start / Abort race
- Each time you press [A] key, race will start or abort.
- M Key: Stick display
- Each time you press [M] key, state of the controller stick is shown or hidden.
- I Key : Icon display
- Each time you press [I] key, icon and arrow that indicate the position of next gate to go to will be shown or hidden.
- Q Key : Quality ON/OFF
- Each time you press [Q] key, [Auto Adjust Quality] in [SCREEN SETTINGS] menu switches to Yes or No. This affects all scenes.
- D Key : Quality Down
- Each time you press [D] key, [Quality Level] in [SCREEN SETTINGS] menu goes down one step. This only affects current scene.
- E Key : Quality Up
- Each time you press [E] key, [Quality Level] in [SCREEN SETTINGS] menu goes up one step. This only affects current scene.
- L Key : Setting a custom reset point
- When you press [L] key, custom reset point will be set at the current drone position. And when you press [R] key, drone will come back there. This custom reset point is cleared when you switch scene or return to home screen. This is useful when you want to practice specific part of a track repeatedly.
- K Key : Mute microphone
- Each time you press [K] key, mute your microphone or not.
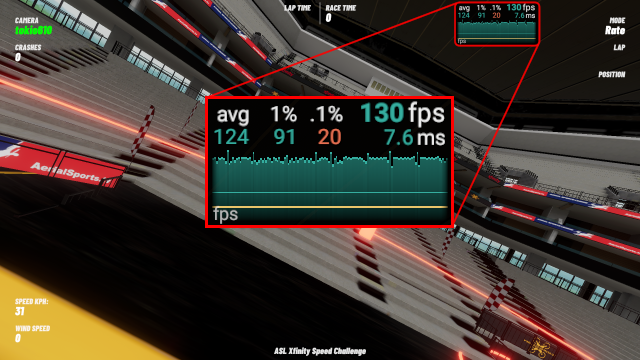
- F12 Key : Display FPS value
- Each time you press [F12] key, current FPS value, average FPS value, minimum / maximum FPS value, and memory usage are displayed or hidden in the center of the upper part of the screen.
- Shift C : Reset chat panel position
- When you press [Shift] + [C] keys, chat panel position will be reset.
- Tab Key : Show lap time and total time
- Each time you press [Tab] key after race, your lap time and total time will be shown or hidden. The same content as when clicking “RACE LEADERBORD” from the menu screen is displayed.
- J Key : Display LEADERBOARD UPDATE screen
- After race, when your time is uploaded to LEADERBORD, each time you press [J] key, LEADERBORD UPDATE screen will be shown or hidden. When LEADERBORD is not updated, nothing is displayed (LEADERBORD UPDATE screen with empty content is displayed).
- Shift L : Set line of sight camera
- When you press [Shift] + [L] keys, line of sight camera is set at the current drone position.
- W Key : Fix aircraft position
- If you press [W] key during flight, drone will be locked in its current position in the air. You can change the posture by moving controller stick, but the position does not change. Press [W] key again to unlock the position.
- F4 Key : Player participation permission
- When you press [F4] key in multiplayer mode, waiting players are allowed to join.
- X Key : Fire
- When you press [X] key, weapon will be fired in Combat game mode (optional content).
- F1 Key : Show player flight path
- In NEMESIS mode, if you press [F1] key after loading player's flight data from LEADERBORD, the flight path of the loaded player will be displayed. For more information, see View and analyze flight paths: to fly faster .
- F2 Key : Show your flight path
- In NEMESIS mode, if you press [F2] key after race, your last flight path will be displayed. For more information, see View and analyze flight paths: to fly faster .
- F3 Key : Flight path analysis mode
- In NEMESIS mode, if you press [F3] key while displaying your flight path, screen will switch to flight path analysis mode. For more information, see View and analyze flight paths: to fly faster .
- Left and Right Arrow Keys : Switch Spectator cameras
- If you press left and right arrow keys while using Spectator camera, camera will switch to another Spectator camera.
- Up and Down Arrow Keys or Mouse Scrollwheel : Zoom Spectator cameras
- If you press up and down arrow keys or turn scroll wheel of your mouse while using Spectator camera, the camera will zoom in and out.