


 Initial settings of VelociDrone Initial startup and radio / controller settings
Here, we will introduce procedure for initial startup and radio / controller setting of
Racing drones / FPV drones
simulator "Veloci Drone".
In addition, how to play "Veloci Drone" in general is explained on the page of How to play VelociDrone FPV drone racing simulator .
How to play VelociDrone FPV drone racing simulator
このページを日本語で見る
Table of contents
Connect Radio / Controller
 Before starting VelociDrone, turn on the power of controller, connect it to your computer, and recognize it as a "HID compliant game controller" and "USB input device".
For Windows, this can be seen on [Start]-[Windows System Tools]-[Control Panel]-[Hardware and Sound]-[Devices and Printers] screen.
Before starting VelociDrone, turn on the power of controller, connect it to your computer, and recognize it as a "HID compliant game controller" and "USB input device".
For Windows, this can be seen on [Start]-[Windows System Tools]-[Control Panel]-[Hardware and Sound]-[Devices and Printers] screen.
There are two types of USB cables: "For data communication" where all terminals are connected, and "For charging" where only power supply terminals are connected. You need to use "For data communication" to make the computer recognize the controller. Please note that some cables attached to bonus of mobile phone or charger, battery are "For charging".
Using OpenTX/EdgeTX-equipped radio
When using OpenTX/EdgeTX-equipped radio, prepare a MODEL with at least both sticks assigned to CH1-CH4. You can also choose the MODEL that you usually use to fly your FPV drone. However, it is better to make a model dedicated to VelociDrone.Here is an example of creating a VelociDrone dedicated MODEL for OpenTX/EdgeTX equipped radio.
How to use OpenTX / EdgeTX Radio
Create MODEL, Bind with drone, Test flight
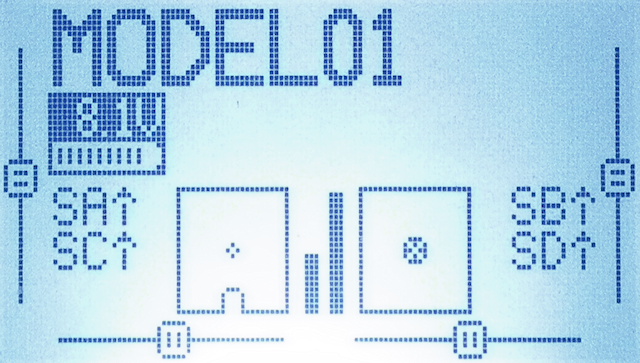
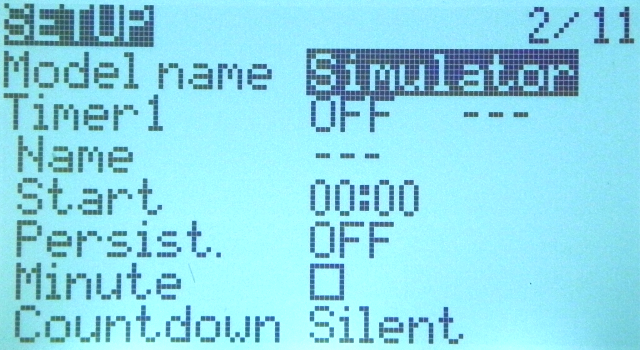 Only the model name and transmitter settings need to be set on MODEL SETUP screen.
For "Model name", enter, for example, "Simulator".
Only the model name and transmitter settings need to be set on MODEL SETUP screen.
For "Model name", enter, for example, "Simulator".
MODEL SETUP setting items explanation
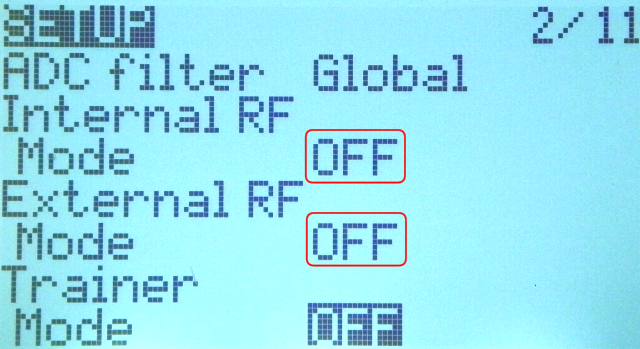 Since transmitter is not used, it is recommended to turn it off to reduce power consumption and prevent unnecessary transmission of radio waves.
Set "Mode" fields of both "Internal RF" and "External RF" to "OFF".
Since transmitter is not used, it is recommended to turn it off to reduce power consumption and prevent unnecessary transmission of radio waves.
Set "Mode" fields of both "Internal RF" and "External RF" to "OFF".
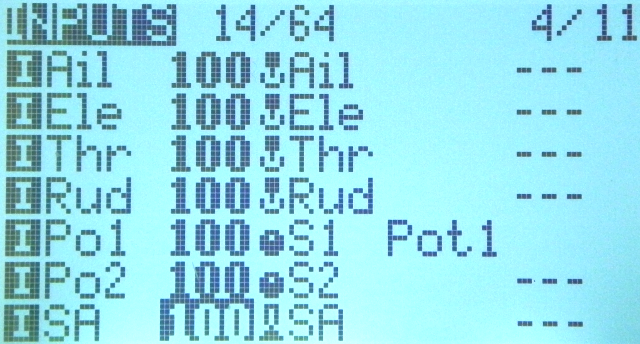 On the MODEL INPUTS screen, register at least both sticks (aileron, elevator, throttle, rudder).
Registration order is free.
Only "Source" field for each input needs to be set.
On the MODEL INPUTS screen, register at least both sticks (aileron, elevator, throttle, rudder).
Registration order is free.
Only "Source" field for each input needs to be set.
In addition, registering all the switches and dials makes them convenient to use.
MODEL INPUTS setting items explanation
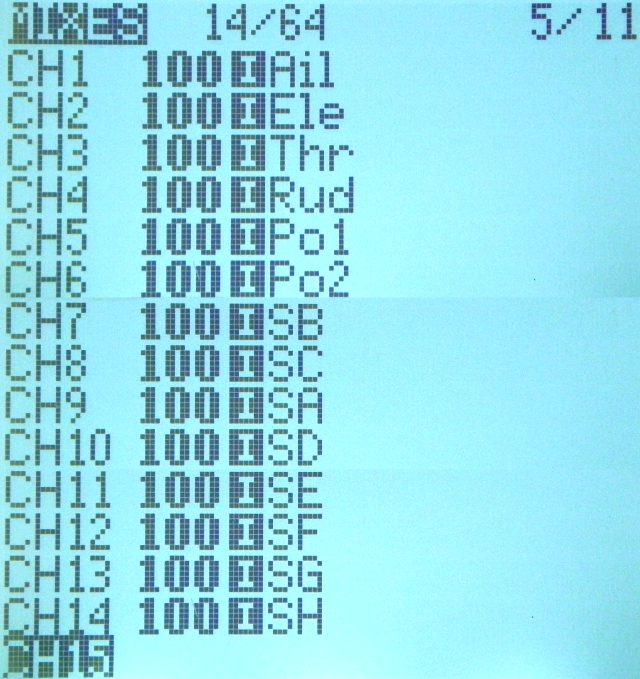 On the MODEL MIXES screen, assign at least sticks (aileron, elevator, throttle, rudder) to CH1-CH4.
These four allocation orders are free.
Only "Source" field for each input needs to be set.
On the MODEL MIXES screen, assign at least sticks (aileron, elevator, throttle, rudder) to CH1-CH4.
These four allocation orders are free.
Only "Source" field for each input needs to be set.
If you want to set other than stick, Assign to CH5 - CH8, input devices that can output multiple values, such as 3-position switches or dials. And to CH9 - CH32, assign devices that outputs two values of ON/OFF, such as 2-position switches or function switches.
And the radio preparation is now complete.
MODEL MIXES setting items explanation
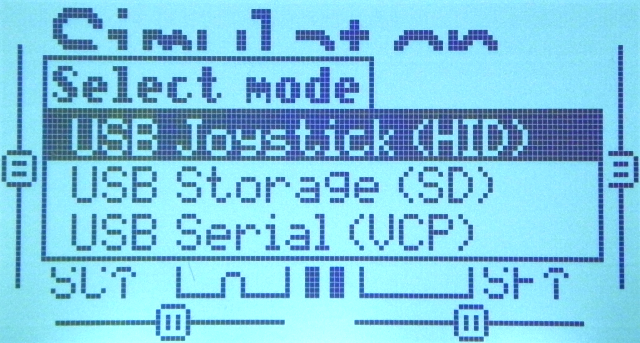 First, turn on the radio.
And connect the radio to your computer with USB cable, a menu like this will be displayed.
Select "USB Joystick (HID)" to operate as a Joystick device.
(Do not connect before turning on the radio if you want to recognize it as a Joystick)
First, turn on the radio.
And connect the radio to your computer with USB cable, a menu like this will be displayed.
Select "USB Joystick (HID)" to operate as a Joystick device.
(Do not connect before turning on the radio if you want to recognize it as a Joystick)
If your OpenTX/EdgeTX radio is not recognized by Windows, please refer to the following site.
OpenTX Radio not working in simulator issue fix (multirotorguide)
First launch of software / Activation
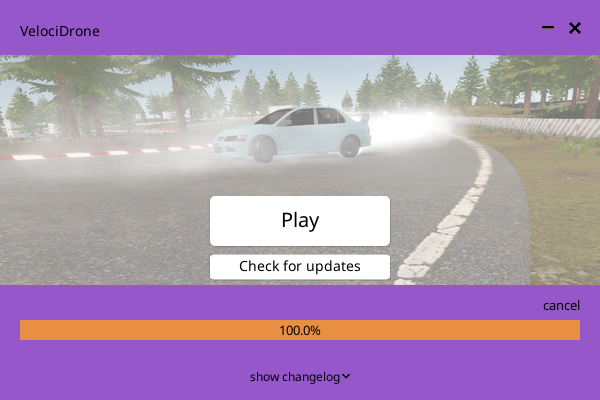 Open VelociDrone installation folder and double-click “Launcher.exe”.
Then, a screen like this will appear, so click “Play” button.
Open VelociDrone installation folder and double-click “Launcher.exe”.
Then, a screen like this will appear, so click “Play” button.
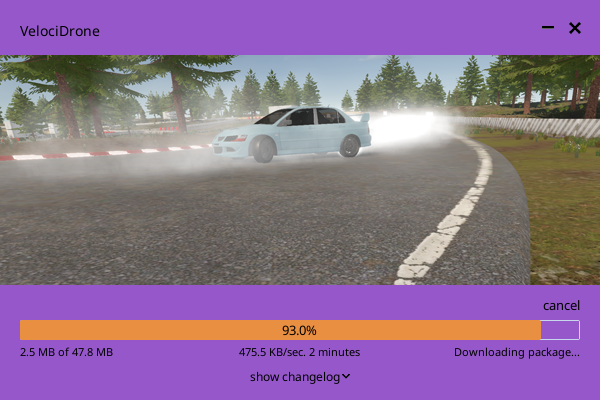 If there is a new update, a screen like this will appear when the software is started, and the download of the update module will start automatically.
Downloading the update module takes tens of seconds for small patches, but for large updates it takes about the same amount of time as for a new installation.
You can defer the update by clicking [cancel].
If there is a new update, a screen like this will appear when the software is started, and the download of the update module will start automatically.
Downloading the update module takes tens of seconds for small patches, but for large updates it takes about the same amount of time as for a new installation.
You can defer the update by clicking [cancel].
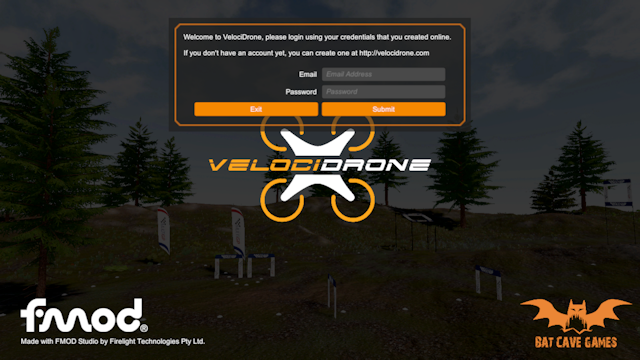 After click “Play” button, you will see a screen like this.
Enter email address and password you registered as your VelociDrone account and click “Submit”.
After click “Play” button, you will see a screen like this.
Enter email address and password you registered as your VelociDrone account and click “Submit”.
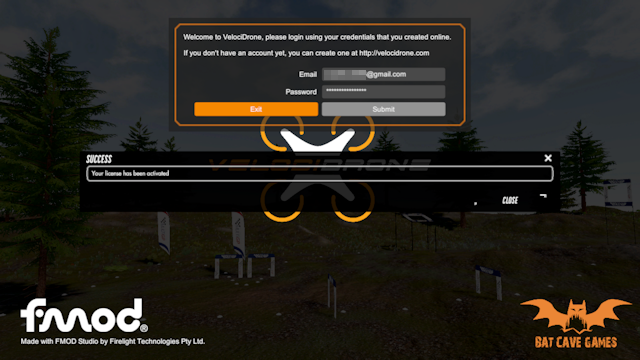 If you enter the correct email address and password, you will see a screen like this.
The message “Your license has been activated” is displayed.
Click “CLOSE”.
If you enter the correct email address and password, you will see a screen like this.
The message “Your license has been activated” is displayed.
Click “CLOSE”.
 It takes a long time to start software.
The screen will remain like this for a while.
You will have to wait for 1 to 2 minutes.
It takes a long time to start software.
The screen will remain like this for a while.
You will have to wait for 1 to 2 minutes.
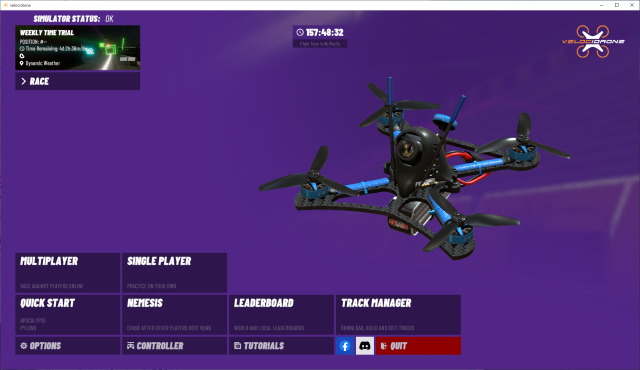 After waiting a few minutes, you will see a menu screen like this.
The first startup is completed successfully.
After waiting a few minutes, you will see a menu screen like this.
The first startup is completed successfully.
In addition, your total flight time is displayed at the top center of this screen. It takes dozens of hours of practice to be able to fly around the track freely. let's do our best.
In my experience, after flying for about 30 hours, I managed to fly to the end on most tracks in Rate mode , aside from lap times :)
Stick settings
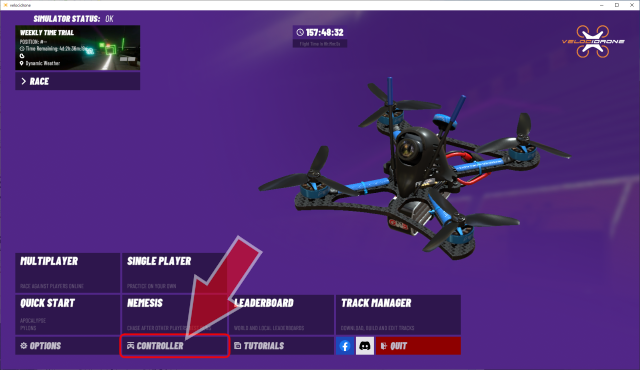 When radio / controller is recognized by PC, click "CONTROLLER" from the menu screen.
 Name of controller recognized by Windows is displayed in upper left of the screen.
In case of a radio equipped with OpenTX/EdgeTX, it seems that it is often displayed with a name such as "Taranis Joystick".
Name of controller recognized by Windows is displayed in upper left of the screen.
In case of a radio equipped with OpenTX/EdgeTX, it seems that it is often displayed with a name such as "Taranis Joystick".
If a different controller name is displayed, click "ASSIGN CONTROLLER" to switch. Then "Move a stick on the controller you want to select." is displayed like this, so moving the stick will select that radio.
OpenTX Radio not working in simulator issue fix (multirotorguide)
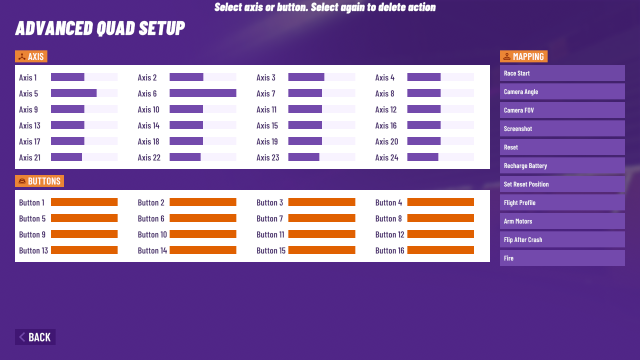 If you click "SHOW AXIS" on the screen above, the screen will look like this.
The bars lined up in the "AXIS" column show the status of the stick/switch, The bars lined up in the "BUTTONS" column show the status of the buttons. As you operate sticks / switches / buttons on your controller, they should move and react.
After confirming the response of the sticks/switches/buttons, click "BACK" at the bottom left of the screen to return to the previous screen..
If particular stick / switch / button does not respond, it is not assigned to any output channel on the radio. Please review the radio settings.
When using OpenTX / EdgeTX radio, max eight sticks / switches assigned to CH1 - CH8 will appear on the "AXIS" column of the screen as analog devices. Max 24 sticks / switches assigned to CH9 - CH32 will appear on the "BUTTONS" column of the screen as digital switches.
 Click “ASSIGN STICKS” to assign stick actions.
First, the sticks of radio illustration moves diagonally, and "Follow Sticks" is displayed. Operate the stick to match the movement of the illustration.
If “Centre Tx Sticks” is displayed on the subsequent screen, move all sticks to the center position. Then the process will proceeds to the next step.
 Next, the left stick in the illustration moves to the right.
Move the left stick on your controller to the right.
Next, the left stick in the illustration moves to the right.
Move the left stick on your controller to the right.
After this, the right stick in the illustration moves up, the right stick moves right, and the left stick moves up, so operate the controller stick accordingly.
 Next, "Move Roll Stick Right" is displayed on the screen of the illustration of the radio.
Move the stick you want to use to roll the drone.
If you want to fly in mode 2, move the right stick right.
Next, "Move Roll Stick Right" is displayed on the screen of the illustration of the radio.
Move the stick you want to use to roll the drone.
If you want to fly in mode 2, move the right stick right.
 Next, "Move Pitch Stick Up" is displayed on the screen of the illustration of the radio.
Move the stick you want to use to control the pitch of the drone.
If you want to fly in mode 2, move the right stick up.
Next, "Move Pitch Stick Up" is displayed on the screen of the illustration of the radio.
Move the stick you want to use to control the pitch of the drone.
If you want to fly in mode 2, move the right stick up.
 Next, "Move Yaw Stick Right" is displayed on the screen of the illustration of the radio.
Move the stick you want to use to operate the yaw of the drone.
If you want to fly in mode 2, move the left stick right.
Next, "Move Yaw Stick Right" is displayed on the screen of the illustration of the radio.
Move the stick you want to use to operate the yaw of the drone.
If you want to fly in mode 2, move the left stick right.
 Next, “Move Throttle Stick Up” is displayed on the screen of the illustration of the radio.
Move the stick you want to use to throttle the drone.
If you want to fly in mode 2, move the left stick up.
Next, “Move Throttle Stick Up” is displayed on the screen of the illustration of the radio.
Move the stick you want to use to throttle the drone.
If you want to fly in mode 2, move the left stick up.
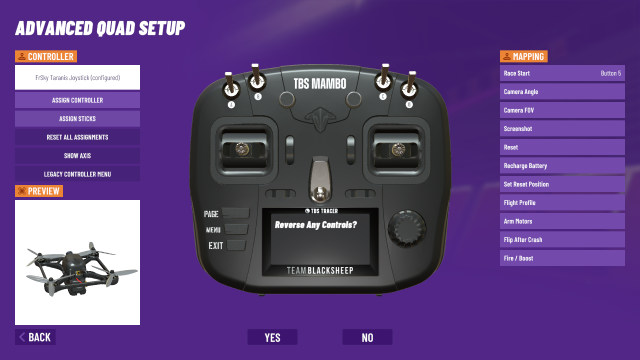 Next, "Reverse Any Controls?" will be displayed on the radio illustration screen.
If you operate the stick on the controller here, the stick in the illustration of the radio will move in the same way. Additionally, the 3DCG of the drone at the bottom left of the screen moves in response to your operations. If the sticks are working as expected, click "NO" here. Then click “BACK” at the bottom left of the screen to save settings and return to main menu.
If the direction of the stick and the direction in which the aircraft moves are reversed, click "YES" on the screen above. Then, starting with "Roll", you will be asked whether or not to reverse the movement of the stick. Reverse only the sticks whose movements are reversed.
Here you had completed stick settings. Click “BACK” at the bottom left of the screen to save settings and return to main menu. If you make a mistake, click “Assign Sticks” and try again.
After completing the settings, open "SHOW AXIS" screen, then slowly move the left and right gimbals (sticks) on the controller.
Make sure that the bars move smoothly as you operate the stick.
In low-priced products, the accuracy of the gimbal (stick) is poor, and the output value may flutter.
And check the value in the center of the stick every time you turn on the radio, and calibrate on the radio if the center is off.
Stick (Gimbal) calibration
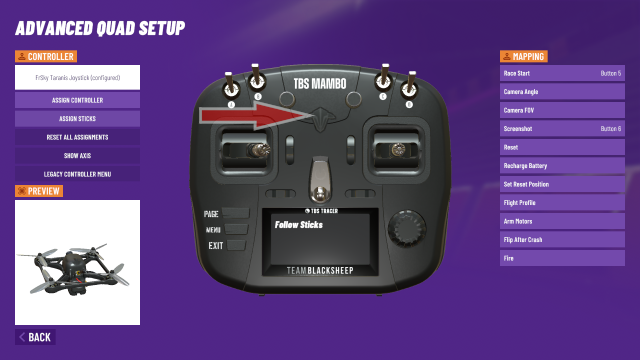
Button / switch settings
When you click "SHOW AXIS" on the "CONTROLLER" screen, the screen looks like this.
You can assign 11 functions from “Race Start” to “Fire” lined up in the right of the screen to buttons or switches on your controller.
First, click function button in the right, and then click button or switch you want to assign sticks / switches / button list from left of the screen.
Do this for each function you want to assign.
If you want to unassign it, double-click the function button in the right of the screen.
Note that these 11 function assignments are not mandatory. You do not have to set anything.
Description of functions for buttons / switches
- Race Start
-
Each time you turn it on, race will start or stop.
You can also click button or use keyboard shortcut [A] key.
- Camera Angle
-
Increases or decreases the angle of drone's FPV camera according to the input value.
It is recommended to assign it to Pot (dial) instead of switch.
You can also use keyboard shortcuts [Page Up] / [Page Down] or [-] / [=] keys. - Camera FOV
-
Change the field of view (FOV) of FPV camera according to the input value.
When [True Lens] in [QUAD SETTINGS] menu is [true], lens is switched, and when [false], FOV is changed.
FOV is usually around 115 to 127 degrees.
It is recommended to assign it to Pot (dial) instead of switch.
You can also use keyboard shortcuts [Insert] / [Delete] or [[] / []] keys. - Screenshot
-
Each time you turn it on, game screen will be captured and saved in PNG format under the Documents folder.
However, menu screen cannot be captured.
You can also use keyboard shortcut [End] or [\] key. - Reset
-
If you turn it on before start of race, drone will move to starting grid.
If you turn it on when you crash during a race, drone will move to the last gate it passed.
You can also use keyboard shortcut [R] key. - Recharge Battery
-
If you turn it on while battery simulation is enabled, battery will be fully charged.
However, this feature cannot be used during race.
You can also use keyboard shortcut [B] key. - Custom Reset Position
-
If you turn it on, custom reset point will be set at the current drone position.
Then press [R] key, or switch assigned [Reset] described above, and drone will come back there.
This custom reset point is cleared when you switch scene or return to home screen.
This is useful when you want to practice specific part of a track repeatedly.
You can also use keyboard shortcut [L] key. - BetaFlightProfile
- Each time you turn it on, BetaFlight profile will switch to Profile1 - Profile2 - Profile3.
- Arm Motors
-
If you turn it on, [ARMED] will be displayed on the screen and motor will be turned on (Arm).
If you turn it off, [DISARMD] will be displayed on the screen and motor will be turned off (Disarm).
This function is effective when "ARMING" is specified as "Manual" at the start of the race. - Flip After Crash
-
If you turn it on while disarming, drone will be in turtle mode.
After that, when you turn Arm on, [ARMED + FLIP ON] will be displayed on the screen, and you can operate stick to raise the drone that has been turned over.
To turn off turtle mode, disarm and then turn this off.
This function is effective when "ARMING" is specified as "Manual" at the start of the race. - Fire
-
Fire a weapon in Combat game mode (optional content).
You can also use keyboard shortcut [Spacebar] or [X] key.
Stick / switch calibration
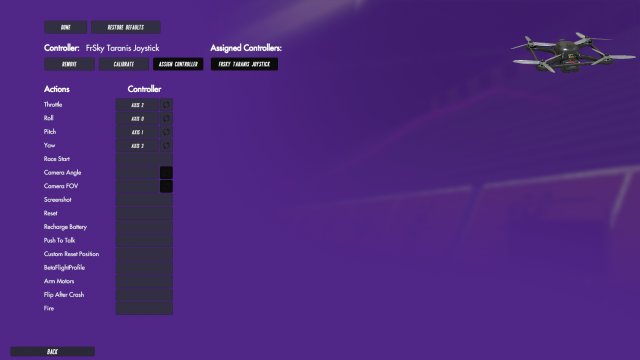 If you click "LEGACY CONTROLLER MENU" on the "CONTROLLER" screen, the screen will look like this.
You can also configure stick settings and button/switch settings on this screen.
Only the calibration method is described here.
If you click "LEGACY CONTROLLER MENU" on the "CONTROLLER" screen, the screen will look like this.
You can also configure stick settings and button/switch settings on this screen.
Only the calibration method is described here.
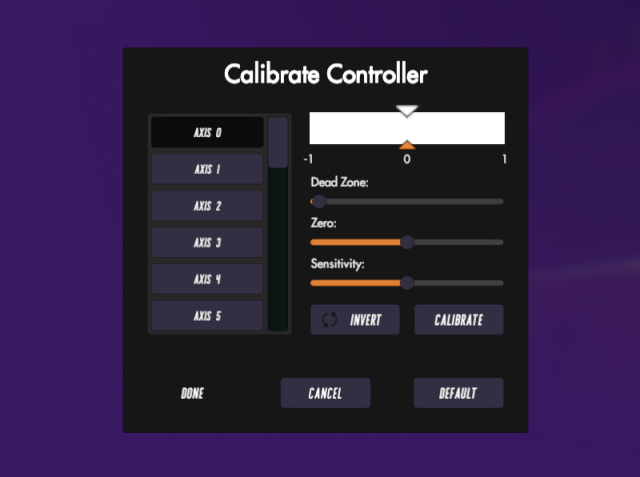 If you click the "CALIBRATE" menu on the screen above, the screen will look like this.
You can calibrate (adjust) the clicked stick or switch.
If you click the "CALIBRATE" menu on the screen above, the screen will look like this.
You can calibrate (adjust) the clicked stick or switch.
Target selection
Select the stick you want to calibrate from "AXIS" on the left side of the screen.
Indicator
At the top of this screen, there are two triangle marks that move in conjunction with the clicked stick / switch operation. Orange triangle below shows the input value from the radio. White triangle above shows the output value to VelociDrone. Red vertical bar indicates the center position of the radio input, and white vertical bar indicates the center position of the output to VelociDrone.
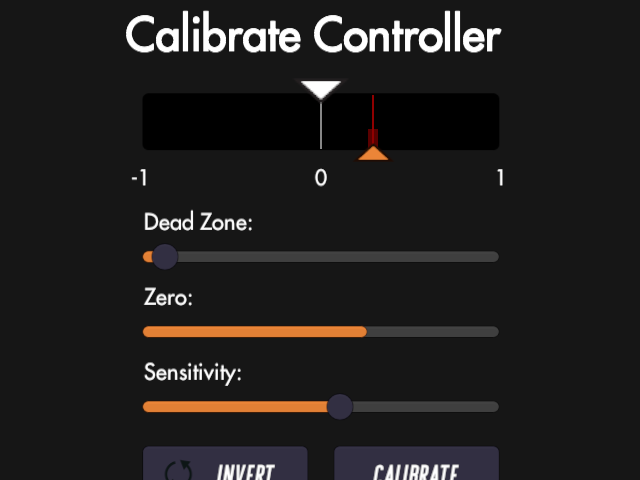 First adjust the "Zero" value.
Drag the Zero slider left or right to move the red vertical bar on the indicator left or right. Specifies which stick / switch position to treat as zero (center). Adjust so that the red vertical bar overlaps the orange triangle when the stick / switch is centered (when you release your finger).
 Then adjust the "Dead Zone" value.
Drag the Dead Zone slider left or right to display red bands to the left and right of the red vertical bar. This specifies a range where the radio input is ignored (treated as zero). If the orange triangle vibrates (jitter occurs) when the stick / switch is centered (when you release your finger), you can ignore it. Adjust so that the red band surrounds the vibrating range.
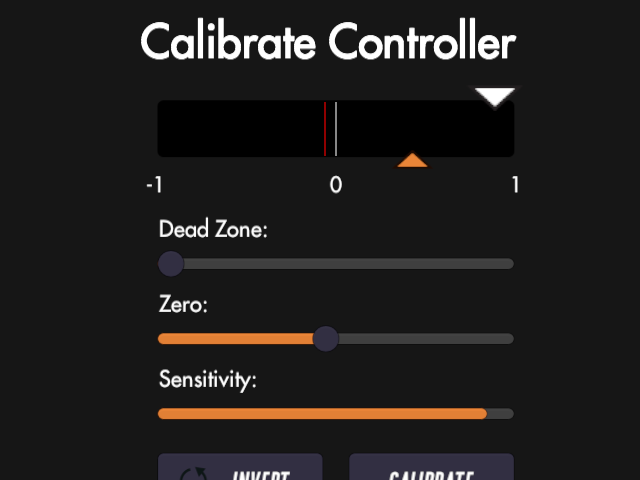 Finally, adjust the "Sensitivity" value.
Drag the Sensitivity slider left or right to change the amount of movement of the white triangle when you move the stick / switch. This specifies the output range to VelociDrone for the radio input. Adjust the white triangle to move exactly in the range -1 to 1 on the indicator when you move the stick / switch all the way up or down or left or right.
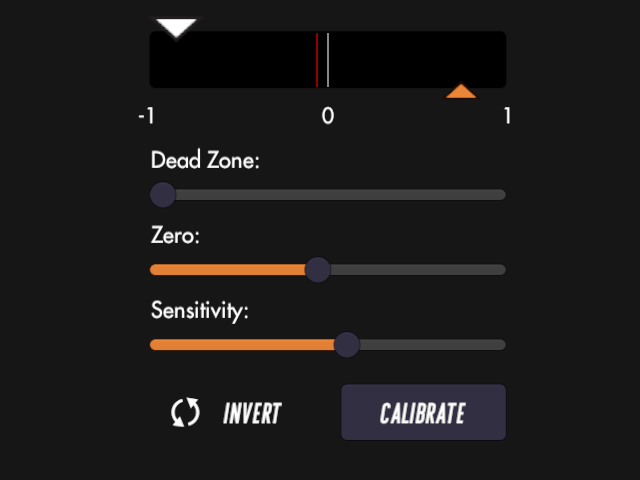 You can invert the stick / switch input by clicking the Invert button.
If the direction of the stick / switch and the direction of movement of the aircraft are reversed, click this.
Click the "CALIBRATE" or "DONE" button when the adjustment is complete.
If you want to discard the adjustment result, click the "CANCEL" button.
Click the "DEFAULT" button to return to the default value determined by VelociDrone when assigning the stick / switch.
You can invert the stick / switch input by clicking the Invert button.
If the direction of the stick / switch and the direction of movement of the aircraft are reversed, click this.
Click the "CALIBRATE" or "DONE" button when the adjustment is complete.
If you want to discard the adjustment result, click the "CANCEL" button.
Click the "DEFAULT" button to return to the default value determined by VelociDrone when assigning the stick / switch.
Drone's flight is strange !? Stick broke !?
When using OpenTX/EdgeTX -equipped radio, if you feel drone is behaving strangely, or if you feel stick is broken, first check the main screen below. Check these screens to find out where the cause lies. Try stick calibration .
How to use OpenTX / EdgeTX Radio /How to fly FPV drone
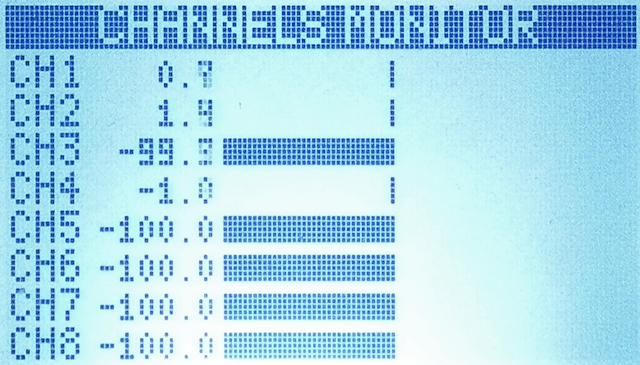 In this "CHANNELS (MIXERS) MONITOR" (Output Monitor) screen, value of each channel output from the radio (transmitter) is displayed as a bar graph.
You can see the actual output value of each channel processed and synthesized on MIXES screen of "MODEL menu".
In this "CHANNELS (MIXERS) MONITOR" (Output Monitor) screen, value of each channel output from the radio (transmitter) is displayed as a bar graph.
You can see the actual output value of each channel processed and synthesized on MIXES screen of "MODEL menu".
Make sure bar graph moves smoothly as you move each stick.
 In this Input Monitor screen, one of the main screens, current input state of sticks and switches recognized by radio is displayed as an illustration.
Make sure illustration moves smoothly as you move each stick.