


 How to use ExifTool Add/edit/delete video/photo location information and shooting date
このページを日本語で見る
Table of contents
- What is ExifTool
- Download and install ExifTool
- ExifTool basic command line
- Read Exif information from photo
- Write Exif information to photos
- Exif information writing example: tag deletion
- Exif information writing example: adding tags
- Exif information writing example: adding a value to a tag
- Exif information writing example: subtracting values from tags
- Correcting the shooting date and time of photos taken with a digital camera with a misaligned calendar
- Write geotag to MPEG4(.mp4) video
- Date and time information for photos taken with Insta360 action camera
- Set correct shooting date and time for photos taken with Insta360 action camera
What is ExifTool
ExifTool is a free tool developed by Phil Harvey that can read and write Exif information of digital photos. The operating environment is Windows, Mac. And it works in other environments that can handle Perl language. It is operated using a command line style interface (CUI).Since the release of version 1 in 2003, it has been continuously enhanced, and now it can handle not only digital photos, video and image files, but also metadata such as PDF files and ZIP files. Also, many options allow for very flexible rewriting of information.
Here, I will explain just a part of this powerful tool, the basic operation of reading and writing Exif information.
ExifTool Official site
Download and install ExifTool
 You can download it by opening
ExifTool official site
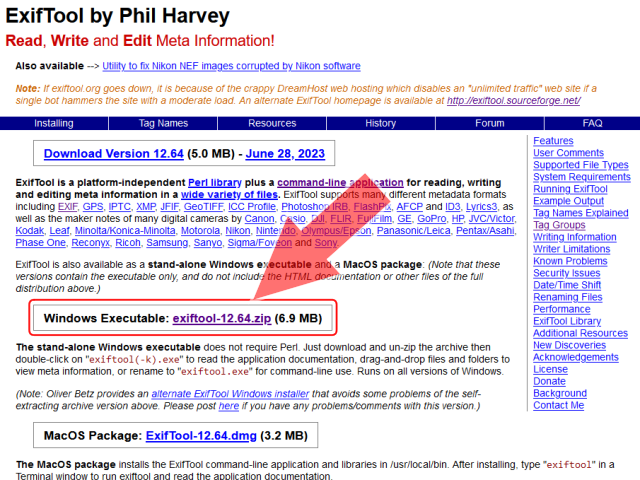
and clicking the link in the figure.
For Windows, click the link that says "Windows Executable".
Then you will get a file such as "exiftool-12.64.zip", so unzip it in any folder.
A command file called "exiftool(-k).exe" will be extracted.
You can download it by opening
ExifTool official site
and clicking the link in the figure.
For Windows, click the link that says "Windows Executable".
Then you will get a file such as "exiftool-12.64.zip", so unzip it in any folder.
A command file called "exiftool(-k).exe" will be extracted.
ExifTool Official site
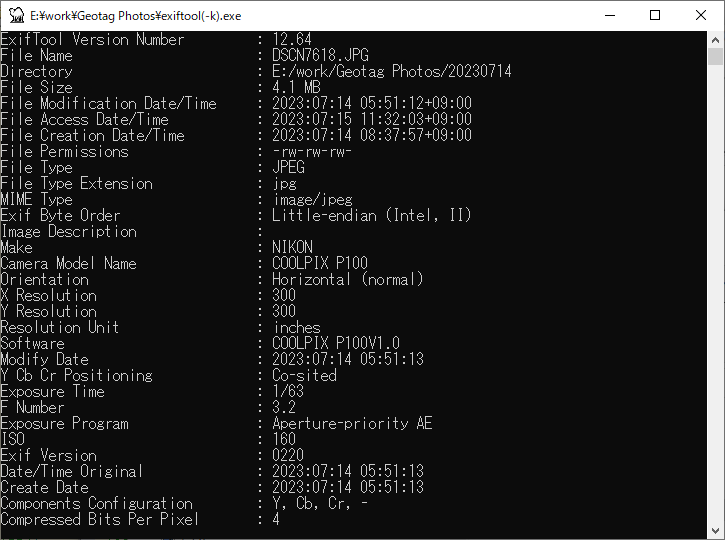 By dragging and dropping a jpeg file onto the unzipped "exiftool(-k).exe" on Explorer, you can view the Exif information of that jpeg file as shown in the figure.
If you just want to browse Exif information, the installation is now complete.
By dragging and dropping a jpeg file onto the unzipped "exiftool(-k).exe" on Explorer, you can view the Exif information of that jpeg file as shown in the figure.
If you just want to browse Exif information, the installation is now complete.
In order to operate ExifTool from the command line or to automate the process using scripts, you need to go one step further. Rename the unzipped "exiftool(-k).exe" to "exiftool.exe" and move it to a folder in the Windows command path. Specifically, move it to the "Windows" folder on your C: drive.
You can read more about how to install it on Installing ExifTool (exiftool) page.
Installing ExifTool (exiftool)
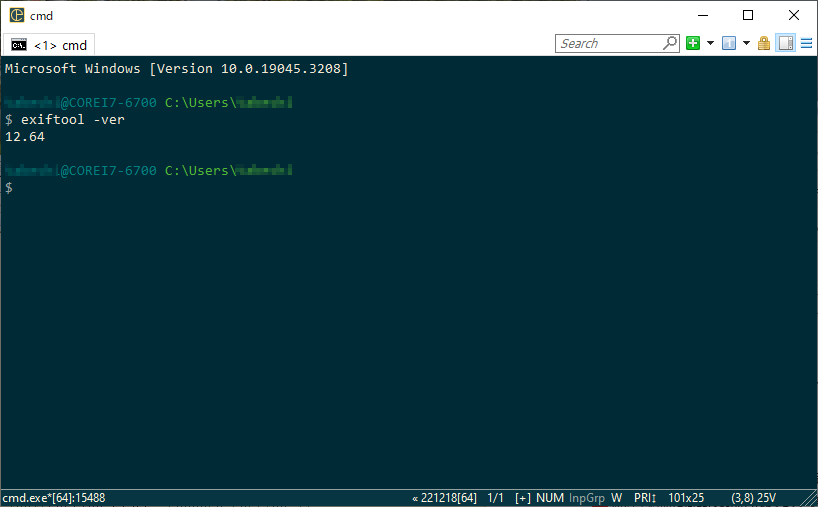 Then, ExifTool can be operated from console applications such as Windows Command Prompt like this.
For example, if you want to know the version of ExifTool itself, enter
Then, ExifTool can be operated from console applications such as Windows Command Prompt like this.
For example, if you want to know the version of ExifTool itself, enter
exiftool -ver
.
By the way, the console app I'm using here is ConEmu .
ConEmu Official site
 When entering commands in the console app, first specify (move) the folder containing the photos to be processed as the working folder.
First enter the drive name to switch drives. For example, enter
e:
to use a folder on the "E:" drive.
Next, specify the target folder with the "cd" (Change Directory) command. For example, to work with photos in the "work/Geotag Photos/20230717" folder, enter
cd "work/Geotag Photos/20230717"
.
If you are using ConEmu , you can enter the path by dragging and dropping the target folder from Explorer to the ConEmu screen as shown in the figure.
Make sure to back up your photos before proceeding, in case your photo files are damaged due to misoperation or tool bugs.
ExifTool will create a backup of the original photo when you update the photo, with a file name such as "dscnxxxx.jpg_original". However, there is a possibility that the creation of the backup fails due to disk failure, etc., or the photos are deleted due to previous operation mistakes.
But if you specify "-overwrite_original" or "-overwrite_original_in_place" in the options, no backup will be generated.
ExifTool basic command line
The basic command line for ExifTool is shown below.Read information
exiftool [OPTIONS] [-TAG...] [--TAG...] FILE...
Write information
exiftool [OPTIONS] -TAG[+-<]=[VALUE]... FILE...
Copy information
exiftool [OPTIONS] "-DSTTAG<SRCTAG..." FILE...
exiftool [OPTIONS] -tagsFromFile SRCFILE ["-[DSTTAG<]SRCTAG..."] FILE...
In [OPTIONS], write a character string (option) that specifies the operation after "- (hyphen)".
For [-TAG], specify the tag (Exif information field name) you want to read or write after "- (hyphen)".
FILE specifies the file name or folder name of the photo to read or write.
You can read how to specify all options and tags on exiftool Application Documentation (exiftool) page. You can also read the list of tag types supported by ExifTool on ExifTool Tag Names (exiftool) page. In addition, you can read the list of tags related to Exif information in EXIF Tags (exiftool) and GPS Tags (exiftool) pages.
exiftool Application Documentation (exiftool)
ExifTool Tag Names (exiftool)
EXIF Tags (exiftool)
GPS Tags (exiftool)
Read Exif information from photo
 To dump all Exif information for a particular photo, type:
exiftool FILENAME
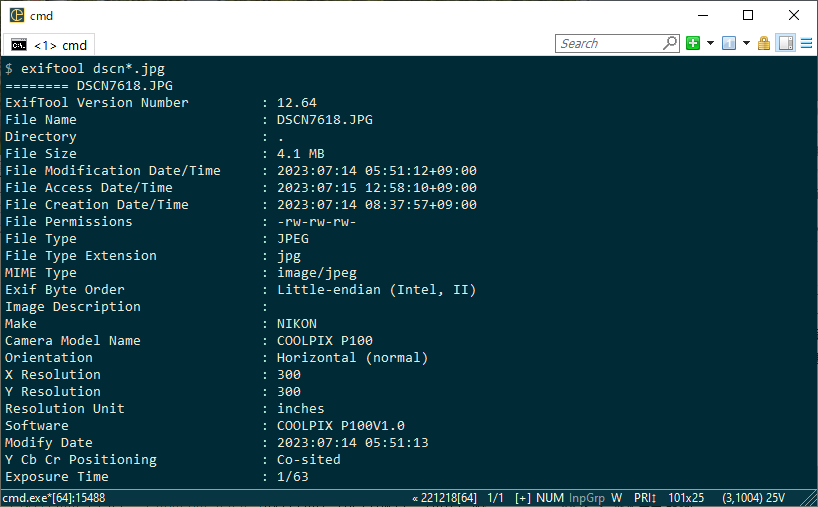
You can also use wildcards in the file name. for example
exiftool dscn*.jpg
will continuously dump the Exif information of all JPEG files whose name starts with "dscn" in the current folder.
 To dump a specific tag of Exif information, type:
exiftool [-TAG] FILENAME
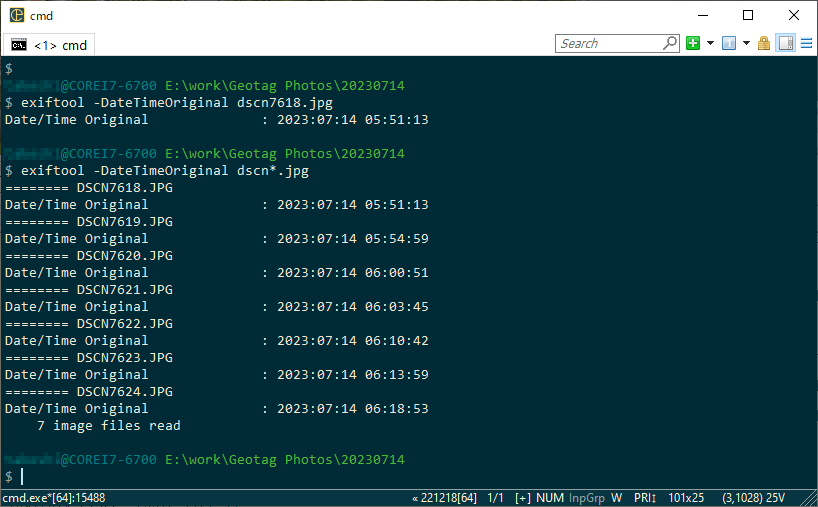
For example, to see a list of the dates and times that all photos were taken, type
exiftool -DateTimeOriginal dscn*.jpg
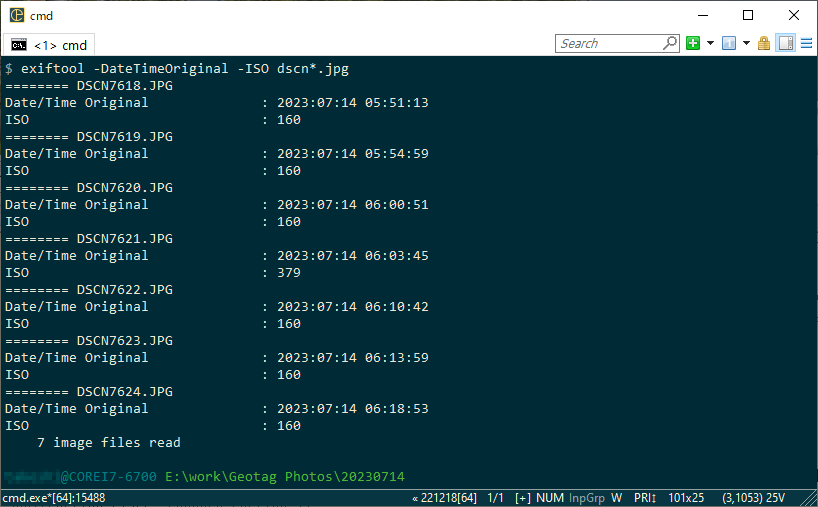 You can also dump multiple tags together.
For example, to see a list of shooting dates and ISO values for all photos, type
exiftool -DateTimeOriginal -ISO dscn*.jpg
READING EXAMPLES : exiftool Application Documentation (exiftool)
Write Exif information to photos
The command line for writing information is as shown aboveexiftool [OPTIONS] -TAG[+-<]=[VALUE]... FILE...
. However, in the table below, I classified the "-TAG[+-<]=[VALUE]..." part more clearly.
| Syntax | Result |
|---|---|
| -TAG= | Deletes the tag specified by "TAG". If multiple groups exist in the target file and they all have the same tag, all of them are deleted. |
| -all= | Remove all tags. However, it may not be possible to remove all tags exactly. You can read about the limitations of this feature at Writer Limitations (exiftool) . |
| -GROUP:TAG= | Removes only the specified tag within the specified group. |
| -GROUP:all= | Delete all tag information in the specified group. |
| -[GROUP:]TAG=VALUE | Sets the value specified by "VALUE" to the tag specified by "TAG".
However, if "GROUP" is specified, only the tags within that GROUP will be updated. |
| -[GROUP:]TAG+=VALUE | Adds the item specified by "VALUE" to the list of tags specified by "TAG".
Alternatively, add the value specified by "VALUE" to the tag representing the date/time.
Or add the value specified by "VALUE" to the numerical value of the tag.
However, if "GROUP" is specified, only the tags within that GROUP will be updated. |
| -[GROUP:]TAG-=VALUE | Deletes the item specified by "VALUE" from the list of tags specified by "TAG".
Alternatively, the value specified by "VALUE" is subtracted from the date/time tag.
Or if the tag number and the value specified in "VALUE" match, the tag is deleted.
However, if "GROUP" is specified, only the tags within that GROUP will be updated. |
| -[GROUP:]TAG<=FILE | Copy the value of the tag specified by "TAG" from the contents of the file specified by "FILE".
However, if "GROUP" is specified, only the tags within that GROUP will be updated. |
What is GROUP?
Besides Exif information contained in JPEG files, exiftool supports viewing and updating a great variety of metadata (tags) in a great variety of file formats. "GROUP" specifies the type of this metadata (tag). For example, if one file contains multiple types of metadata (tags) and each has a tag with the same name, all tags with the same name will be updated if GROUP is not specified.
If you're updating only Exif information, be sure to always specify "EXIF:" as the group name.
You can read the list of groups on Tag Groups (exiftool) page.
Tag Groups (exiftool)
Exif information writing example: tag deletion
 To remove a specific tag for a specific photo, type:
exiftool -TAG= FILENAME
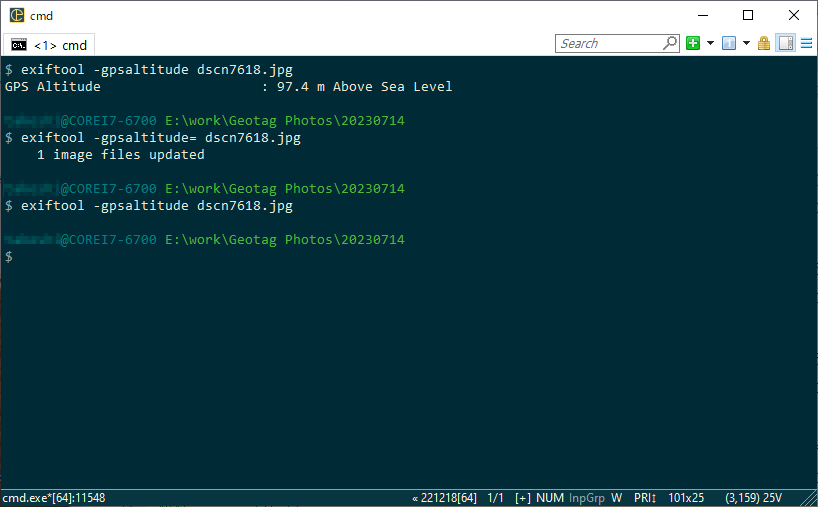
In the example shown in the right figure, the GPS altitude information "gpsaltitude" is deleted from the photo "dscn7618.jpg". First, enter
exiftool -gpsaltitude dscn7618.jpg
to verify that the original photo contains GPS elevation information. Next, enter
exiftool -gpsaltitude= dscn7618.jpg
to delete the GPS altitude information. Since the deletion was successful, "1 image files updated" is displayed. Exiftool will now create a backup of the original photo "dscn7618.jpg_original". Finally, enter
exiftool -gpsaltitude dscn7618.jpg
again to confirm that the GPS altitude information is gone (nothing is displayed).
To specify a group when deleting, enter
exiftool -EXIF:gpsaltitude= dscn7618.jpg
.
Exif information writing example: adding tags
 To add a specific tag, enter:
exiftool -TAG=VALUE FILENAME
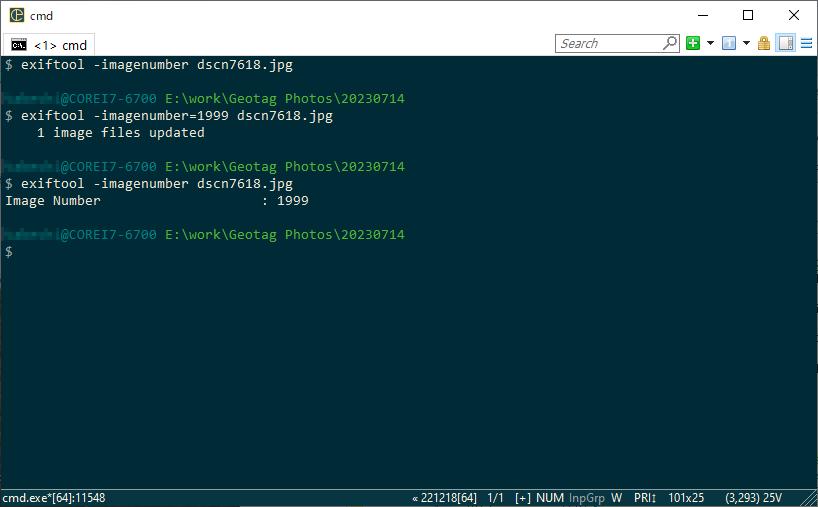
In the example shown in the figure to the right, we added "1999" as the "imagenumber" field to the photo "dscn7618.jpg". Specifically, enter
exiftool -imagenumber=1999 dscn7618.jpg
. Exiftool will also update the contents of the original photo backup "dscn7618.jpg_original". No matter how many times you update, the number of backup files generated will always be one.
Exif information writing example: adding a value to a tag
 To add a value to a specific tag, enter:
exiftool -TAG+=VALUE FILENAME
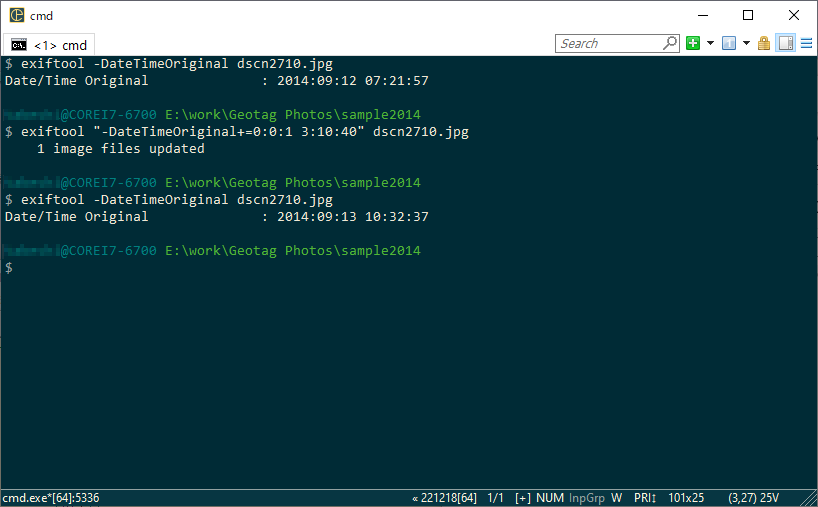
In the example shown in the right figure, "0:0:1 3:10:40 (1 day, 3 hours, 10 minutes and 40 seconds)" is added to the shooting date and time "DateTimeOriginal". Since the VALUE specification contains blank characters, the entire argument is enclosed in quotation marks like
"-DateTimeOriginal+=0:0:1 3:10:40"
.
Exif information writing example: subtracting values from tags
 To subtract a value from a specific tag, enter:
exiftool -TAG-=VALUE FILENAME
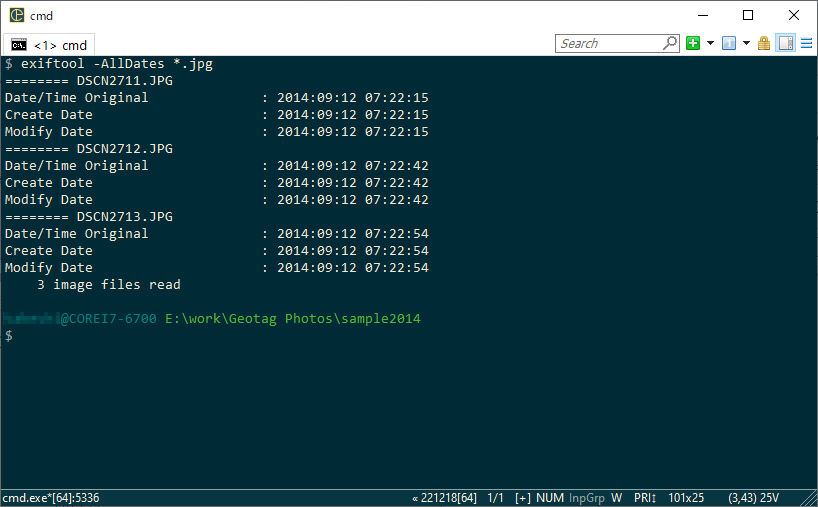
Here, let's subtract the shooting date and time of multiple photos at once. First, type
exiftool -AllDates *.jpg
to check the date and time the current photo was taken.
The tag "-AllDates" specified here is unique to Exiftools and is called a Shortcut. Normally, the date and time the photo was taken is written in three places: "DateTimeOriginal ", "CreateDate", and "ModifyDate", and when you change it, you need to change all three. Specifying "-AllDates" in Exiftools is the same as specifying these three tags.
You can read about Shortcuts that can be used with Exiftools on Shortcuts Tags (exiftool) page.
Shortcuts Tags (exiftool)
Shortcuts can also be defined by the user. Create a configuration file with the file name ".ExifTool_config" in the folder containing exiftools.exe. A sample configuration file can be read on example.config (exiftool) page.
example.config (exiftool)
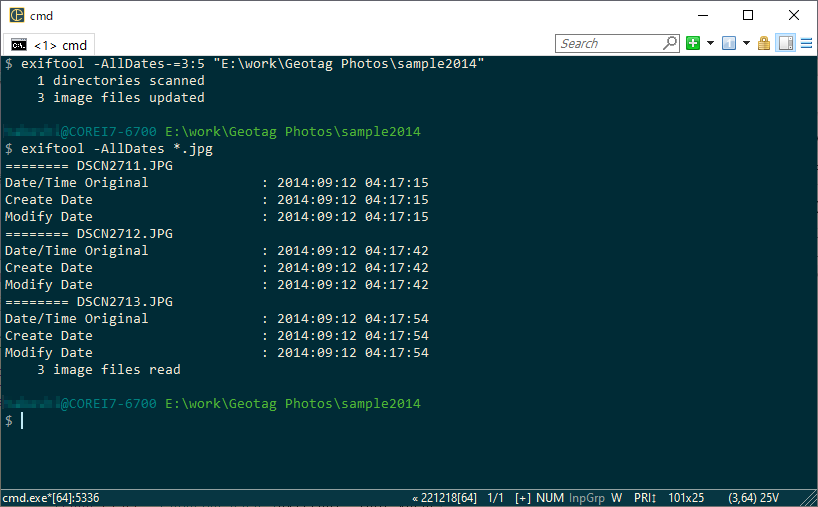 In this example, the date difference is specified as
-AllDates-=3:5
Specifying "3:5" means 3 hours and 5 minutes. Exiftools has many ways to specify date and time. For example, simply specifying "1" represents one hour, and specifying "1::0" represents one year. You can also shift the timezone by prefixing the number with a +/- sign. You can read about the date and time specification methods that can be used with Exiftools in the "SHIFT STRING" section of ExifTool Date/Time Shift Module (exiftool) page.
ExifTool Date/Time Shift Module (exiftool)
Also, here we specify the folder name rather than the file name to specify the photos to be processed.
If you specify a folder name, all files stored in that folder will be processed.
To include subfolders as well, add "-r" to the option and specify like
exiftool -r -AllDates-=VALUE "FOLDER NAME"
In the result shown in the figure, you can see that "DateTimeOriginal ", "CreateDate", "ModifyDate" of all files are subtracted at once.
WRITING EXAMPLES : exiftool Application Documentation (exiftool)
Correcting the shooting date and time of photos taken with a digital camera with a misaligned calendar
If you took pictures without noticing that the digital camera's calendar was out of alignment, you can collectively correct the shooting date and time of those pictures. Even if the calendar is off, the relative shooting date and time of each photo is correct, so simply add or subtract the offset time to the shooting date and time of all photos.If there is any one photo whose shooting date and time can be determined almost accurately, first read the shooting date and time of that photo using the tag "-AllDates".
exiftool -AllDates FILENAME
Then, find the difference in time from the correct shooting date and time (the time that was deviated). Then use
exiftool -AllDates+=TIME_DIFFERENCE "FOLDER NAME"
or
exiftool -AllDates-=TIME_DIFFERENCE "FOLDER NAME"
described above to add or subtract the time difference from the date and time taken of all the photos saved in the folder.
Write geotag to MPEG4(.mp4) video
There is no uniform way to write location information to video. Also, depending on the application that browses the video, where the location information written in the video is referenced varies. Here, I will explain how to write location information for Google Photos to recognize it.Google Photos recognizes the tags "Quicktime:CreateDate" and "Quicktime:GPSCoordinates" in MPEG4(.mp4) videos. To write the shooting date and time to the video, specify as
exiftool -P -CreateDate="YYYY:MM:DD HH:MM:SS" FILENAME
, and to write the location information to the video, specify as
exiftool -P -GPSCoordinates="Latitude, Longitude, Altitude" FILENAME
. However, if the coordinates have more than 5 digits after the decimal point, they may be ignored. If you add "-P" to the option, it will keep the file modification time as the original value.
About to specify date and time
According to the specification, the date and time information of Quicktime is to be recorded in UTC. However, most digital cameras are not time zone aware and record date and time information in local time. For this reason, ExifTool also treats Quicktime date and time information as local time by default. If you want ExifTool to handle date and time information recorded in UTC, add the "QuickTimeUTC" option.
QuickTime Tags (ExifTool)
Geotagging MP4 files - unrecognised by Google Photos (ExifTool Forum)
Date and time information for photos taken with Insta360 action camera
When you take a photo with an Insta360 action camera such as Insta360 GO 3 and specify the shooting format "insp+Raw" or "PureShot", the camera stores two files in insp format and Raw (DNG) format. And both files will be converted to JPEG files when you export them with the Insta360 STUDIO app on your computer. However, JPEG files generated by exporting Raw (DNG) format do not have the correct shooting date and time.Normally, the shooting date and time of a photo must be written in three places of Exif information: "DateTimeOriginal", "CreateDate", and "ModifyDate". However, photos exported in Raw (DNG) format of Insta360 action camera have date and time stored only in "ModifyDate" field (see table below).
For this reason, you need to set the correct shooting date and time before geotagging your photos using tools such as Geotag Photos Pro .
How to use Geotag Photos Pro / GPS Logger / Automatically record location info and write it to digital camera photos
How to: geotag your Insta360 Pro photos without the GPS module (medium)
| Shooting mode | Format | DateTimeOriginal | CreateDate | ModifyDate |
|---|---|---|---|---|
| Photo | insp | Yes | Yes | Yes |
| insp+Raw (insp) | Yes | Yes | Yes | |
| insp+Raw (DNG) | Non | Non | Yes | |
| PureShot (insp) | Yes | Yes | Yes | |
| PureShot (DNG) | Non | Non | Yes | |
| HDR Photo | insp | Yes | Yes | Yes |
| PureShot (insp) | Yes | Yes | Yes | |
| PureShot (DNG) | Non | Non | Yes | |
| Interval | insp | Yes | Yes | Yes |
| insp+Raw (insp) | Yes | Yes | Yes | |
| insp+Raw (DNG) | Non | Non | Yes | |
| Starlapse | insp | Yes | Yes | Yes |
| insp+Raw (insp) | Yes | Yes | Yes | |
| insp+Raw (DNG) | Non | Non | Yes |
Set correct shooting date and time for photos taken with Insta360 action camera
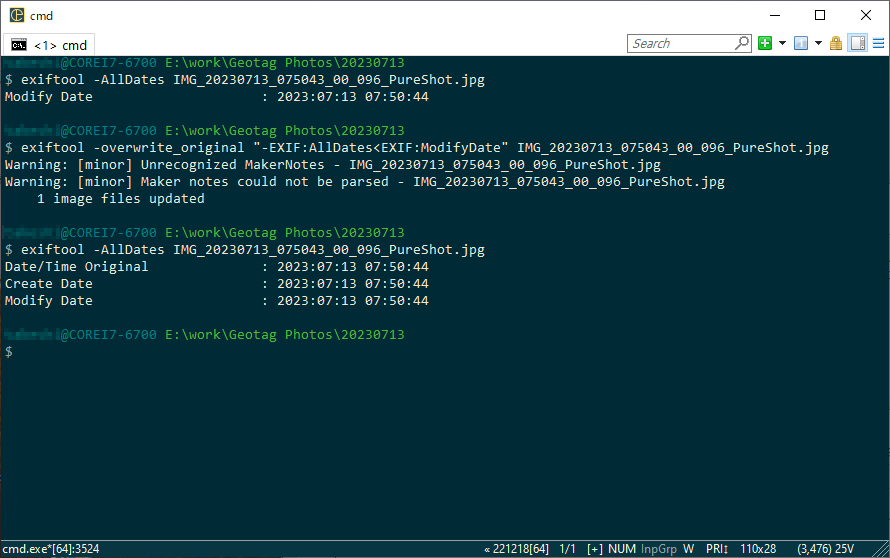
exiftool "-AllDates<ModifyDate" FILENAME
as shown in the figure. When the backup file is unnecessary, specify the option "-overwrite_original" like
exiftool -overwrite_original "-AllDates<ModifyDate" FILENAME
. Also, if you specify "*.jpg" or "folder name" instead of "FILENAME", you can change the shooting date and time of multiple photos at once.
However, since the tag "MakerNotes" is not written in the photos taken with the Insta360 action camera, a warning like the figure is displayed.
How to use Insta360 GO 3 - Compact and lightweight 2.7K action camera weighing 35.5 grams