

Dreamcast revival strategy HDMI connection/game extraction/emulator Flycast
Sega's last home game console, "Dreamcast," which I had stored away deep inside my TV stand without touching it for over 20 years. When a new HDMI converter (Amazon.co.jp) was released in 2023, I decided to carry out a revival strategy.- Try starting the Dreamcast
- Prepare HDMI converter
- Prepare a disc for extracting game software
- Extract BIOS ROM and FLASH memory
- Extract game software to SD card
- Installing the emulator Flycast
- First startup of the emulator Flycast
- Settings of the emulator Flycast
- Game does not start on Flycast and the menu screen appears!?
- Flycast window/full screen mode switching
- Flycast menu operations: Quit the game/Swap disk/save state/save settings
- How to use a game controller with Flycast
- How to use a Light Gun (gun controller) with Flycast
- How to use a keyboard with Flycast
- Substitute a game controller for the maracas controller
- Visual memory storage location in Flycast
- Modify Flycast box art (artwork/cover)
- Replace the power supply unit with DreamPSU/Boot with AC adapter
- 3D graphics engine: PowerVR-CLX2
- Future plans, or rather, dreams
Try starting the Dreamcast

Prepare HDMI converter
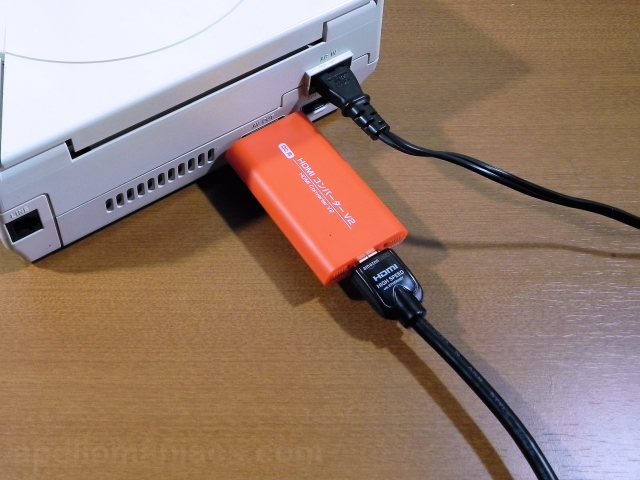 I was able to confirm that it worked, so I immediately purchased Columbus Circle's
Dreamcast HDMI Converter V2 (Amazon.co.jp)
and tried it out.
The image quality is pretty good, and there is no problem at all when playing games with VGA resolution.
If you set the switch to 4:3/VGA, you can enjoy most games as is.
If you just want to enjoy the game on the Dreamcast itself, the revival strategy is complete at this point.
I was able to confirm that it worked, so I immediately purchased Columbus Circle's
Dreamcast HDMI Converter V2 (Amazon.co.jp)
and tried it out.
The image quality is pretty good, and there is no problem at all when playing games with VGA resolution.
If you set the switch to 4:3/VGA, you can enjoy most games as is.
If you just want to enjoy the game on the Dreamcast itself, the revival strategy is complete at this point.
However, as shown in the photo, the casing is large, so the serial port on the right side becomes almost unusable. So you can't insert an SD card reader, you can't extract game software.
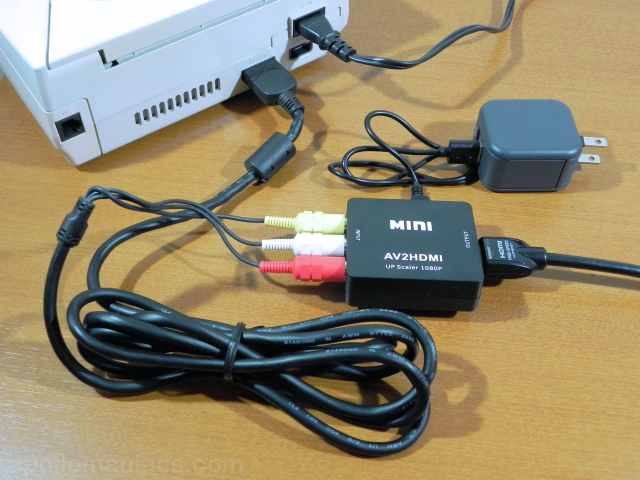 The next thing I tried was the
RCA-HDMI converter (Amazon.com)
.
As shown in the photo, connect it to the composite cable that comes with the Dreamcast.
Since it needs to be powered by a USB cable, a separate USB charger is also required.
Image quality is at a low level commensurate with the price.
When connected to a TV, the aspect ratio is strange and the image quality is significantly lower than the Columbus Circle HDMI converter.
It would be better to use it exclusively for extracting game software.
The next thing I tried was the
RCA-HDMI converter (Amazon.com)
.
As shown in the photo, connect it to the composite cable that comes with the Dreamcast.
Since it needs to be powered by a USB cable, a separate USB charger is also required.
Image quality is at a low level commensurate with the price.
When connected to a TV, the aspect ratio is strange and the image quality is significantly lower than the Columbus Circle HDMI converter.
It would be better to use it exclusively for extracting game software.
-
Columbus Circle (for DC) HDMI Converter V2 - Peripherals for Dreamcast

Columbus Circle 2023-11-30 JPY6869
This is a new "video output converter" product that is compatible with the nostalgic game console "Dreamcast." Equipped with useful functions, convenience has been greatly improved! By using this product, you can easily connect a DC unit that does not support "HDMI connection" to a modern TV or PC monitor via HDMI. This peripheral accessory product is recommended for those who want to enjoy the nostalgic DC games they enjoyed back then.
 (Japan)
-
AV to HDMI Converter, RCA to HDMI, 1080P Mini RCA Composite CVBS Video Audio Converter
BD&M USD9.95
RCA TO HDMI Converter ADAPTER - Converts analog RCA composite (Yellow, White, Red) input to HDMI 720P/1080P (60HZ) output, displayed on HDTV/Monitor. Note: RCA inputs for HDMI output only! Plug & Play: AV to HDMI converter no need any drivers, just plug to play.Please remember to hook up the USB power cable (included) to 5V power source to make it work.You can get it to work within minutes.
(US)
(UK)
Prepare a disc for extracting game software
In order to transfer the gameplay environment of the Dreamcast, which is old and could break down at any time, to a PC emulator, I decided to extract the game software.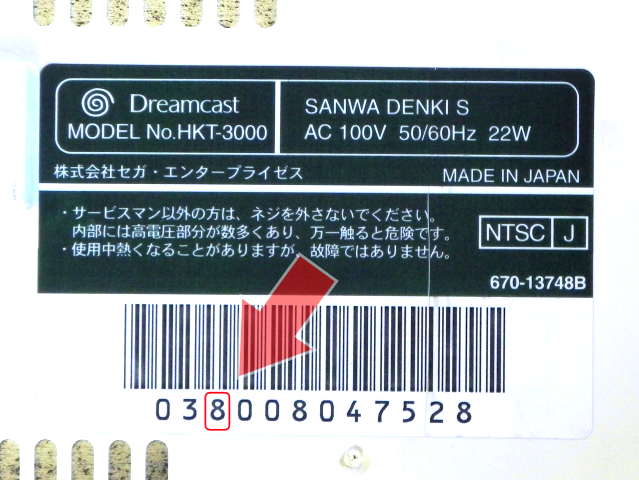 Only Dreamcast models manufactured between 1998 and October 2000 that support MIL-CD can extract game software.
Products manufactured after November 2000 do not seem to support MIL-CD.
The year of production can be determined by the third digit from the top of the serial number.
If this is 8 or 9, it's OK. However, in the case of repaired items, the contents may be replaced with items that do not support MIL-CD.
Only Dreamcast models manufactured between 1998 and October 2000 that support MIL-CD can extract game software.
Products manufactured after November 2000 do not seem to support MIL-CD.
The year of production can be determined by the third digit from the top of the serial number.
If this is 8 or 9, it's OK. However, in the case of repaired items, the contents may be replaced with items that do not support MIL-CD.
The model I own is an early lot product that I bought in line at a game shop right after its release.
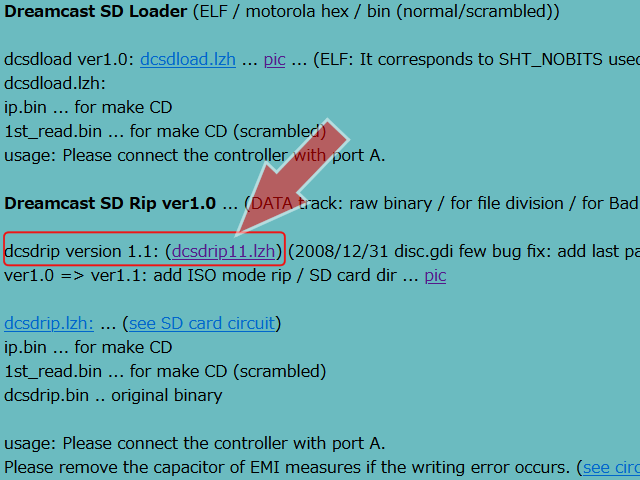 I use
Dreamcast SD Rip (dcsdrip)
provided by
JJ1ODM
as the software for extracting game software.
Use a tool such as
BootDreams
to convert this into a CDI (Compact Disk Image) format CD image file that can be booted on the Dreamcast.
I use
Dreamcast SD Rip (dcsdrip)
provided by
JJ1ODM
as the software for extracting game software.
Use a tool such as
BootDreams
to convert this into a CDI (Compact Disk Image) format CD image file that can be booted on the Dreamcast.
Or download the converted CD image file .
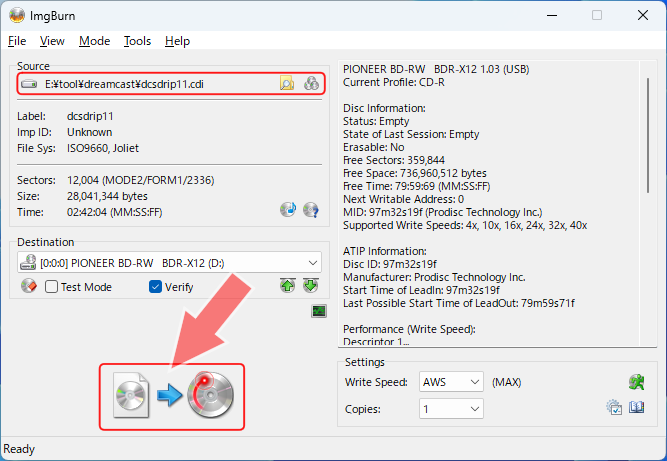
 If you want to create a CDI file yourself using the tool BootDreams, specify it as shown in this figure.
Click the [Browse] button and select the extracted "dcsdrip11" folder.
No other changes are required.
If you want to create a CDI file yourself using the tool BootDreams, specify it as shown in this figure.
Click the [Browse] button and select the extracted "dcsdrip11" folder.
No other changes are required.
Click the [Process] button to open the output folder specification screen, so specify the folder in which you want to save the CDI file. Then, a CDI file "dcsdrip11.cdi" will be generated instantly.
 Burn this CD image file onto a CD-R.
To do this, I use free software
ImgBurn
.
Burn this CD image file onto a CD-R.
To do this, I use free software
ImgBurn
.
By installing the "Padus .CDI File Mounter" plug-in into ImgBurn and specifying the obtained "dcsdrip11.cdi" file as input, you can easily and reliably burn it to a CD-R.
For more information, please see the "Burn .CDI format files to CD-R" chapter on the How to Use ImgBurn page.
Extract BIOS ROM and FLASH memory
 Insert the CD-R on which you burned "Dreamcast SD Rip" into the Dreamcast, connect the controller and TV, and turn on the Dreamcast.
The first screen will be the calendar settings screen.
Press the right side of the cross key to move the cursor to "Confirm" and press the A button.
Insert the CD-R on which you burned "Dreamcast SD Rip" into the Dreamcast, connect the controller and TV, and turn on the Dreamcast.
The first screen will be the calendar settings screen.
Press the right side of the cross key to move the cursor to "Confirm" and press the A button.
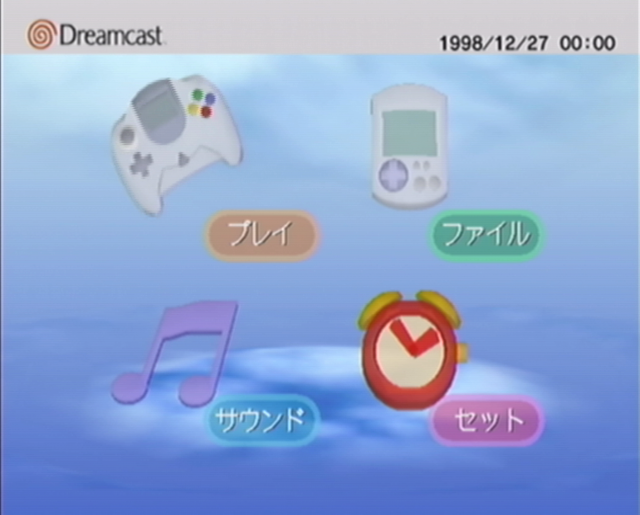 The menu screen will appear.
Select "Play" with the cross key and press the A button. The SEGA logo will be displayed and "Dreamcast SD Rip" will start.
The menu screen will appear.
Select "Play" with the cross key and press the A button. The SEGA logo will be displayed and "Dreamcast SD Rip" will start.
If creating a CD-R fails, a message such as "Please install game software" will be displayed when you press the A button. Please recreate the CD-R.
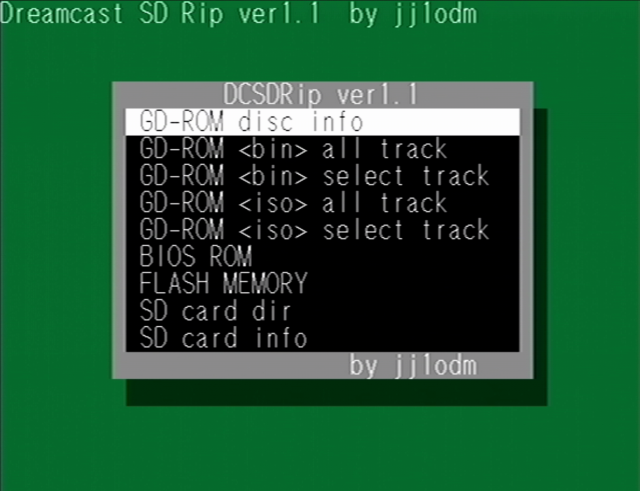 When "Dreamcast SD Rip" is successfully started, a screen like this will appear.
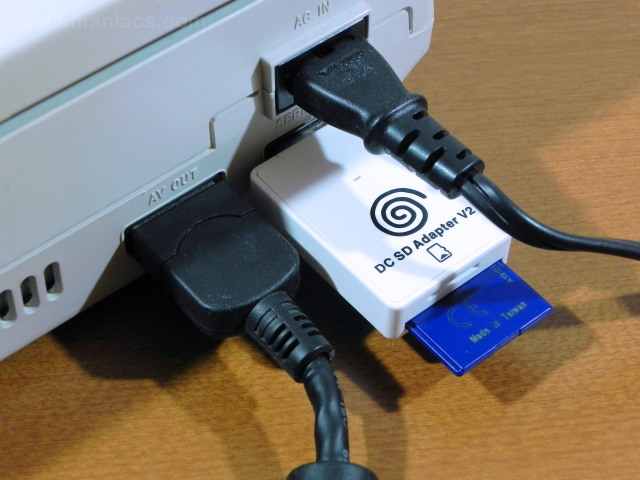 Use the
Dreamcast SD Card Adapter (Amazon.com)
to connect the SD card to the Dreamcast's serial port as shown in the photo.
Use the
Dreamcast SD Card Adapter (Amazon.com)
to connect the SD card to the Dreamcast's serial port as shown in the photo.
A minimum SD card capacity of 2GB is sufficient. Format it in FAT32 format on your computer in advance.
SD card (SDXC standard) with a capacity of more than 32GB cannot be formatted in FAT32 using OS standard function. You need to use a free software formatter.
-
Card Reader,DC Memory Card Adapter Reader,Support TF and SD Card,Plug and Play
Estink USD20.18
It is newly upgraded in many ways, using high-end mold shells and customized stainless steel plugs. Compared with the previous generation of traditional hand-made welded plugs, it is more durable and will not cause short circuits. It adds products. Service life.
(US)
(UK)
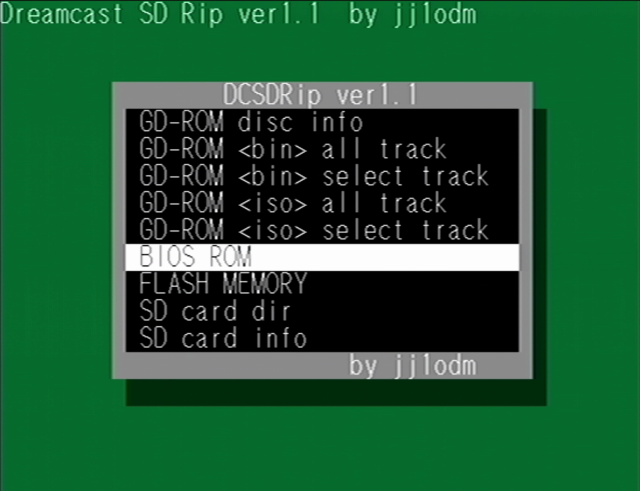 First, extract the Dreamcast BIOS ROM image.
Select "BIOS ROM" from the menu using the controller's cross key and press the A button.
First, extract the Dreamcast BIOS ROM image.
Select "BIOS ROM" from the menu using the controller's cross key and press the A button.
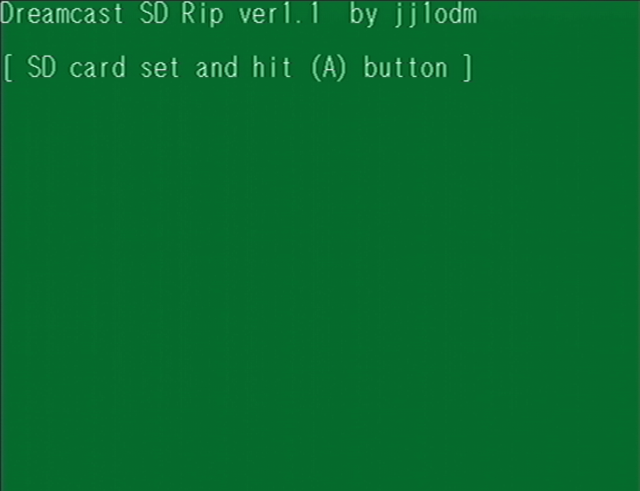 Then you will see a screen like this.
Make sure the SD card is inserted correctly and press the A button.
Then you will see a screen like this.
Make sure the SD card is inserted correctly and press the A button.
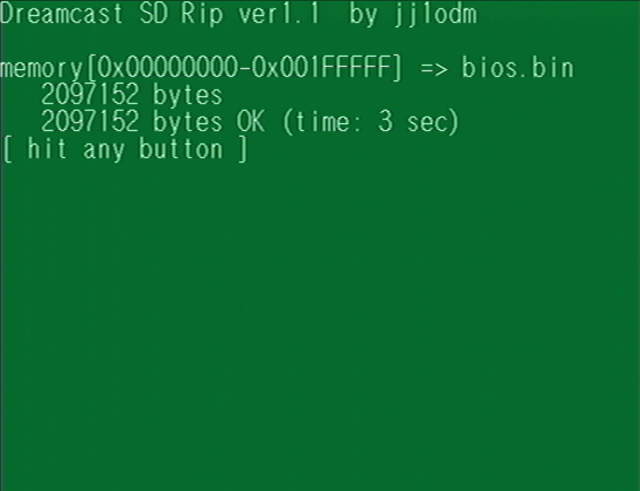 Extracting is completed in just a moment (3 seconds).
Press any button on your controller (e.g. A button).
Extracting is completed in just a moment (3 seconds).
Press any button on your controller (e.g. A button).
 Then you will be returned to the menu.
Next, select "FLASH MEMORY" and press the A button.
Then you will be returned to the menu.
Next, select "FLASH MEMORY" and press the A button.
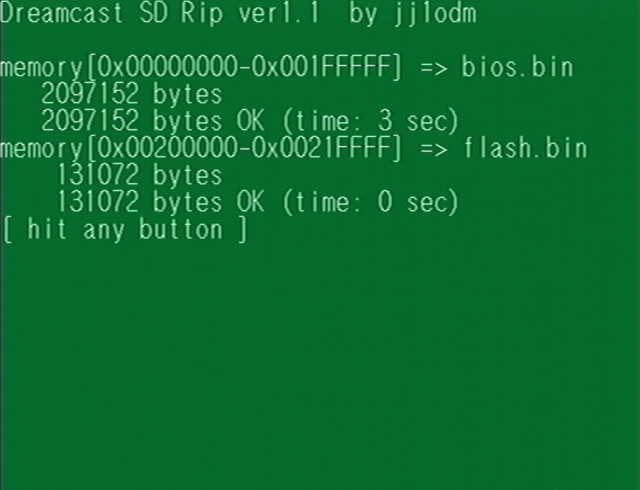 Extracting is completed in just a moment (0 seconds).
Press any button on your controller (e.g. A button).
Extracting is completed in just a moment (0 seconds).
Press any button on your controller (e.g. A button).
When you return to the menu screen, turn off the Dreamcast and remove the SD card.
The SD card stores two files: "bios.bin" and "flash.bin". Move these to your computer and empty the SD card.
Extract game software to SD card
Next, extract the game software to the SD card. You will need to repeatedly extract and copy game software to your computer, one title at a time.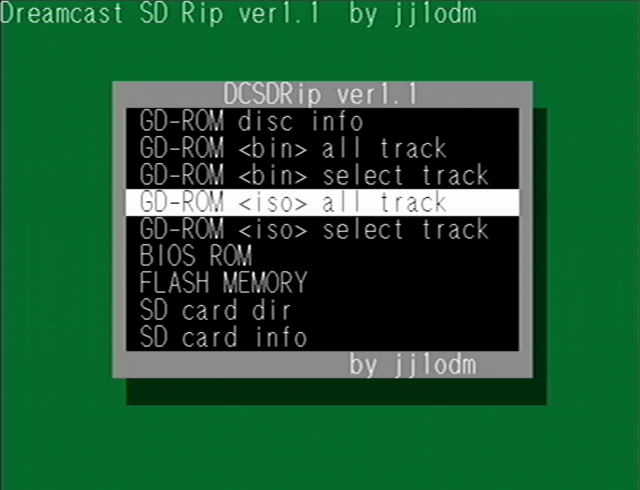 Start "Dreamcast SD Rip" in the same way as when extracting BIOS ROM and FLASH memory.
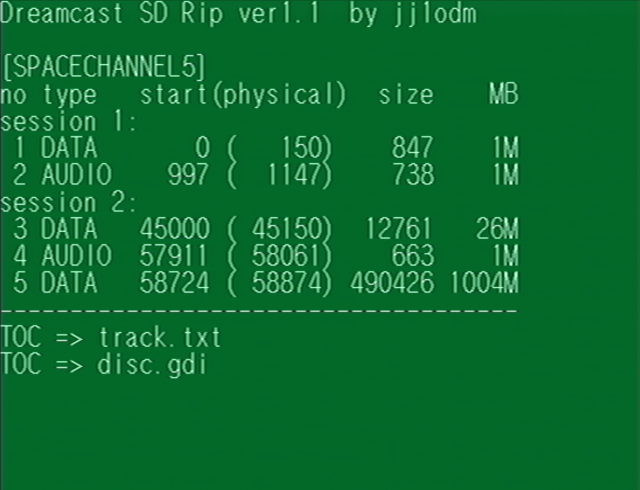
Select "GD-ROM <iso> all track" from the menu using the controller's cross key.
Then, insert the game software disc and press the A button.
Then you will see a screen like this.
Make sure the SD card is inserted correctly and press the A button.
Start "Dreamcast SD Rip" in the same way as when extracting BIOS ROM and FLASH memory.
Select "GD-ROM <iso> all track" from the menu using the controller's cross key.
Then, insert the game software disc and press the A button.
Then you will see a screen like this.
Make sure the SD card is inserted correctly and press the A button.
 Extract of the game software will begin.
It takes approximately 30 minutes to extract one game software.
Extract of the game software will begin.
It takes approximately 30 minutes to extract one game software.
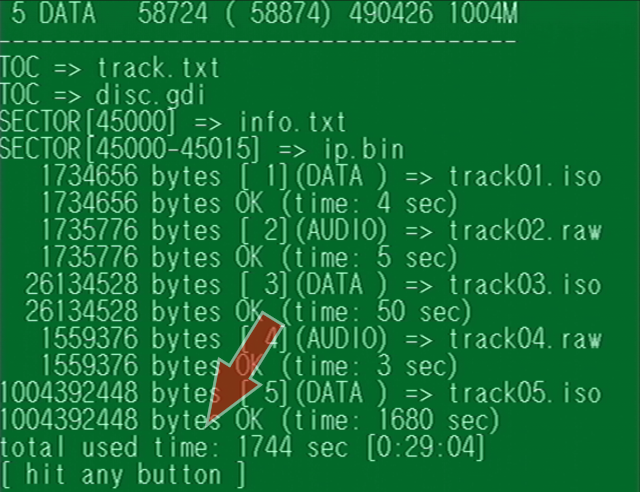 When the extraction is complete, a screen like this will appear.
The time taken to extract is displayed in the "total used time" column.
Press any button on your controller (e.g. A button).
When the extraction is complete, a screen like this will appear.
The time taken to extract is displayed in the "total used time" column.
Press any button on your controller (e.g. A button).
When you return to the menu screen, turn off the Dreamcast and remove the SD card.
SD cards store many files. Create a folder on your computer for each game title and move all these files. Empty the contents of the SD card.
Repeat this step if you want to extract multiple game software.
Installing the emulator Flycast
Next, in order to run the game software on your computer, download and install the Dreamcast emulator "Flycast".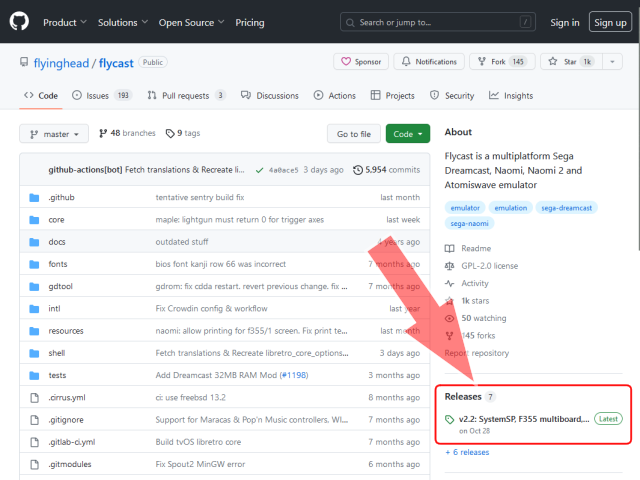 Flycast is distributed on GitHub.
Open Flycast page on
GitHub
.
Then click "Releases" from the menu on the right.
Or click "Latest" to move to the latest version of the page
Flycast is distributed on GitHub.
Open Flycast page on
GitHub
.
Then click "Releases" from the menu on the right.
Or click "Latest" to move to the latest version of the page
 Then the
Flycast release page
will open.
This screen allows you to download any version of Flycast, including past versions.
The latest version is at the top.
Then the
Flycast release page
will open.
This screen allows you to download any version of Flycast, including past versions.
The latest version is at the top.
Flycast is updated approximately once every six months.
 Scroll this screen and you will find download links for each OS in the “Assets” column.
Click this to download Flycast.
Click the link that matches your OS.
Scroll this screen and you will find download links for each OS in the “Assets” column.
Click this to download Flycast.
Click the link that matches your OS.
For Windows, click the file name such as "flycast-win64-[version].zip". The file size is around 6MB and can be downloaded in just a few seconds. When you unzip the Zip file, you will get a file called "flycast.exe".
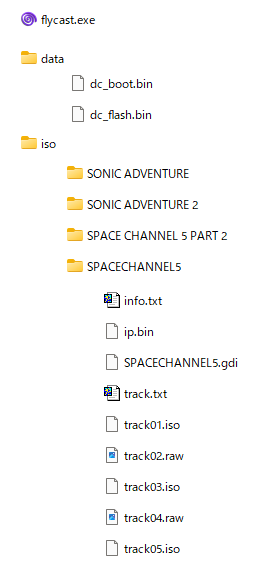 Store the prepared files on your computer in the folder structure shown in this figure.
Store "flycast.exe" under any folder.
Create a "data" folder in the folder containing "flycast.exe".
Store the BIOS ROM and FLASH memory in the "data" folder. Rename them to "dc_boot.bin" and "dc_flash.bin" respectively.
Create separate folders (name is free) for each game software under any folder and store them there. In this example, a folder "iso" for game software is created in the same folder as "flycast.exe".
Rename the "disc.gdi" file (or .cdi/.chd/.cue file) in each game software to "[game name].gdi". Japanese (full-width characters) can also be used for this name. The string specified here will be displayed when you hover over the game software artwork on the Flycast main screen.
Even if there are files or folders other than those listed above in the folder containing "flycast.exe", flycast will work without problems. It is convenient to dig a dedicated folder here and save scans of game software manuals, etc.
First startup of the emulator Flycast
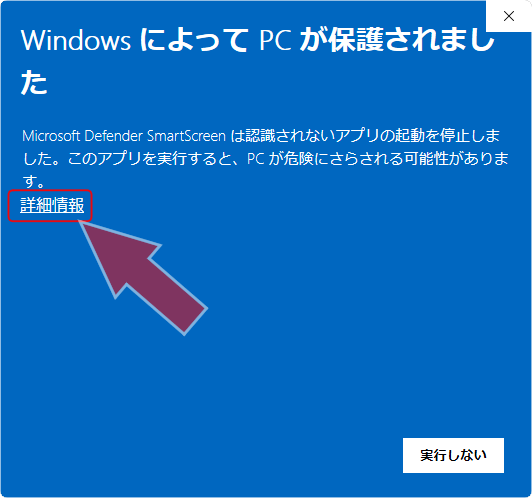 On Windows, double-click "flycast.exe" to start it.
When you start up for the first time, a warning screen like this will appear.
Click "More information".
On Windows, double-click "flycast.exe" to start it.
When you start up for the first time, a warning screen like this will appear.
Click "More information".
Note: Never run untrusted exe files. Please do not run programs other than those downloaded directly from the Flycast official website . Otherwise, it may be contaminated with viruses etc.
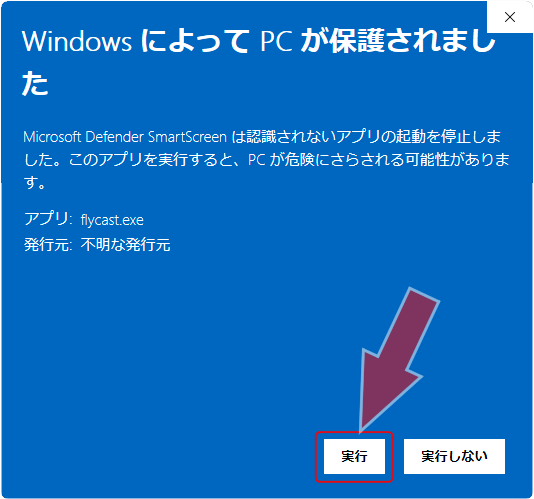 Then you will see a screen like this.
Click "Run".
Then you will see a screen like this.
Click "Run".
 Flycast has started.
First, perform the minimum initial settings. Click the [Settings] button at the top right of the screen.
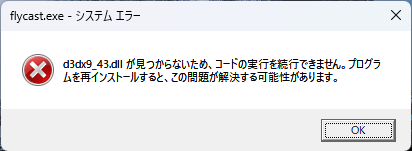 When you start Flycast, if the message "The code cannot continue executing because d3dx9_43.dll was not found" appears as shown in the figure, you need to install the 3D graphics library "DirectX".
You can install DirectX by downloading "dxwebsetup.exe" from the DirectX End-User Runtime (Microsoft) page and running it.
Alternatively, download "directx_Jun2010_redist.exe" from Microsoft's DirectX Redist (June 2010) (Microsoft) page and run it to unzip the DirectX installer to any folder. Double-click "DXSETUP.exe" included in it to install DirectX.
In either case, you can delete the downloaded installer file once the installation is complete.
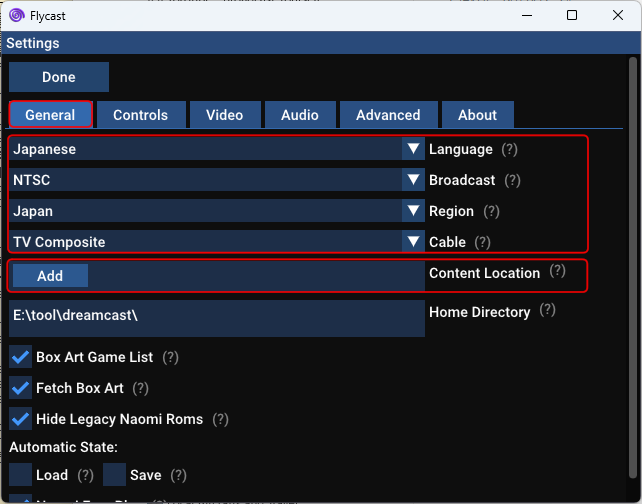 On the [General] tab, configure the settings shown in the red frame in the figure.
Language and region settings
In the Language and Region fields, select the language and region in which the game you want to play is sold. When playing Japanese version of games released in Japan, select "Japanese" and "Japan" respectively. When playing games sold in other regions, change this before launching the game. Otherwise, the game will not start and will switch to the Dreamcast's BIOS (menu) screen.
By using the "Save settings for each game" feature, which will be described later, you can automatically switch the language and region when starting the game.
 Click the [Add] button in the Content Location field on the screen above.
The file browser screen will then appear as shown in this figure.
Click the [Add] button in the Content Location field on the screen above.
The file browser screen will then appear as shown in this figure.
Click [.. Up to Parent Directory] at the top to move up one folder. Click a folder name to open that folder.
When you can see the game software folder list as shown in this figure, click the [Select Current Directory] button at the bottom left of the screen.
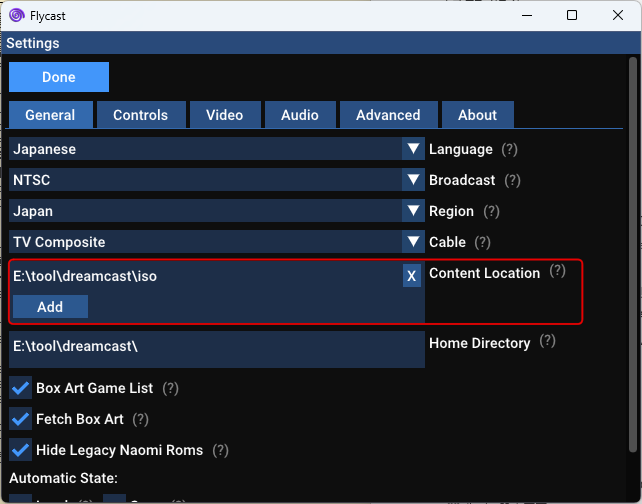 Then a folder will be added as shown in this figure.
If you have games saved in multiple different locations, you can also specify the game folders stored in different locations by clicking the [Add] button.
Then a folder will be added as shown in this figure.
If you have games saved in multiple different locations, you can also specify the game folders stored in different locations by clicking the [Add] button.
 Click the [Done] button at the top left of the settings screen to return to the main screen.
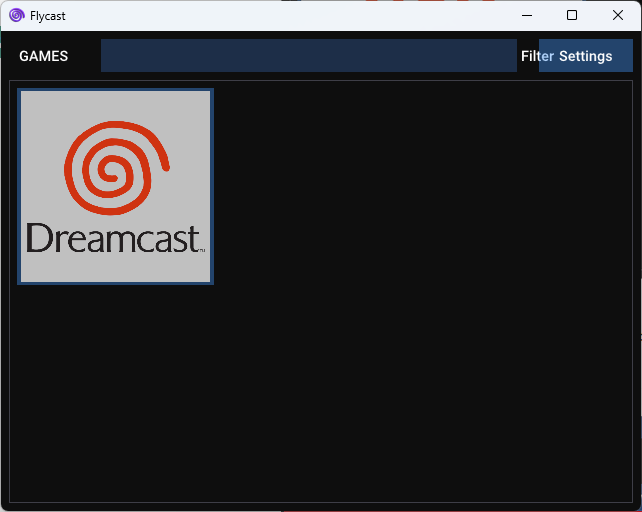
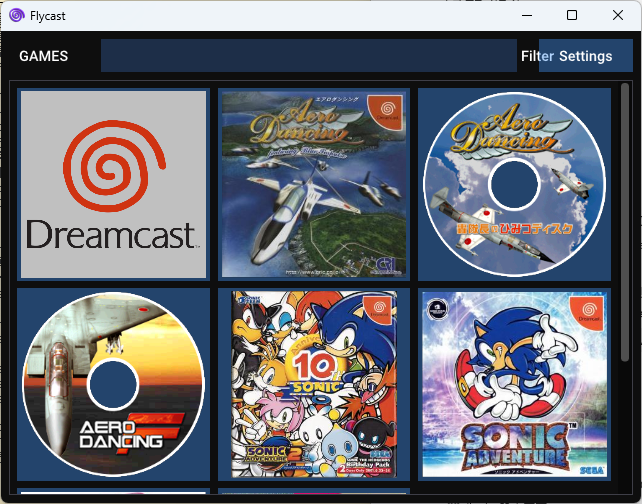
The game software has been loaded onto Flycast.
Click the [Done] button at the top left of the settings screen to return to the main screen.
The game software has been loaded onto Flycast.
Click on the game artwork to start the game.
Click the Dreamcast logo at the top left of the screen to start the BIOS (menu screen). You can manage memory cards.
Settings of the emulator Flycast
On the Flycast startup screen, click the [Settings] button at the top right to access the settings screen. If you hover your mouse over the "(?)" at the end of each item name, you can read the description of the item's function. Here I will explain the minimum setting items.The information set here will be saved in "emu.cfg" which is generated in the folder storing Flycast. If you delete this file, all settings will be reset to their default values. This file can also be edited with a text editor.
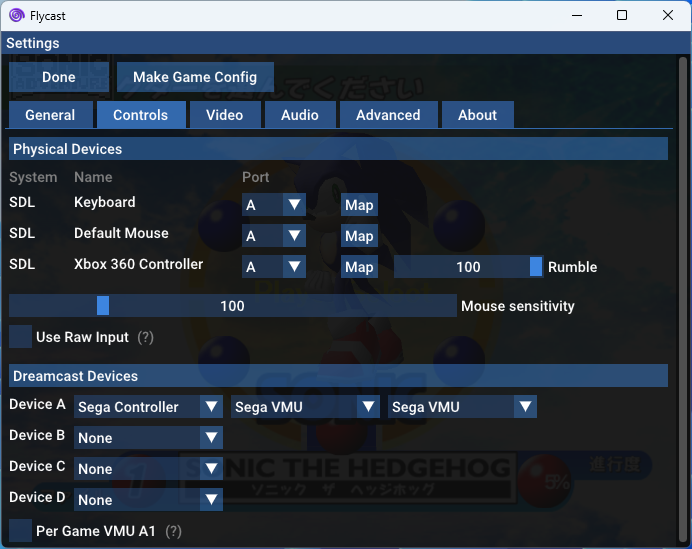
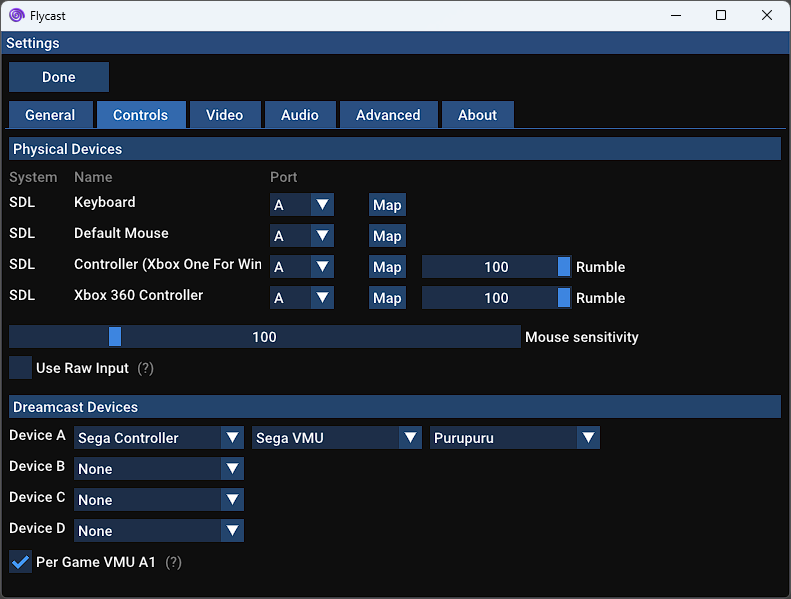 On the [Controls] tab, you can configure settings for game controllers, etc.
Game controllers for Windows can be used without any special settings.
On the [Controls] tab, you can configure settings for game controllers, etc.
Game controllers for Windows can be used without any special settings.
In this example, the computer's keyboard, mouse, and two controllers are all connected to port A. You can control the game using any keyboard, mouse, or controller.
Click the [Map] button to change the assignment (mapping) of each button on the device. When you change the mapping, a "mappings" folder is created under the folder that stores Flycast, and configuration files (.cfg) are stored for each device. This file can also be edited with a text editor.
If your controller is equipped with a vibrator, you can adjust the vibration strength in the [Rumble] field.
In this example, the device connected to port A is treated as a controller/gamepad (Sega Controller). And "Visual Memory Unit" is assigned to expansion socket 1 of the controller, and "PuruPuru Pack (Vibration generator)" is assigned to expansion socket 2.
If you specify "Purupuru" for the controller's expansion socket, the vibrator of the controller connected to the computer will vibrate (only for compatible games). Many of the computer controllers currently sold are equipped with vibrators.
Please see the chapters below for information on how to use various devices.
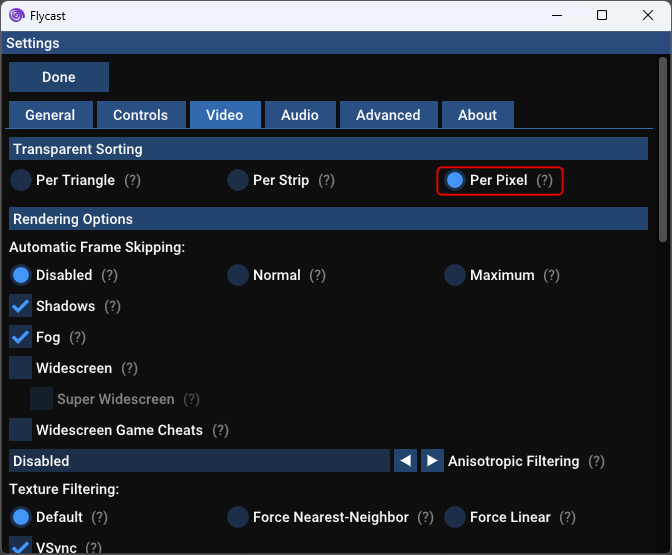 On the [Video] tab, you can configure settings related to screen display.
Although it is possible to specify very detailed settings such as rendering options, first make sure that each game runs without problems with the default settings.
As you continue to tune each item, you will be able to play more comfortably and with a more beautiful screen.
On the [Video] tab, you can configure settings related to screen display.
Although it is possible to specify very detailed settings such as rendering options, first make sure that each game runs without problems with the default settings.
As you continue to tune each item, you will be able to play more comfortably and with a more beautiful screen.
I recommend changing the [Transparent Sorting] field to [Per Pixel]. This will increase the load on your computer, but the rendering results will be more accurate and closer to the Dreamcast display. However, if [Vulkan] is not specified in the [Graphics API] field (described later), the game may drop frames.
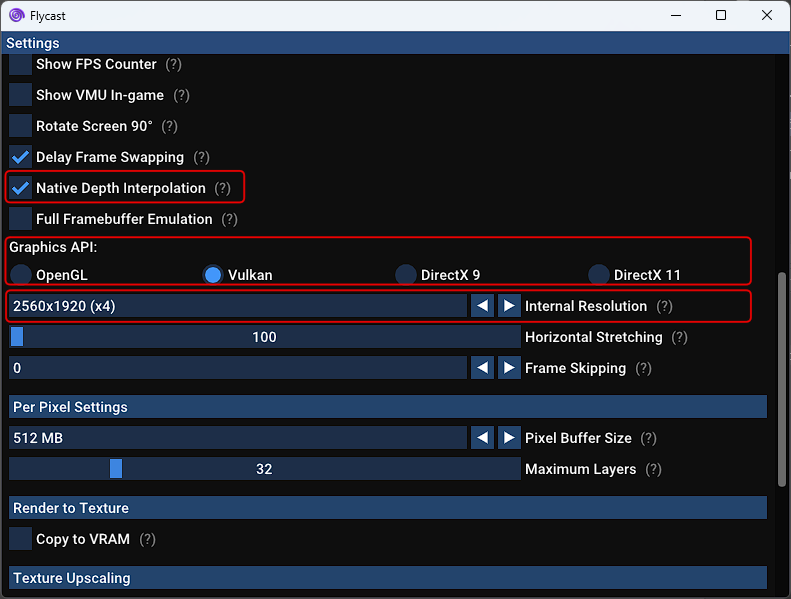 Try checking the [Native Depth Interpolation] field if textures or polygons in the distance are flickering.
This is especially effective when using AMD graphics.
Try checking the [Native Depth Interpolation] field if textures or polygons in the distance are flickering.
This is especially effective when using AMD graphics.
I recommend changing the [Graphics API] field to [Vulkan]. If this causes display problems, please try [OpenGL] - [DirectX11] - [DirectX9] in this order.
In the [Internal Resolution] field, you can specify the rendering resolution (screen VRAM resolution). It can be rendered at a higher resolution than the original Dreamcast (640x480 pixels). If you have a recent (2020's) intermediate class or above computer, I think you can display around [1280x960(x2)] to [2560x1920(x4)] without an external graphics engine. Please set it according to the resolution of the display you are using.
However, increasing the resolution will not increase the resolution of pre-rendered background videos or 2D images. By increasing the resolution, you can see at a glance which parts of game's scenes are being rendered in real time. You can get a glimpse of the ingenuity and efforts of game programmers at the time to reduce the number of polygons.
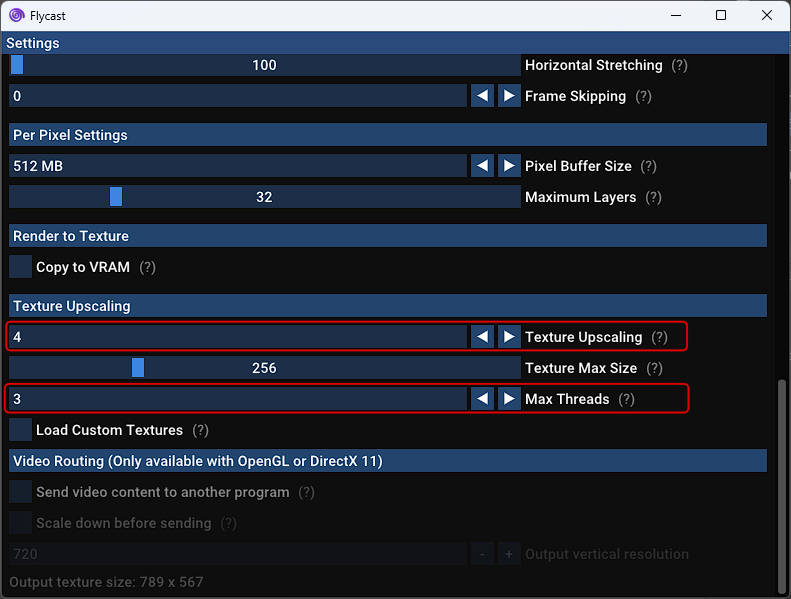 In the [Textue Upscaling] field, you can increase the resolution of the texture (image pasted to the polygon).
However, it consumes machine power.
Try setting 2 for a modern standard performance machine, and 4 for a high performance machine.
In the [Textue Upscaling] field, you can increase the resolution of the texture (image pasted to the polygon).
However, it consumes machine power.
Try setting 2 for a modern standard performance machine, and 4 for a high performance machine.
In the [Max Threads] field, specify the number of threads used to increase the resolution of the texture. Increasing this number will use more machine power to increase the resolution of the texture. The maximum value can be specified as the number of physical cores of the CPU - 1.
The first sign of a computer being overloaded is often the audio. If the game's BGM or sound effects are disrupted or interrupted, please change the items explained above to reduce the load. In particular, try lowering the [Internal Resolution] and [Textue Upscaling] values.
Surprisingly, games (visual novels) drawn only with 2D graphics (sprites) may be more susceptible to high loads than 3D games.
If you use the "save settings for each game" function described later, you can set the load that suits each game.
Game does not start on Flycast and the menu screen appears!?
If the game does not start and the Dreamcast BIOS (menu) screen appears, please check the language and region settings of Flycast.
The Language and Region fields (or Broadcast field or Cable field) on the Flycast settings screen [Settings]-[General] must match the language and region in which the game you are playing is sold.
For example, when playing a game sold in America, switch to "English", "USA".
By using the "Save settings for each game" feature, which will be described later, you can automatically switch the language and region when starting the game.
Flycast window/full screen mode switching
As with general Windows software, you can switch between window/full screen mode each time you press the [F11] key. You can also switch between window/full screen mode using [Alt]+[Enter]. You can use this operation to switch the display even during gameplay.The next time you start Flycast, it will start up in the last screen mode you set.
Flycast menu operations: Quit the game/Swap disk/save state/save settings
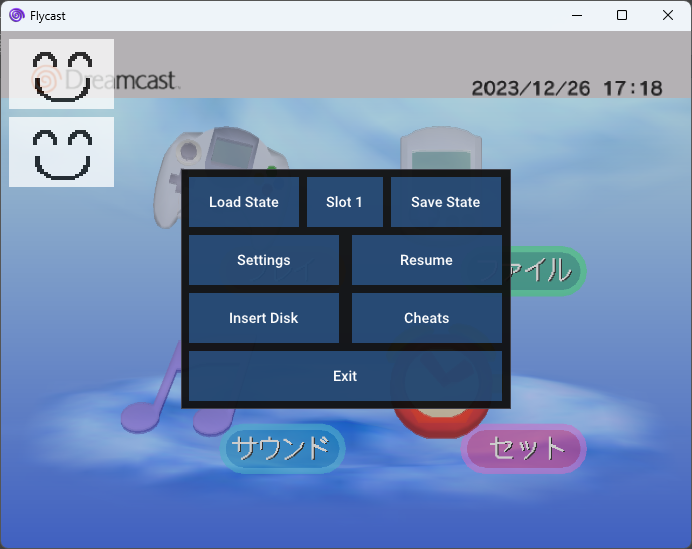
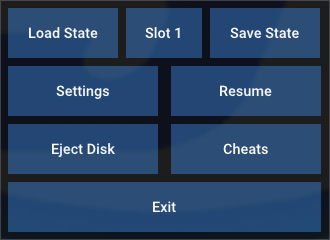 When you press the [TAB] key or the button assigned to Menu on your controller (usually [View] or [BACK] button) while playing a game, a menu like this will appear.
In addition to operating with the mouse or keyboard, you can move the cursor with the controller's cross key and select with the A button.
When you press the [TAB] key or the button assigned to Menu on your controller (usually [View] or [BACK] button) while playing a game, a menu like this will appear.
In addition to operating with the mouse or keyboard, you can move the cursor with the controller's cross key and select with the A button.
Click [Exit] to exit the game you are currently playing and return to the Flycast's main screen.
Click [Resume] to return to the game you are currently playing.
If you press the [TAB] key again or the button assigned to Menu on the controller (BACK button), the menu will close and you will return to the game you are currently playing.
 Click [Eject Disk] on the screen above to move to the Dreamcast BIOS (menu) screen.
Click this for games that require you to swap discs during play.
Click [Eject Disk] on the screen above to move to the Dreamcast BIOS (menu) screen.
Click this for games that require you to swap discs during play.
After moving to the BIOS (menu) screen, press the [TAB] key to call up the menu again. Then the [Insert Disk] button will appear like this. Clicking this will take you to the Flycast game list screen, so select the disk you want to replace.
Then you will be returned to the Dreamcast BIOS (menu) screen, so select "Play" and the disc will be loaded.
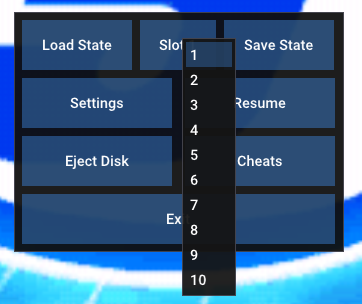 You can save the state using the [Load state], [Slot], and [Save State] buttons at the top.
Select the slot number to save/load the state using the [Slot] button, save it using the [Save State] button, and load it using the [Load state] button.
Ten types of slots from 1 to 10 can be memorized.
You can save the state using the [Load state], [Slot], and [Save State] buttons at the top.
Select the slot number to save/load the state using the [Slot] button, save it using the [Save State] button, and load it using the [Load state] button.
Ten types of slots from 1 to 10 can be memorized.
 When you click [Settings] on the menu screen during gameplay, a screen like this will appear.
You can make almost the same settings as when you call up [Settings] from the main screen.
When you click [Settings] on the menu screen during gameplay, a screen like this will appear.
You can make almost the same settings as when you call up [Settings] from the main screen.
At the top of the screen is a [Make Game Config] button. Click this to remember the current settings for the game you are currently playing. The next time you start the game, the memorized settings will be automatically recalled. And when you "Exit" from the game, the settings before the game started will be restored.
Settings for each game are saved in "emu.cfg", which is generated in the folder containing Flycast. A field starting with "[Game ID]" will be added to the top of this file. This file can also be edited with a text editor.
How to use a game controller with Flycast
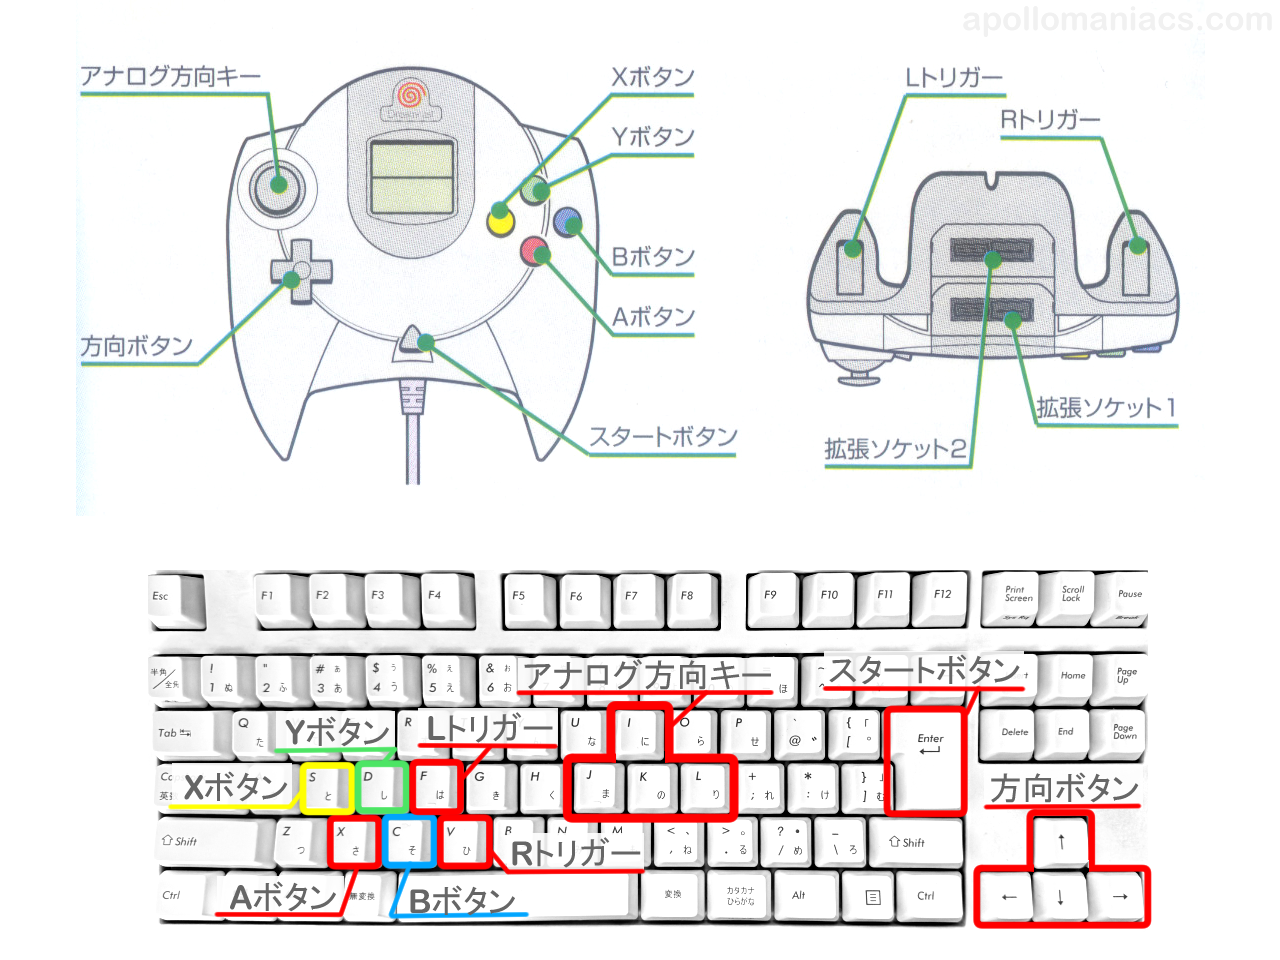 If you select "Sega Controller" in the [Settings]-[Controls]-[Dreamcast Devices] field, the device assigned to that port can be used as a controller.
Game controllers for Windows can be used as is.
For keyboards, the correspondence between each button and key on the controller is as shown in this figure.
For a mouse, the left button can be used as the [A] button, the right button can be used as the [B] button, and the center (click wheel) button can be used as the [Start] button.
These assignments can be changed by clicking the [Map] button in the [Settings]-[Controls]-[Physical Devices] field.
Windows game controllers may not work properly when connected to a computer via a low-cost, off-brand USB hub. In such a case, please replace the USB hub with another product or connect the controller directly to the USB connector on the computer.
The quality of Windows game controllers varies depending on the product. Cheap non-brand gamepads in the USD15 range can have poor stick and button sensitivity, making it difficult to enjoy the game properly. I recommend getting a controller from a well-known manufacturer that has good performance and allows you to update firmware and adjust sensitivity using the manufacturer's app.
You can check the sensitivity of your controller by opening the Gamepad Tester (Hardware Tester) website. Please use a product that allows smooth input without fluctuating the output when operating the analog stick or trigger.
-
Razer Wolverine V2 Chroma Wired Gaming Pro Controller
Razer USD89.99
POWERED BY RAZER CHROMA RGB — Enjoy Greater Immersion and Customize with 16.8 Million Colors and Lighting Effects via the Razer Controller Setup for Xbox App. 6 ADDITIONAL REMAPPABLE BUTTONS — Unleash Greater Control and a More Personalized Play Style with 4 Extra Triggers and 2 Remappable Bumpers That Can Be Customized via the Razer Controller Setup for Xbox App.
(US)
(UK)
-
Razer Wolverine V2 Wired Gaming Controller for Xbox Series X|S, Xbox One, PC
Razer USD64.55
The controller’s ergonomics provide a natural grip that ensures agile and accurate button interaction. The contoured design and non-slip rubber grips allow all-day gaming at peak performance
(US)
(UK)
-
GameSir T4 Kaleid Transparent Wired Gaming Controller for Windows 10/11
GameSir USD41.99
FOUR ULTRA-PERSONALIZED LIGHT EFFECTS: Show your personality with the GameSir T4 Kaleid PC controller. Featuring 4 ultra-personalized light effects, you can perfectly adjust the keyframe, speed, brightness, and the colors of the 5 light beads. This feature allows you to customize the colors and effects of the lights on your controller, elevating your gaming experience and adding some personality.
(US)
(UK)
-
GameSir G7 SE Wired Controller for Xbox Series X|S, Xbox One & Windows 10/11
GameSir USD44.99
Versatile Compatibility: Supports Xbox Series X/S, Xbox One X/S consoles, and PC Win10 and above (including the Steam game platform). Precise Control: Features Hall Joysticks and Hall trigger for comfortable feel, long life, and enhanced gaming accuracy.
(US)
(UK)
-
GameSir G7 Wired Controller for Xbox Series X|S, Xbox One & Windows 10/11
GameSir USD44.99
GameSir G7 Xbox controller work for Xbox One, Xbox Seris X, Xbox Seris S, compatible with Windows 10/11 PC. The detachable 10ft(3m) USB-C cable gives you the freedom to play from your desired spot in the room.
(US)
(UK)
How to use a Light Gun (gun controller) with Flycast
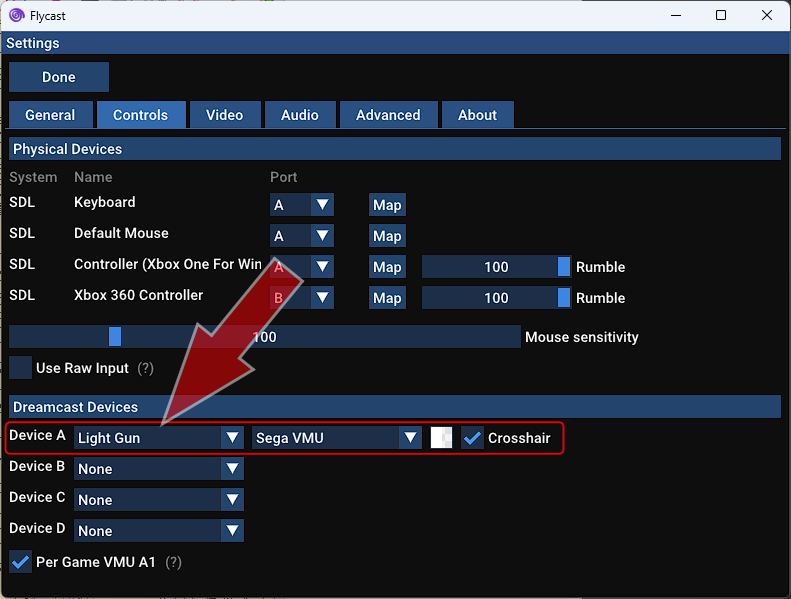 If you want to use a Light Gun (gun controller) in the game, set it up as shown in this figure.
In the [Settings]-[Controls]-[Dreamcast Devices] field, select "Light Gun" for the port you want to use.
The device assigned to the specified port can then be used as a Light Gun.
If you want to use a Light Gun (gun controller) in the game, set it up as shown in this figure.
In the [Settings]-[Controls]-[Dreamcast Devices] field, select "Light Gun" for the port you want to use.
The device assigned to the specified port can then be used as a Light Gun.
I recommend using a mouse for Light Gun. When you check [Crosshair], a mouse cursor will appear on the game screen. Aim with your mouse cursor. Shoot with the left button ([A] button). Normally, reload (reloading bullets) is done by shooting outside the screen, but in Flycast, you click on the black area on the left and right outside of the game screen. When using Flycast in windowed mode, change the window size so that black areas appear on the left and right sides.
These assignments can be changed by clicking the [Map] button in the [Settings]-[Controls]-[Physical Devices] field.
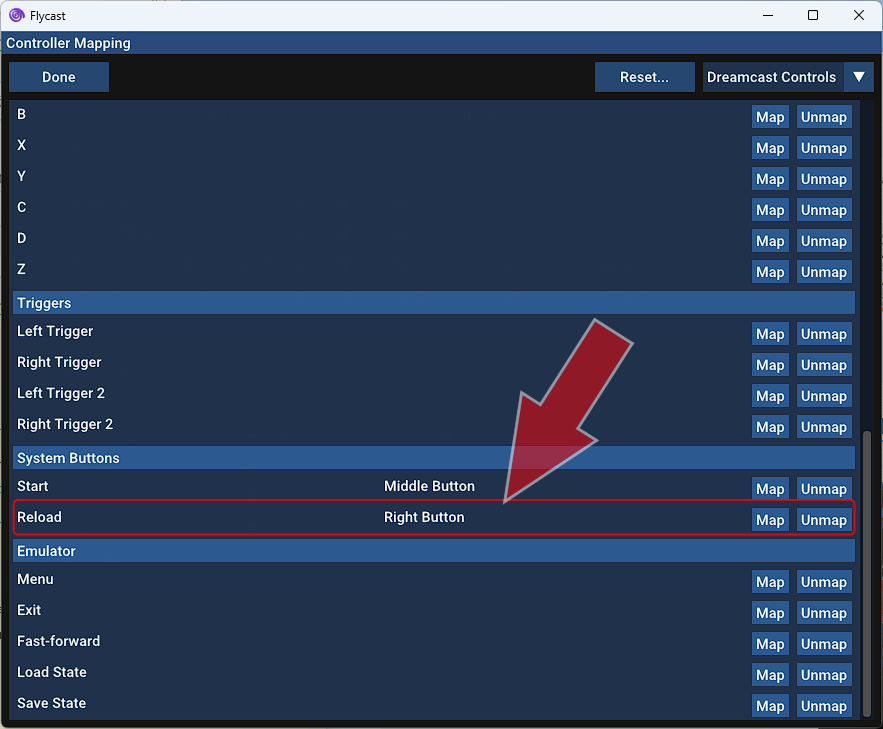 You can also assign the reload operation to a mouse button.
If you click the [Map] button for "Default Mouse" in the [Settings]-[Controls]-[Physical Devices] field, a screen like this will appear.
When you click the [Map] button in the [Reload] column, you will be asked which button to assign to [Reload], so for example, click the right mouse button.
You will then be able to reload with the right button.
You can also assign the reload operation to a mouse button.
If you click the [Map] button for "Default Mouse" in the [Settings]-[Controls]-[Physical Devices] field, a screen like this will appear.
When you click the [Map] button in the [Reload] column, you will be asked which button to assign to [Reload], so for example, click the right mouse button.
You will then be able to reload with the right button.
How to use a keyboard with Flycast
 For example, when playing a game that uses a keyboard such as "THE TYPING OF THE DEAD", set it like this figure.
If you specify "Keybord" in the "Device A" field, you can use your computer's keyboard as a Dreamcast keyboard.
For example, when playing a game that uses a keyboard such as "THE TYPING OF THE DEAD", set it like this figure.
If you specify "Keybord" in the "Device A" field, you can use your computer's keyboard as a Dreamcast keyboard.
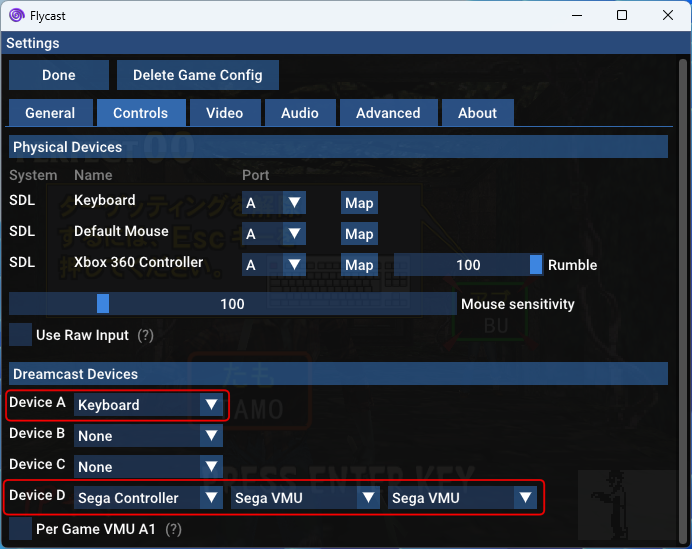
At the same time, if you connect a controller equipped with VMU to another port (in the example shown in the figure, "Device D" column), you can save game play records there.
Then, if you click [Make Game Config], the keyboard will be automatically connected the next time you start "THE TYPING OF THE DEAD".
Substitute a game controller for the maracas controller
 Use when playing "Samba de Amigo",
You can emulate the Dreamcast's maracas controller with a PC game controller.
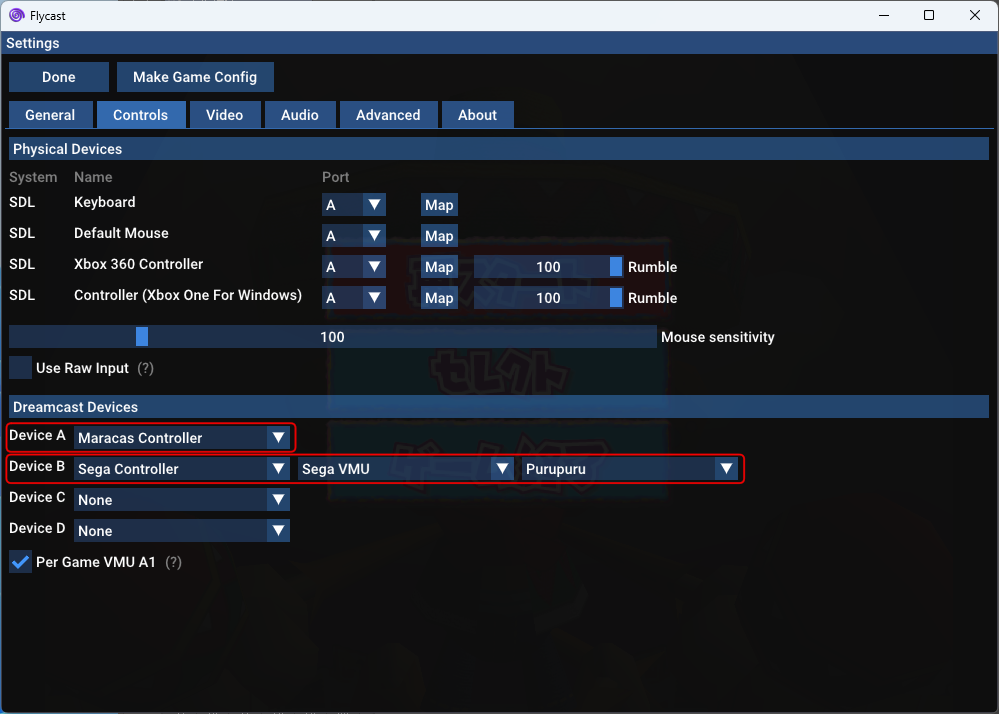
For example, set it as shown in this figure.
Use when playing "Samba de Amigo",
You can emulate the Dreamcast's maracas controller with a PC game controller.
For example, set it as shown in this figure.
The game controller's left analog stick will then be assigned to the left maracas, and the right analog stick will be assigned to the right maracas. The A button on the game controller will be assigned to the "shake" action of the right maracas, and the B button will be assigned to the "shake" action of the left maracas.
You can change the button assignments by clicking the game controller's [Map] button in the settings screen [Settings] - [Controls] - [Physical Devices] field.
At the same time, if you connect a controller equipped with VMU to another port (in the example shown in the figure, "Device B" column), you can save game play records there.
However, it is quite difficult to control games that use maracas with a game controller. First, use the game's "Training" mode to practice the controls.
Visual memory storage location in Flycast
 Flycast also emulates the Dreamcast's external storage, the visual memory unit (VMU).
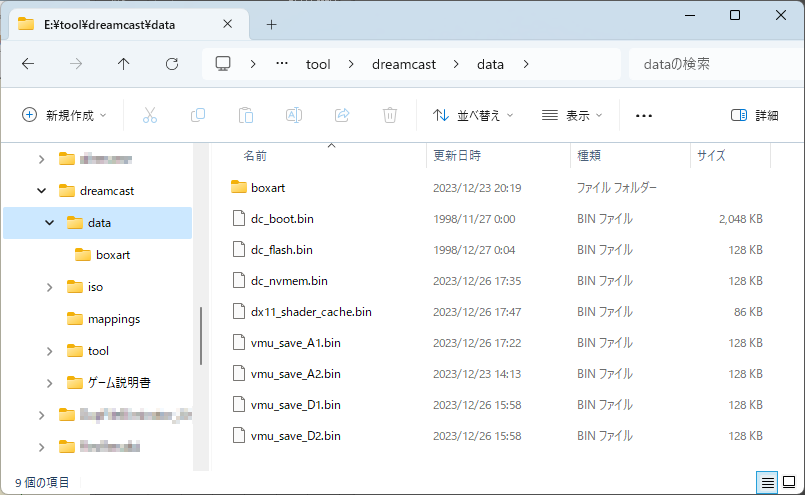
When you start Flycast, the files shown in the figure are generated under the "data" folder.
Flycast also emulates the Dreamcast's external storage, the visual memory unit (VMU).
When you start Flycast, the files shown in the figure are generated under the "data" folder.
"vmu_save_[port number][slot number].bin" saves information about the visual memory unit. By replacing this file, you can simulate replacing the visual memory unit.
Furthermore, "dc_nvmem.bin" stores information such as the Dreamcast's calendar clock and language settings.
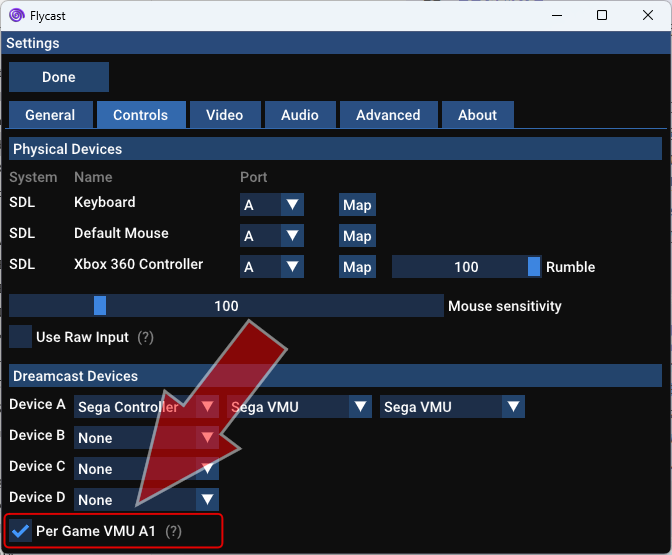 If you check [Per Game VMU A1] on the [Settings]-[Controls] screen, a dedicated visual memory will be created for each game.
The VMU file will be saved for each game with the name "[.gdi file name]_vmu_save_A1.bin" under the "data" folder.
There is no need to worry about the remaining capacity of the VMU.
If you check [Per Game VMU A1] on the [Settings]-[Controls] screen, a dedicated visual memory will be created for each game.
The VMU file will be saved for each game with the name "[.gdi file name]_vmu_save_A1.bin" under the "data" folder.
There is no need to worry about the remaining capacity of the VMU.
Modify Flycast box art (artwork/cover)
Flycast automatically collects the box art (artwork/cover) of loaded games from the internet. However, depending on the title, the wrong image may be loaded or the image may not be displayed. You can fix this manually.Replace image
Box art is stored as a 300x300 pixel jpg image in the "boxart" folder under the "data" folder. If the image is incorrect, you can simply overwrite it with the correct image you prepared.
Add image
If the images are not loading, you will also need to modify the Flycast game database file. "flycast-gamedb.json" under the "boxart" folder is the game database file. Edit this with a text editor.
The box art save path is written in the "boxart_path" entry for each game title in "flycast-gamedb.json". If the image has not been loaded, this area will be blank. Write the path of the correct image you prepared here.
Furthermore, "flycast-gamedb.json" will be updated to the latest state when Flycast is terminated. Before editing this file, please close Flycast first.
Specify with relative path
You can specify the box art with a relative path by replacing all of "boxart_path" entry with something like "./data/boxart/xxxxxxx.jpg". You can freely change the location of the folder where Flycast is installed.
Regenerate box art
You can regenerate the box art by deleting all files under the "boxart" folder and starting Flycast. However, before deleting files, please back up any necessary files, such as images you have prepared yourself.
Replace the power supply unit with DreamPSU/Boot with AC adapter
One of the most common causes of failure in older electrical products is deterioration of the electrolytic capacitor in the power supply unit. For the Dreamcast, Bitfunx , which sells accessories for game consoles, sells a part called " DreamPSU (Amazon.com) " that replaces the power supply unit with an AC adapter. I decided to replace the power supply unit while I could get this part.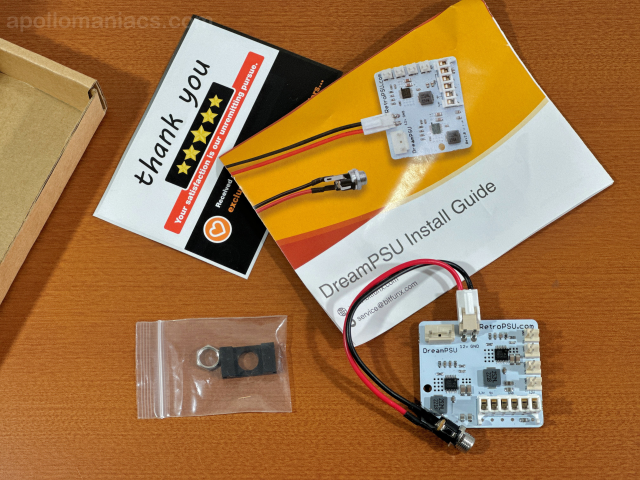 This photo shows the items included with the DreamPSU, including the power supply board, the parts that secure the connector to the Dreamcast case, assembly instructions, and a Thank You card.
Prices vary depending on the store, but you can purchase it for around USD30.
This photo shows the items included with the DreamPSU, including the power supply board, the parts that secure the connector to the Dreamcast case, assembly instructions, and a Thank You card.
Prices vary depending on the store, but you can purchase it for around USD30.
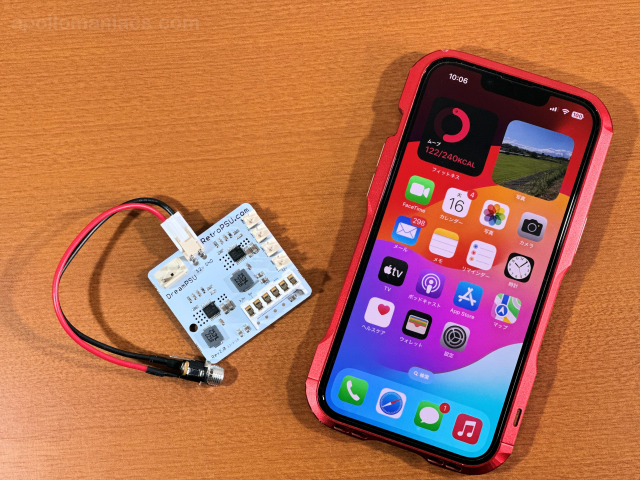 I compared the power board with the iPhone.
It's a very small board.
I compared the power board with the iPhone.
It's a very small board.
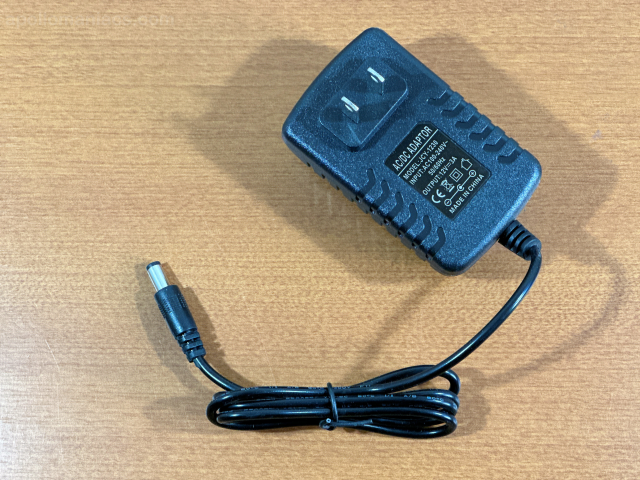 AC adapter is sold separately.
An AC adapter that can output 12V-3A is required.
You can purchase it on Amazon.com for just over USD10.
The connector pin size can be 5.5mm x 2.1mm or 2.5mm.
The polarity of the connector pin is center positive.
AC adapter is sold separately.
An AC adapter that can output 12V-3A is required.
You can purchase it on Amazon.com for just over USD10.
The connector pin size can be 5.5mm x 2.1mm or 2.5mm.
The polarity of the connector pin is center positive.
 Now let's assemble it.
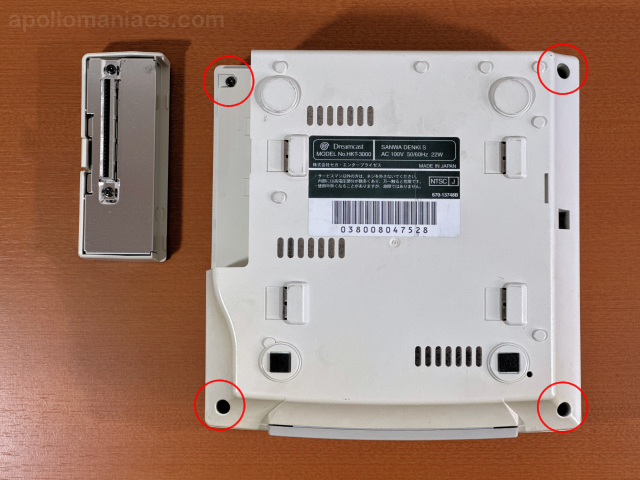
Remove the modem unit from the Dreamcast body and remove the four screws shown in the red circles in this photo.
All four screws are the same size.
Now let's assemble it.
Remove the modem unit from the Dreamcast body and remove the four screws shown in the red circles in this photo.
All four screws are the same size.
Remove the modem unit horizontally while pulling the tab.
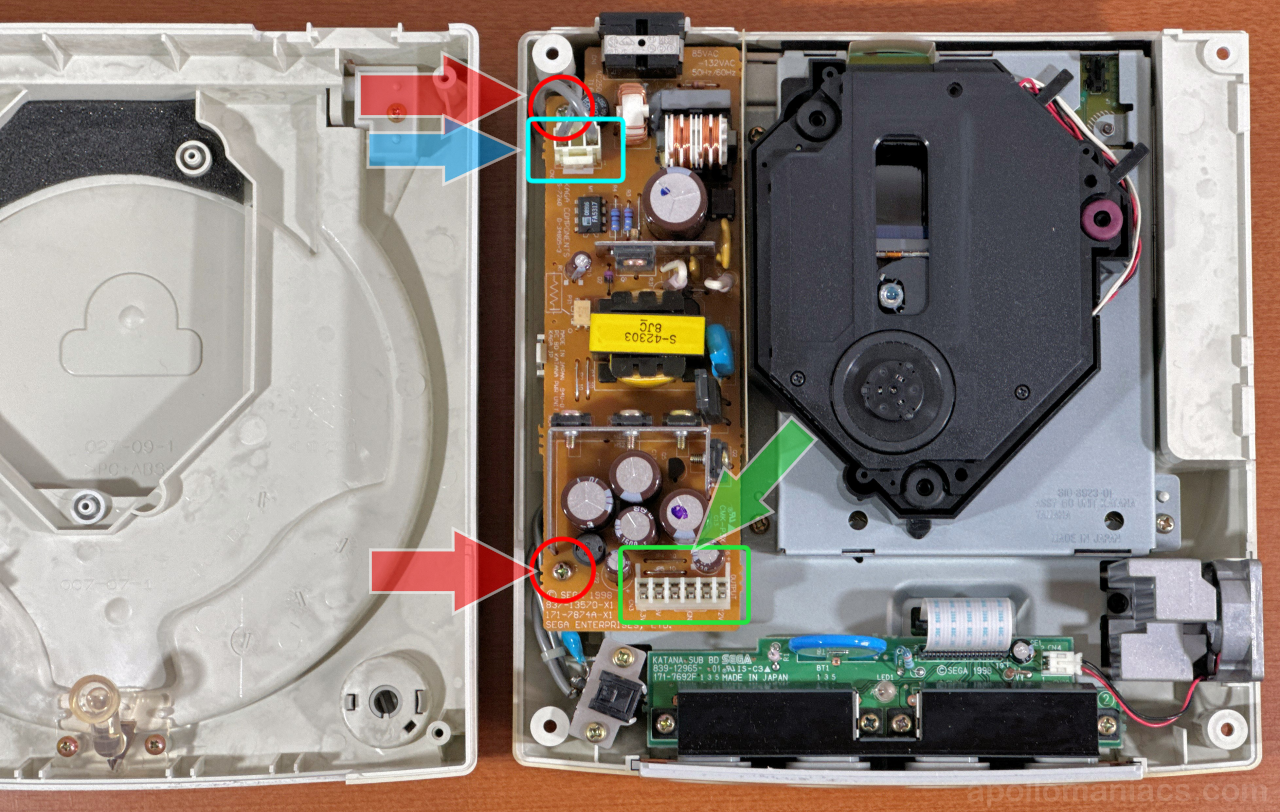 If you carefully lift the top of the case and remove it, it will look like this photo.
First, remove the connector indicated by the blue arrow.
Next, remove the two screws marked with red circles.
The screws are used when installing DreamPSU.
Please do not lose it.
If you carefully lift the top of the case and remove it, it will look like this photo.
First, remove the connector indicated by the blue arrow.
Next, remove the two screws marked with red circles.
The screws are used when installing DreamPSU.
Please do not lose it.
Then remove the old power supply unit. The power supply unit is connected to the main board with a white square 6-pin connector, indicated by the green arrow. Carefully pull the entire power supply unit upwards.
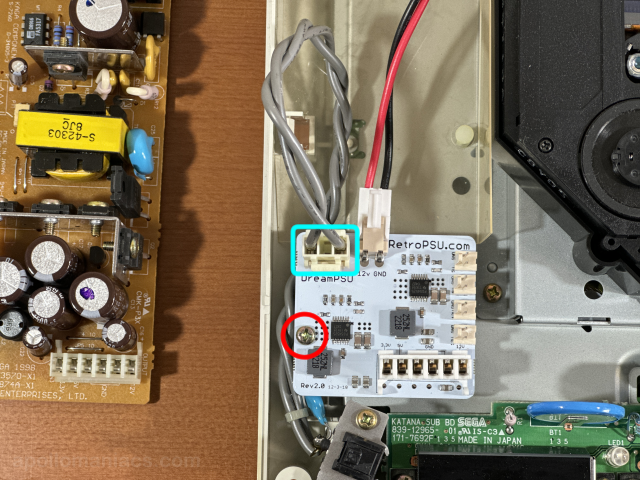 Install DreamPSU as shown in this photo.
Insert it into the 6-pin connector and secure it with the screw (1 piece) indicated by the red circle.
Then attach the connector surrounded by the blue square.
Install DreamPSU as shown in this photo.
Insert it into the 6-pin connector and secure it with the screw (1 piece) indicated by the red circle.
Then attach the connector surrounded by the blue square.
The old power supply unit that was removed will still work, so keep it in the Dreamcast box.
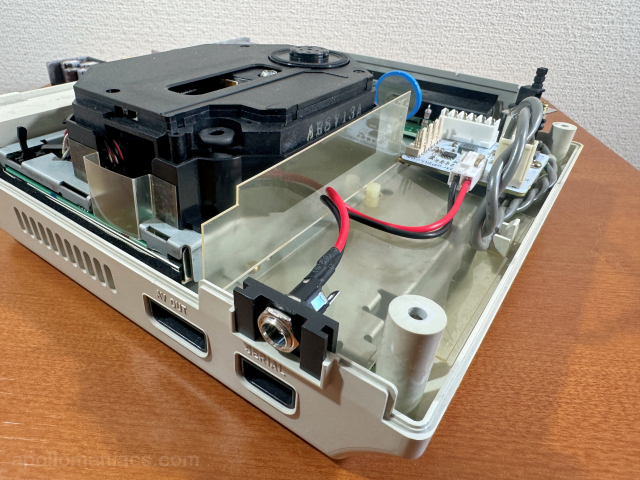 Fix the AC adapter connector to the housing using the parts attached to DreamPSU.
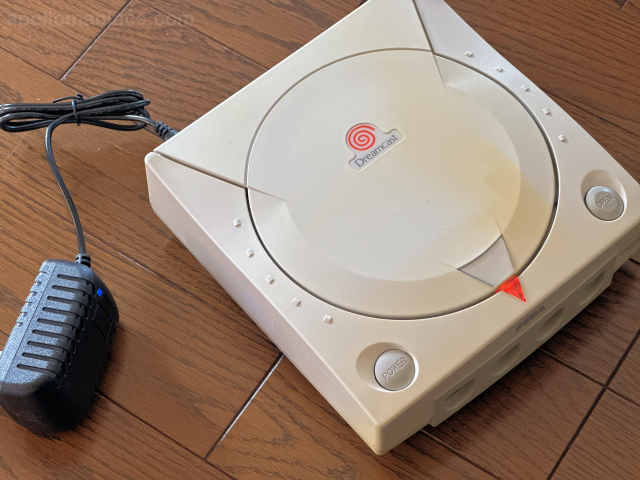 I was able to successfully start up with the AC adapter.
3D graphics engine: PowerVR-CLX2
")
")
")
What PowerVR had over other 3D graphics engines at the time was its scalable design, which rendered in tiles, and its unique architecture, which defined objects as a combination of infinite planes rather than polygons. These features make it suitable for even low-power mobile devices, and after the partnership with NEC ended, it was also adopted in Apple's iPhone series.
Future plans, or rather, dreams
First of all, I want to restore the body, which has completely discolored due to yellowing in the dark, to its original white and beautiful state.

I also want to update the GD drive (mechanical part), which are most likely to deteriorate. There seems to be an emulation kit that replaces the GD drive with an SD card, but it doesn't work with early lot products.
Once I have achieved these, I will update this page.
But in reality, I may end up tucking it away deep inside the TV stand again and forgetting about its existence.
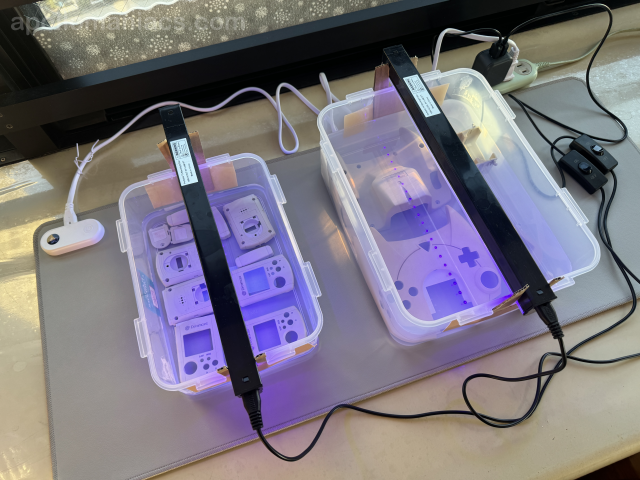 This photo shows it being placed on a heated desk mat, soaked in oxygen bleach, and exposed to UV (black) light to remove the yellowing.
After about two weeks, it finally started to turn white.
This photo shows it being placed on a heated desk mat, soaked in oxygen bleach, and exposed to UV (black) light to remove the yellowing.
After about two weeks, it finally started to turn white.