


How to use Insta360 X4 - 360 degree action camera that can shoot 8K

- What is Insta360 X4 Camera?
- Introducing Insta360 X4 Camera
- Introducing Insta360 X4 exclusive accessories
- Name of each part
- Insta360 X4 initial settings
- Attaching the lens guard, microSD card, and Thermo Grip Cover
- How to charge the battery
- Installing Insta360 app
- Activate the camera
- Shooting mode
- List of shooting modes
- What is 5.7K+(plus) mode?
- What is insv/insp format?
- What is PureShot?
- What is HDR shooting?
- FlowState image stabilization
- What is FreeFrame video?
- Other video formats
- Basic operation
- How to use the touch screen
- Preview screen
- Shooting parameter setting screen
- Camera setting screen
- Advanced camera settings screen
- Quick Capture: Start shooting immediately when power down
- Pre-Recording: Start recording before pressing the shutter button
- Preset: Saving shooting parameters
- Importing videos/photos to a computer
- Add location information (geotagging) to videos and photos
- Waterproof performance of Insta360 X4
- How to use Insta360 X4 Invisible Dive Case
- How to use Insta360 X4 Utility Frame
- How to use Insta360 Bullet Time Accessory
- How to use Insta360 GPS Preview Remote
 How to use Insta360 app
- Remote control from Insta360 app
- Manage videos and photos taken
- Export to smartphone album from Insta360 app
- Easily create videos using Insta360 app's Auto Edit feature
- Add effects using Insta360 app's Shot Lab feature
- Professional video editing with Insta360 app
- Remove watermark logo from video
 How to use Insta360 STUDIO
- Insta360 X4 Camera Indicator Light Meaning
- MicroSD card for Insta360 X4
- Insta360 X4 Camera specifications
- Insta360 X4 Related Sites
What is Insta360 X4 Camera?

Images from two 4K 180-degree fisheye cameras mounted on the front and back are stitched (combined) within the camera and saved as a 360-degree image. It always shoots in all directions, so there are no missed angles. You can enjoy the 360-degree photos/videos you have taken by dragging them on the app and turning your view point around them, or you can cut out the necessary parts and export them as regular square images. You can also use only one of the 180-degree fisheye cameras as a regular 4K action camera. With FlowState image stabilization on the Insta360 series, you can capture clear, blur-free images even when shooting in strong vibrations. The highest record resolution is 8K30fps (7680x3840). When fully charged, you can record 75 minutes of video at 8K30fps and 135 minutes of video at 5.7K30fps.
Even if you take a picture using a selfie stick, the selfie stick will not be visible in the video. Therefore, you can take third-person perspective footage that looks like it was taken by a drone or someone else. The camera itself is waterproof to a depth of 10m(33ft), and can be used to a depth of 50m(164ft) with a special dive case.
How to enjoy 360 degree videos and photos
To share the 360-degree videos and photos taken with the Insta360 X4 camera, upload them to a photo sharing platform that supports 360-degree video and photo playback, such as
Or create normal (flat) videos using the various editing functions provided by the
-
Insta360 X4 - Waterproof 8K 360 Action Camera, 4K Wide-Angle Video

Insta360 2024/04/16 USD499.99
The 8K era is here. Insta360 X4 delivers 360° video in stunning 8K or 5.7K60fps! Use Active HDR to keep shots color accurate too, even in action scenarios. With Insta360 X4, get out there and shoot, not having to worry about lining up a shot. Shoot first, then reframe easily after, all in the AI-powered Insta360 app.

 (US)
(UK)
(US)
(UK)
-
Insta360 X3-360 Action Camera with 5.7K 360 Active HDR Video
Insta360 2023/4 USD399.99
Insta360 X3 combines 5.7k 360 with all the power of a 4K action camera together. Unbelievable potential! Insta360 X3 captures 360 Active HDR video, with all the benefits of a traditional action camera. Choose your favorite angle after the fact with easy reframing in the AI-powered Insta360 app.
(US)
(UK)
-
Insta360 GO 3 Action Camera
Insta360 2023/06/27 USD343.99
Max resolution: 2.7K: 2720x1530@24/25/30fp / Weight:35.5g
Weighing in at only 35g, GO 3 is an incredibly tiny action camera that you can take anywhere. Capture effortless, hands-free POV videos or creative angles at 2.7K. Perfect for mountain biking, pets, travel, anything goes! A versatile magnetic design with a set of handy accessories such as the Magnet Pendant and Easy Clip, GO 3 gives you endless creative possibilities, with angles no other camera can handle.
(US)
(UK)
How to use Insta360 GO 3 - Compact and lightweight 2.7K action camera weighing 35.5 grams
Introducing Insta360 X4 Camera
 It comes in a box like this photo.
This is a size comparison with an iPhone.
It comes in a box like this photo.
This is a size comparison with an iPhone.
 The box contains something like this photo.
The top row from left is the camera body, carrying case, Thermo Grip Cover, cleaning cloth, and USB Type-C to Type-C cable.
The middle row contains the warranty card, waterproof instructions, quick start guide, and stickers.
The bottom row is the safety guideline, and then the lens guard.
The box contains something like this photo.
The top row from left is the camera body, carrying case, Thermo Grip Cover, cleaning cloth, and USB Type-C to Type-C cable.
The middle row contains the warranty card, waterproof instructions, quick start guide, and stickers.
The bottom row is the safety guideline, and then the lens guard.
This product does not have storage. The microSD card required for shooting is sold separately. Please prepare a microSD card compatible with Insta360 X4 .
The Thermo Grip Cover is a cover that prevents the heat generated by the camera from being transferred to your hands, and is recommended for use when shooting 8K videos for long periods of time.
A more detailed user manual can be downloaded from the Insta360 X4 manual download page (Insta360) .
 This is a size comparison with an iPhone.
It's a size that fits in the palm of your hand.
The entire surface has fine mesh-like unevenness to ensure a firm grip.
This is a size comparison with an iPhone.
It's a size that fits in the palm of your hand.
The entire surface has fine mesh-like unevenness to ensure a firm grip.
 The actual weight of the camera was 206g.
It weighs about the same as a modern smartphone.
The actual weight of the camera was 206g.
It weighs about the same as a modern smartphone.
 The bottom has a female hole for a 1/4 inch screw mount, which is common on camera tripods.
To use the fork-shaped mount system "2 prong mount" made famous by the GoPro series, you need to purchase a Utility Frame (Insta360) or a Quick release mount (Insta360) sold separately.
Introducing Insta360 X4 exclusive accessories
Insta360 X4 is available with many accessories that expand your shooting possibilities. Among them, we will introduce some particularly noteworthy accessories. Lens guard made of tempered glass.
You can shoot clearer and brighter images than the standard lens guard that comes with the camera.
Lens guard made of tempered glass.
You can shoot clearer and brighter images than the standard lens guard that comes with the camera.
 A screen protector made of high-strength tempered glass.
A protector installation kit is included.
A screen protector made of high-strength tempered glass.
A protector installation kit is included.
 A simple lens cap made of silicone.
If you have this when you want to leave your camera on your desk for a while, you won't have to worry about it getting scratched.
A simple lens cap made of silicone.
If you have this when you want to leave your camera on your desk for a while, you won't have to worry about it getting scratched.
 A metal frame that protects the camera body.
There is a cold shoe and a 1/4 inch female screw hole on both sides, a 1/4 inch female screw hole on the bottom, and the fork-shaped mount system "2 prong mount" that became famous for the GoPro series. .
A lens cap is also included.
A metal frame that protects the camera body.
There is a cold shoe and a 1/4 inch female screw hole on both sides, a 1/4 inch female screw hole on the bottom, and the fork-shaped mount system "2 prong mount" that became famous for the GoPro series. .
A lens cap is also included.
This is an essential accessory if you want to use various mounts for GoPro to photograph action scenes that involve vibrations, such as bicycles and motorcycles.
For more information, see How to use Insta360 X4 Utility Frame .
 It is equipped with a 3.5mm audio jack for connecting an external microphone and a Type-C connector for charging.
Remove the cover of the USB Type-C connector on the side of the camera body and attach it there.
It becomes completely invisible when shooting 360 degree video.
It is equipped with a 3.5mm audio jack for connecting an external microphone and a Type-C connector for charging.
Remove the cover of the USB Type-C connector on the side of the camera body and attach it there.
It becomes completely invisible when shooting 360 degree video.
 This is a microSD card reader/writer.
When connected, videos and photos taken will be saved to the microSD card inserted into this quick reader.
Remove the cover of the USB Type-C connector on the side of the camera body and attach it there.
Equipped with USB Type-C and Lightning connectors, you can connect it to your computer or smartphone after shooting for direct access to your videos and photos.
When shooting at 8K resolution, the file size of the video becomes very large.
With this, there is no need to transfer it over Wi-Fi.
This is a microSD card reader/writer.
When connected, videos and photos taken will be saved to the microSD card inserted into this quick reader.
Remove the cover of the USB Type-C connector on the side of the camera body and attach it there.
Equipped with USB Type-C and Lightning connectors, you can connect it to your computer or smartphone after shooting for direct access to your videos and photos.
When shooting at 8K resolution, the file size of the video becomes very large.
With this, there is no need to transfer it over Wi-Fi.
 This is a full-fledged waterproof case that increases the waterproof performance of Insta360 X4 from the original 10m (33ft) to 50m (164ft).
Not only divers and snorkelers, but also those who want to use Insta360 X4 for marine activities, even those who do not dive deeply, should prepare this Dive Case.
Since the lens guard cannot be used underwater, I think it is best to use a dive case to protect the lens.
This is a full-fledged waterproof case that increases the waterproof performance of Insta360 X4 from the original 10m (33ft) to 50m (164ft).
Not only divers and snorkelers, but also those who want to use Insta360 X4 for marine activities, even those who do not dive deeply, should prepare this Dive Case.
Since the lens guard cannot be used underwater, I think it is best to use a dive case to protect the lens.
For more information, see How to use Insta360 X4 Invisible Dive Case .
 Although it's called a Bullet Time Accessory, it's actually a set of two selfie sticks that are useful in a variety of situations.
This doesn't mean it can only be used for bullet time video.
Rather, this kit is a multi-purpose camera handle that provides so many new shooting angles.
If you are an Insta360 X4 user, this is a must-have item.
For more information, see
How to use Insta360 Bullet Time Accessory
.
Although it's called a Bullet Time Accessory, it's actually a set of two selfie sticks that are useful in a variety of situations.
This doesn't mean it can only be used for bullet time video.
Rather, this kit is a multi-purpose camera handle that provides so many new shooting angles.
If you are an Insta360 X4 user, this is a must-have item.
For more information, see
How to use Insta360 Bullet Time Accessory
.
There's also an accessory called the Bullet Time Cord (Insta360) , which is a retractable cord that's smaller and more portable.
 This is a Bluetooth shutter remote control equipped with GPS.
Not only can you press the shutter remotely, you can also change shooting parameters and view preview images.
Location information from GPS is saved in the captured video.
Remote control up to 20m. Preview possible up to 8 meters away.
This is a Bluetooth shutter remote control equipped with GPS.
Not only can you press the shutter remotely, you can also change shooting parameters and view preview images.
Location information from GPS is saved in the captured video.
Remote control up to 20m. Preview possible up to 8 meters away.
For more information, see How to use Insta360 GPS Preview Remote .
 Selfie sticks for the Insta360 camera are available in various lengths and shapes, such as long ones, bicycle sticks, handle sticks, for helmets, cars, and ski sticks, but this is a selfie stick that can remotely control the camera.
When connected to the camera with a USB cable, you can turn the camera on/off and operate the shutter from your fingertips.
Built-in 4500mAh battery can also extend the usage time of the camera.
Selfie sticks for the Insta360 camera are available in various lengths and shapes, such as long ones, bicycle sticks, handle sticks, for helmets, cars, and ski sticks, but this is a selfie stick that can remotely control the camera.
When connected to the camera with a USB cable, you can turn the camera on/off and operate the shutter from your fingertips.
Built-in 4500mAh battery can also extend the usage time of the camera.
Name of each part
Click to enlarge.
Insta360 X4 initial settings
Here, we will explain in order the first thing you should do after purchasing Insta360 X4. Please click on each item.Attaching the lens guard, microSD card, and Thermo Grip Cover
 First of all, install a lens guard to prevent scratches on the lens.
Take out the lens guard that comes with the camera and place it on the lens, aligning the blue dot on the frame with the arrow in the photo.
First of all, install a lens guard to prevent scratches on the lens.
Take out the lens guard that comes with the camera and place it on the lens, aligning the blue dot on the frame with the arrow in the photo.
 Then turn it clockwise so that the blue dot lines up with the microphone hole.
Depending on whether or not you have attached the lens guard, you will need to change the camera settings. After completing the initial camera settings, tap the
In addition to the standard lens guard that comes with the camera, you can also purchase a Premium Lens Guards (Insta360) made of tempered glass that is more resistant to shocks and scratches.
Please note that the lens guard cannot be used underwater. Please remove the lens guard when taking underwater photos. In that case, we recommend using a special dive case.
 Slide the two hooks on the battery lid on the left side of the main unit inward and the battery will pop out.
Then, you will see the microSD card slot in the place indicated by the red circle in the photo.
Insert the microSD card here.
Slide the two hooks on the battery lid on the left side of the main unit inward and the battery will pop out.
Then, you will see the microSD card slot in the place indicated by the red circle in the photo.
Insert the microSD card here.
Insert the microSD card with the label side facing up (touch panel side) and the terminals facing towards the back. Then insert the battery.
If an orange mark is visible on the hook, the battery is not installed correctly. Push the battery firmly until the orange mark disappears.
MicroSD card for Insta360 X4
The maximum bitrate of Insta360 X4 camera can reach around 200Mbps. To record 8K 30fps video, a microSD card with UHS Class 3 (U3), Video Class 30 (V30), UHS-I or higher performance is required. Please see the MicroSD card for Insta360 X4 chapter for more information.
 Attach the Thermo Grip Cover that comes with the camera.
Carefully fit the cover onto the camera, being careful not to damage the lens guard.
Both installation and removal are done from the top of the camera.
Attach the Thermo Grip Cover that comes with the camera.
Carefully fit the cover onto the camera, being careful not to damage the lens guard.
Both installation and removal are done from the top of the camera.
The Thermo Grip Cover can usually be left on. However, it must be removed when submerging the camera and when using Invisible Dive Case, Utility Frame, Water sports rope mount, and Accessory shoe.
How to charge the battery

Insta360 X4 supports USB PD (Power Delivery) charging. It is recommended to use a USB PD charger with an output of 36W or higher.
While charging, the indicator light below the display will turn red. When charging at 18W, it takes approximately 38 minutes to charge the device to 80% and approximately 55 minutes to fully charge. The indicator light will turn off when the device is fully charged.
Additionally, this small lid can be removed to attach accessories such as a Mic Adapter (Insta360) or Quick Reader (Insta360) or . However, if this lid is open, the waterproof function will be lost. Please close this lid tightly when using it in a water area.
About battery duration
The nominal value for video shooting is approximately 75 minutes when shooting at 8K30fps and approximately 135 minutes when shooting at 5.7K30fps. When shooting photos, it will probably last at least twice as long as when shooting videos, depending on how often you shoot. In addition, Insta360 X4 can be used while charging. If you want to shoot long time lapses or star lapses, you can do so while connecting the charger or mobile battery.
Installing Insta360 app
Like other Insta360 action cameras, the Insta360 X series can be controlled with the Insta360 app. Install Insta360 app on your smartphone.-
Insta360
Shenzhen Arashi Vision Co., Ltd. Photo / video free
Insta360 cameras give creators, athletes and adventurers tools to create like they’ve never created. Whether you're upping your shooting game with an Insta360 ONE R or ONE X, the Insta360 App is a creative powerhouse in your pocket that acts as your camera’s sidekick. Editing on your phone has never been easier.
view details (App Store)
Activate the camera
To use Insta360 X4, you must first activate it using the Insta360 app.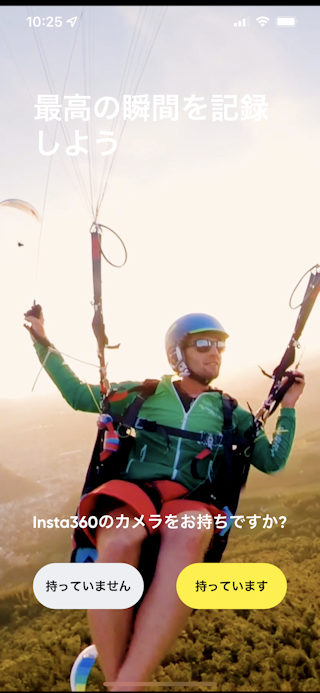 Enable Bluetooth and Wi-Fi on your iPod / iPad / iPhone.
Then open
 Then you will see a screen like this.
This is the screen for requesting various permissions.
Allow everything but "notifications" to control the camera.
Set "Notification" to your liking.
Then tap "Enter app".
Then you will see a screen like this.
This is the screen for requesting various permissions.
Allow everything but "notifications" to control the camera.
Set "Notification" to your liking.
Then tap "Enter app".
You can get help by tapping book icon displayed on the edge of the screen.
 Next, click the
The touch screen of the Insta360 X4 camera will then look like this. Select your preferred language and tap [Next] at the top right of the screen.
For instructions on how to operate the Insta360 X4 camera, see Basic operation and How to use the touch screen .
 The camera's touch screen will then display something like this.
Look at the Insta360 app screen on your smartphone.
The camera's touch screen will then display something like this.
Look at the Insta360 app screen on your smartphone.
 At the bottom of the app screen, tap the message "Connect now" or "Multiple devices found. Confirm" as shown.
Alternatively, tap the yellow
At the bottom of the app screen, tap the message "Connect now" or "Multiple devices found. Confirm" as shown.
Alternatively, tap the yellow
 When a screen like this to connect a different model appears, select the camera you want to connect from the "Another device" field at the bottom of the screen.
 Connection between the camera and the app will begin.
Wait for a while.
Connection between the camera and the app will begin.
Wait for a while.
 In many cases, the firmware (control software built into the device) needs to be updated when connecting for the first time.
When you see a screen like this, tap "Start downloading."
The latest firmware for Insta360 X4 will then be downloaded from the Internet to your smartphone.
In many cases, the firmware (control software built into the device) needs to be updated when connecting for the first time.
When you see a screen like this, tap "Start downloading."
The latest firmware for Insta360 X4 will then be downloaded from the Internet to your smartphone.
 When the firmware download is complete, a screen like this will appear.
Take a look at the Insta360 X4's touchscreen.
When the firmware download is complete, a screen like this will appear.
Take a look at the Insta360 X4's touchscreen.
 The screen will look like this.
Tap Confirm.
The screen will look like this.
Tap Confirm.
 Then Insta360 app and Insta360 X4 Camera will be connected.
A confirmation screen like this is displayed on the way.
Tap "Connect".
Then Insta360 app and Insta360 X4 Camera will be connected.
A confirmation screen like this is displayed on the way.
Tap "Connect".
 Sometimes it says "New firmware available" like this.
Here, upload the firmware you downloaded to your smartphone earlier to the camera and update it.
Follow the instructions on the screen to update.
Sometimes it says "New firmware available" like this.
Here, upload the firmware you downloaded to your smartphone earlier to the camera and update it.
Follow the instructions on the screen to update.
Once the update is complete, the camera will restart and you will have to start over from the language selection screen. Please perform the series of operations again.
Please continue to connect to the
Note: Make sure your camera battery is fully charged when updating. If the camera loses power during the update, it may stop working. I think it's good to update while charging with a charger or mobile battery.
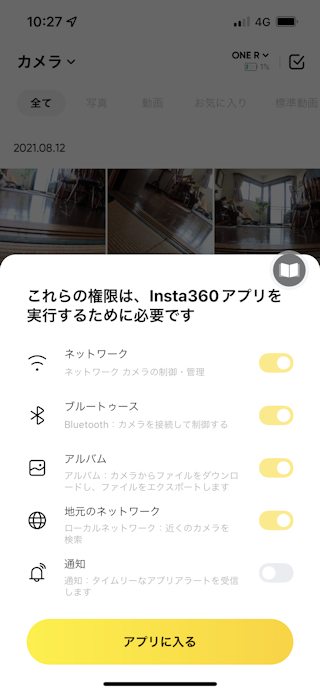
 Once the connection is complete, a simple tutorial will be displayed on the camera screen.
Swipe the screen left or right to display other items.
If you follow the on-screen instructions, you will finally see the
Shooting mode
switching screen shown in the photo, and the tutorial will end.
Once the connection is complete, a simple tutorial will be displayed on the camera screen.
Swipe the screen left or right to display other items.
If you follow the on-screen instructions, you will finally see the
Shooting mode
switching screen shown in the photo, and the tutorial will end.
Select one of the shooting modes and tap its icon to go to the camera's Preview screen .
You can review this tutorial as many times as you like by selecting "Reset tutorial" on the Advanced camera settings screen .
Shooting mode
After selecting a shooting mode, swipe up from the bottom edge of the touch panel on the Preview screen to switch shooting formats such as resolution and frame rate.
List of shooting modes
Some shooting modes can be used in 360 degree mode and others in Single-Lens (180 degree fisheye) mode.Shooting modes that can be used in both 360 degree/Single-Lens mode
Shoot a normal video. You can select from the following shooting formats.
360 degree mode
Resolution: 8K(Max30fps) / 5.7K+ (Max30fps) / 5.7K(Max60fps) / 4K(Max100fps)
Frame rate: 100 / 60 / 50 / 30 / 25 / 24 fps
Single mode
Aspect ratio: 16:9 / 9:16
Resolution: 4K / 2.7K / 1080P(FHD) (いずれもMax60fps)
Frame rate: 60 / 50 / 30 / 25 / 24 fps
The video will be recorded continuously for the length specified by "Loop Time", but older recordings will be deleted automatically. Always leave the video for the length specified by the loop time. For example, if you specify 1 minute as the loop time, the last 1-2 minutes will be left as a video no matter how many minutes you shoot. This can also be used for purposes such as drive recorders and surveillance cameras. The loop (shooting) time can be selected from 1 / 3 / 5 / 10 / 15 / 20 / 25 / 30 minutes or unlimited.
You can select from the following shooting formats.
360 degree mode
Resolution: 8K(Max30fps) / 5.7K+ (Max30fps) / 5.7K(Max60fps) / 4K(Max60fps)
Frame rate: 60 / 50 / 30 / 25 / 24 fps
Single mode
Aspect ratio: 16:9 / 9:16
Resolution: 4K / 2.7K / 1080P(FHD) (いずれもMax60fps)
Frame rate: 60 / 50 / 30 / 25 / 24 fps
Take a normal photo. File format can be selected from insp / PureShot / PureShot+RAW. Timer can be selected from Off / 3 / 5 / 10 / 15 seconds. You can select from the following shooting formats.
360 degree mode
Resolution: 72MP (11904 x 5952 pixel) / 18MP (5888 x 2944 pixel)
Single mode
Aspect ratio: 16:9 / 9:16 / 1:1
Resolution: 36MP (5984 x 5984 pixel) / 9MP (2976 x 2976 pixel)
Shooting modes that can only be used in 360 degree mode
Shoots High Dynamic Range (HDR) video with image stabilization applied. Shooting in a bright environment is recommended. Otherwise, you may experience blur in fast-moving scenes.
You can select from the following shooting formats.
Resolution: 5.7K
Frame rate: 30 / 25 / 24 fps
Shoot time-lapse videos. Fix the camera when shooting, or place on an Rotating Tripod (Amazon.com) to take panoramic shots. No audio is recorded.
You can select from the following shooting formats.
Resolution: 11K / 8K / 5.7K
Frame rate: 30 fps
Shooting interval: 0.5s / 1s / 2s / 5s / 10s / 30s / 1min / 2min
The shooting results cannot be played back on the camera and must be exported by Insta360 app or Insta360 Studio
While shooting, the touchscreen displays two times in the format "MM:SS->MM:SS". The number on the left is the shooting time, and the number on the right is the time of the video being created. For example, the recording time required to create a time-lapse video of 10 seconds (=300 frames @ 30 FPS) is as follows.
| Shooting interval | Recording time |
|---|---|
| 0.5s | 150s (2.5min) |
| 1s | 300s (5min) |
| 2s | 600s (10min) |
| 5s | 1500s (25min) |
| 10s | 3000s (50min) |
| 30s | 9000s (150min : 2.5h) |
| 1min | 300min (5h) |
| 2min | 600min (10h) |
Capture hyperlapse (speed-up / fast forward) video. A fast-forward video with a playback speed of about 10 times (playback time is about 1/10) ~ 60 times is recorded. For example, recording for 15 minutes (900sec) at 10x speed will generate a video of 1 minute and 30 seconds (90sec). If you shoot while moving the camera, you can get a great effect. No audio is recorded.
You can select from the following shooting formats.
Resolution: 8K / 5.7K
Frame rate: 30 fps
Speed: Auto / 10x / 15x / 20x / 30x / 60x
Shoot slow motion video. The photographer holding the selfie stick is always kept in the center of the screen. The bottom of the camera (selfie stick side) is always in the center of the screen, and the angle cannot be changed. Attach the camera to a selfie stick and hold it straight up so that the person taking the picture is centered in the screen. By using the Bullet Time Accessory (Insta360) or Bullet Time Code (Insta360) and rotate a selfie stick with a camera attached above your head, you can take videos that look like "spin shots" using a drone.
You can choose the shooting format from 5.7K-120fps or 3K-240fps. If you select 5.7K resolution, the video will be shot at 120fps and played back at 29.97fps, so resulting in approximately 1/4 the slow motion. If you select 3K resolution, the video will be shot at 240fps and played back at 29.97fps, so resulting in approximately 1/8 slow motion.
For more information, see How to use Insta360 Bullet Time Accessory .
This is a dedicated starry sky shooting mode that takes time-lapse shots of the movement of stars. You can shoot the starry sky even in the city, but the screen will be brighter. A darker place, such as in the mountains, is better for capturing beautiful starry skies. You can take "Star lapse videos," which record the movement of stars, or "Star trail photos," which record still images of the movement of stars.
Star lapse videos
Resolution: 18MP
Shooting time: 3min / 5min/ 10min / 15min / 30min / 1h / 2h / 3h / 5h / 10h / unlimited
Star trail photos
Resolution: 18MP
Shooting time: 3min / 5min/ 10min / 15min / 30min / 1h / 2h / 3h / 5h / 10h / unlimited
For both, you can choose the timer from Off / 3 / 5 / 10 / 15 seconds.
Fix the camera on a tripod, etc., and start shooting after the sky gets dark. It takes about 5 seconds to shoot one frame. Therefore, to generate a 10 second (=300 frames @30FPS) video, it is necessary to shoot continuously for about 25 minutes. To capture the movement of stars, continuous shooting for 4 to 6 hours is recommended. Connect the camera to a charger or high-capacity mobile battery and shoot for a long time.
If you press the shutter button during shooting, shooting will end after the current photo is taken.
The shooting results cannot be played back on the camera and must be exported by Insta360 app or Insta360 Studio Starlapses taken over several hours are made up of thousands of JPEG photos, and it takes several hours to import them into the app.
Takes photos continuously in a short period of time (continuous shooting). File format can be selected from insp / PureShot .
You can select from the following shooting formats.
Resolution: 18MP
Shooting time and number of shots: 3 images per second / 5 images per second / 10 images per second / 15 images per second / 15 images per 3 seconds / 15 images per 6 seconds / 15 images per 10 seconds
You can choose the timer from Off / 3 / 5 / 10 / 15 seconds.
It keeps taking pictures at the specified interval. With Insta360 Studio on PC , you can choose to export photos individually or combine them as a video after shooting. File format can be selected from insp / PureShot / PureShot+RAW.
You can select from the following shooting formats.
Resolution: 72MP / 18MP
Shooting time: 3min / 5min/ 10min / 15min / 30min / 1h / 2h / 3h / 5h / 10h / unlimited
Shooting interval: 3 / 5 / 10 / 30 / 60 / 120 sec
Take High Dynamic Range (HDR) photos using the PureShot function. The file format is fixed to PureShot .
You can select from the following shooting formats.
Resolution: 72MP / 18MP
You can choose the timer from Off / 3 / 5 / 10 / 15 seconds.
Shooting modes that can only be used in Single-Lens mode
Capture wide-angle selfie videos where the selfie stick is hidden. The photographer holding the selfie stick is always kept in the center of the screen. The bottom (selfie stick side) or top of the camera will always be in the center of the screen, and the angle cannot be changed. Attach the camera to a selfie stick and hold it straight up so that the person taking the picture is centered in the screen.
You can select from the following shooting formats.
Aspect ratio: 16:9 / 9:16
Resolution: 4K(Max30fps) / 2.7K(Max120fps) / 1080P(Max120fps)
Frame rate: 120 / 100 / 60 / 50 / 30 / 25 / 24 fps
If you specify a frame rate of 50fps or higher at a resolution of 2.7K or 1080P, the video will be recorded as FreeFrame videos . Also, if you specify a resolution of 4K, all videos will be recorded as FreeFrame videos .
Shoot a FreeFrame Video with adjustable aspect ratio, image stabilization, horizontal leveling etc. after recording.
You can select from the following shooting formats.
Aspect ratio: 16:9 / 9:16 / 4:3 / 3:4 / 1:1
Horizontal leveling: ON / OFF
Resolution: 4K(Max30fps) / 2.7K(Max60fps) / 1080P(Max60fps)
Frame rate: 60 / 50 / 30 / 25 / 24 fps
What is 5.7K+(plus) mode?
5.7K+ (plus) mode allows you to shoot with image quality (bit rate) close to 8K mode, but with a smaller file size. However, it is not suitable for shooting in dark places. The normal 5.7K mode bit rate is about 87Mbps (L5.1), but the 5.7K+ mode bit rate is 1.2 times higher, about 107Mbps (L5.2). Shoots at a bit rate of 60% of 8K mode 172Mbps (L6.1). (for 30fps)
What is insv/insp format?
This is Insta360's proprietary recording format. The extension for videos is ".insv" and for photos is ".insp".
The photo is 5984x5984 pixels (in single mode with 36MP resolution) or 11904x5952 pixels (in 360 degree mode with 72MP resolution), and the internal structure is JPEG.
The video consists of 3 tracks: 2 square video tracks and an audio track (AAC LC 192kbps), and the internal structure is MPEG-4 avc1. The video track resolution and profile change depending on the shooting resolution you specify. For example, in 360-degree mode with a resolution of 8K, the video track resolution is 3840x3840 pixels and is recorded with the Main profile of Level 6.1.

In each case, one (single mode) or two (360 degree mode) raw circular images are recorded. Also, when recording a video, a low-resolution preview video with the extension ".lrv" is also generated. This is used when previewing in apps and on touchscreens. This insv/lrv format file can be played using the free video playback software VLC media player .
When you export an insv/insp format file using the Insta360 app or Insta360 STUDIO , the video will be exported with the file name "temp_video_nnnnnnnnnnnnn.mp4" and the photo will be exported with the file name "IMG_YYYYMMDD_HHMMSS_nn_xxx.jpg" in the "Insta360" album of
What is PureShot?
PureShot is an AI shooting mode developed by Insta360 that uses AI to extend the dynamic range of a photo while reducing noise and preserving details to produce sharp images. Normal HDR photography synthesizes multiple photographs with different exposures, but PureShot is a technology that uses AI to extend the dynamic range with just one photograph. PureShot can be enabled/disabled in Insta360 app or Insta360 Studio after shooting. When you specify PureShot+Raw as the shooting format, two files are saved inside the camera: insp format and Raw (DNG) format.
This feature was first introduced on Insta360 ONE R in September 2020.
What is HDR shooting?
HDR (High Dynamic Range) shooting is the process of continuously shooting underexposed and overexposed images in addition to properly exposed images and combining them to create an image with a wider dynamic range. This allows you to shoot more beautiful images when the screen has a mixture of very bright and dark areas, or when the screen is backlit. However, since there is a time difference between continuously shot images, the composite image will be blurred if the subject or photographer is moving. It is not suitable for shooting fast-moving or dark scenes. Please use them appropriately depending on the scene.
FlowState image stabilization
This is a function that uses the gyro sensor installed in the camera to cancel out camera vibration, and is a function that forms the basis of an “ACTION CAMERA”. FlowState image stabilization is applied during playback using the gyro information recorded during recording. The export process also generates a video with image stabilization applied.
What is FreeFrame video?
FreeFrame video is unprocessed RAW data, and can be applied with the image stabilization technology "FlowState image stabilization", adjust horizontal leveling (Horizon Lock), adjust FOV (field of view), and adjust aspect ratio (vertical to horizontal ratio), using an app or computer after shooting. This is suitable for aspect ratio changes and more sophisticated editing for TikTok, Instagram and Facebook.
The file is saved in the camera with the file name "PRO_VID_YYYYMMDD_HHMMSS_nn_xxx.mp4". The "YYYYMMDD_HHMMSS" part of the file name is the year, month, day, hour, minute, and second when the video was taken. When shooting in 4K, the format of this file is that the video track has a resolution of 4608x4608 pixels, the codec is MPEG4 avc1 Level 6.2 Main profile, and the audio track is AAC LC 192kbps.
To apply FlowState etc. to this video, you need to export using Insta360 app on your smartphone or Insta360 Studio on your computer. If you open "PRO_VID_YYYYMMDD_HHMMSS_nn_xxx.mp4" as it is without exporting with a media player etc., unprocessed circular image will be played.
At the same time, a low-resolution preview video with the file name "PRO_LRV_YYYYMMDD_HHMMSS_nn_xxx.lrv" is also generated. This is used when previewing in apps and on touchscreens.
Other video formats
In-camera image stabilization is applied to non-FreeFrame videos. It will be saved with the file name "VID_YYYYMMDD_HHMMSS_nn_xxx.insv" (360 degree mode) or "VID_YYYYMMDD_HHMMSS_nn_xxx.mp4" (single mode). Single mode videos can be played on any media player without conversion. The codec of this file is MPEG-4 avc1, and the profile changes depending on the specified shooting resolution.
At the same time, a low-resolution preview video with the file name "LRV_YYYYMMDD_HHMMSS_nn_xxx.lrv" is also generated. The resolution of this video file also changes depending on the shooting resolution you specify. This is used when previewing in apps and on touchscreens.
Basic operation
The operation method for each button on the camera body is as follows.| Button | Action | Function |
|---|---|---|
(Power) | click |
If the power is off, turn it on. It will start up in about 4 seconds and ready to take pictures. When the power is on, wake from sleep or turn on/off the touch screen. |
| Hold for 2 seconds | Power off. (Release your finger when the power off animation is displayed) | |
| Hold for 5 seconds | Force power off | |
(Quick) | click | The tutorial screen is displayed at the first startup. |
| Press once to open the Preset switch menu. Press again to switch to another preset or another shooting mode. | ||
You can assign one of the following functions using the [Customize Button] - [Quick Button] menu on the
Advanced camera settings screen
.
|
||
| Long press | Turns dive case mode on/off. | |
(Lens/Menu) | click | Switch between single lens/360 degree lens. |
You can assign one of the following functions using the [Customize Button] - [Menu Button] menu on the
Advanced camera settings screen
.
|
||
(Shutter) | click | If the power is off, turn it on and start shooting. However, you need to configure Quick Capture settings on the Camera setting screen in advance. |
| When powered on, start recording photos or videos (if in preview screen). Or return to the Preview screen (if not on the preview screen). | ||
| Confirm the connection with the app (when connecting for the first time) | ||
| Long press | Cancel the recording and delete the file. However, you must first enable "Long press Shutter Button to cancel recording" on the Advanced camera settings screen . |
How to use the touch screen
| Gesture | Description |
|---|---|
 (tap the screen) |
Hide/Show information on the touchscreen. |
 (Swipe down from the top edge) |
Switch to the Camera setting screen. |
 (Swipe left or right on center) |
Adjust the preview display position in 360 degree mode. |
 (Swipe in from the left edge) |
Switch to the album page. You can browse videos and photos that have been taken so far. |
 (Swipe in from the right edge) |
Switch to the Shooting parameter setting screen . You can specify shutter speed, ISO, EV, white balance, etc. for each selected shooting mode. |
 (Swipe up from the bottom edge) |
Switch to the shooting format setting screen. FlowState stabilization, Aspect ratio, resolution, frame rate, etc. can be specified for each selected shooting mode. |
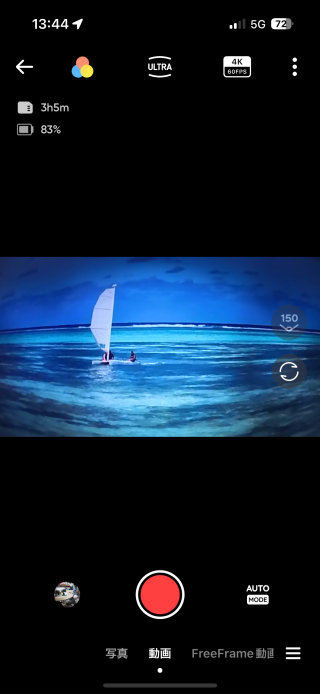
Preview screen

(Image taken from official user manual)
The meanings of the icons displayed around the screen are shown in the table below.
| No. | item | description |
|---|---|---|
| 1 | (storage) |
Displays the remaining number of photos or length of video footage that can be stored in the microSD card. |
| 2 | (battery status) |
Displays the battery level. |
| 3 | (shooting mode) |
Indicates the current shooting mode . Touch here to switch to the shooting mode switching screen. Swipe left or right on the screen to switch shooting modes. |
| 4 | (shooting format) |
Indicates the current shooting format. Touch here to display the shooting format switching screen. You can switch by touching and swiping each item. |
| 5 | (Lens switching) |
When in 360 degree mode, restores the preview display position. When in single mode, switch between front and rear cameras. |
| 6 | (FOV(field of view)) |
Indicates the current FOV (Field Of View).
Touch here to go to the FOV switching screen.
Then tap the icon to switch FOV.
The following FOVs can be selected.
However, depending on the current
Shooting mode
, some FOVs may not be selectable.
MAX (MaxView): The image will have large distortion. Suitable for open landscapes such as valleys and grasslands. MEGA (MegaView): Suitable for wide-angle shooting and urban scenes. ACTION (ActionView): Suitable for skiing, cycling, and biking. ULTRA (UltraWide): Suitable for mountain climbing, hiking, and outdoor sports. DEWARP (Narrow Angle): Suitable for Vlogs and other situations where you want to emphasize people or things. |
In addition, the following icons are displayed at the top right of the screen depending on the camera status.
| No. | item | description |
|---|---|---|
| 1 | (screen lock) |
Indicates that the touch screen is locked. Swipe up on the touch screen to unlock. |
| 2 | (time capture) |
Indicates that time capture (scheduled recording: recording starts at the specified time) is set. |
| 3 | (preset) |
Indicates that a preset shooting mode is set. Displays an icon for the currently selected preset. |
| 4 | (Wi-Fi) |
Indicates that Wi-Fi is enabled. |
Shooting parameter setting screen

| item | description |
|---|---|
| tone | Adjust the color tone of the entire image (video only). The initial value is standard. You can choose from Standard / Vivid / Flat. |
| EV | Specify EV (Exposure compensation value). The initial value is 0. You can choose from -0.7 / -0.3 / 0 / +0.3 / +0.7. |
| Low light stabilization |
Specify whether to perform image stabilization when the surroundings are dark (video only).
The initial value is off.
You can choose from Off/On.
Turning this on will suppress blur when the surroundings are dark. However, the screen may become dark or flicker. |
| WB | Specify the white balance adjustment value. The initial value is automatic. You can choose from automatic or manual 2000K ~ 10000K (in 500K increments). |
| balanced exposure |
Specifies how to adjust the exposure of the two lenses (video only).
The initial value is automatic.
You can choose from High / Standard / Auto.
"High" is suitable for scenes where the difference in light intensity between the two lenses is very large. "Standard" adjusts the appropriate exposure using two lenses individually. Suitable for backlit scenes. "Auto" automatically adjusts to uniform exposure. Suitable for various scenes. |
| format | Specify the file format of the photo (photos only). The initial value varies depending on the photo type. Can be selected from insp / PureShot / PureShot+RAW |
| shutter speed | Specify the shutter speed (manual photo mode only). You can choose from automatic or 1/8000sec ~ 120sec. |
| ISO | Specify the ISO sensitivity (manual photo mode only). You can choose between automatic or 100 to 1600. |
| Metering mode |
Specify the photometry mode (single lens photo mode only).
The initial value is face priority.
You can choose from "Face Priority" / "Matrix".
"Face Priority" adjusts so that the face is properly exposed. Suitable for portrait photography. "Matrix" adjusts so that the entire image has the correct exposure. |
Camera setting screen

| Icon | Description |
|---|---|
| Turn screen rotation lock on/off. It is on by default. When the screen rotation lock is off, rotating the camera also rotates the image, keeping it level at all times. If you turn this on, the rotation of the camera will be directly reflected in the image. | |
| Lock the screen. If you lock it, the touch screen will not respond even if you tap it carelessly. Swipe up on the touch screen to unlock. If you use the camera underwater, please lock the screen. | |
| Adjust screen brightness. Adjust the brightness by sliding the bar displayed on the screen left or right. Dimming it down saves battery power. If you select [A (Auto)], the illuminance will automatically change according to the surrounding brightness. | |
| Specify the type of lens guard. Changing this will change the way the front and back camera images are stitched (combined) in 360 degree mode. You can choose from "Auto," "Standard Lens Guard," "Premium Lens Guard," and "No Lens Guard." For more accurate stitching, select a setting other than "Auto". | |
| Turn on/off the screen reader feature. It provides audio guidance on the operation results when shooting, switching modes, and low battery. Default is off. | |
| Set the notification sound volume. Choose from Adaptive, High, Medium, Low, and Mute. Default is Medium. | |
| Turn on/off the AI highlight assistant function. Uses AI to detect and mark highlight scenes in the video being shot. This information will be referenced when editing in the Insta360 app after the photo is taken. It becomes easy to combine highlight scenes from multiple videos into one video. However, power consumption and temperature may increase during shooting. Default is off. | |
| Turn gesture control on/off. You can control the camera using gestures when it is difficult to use your fingers, such as when wearing gloves. Operate from 0.4 to 1.6 meters away from the camera. Raise your palm towards the camera to start/stop recording. If you sign peace to the camera, your photo will be taken. In either case, your head should be in the frame. Default is off. | |
| Turn voice control on/off. The only languages that can be used are English, Chinese, and Japanese. You can use voice commands such as "Take a Photo", "Start Recording", "Stop Recording", "Mark That", "Shutdown Camera". Default is off. | |
| Turn Quick Capture on/off. It is off by default. | |
| Start Pre-recording Recording starts 10-15 seconds before pressing the shutter button. | |
| Set the time capture (scheduled recording: start shooting at the specified time) function. When turned on, you can specify the start time, recording time, whether to repeat (once/daily), shooting mode, shooting format, etc. You can choose the recording time from 5min, 15min, 30min, 1h, 2h, 5h, 10h, or unlimited. However, Time shift, Bullet time, and Me mode cannot be selected. | |
| Turn on/off the indicator light . Turn off the indicator light when it becomes a nuisance, such as when taking photos / videos in a dark place. | |
| Switch audio mode (sound settings). You can choose from Auto Wind Noise Reduction / Stereo / Active Wind Reduction / Direction Focus. Default is Auto Wind Noise Reduction. When using Insta360 X4 Mic Wind Muff (Insta360) , you need to switch to "Active Wind Reduction". | |
|
Enable
dive case
mode.
When enabled, you will be prompted to remove the lens guard first.
The touch panel will then be locked and you will be able to switch shooting modes with the
|
|
| Connect with Bluetooth headphones. Tap this icon to put the camera into pairing mode with your Bluetooth headphones. | |
| Connect to a Bluetooth remote control (sold separately). Tap this icon to put the camera into pairing mode with your Bluetooth remote control. | |
|
Switch, add, and edit
Preset
shooting modes.
The same screen appears when you press the
|
|
| Open the Advanced camera settings screen . You can check the firmware version, set Quick Capture and camera buttons, turn Wi-Fi on/off, gyro calibration, reset, etc. |
Advanced camera settings screen

| Item | Description |
|---|---|
| Camera info | You can check the device type (product name), serial number, firmware version, camera hardware version, etc. |
| SD card | You can check the total capacity and used capacity of the microSD card. You can also format (initialize) the card. |
| Screen Auto Sleep | You can specify the amount of time before going to sleep when the camera is not being operated. You can specify 5 seconds to 3 minutes or disable. The initial value is 90 seconds. |
| Touch to active when off | If this is turned on, touching the screen will wake the device from sleep. The initial value is off. |
| Auto Power Off | You can specify the amount of time before the power turns off automatically when the camera is not being operated. You can specify 3 minutes, 5 minutes, 15 minutes, or invalid. The initial value is 3 minutes. |
| Power-off Charging | You can select the behavior when the AC adapter is connected and charging starts when the power is turned off. You can choose from "Charge only", "Charge and power on", or "Charge and record". The initial value is "Charge only". |
| Image Settings | You can set the image quality. Video encoding method (H.265/H.264), bit rate (standard/high), video sharpness (high/medium/low), flicker prevention (auto/50Hz/60Hz), in-camera stitching (on/off) ) can be specified. |
| Customize Button |
Change the function assignments of the
|
| Long press Shutter Button to cancel recording |
Turn this on to cancel recording and delete the file when you press and hold the
|
| Wi-Fi Settings | You can set the Wi-Fi operation mode (auto/always enabled) and display the SSID and password. Wi-Fi is used when connecting with your smartphone (Insta360 app). The initial value is "Auto". |
| Bluetooth Wakeup | You can select on/off. When turned on, you can launch and connect your camera from the GPS Preview Remote or the Insta360 app even when the camera is powered off. The initial value is off. |
| External Mic Gain | Gain can be selected when connecting an external microphone. You can choose from +6db~-18db. The initial value is 0db. |
| Thermo Grip Cover | You can specify whether or not a Thermo Grip Cover is used. You can choose from "Automatic recognition", "Installed", and "Not installed". The default and recommended value is "Automatic recognition". |
| Language | You can select the language of messages displayed on the touch screen. You can choose from 9 languages. |
| Date and Time | You can select the date, time, and display format. The display format can be selected from "MM/DD/YY", "YY/MM/DD", and "DD/MM/YY". The initial value is "MM/DD/YY". |
| Gyroscope Calibration | You can calibrate the gyro sensor installed in the camera. Just place your camera on a horizontal surface and tap the button that appears on the screen. Proofread it at least once immediately after purchase. |
| Reset Tutorial | You can redisplay the tutorial screen that was displayed on the touch screen when you first started up the camera. You can choose "Confirm (display again)" or "Cancel (do nothing)". |
| Reset Camera | Resets various camera settings. Photos and videos taken will remain. |
| Certification | Displays the device certification information for each country that the camera has obtained. |
Quick Capture: Start shooting immediately when power down

To use this feature, first turn on Quick Capture in the Insta360 app settings screen or camera settings screen, and select Shooting mode and its parameters.
To configure settings with the camera, swipe down from the top edge of the touch screen to open the Camera setting screen and tap the
Pre-Recording: Start recording before pressing the shutter button

To start pre-recording, open the Camera setting screen and tap the
When you start pre-recording, a blue icon indicating that pre-recording is in progress and the current pre-recording time (seconds) will be displayed at the bottom of the preview screen. When you press the shutter button, pre-recording ends and the video being pre-recorded is imported. Tap the icon that indicates pre-recording in progress to cancel pre-recording.
Note that Pre-Recording can only be specified for video, active HDR video, or FreeFrame video Shooting mode .
Preset: Saving shooting parameters

You can switch presets by flicking this preset menu screen left or right or clicking the
By tapping the
The following three types of presets are provided as initial settings.
| Name | Mode | Format | Parameter |
|---|---|---|---|
Motorcycling | 360 degree video | 8K/30fps | Auto |
Skiing | 360 degree video | 5.7K/60fps | EV+0.3 Others are auto |
Outdoors | 360 degree video | 8K/30fps | EV-0.3 Others are auto |
In addition to the three types above, you can choose from a total of 10 preset templates, including the following seven types.
| Name | Mode | Format | Parameter |
|---|---|---|---|
Customize | 360 degree video | 5.7K/60fps | Auto |
riding | 360 degree video | 8K/30fps | Auto |
Running | 360 degree video | 8K/30fps | Auto |
Surfing | 360 degree video | 5.7K/60fps | EV-0.3 Others are auto |
Diving | 360 degree video | 8K/30fps | EV+0.3 Others are auto |
Cars | 360 degree video | 5.7K/60fps | Auto |
Ball Sports | 360 degree video | 5.7K/60fps | Auto |
To turn off a preset, tap the
Importing videos/photos to a computer

If you are unable to connect your computer and camera, try restarting your computer and camera.
By the way, if you tap "Reverse charging" on this screen, you can use the camera as a mobile battery. You can charge devices connected to the camera with a USB cable.
Add location information (geotagging) to videos and photos

When using Insta360 X4, at the same time, start the GPS logger app on your iPhone and record the location information. Then, on the computer, write the recorded location information to the photos taken with Insta360 X4, relying on the shooting date and time information.
Geotag Photos Pro App is recommended for GPS logger function and location information writing.
For more information, please see each link below.
Waterproof performance of Insta360 X4
The camera body is water resistant to a depth of 10m (33ft). You can use it as is for a short swim in the sea. However, it is recommended that you always use a Insta360 X4 Invisible Dive Case when diving, doing water sports that involve strong water splashes, or when you want to maintain accurate 360-degree camera stitching (compositing) and image quality underwater.Please note the following when using Insta360 X4 underwater without putting it in a Dive Case.
- It will not be waterproof unless the battery and USB cover are tightly closed. Before entering the water, please make sure that the battery and USB cover are not loose and there are no orange marks visible on the hook.
- The lens guard is not waterproof. Before entering the water, you must remove the lens guard.
- Do not leave the camera in humid conditions such as hot springs or saunas for more than 1 hour. The camera operating temperature is -20°C ~ +40°C (-3.9°F ~ +103.9°F).
- Be careful to avoid sudden changes in temperature and humidity around the camera. Otherwise, condensation may form inside the camera, which may affect the image quality.
-
Before putting your camera in water, tap the
 (screen lock)
icon on the settings screen to lock the touchscreen.
Otherwise, the touch screen may malfunction if it comes into contact with water.
(screen lock)
icon on the settings screen to lock the touchscreen.
Otherwise, the touch screen may malfunction if it comes into contact with water.
While the screen is locked, use the (Quick)
button or
(Quick)
button or
 (Lens/Menu)
button to switch shooting modes, and press the
(Lens/Menu)
button to switch shooting modes, and press the
 (Shutter)
button to return to the preview screen.
(Shutter)
button to return to the preview screen.
To do this, first assign the "shooting mode switching" function to one of these buttons on the settings screen's [Customize Buttons]-[Quick Button/Menu Button] screen. - Avoid activities that apply high water pressure, such as jumping into water at high speed while holding the camera. The impact may cause water to enter the camera. When engaging in such intense water sports, please use a Insta360 X4 Invisible Dive Case .
- After using your camera underwater, wipe it thoroughly with a soft cloth and let it dry. The battery and USB cover must be completely air-dried before opening. If water gets inside the USB cover, open the USB cover and let it dry completely naturally. Please note that the recording performance of the microphone may deteriorate for about 24 hours after being used underwater.
- Do not heat or dry it with a hair dryer. Otherwise, the microphone or speaker may be damaged. Also, after using it in seawater, it is necessary to soak it in fresh water for 5 to 10 minutes to remove the salt.
How to use Insta360 X4 Invisible Dive Case
The Insta360 X4 Invisible Dive Case (sold separately) provides water resistance to a depth of 50m (164ft). It has sufficient water resistance for leisure diving. Not only divers and snorkelers, but also those who want to use Insta360 X4 for marine activities, even those who do not dive deeply, should prepare the
Insta360 X4 Invisible Dive Case (Insta360)
.
Not only divers and snorkelers, but also those who want to use Insta360 X4 for marine activities, even those who do not dive deeply, should prepare the
Insta360 X4 Invisible Dive Case (Insta360)
.
Since the lens guard cannot be used underwater, I think it is best to use a dive case to protect the lens.
 The box contains something like this photo.
From top left: dive case, carrying pouch, lens cloth, and 12 anti-fog sheet (Amazon.com) .
From the bottom left: instruction manual, cautionary notes, 3-prong mount to 1/4 inch screw adapter and handle, and four Anti-slip Rngs.
If there is a gap in the 3-prong mount connection part of the arm you are trying to attach, and you cannot securely fix it, attach Anti-slip Rngs to increase the thickness.
 The dive case opens as shown in this photo.
The place where the blue sheet is sandwiched is the slot where you insert the
anti-fog sheet (Amazon.com)
.
Just before use, please insert an anti-fog sheet instead of the blue sheet.
When using anti-fog sheets made by other companies, please cut them to 37.1x19x1.2mm.
The dive case opens as shown in this photo.
The place where the blue sheet is sandwiched is the slot where you insert the
anti-fog sheet (Amazon.com)
.
Just before use, please insert an anti-fog sheet instead of the blue sheet.
When using anti-fog sheets made by other companies, please cut them to 37.1x19x1.2mm.
There is a lanyard hole at the bottom of the case. It is a good idea to attach a Float strap that floats on water .
 Set up the camera like this.
Insert the camera so that you can press the
Set up the camera like this.
Insert the camera so that you can press the
 The
Floating Hand Grip (Insta360)
is sold separately.
If you don't mind if it doesn't float on water, you can use the alminum "
114cm Invisible Selfie Stick
".
The
Floating Hand Grip (Insta360)
is sold separately.
If you don't mind if it doesn't float on water, you can use the alminum "
114cm Invisible Selfie Stick
".
Floating hand grips have hollow grips that create buoyancy. It might be good to put your hotel room key in when diving at a resort.
Please note that in order to remove the selfie stick from the video, you must connect the selfie stick and the dive case straight.
Preparation before use
Before each use, submerge the empty Dive Case in a bathtub for at least 30 minutes to make sure there are no leaks. You can check for water leaks by placing tissue paper or something similar inside the case. When empty, the water resistance of this case is approximately 30m (98ft).
Set the camera
Open or close the dive case in an area free of sand, etc. Before putting the camera into the Dive Case, you need to remove the lens guard and Thermo Grip Cover. When closing the lid, make sure that there is no sand attached to the O-ring (rubber seal). Make sure that the lens part of your camera and dive case is clean.
Then, just before closing the lid, turn on the camera, open the Camera setting screen , and enable
Divie Case Mode can also be turned on/off by pressing and holding the
Precautions when using
For better image stitching results, when shooting underwater, try to hold the camera perpendicular to the water surface. If you hold the camera so that it sticks out toward the subject, the subject will overlap the stitched part.
The case is sensitive to impacts and is not guaranteed to withstand drops from heights higher than 1m (3.3ft). Also, jumping into water from a height of 2m (6.6ft) or higher is not guaranteed.
Care after use
After getting out of the water, wipe the case with a soft towel before opening the lid. Avoid opening the lid when the Dive Case is wet.
Also, after using it in seawater, it is necessary to soak it in a large amount of fresh water for at least 60 minutes to remove the salt before storing it. I recommend filling a bathtub with lukewarm water and soaking it overnight.
After use, let it dry naturally and apply silicon grease for O-rings (Amazon.com) to the O-ring (rubber seal) before storing. Also, when storing, do not close the lid tightly to avoid sticking or deformation of the O-ring (rubber seal).
How to operate in Dive Case Mode
| Button | Action | Function |
|---|---|---|
(Power) |
Click |
If the power is off, turn it on. It will start up in about 4 seconds and display a
Preview screen
.
Turn on the touch screen if it is off. Switch the Shooting mode when the Preview screen is displayed. Clicking continuously will switch to the next shooting mode. Turn the touch screen on/off while shooting. |
| Long press | Turn off the camera. | |
(Quick) |
Click |
When the touch screen is off or on the
Preview screen
, start recording.
While switching Shooting mode , the camera switches to the currently selected shooting mode and returns to the Preview screen . If recording is in progress, it will end recording. |
| Dowble click |
When the touch screen is off or on the
Preview screen
, each double click will switch the lens between [Front single lens] - [Rear single lens] - [360 degrees]
While switching Shooting mode , switch between [Single Lens Mode] and [360 Degree Mode]. |
|
| Long press | Turns Dive Case Mode on/off. However, you cannot change the mode while shooting. |
How to use Insta360 X4 Utility Frame
Insta360 X4 Utility Frame is a metal frame that protects the camera body. This is an essential accessory if you want to use various mounts for GoPro to photograph action scenes that involve vibrations, such as bicycles and motorcycles. The box contains something like this.
A Utility Frame, lens cap, and instruction manual.
The box contains something like this.
A Utility Frame, lens cap, and instruction manual.
 There is a 1/4 inch female screw hole on the bottom.
When you raise the parts on both sides, it becomes the fork-shaped mount system "2 prong mount" that became famous for the GoPro series.
There is a 1/4 inch female screw hole on the bottom.
When you raise the parts on both sides, it becomes the fork-shaped mount system "2 prong mount" that became famous for the GoPro series.
There are also cold shoes and a 1/4 inch female screw holes on both sides. Commercially available LED lights and handles can also be attached.
Note that the 1/4 inch female screw hole is through. It integrates with the camera screw hole.
 This is a photo installed on Insta360 X4.
Pull the red clasp to open and close with one touch.
Microphone, speaker, power button, and quick buttons are all accessible.
However, the microphone hole is at the very edge of the frame, so the
Insta360 X4 Mic Wind Muff (Insta360)
cannot be attached.
This is a photo installed on Insta360 X4.
Pull the red clasp to open and close with one touch.
Microphone, speaker, power button, and quick buttons are all accessible.
However, the microphone hole is at the very edge of the frame, so the
Insta360 X4 Mic Wind Muff (Insta360)
cannot be attached.
 This is a photo of the opposite side.
USB connector and microphone are accessible.
But to access the battery and microSD card, you'll need to remove the camera from the Utility Frame.
This is a photo of the opposite side.
USB connector and microphone are accessible.
But to access the battery and microSD card, you'll need to remove the camera from the Utility Frame.
 This is a photo with the included lens cap attached.
Made of soft silicone.
The lens cap is held in place quite firmly.
It won't come off naturally.
There is a gap between the lens cap and lens cover to prevent them from coming into close contact.
This is a photo with the included lens cap attached.
Made of soft silicone.
The lens cap is held in place quite firmly.
It won't come off naturally.
There is a gap between the lens cap and lens cover to prevent them from coming into close contact.
Please note that this lens cap is exclusively for the Utility Frame. Even if you put it over a camera body that doesn't have a Utility Frame, it will wobble and fall off easily.
 This photo shows the "2 prong mount" raised.
For example, like a Quick Release Mount (Insta360) , a mount that screws into a 1/4" screw hole on a camera can easily come loose due to vibration when attached to a bicycle or motorcycle. However, with this Utility Frame, you can securely attach it to your GoPro mount.
 Various mounts for GoPro are introduced on the
How to use Insta360 GO 3 - Compact and lightweight 2.7K action camera weighing 35.5 grams
page.
Please refer.
Various mounts for GoPro are introduced on the
How to use Insta360 GO 3 - Compact and lightweight 2.7K action camera weighing 35.5 grams
page.
Please refer.
However, the Insta360 X4 is heavy and large, so some mounts may not work well with it.
How to use Insta360 Bullet Time Accessory
Although it's called a Bullet Time Accessory, it's actually a set of two selfie sticks that are useful in a variety of situations. This doesn't mean it can only be used for bullet time video. Rather, this kit is a multi-purpose camera handle that provides so many new shooting angles. If you are an Insta360 X4 user, this is a must-have item. When you purchase the Bullet Time Accessory, you will receive a set of "
114cm Invisible Selfie Stick
" and "Tripod Handle" as shown in the photo.
These can also be purchased separately.
When you purchase the Bullet Time Accessory, you will receive a set of "
114cm Invisible Selfie Stick
" and "Tripod Handle" as shown in the photo.
These can also be purchased separately.
 On the left side of the photo is the "114cm Invisible Selfie Stick."
23.3cm when folded. When fully extended, it can reach 114cm.
It is made with plenty of metal parts and is sturdy.
Even if you attach a heavy camera and swing it around, it will not bend.
It can also be used for shooting sports scenes such as skiing.
On the left side of the photo is the "114cm Invisible Selfie Stick."
23.3cm when folded. When fully extended, it can reach 114cm.
It is made with plenty of metal parts and is sturdy.
Even if you attach a heavy camera and swing it around, it will not bend.
It can also be used for shooting sports scenes such as skiing.
The "Tripod Handle" is on the right side of the photo. It's compact and can be used on a daily basis when you carry your camera around.
 The Tripod Handle can also be used as a tripod by opening the legs.
You can use it to take selfies using a timer like a regular camera, and you can also use it for time-lapse/star-lapse photography.
The Tripod Handle can also be used as a tripod by opening the legs.
You can use it to take selfies using a timer like a regular camera, and you can also use it for time-lapse/star-lapse photography.
 The head of the Tripod Handle has two 1/4 inch screws, one on the top and one on the side.
Then, by turning the grip section below, you can lock or free the pan head section.
When the pan head part is free, you can rotate the pan head part by shaking the handle.
The head of the Tripod Handle has two 1/4 inch screws, one on the top and one on the side.
Then, by turning the grip section below, you can lock or free the pan head section.
When the pan head part is free, you can rotate the pan head part by shaking the handle.
 By connecting two selfie sticks vertically, you can use it as a stand with a maximum total height of approximately 129cm.
The camera can be fixed at approximately eye level.
However, since the center of gravity is high, it is easy to fall over, so you need to be careful where you place it.
By connecting two selfie sticks vertically, you can use it as a stand with a maximum total height of approximately 129cm.
The camera can be fixed at approximately eye level.
However, since the center of gravity is high, it is easy to fall over, so you need to be careful where you place it.
Also, if you hold it in your hand while it is stretched out, you can shoot images that look like you are looking down from a drone.
If you connect the camera and selfie stick straight, the selfie stick will disappear from the video.
 When shooting bullet time videos, connect two selfie sticks together in an L shape like this.
This photo shows the selfie stick extended to its maximum (7 steps).
However, when extended to its maximum, it becomes heavy and cannot be rotated smoothly.
When shooting bullet time video, I think it's best to shoot at about half this length (3 to 4 steps).
When shooting bullet time videos, connect two selfie sticks together in an L shape like this.
This photo shows the selfie stick extended to its maximum (7 steps).
However, when extended to its maximum, it becomes heavy and cannot be rotated smoothly.
When shooting bullet time video, I think it's best to shoot at about half this length (3 to 4 steps).
It takes some getting used to to be able to turn the handle smoothly.
How to use Insta360 app
Like other Insta360 action cameras, the Insta360 X series can be controlled with the Insta360 app.
Install Insta360 app on your smartphone.
-
Insta360
Shenzhen Arashi Vision Co., Ltd. Photo / video free
Insta360 cameras give creators, athletes and adventurers tools to create like they’ve never created. Whether you're upping your shooting game with an Insta360 ONE R or ONE X, the Insta360 App is a creative powerhouse in your pocket that acts as your camera’s sidekick. Editing on your phone has never been easier.
view details (App Store)
Remote control from Insta360 app
Insta360 cameras can be controlled remotely from the Insta360 app on your smartphone.
Photos taken with the remote control save your smartphone's location information.
Turn on your camera and open the
 Once the connection is complete, the
 Tap
Tap
Tap red record button to start recording.
You can switch between shooting modes by flicking the menu at the bottom of the screen left or right, or by tapping
By tapping icons lined up at the top of the screen, you can specify the resolution, file format, etc. for the selected shooting mode.
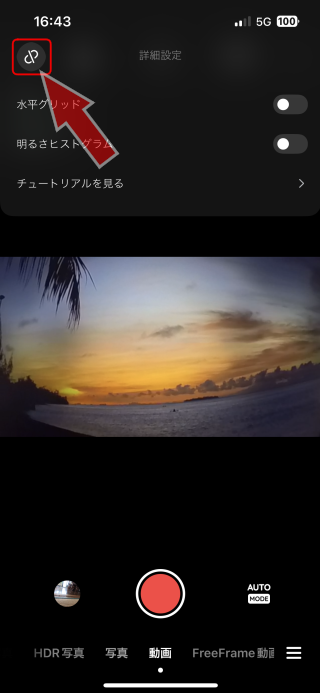 Tap
Tap
On this screen, for video, you can specify writing of GPS (location) information and display of brightness histogram. For photos, you can also turn on/off in-camera stitching in addition to these settings.
To detach the app from the camera, tap the
 Then the screen will look like this.
Tap "Disconnect" to disconnect the Insta360 app and camera.
Then the screen will look like this.
Tap "Disconnect" to disconnect the Insta360 app and camera.
Manage videos and photos taken
 Videos and photos stored in the Insta360 camera storage can be edited on the app or downloaded to your smartphone.
Open the
 The screen will look like this.
When you tap thumbnail, it will be selected with a yellow check mark in its upper right corner.
And at the bottom of the screen, the following icons are lined up.
The screen will look like this.
When you tap thumbnail, it will be selected with a yellow check mark in its upper right corner.
And at the bottom of the screen, the following icons are lined up.
Tap
Tap
Tap
Tap
To specify the export method in more detail, select individual videos/photos and perform the export operation. See Export to smartphone album from Insta360 app .
Export to smartphone album from Insta360 app
Videos and photos taken with the Insta360 camera can be exported to an album on your smartphone using the Insta360 app.
You can convert it to common MP4 or JPEG formats and upload it to various services or share it with family and friends.
Using simple editing functions, you can add background music and special effects to make your videos look even better.
If you want to create more elaborate videos by adding various effects, check out Easily create videos using Insta360 app's Auto Edit feature and Add effects using Insta360 app's Shot Lab feature .
 On the
If you tap the screen being played, a screen like this will appear. By tapping the icons lined up at the bottom, you can crop, change the FOV (viewing angle), adjust the image quality, add various effects, add background music, and cut out photos (snapshots) from the video.
For videos, you can select three editing methods from the menu at the top of the screen: "AI", "Quick", and "Pro". All are converted to normal (flat) video and output.
360 degree video
If you want to output the 360-degree video as is, tap the
AI editing
The app automatically creates interesting videos that take advantage of the features of the 360-degree camera. Try this first.
Quick edit
Edit using several pre-prepared templates. You can easily edit it like a puzzle.
Pro edit
Just like in a general video editing app, you can specify details such as trimming, changing aspect ratio, applying various filters, and adjusting image quality. You can also specify tracking of people.
Export
When you have finished editing, tap the
 When you tap [AI] on the screen above, a screen like this will appear.
Tap the icon at the bottom of the screen.
When you tap [AI] on the screen above, a screen like this will appear.
Tap the icon at the bottom of the screen.
 Video analysis will then begin.
The detected highlight scenes are lined up at the bottom of the screen.
Video analysis will then begin.
The detected highlight scenes are lined up at the bottom of the screen.
 The AI editing results will then be displayed.
A video that was simply taken while walking has been transformed into an interesting video with background music that takes advantage of the functionality of a 360-degree camera.
The AI editing results will then be displayed.
A video that was simply taken while walking has been transformed into an interesting video with background music that takes advantage of the functionality of a 360-degree camera.
Edit results can be selected using the icons at the bottom left of the screen. In the example shown, two editing results are displayed, one with a playback time of 22 seconds and one with a playback time of 11 seconds. Select one and tap the
You can change the length (range) of the video by dragging the left and right edges of the timeline at the bottom of the screen left and right.
By tapping [Selfie View] at the bottom of the screen, you can pick up a selfie scene from the video. You can also export just that part.
 For photos, you can select two editing methods from the menu at the top of the screen: "Animate" and "Custom".
Animate
Convert your photos into automatically animated flat videos. You can specify the aspect ratio and BGM. Tap the templates lined up at the bottom of the screen to switch the animation.
Custom
Output as a 360 degree image or wide-angle flat image. If you select wide-angle, you can crop any part of the 360-degree image. You can specify the aspect ratio and FOV (viewing angle).
Export
When you have finished editing, tap the
 Tap
Tap
On this screen, you can turn on/off "FlowState stabilization", "Identify Tracking Targets", "Direction lock", "Chromatic Calibration", etc.
 Tap
Tap
If you select "360 degree", there are no items that can be adjusted. Tap the "Output" button to start exporting to your smartphone from the Insta360 app.
If you select "360 degree", the image will be expanded and exported as a horizontal image, just like if a globe were expanded into a flat map. If you upload this to a photo sharing platform that supports 360-degree videos and photos, such as
 If you select "Flat", you can select "Quick Export" or "Custom".
Tap "Custom" to make detailed selections such as resolution, bit rate, frame rate, etc.
Tap the "Output" button to start exporting to your smartphone from the Insta360 app.
If you select "Flat", you can select "Quick Export" or "Custom".
Tap "Custom" to make detailed selections such as resolution, bit rate, frame rate, etc.
Tap the "Output" button to start exporting to your smartphone from the Insta360 app.
 When a screen like this appears, exporting is complete.
An album called "Insta360" will be created in the
When a screen like this appears, exporting is complete.
An album called "Insta360" will be created in the
Easily create videos using Insta360 app's Auto Edit feature
Let's try the easiest "Auto Edit" feature.
Create cool flat videos with background music in just a few minutes.
 On the
 The file selection screen will then appear.
Select one or more videos you want to edit.
The file selection screen will then appear.
Select one or more videos you want to edit.
You can also import edited videos and photos. I think it's a good idea to use " Shot Lab " to apply effects to some videos in advance.
Then tap the "Next" button at the bottom right of the screen.
 Next, at the bottom of the screen, you will see suggestions for the length of the video you want to generate.
Please choose according to your preference.
Next, at the bottom of the screen, you will see suggestions for the length of the video you want to generate.
Please choose according to your preference.
 An automatically generated video will then be displayed.
If you are satisfied with this, tap "Next" at the top right of the screen.
An automatically generated video will then be displayed.
If you are satisfied with this, tap "Next" at the top right of the screen.
You can switch the aspect ratio by tapping the buttons labeled "9:16" and "16:9" at the bottom right of the screen.
You can change the template, title, etc. by tapping the icons lined up at the bottom center of the screen. The name of the selected BGM is displayed below it. Tap here to change the BGM.
Tap the "Edit" button at the bottom of the screen to change the order of the videos, change the length of each video, or delete videos.
 When you tap "Next" on the screen above, a screen like this will appear.
If you tap "Phone Album", an album called "Insta360" will be created in the
Add effects using Insta360 app's Shot Lab feature
Using the "Shot Lab" feature, you can easily create flat videos with various effects added.
 Open the
Each effect supports different camera models. Check the camera model name below the effect title.
 Once you select an effect, you can watch a video explaining how to shoot it.
However, even if you do not follow this explanation, you can still apply some effects.
Once you select an effect, you can watch a video explaining how to shoot it.
However, even if you do not follow this explanation, you can still apply some effects.
To use the effect, tap the "Use Template" button.
 The file selection screen will then appear.
Select one or more videos you want to edit.
The file selection screen will then appear.
Select one or more videos you want to edit.
The number of videos you can select depends on the effect. For many effects, you can only select one video.
Then tap the "Next" button at the bottom right of the screen.
 The selected video will be displayed.
Adjust the start and end points where you want to apply the effect as desired.
Then tap the "Next" button.
The selected video will be displayed.
Adjust the start and end points where you want to apply the effect as desired.
Then tap the "Next" button.
 Video analysis will begin.
Wait for a while.
Video analysis will begin.
Wait for a while.
 A preview of the video with the effect applied will be displayed.
You can switch the aspect ratio by tapping the buttons labeled "9:16" and "16:9" at the bottom right of the screen.
You can change the effects etc. by tapping the icons lined up at the bottom center of the screen.
Once the settings are complete, tap the
Then you will see a screen like this.
If you tap "Phone Album", an album called "Insta360" will be created in the
Professional video editing with Insta360 app
The Insta360 app also allows you to perform full-fledged video editing.
 Open the
The file selection screen will then appear.
Select one or more videos you want to edit.
Open the
The file selection screen will then appear.
Select one or more videos you want to edit.
You can also import edited videos and photos. I think it's a good idea to use " Shot Lab " to apply effects to some videos in advance.
Then tap the "Next" button at the bottom right of the screen.
 Then you will see a screen like this.
This screen is similar to general video editing software that uses the timeline to edit videos.
Then you will see a screen like this.
This screen is similar to general video editing software that uses the timeline to edit videos.
You can change the length and order of video clips on the timeline.
You can add BGM, titles, stickers (illustrations), apply effects, and change the playback speed at any time.
When you're done editing, tap the
 When you tap the
Remove watermark logo from video
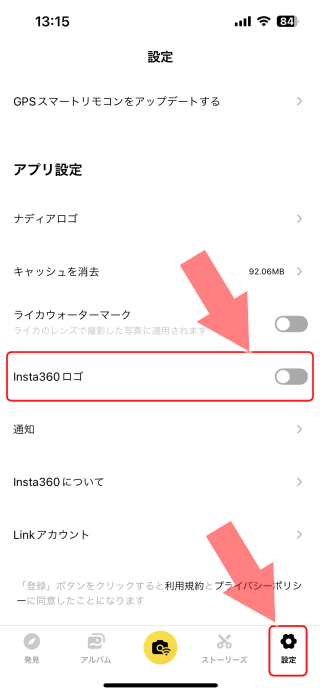 When exporting from Insta360 app to a smartphone, a watermark logo "SHOT ON Insta360 ONE R" is burned into the bottom right of the image by default.
To turn it off, open the Insta360 app's Settings screen and set the "Insta360 logo" to
When exporting from Insta360 app to a smartphone, a watermark logo "SHOT ON Insta360 ONE R" is burned into the bottom right of the image by default.
To turn it off, open the Insta360 app's Settings screen and set the "Insta360 logo" to
How to use Insta360 STUDIO
Software called "Insta360 STUDIO" that allows you to edit videos and photos of Insta360 series cameras on a Windows / Mac computer has been released.
You can export multiple videos and photos at once on a large screen.
You can download the free app "Insta360 STUDIO" from Insta360 download page
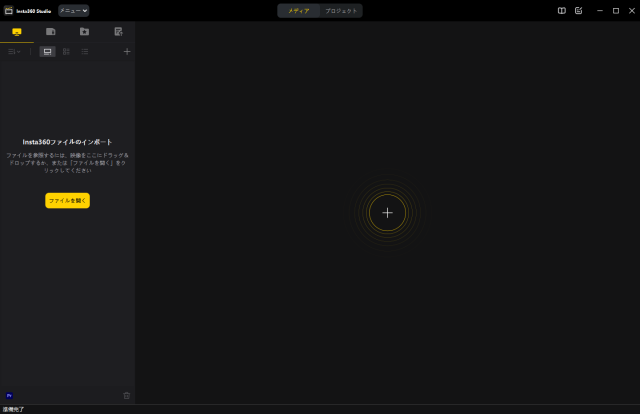 After installing Insta360 STUDIO, click
When the camera is turned on and connected to a computer using a USB cable, a screen like the one shown on the right will be displayed on the touch screen.
If you select "U-Disk Mode", you can access the camera as a USB memory.
After installing Insta360 STUDIO, click
When the camera is turned on and connected to a computer using a USB cable, a screen like the one shown on the right will be displayed on the touch screen.
If you select "U-Disk Mode", you can access the camera as a USB memory.
If you are unable to connect your computer and camera, try restarting your computer and camera.
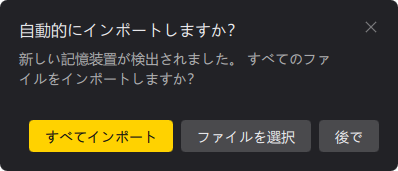 Then, dialog box like this will bring up.
Click "Import All" to load all videos / photos on the Insta360 camera into Insta360 STUDIO.
Click "Select File" to open Insta360 camera in Explorer. Select the file you want to load and drag and drop it to Insta360 STUDIO.
Note that "import" here simply means loading the "file list" from the storage into Insta360 STUDIO. Videos and photos themselves are not copied to your computer.
 When loading is complete, you will see a screen like this.
On the left side of the screen, a list of thumbnails of videos and photos on the storage of Insta360 camera is displayed.
Currently selected video / photo is displayed on the right side of the screen, and you can play it back and perform various processing / trimming.
When loading is complete, you will see a screen like this.
On the left side of the screen, a list of thumbnails of videos and photos on the storage of Insta360 camera is displayed.
Currently selected video / photo is displayed on the right side of the screen, and you can play it back and perform various processing / trimming.
Operation is easy. Double-click the video / photo you want to edit from the thumbnail on the left side of the screen. Then you can process it by clicking each icon on the right screen. Hover your mouse cursor over each icon on the screen to see a description of the function.
 By clicking the icons on the right side of the screen, you can set FlowState image stabilization, FOV, image processing (colorful, vivid plus, AquaVision), audio noise cancellation, etc.
You can also view media information such as the shooting date and time, resolution, and bitrate.
By clicking the icons on the right side of the screen, you can set FlowState image stabilization, FOV, image processing (colorful, vivid plus, AquaVision), audio noise cancellation, etc.
You can also view media information such as the shooting date and time, resolution, and bitrate.
After editing, click
 Then you can see a dialog box like this.
You can specify the output file name, folder you want to store, bit rate, resolution, frame rate, format, etc.
Click "Export" at the bottom right of the screen to store the edited video in the specified folder on your computer.
Then you can see a dialog box like this.
You can specify the output file name, folder you want to store, bit rate, resolution, frame rate, format, etc.
Click "Export" at the bottom right of the screen to store the edited video in the specified folder on your computer.
 When exporting photos, the screen will look like this.
You can select "360 degree photo" or "Animate" with the switch at the top center of the screen.
Animate turns your photo into a flat video that automatically animates.
Tap the templates lined up at the bottom of the screen to switch the animation.
When exporting photos, the screen will look like this.
You can select "360 degree photo" or "Animate" with the switch at the top center of the screen.
Animate turns your photo into a flat video that automatically animates.
Tap the templates lined up at the bottom of the screen to switch the animation.
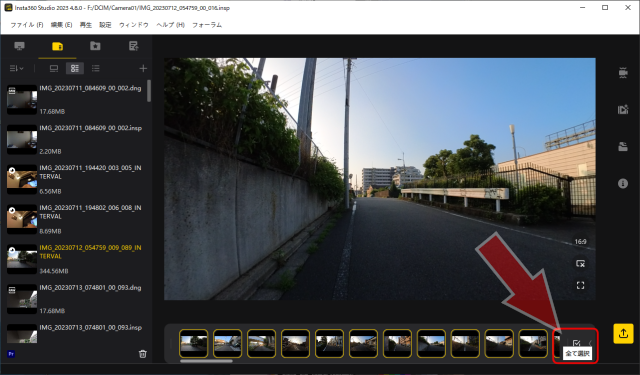 For Interval/Starlapse photos, you can choose to export photos individually or combine them to export as a video.
Choosing insp+Raw as the format will generate two files, one with "DNG" in the filename and one without.
PureShot can be applied by selecting a file with "DNG".
For Interval/Starlapse photos, you can choose to export photos individually or combine them to export as a video.
Choosing insp+Raw as the format will generate two files, one with "DNG" in the filename and one without.
PureShot can be applied by selecting a file with "DNG".
You can export all photos at once by clicking the "Select All" checkmark at the bottom right of the screen as shown.
Alternatively, if you select several photos from the thumbnails lined up at the bottom of the screen, you can export only the selected photos at once.
 When exporting as a photo, you can choose to specify aspect ratio, resolution, and auto-horizontal correction.
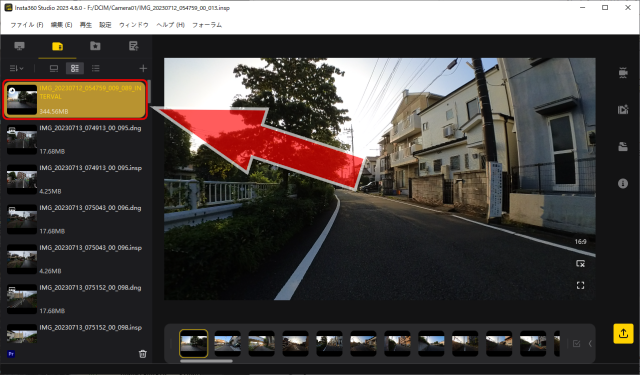 To combine Interval/Starlapse photos and export them as a video, double-click an interval photo from the list on the left, and then click
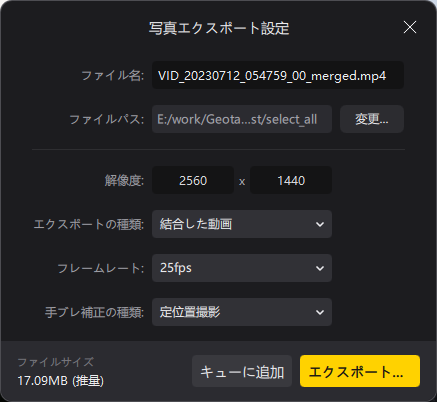 If you want to export as a video, specify "Combined video" in the "Export type" field.
You can select the resolution, frame rate, and type of camera shake correction (Stationary(fixed position shooting) / Motion(moving shooting)).
Frame rate can be selected from 24 / 25 / 30 / 50 / 60 fps for interval and 24 / 25 fps for starlapse.
If you want to export as a video, specify "Combined video" in the "Export type" field.
You can select the resolution, frame rate, and type of camera shake correction (Stationary(fixed position shooting) / Motion(moving shooting)).
Frame rate can be selected from 24 / 25 / 30 / 50 / 60 fps for interval and 24 / 25 fps for starlapse.
If you specify "Interval/Starlapse Sequence" in the "Type of export" field on this screen, you can export all photos as "Photos".
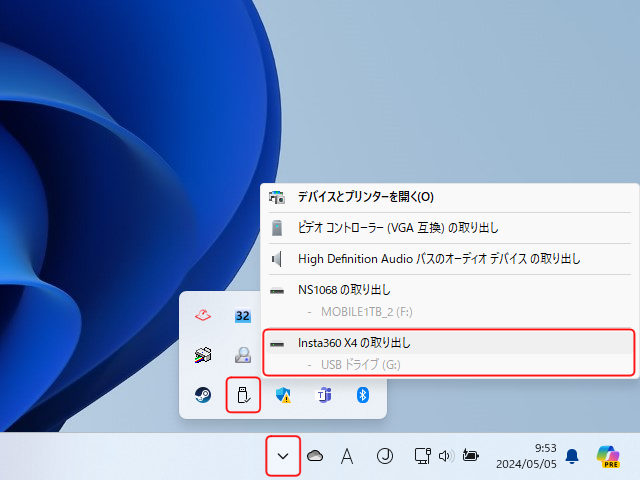 When disconnecting the camera from the computer, first close the Insta360 STUDIO app.
Then, in the same way as when removing the USB memory, first perform the "eject" operation of the drive and then remove it.
Otherwise, videos and photos stored in the camera may be corrupted.
When disconnecting the camera from the computer, first close the Insta360 STUDIO app.
Then, in the same way as when removing the USB memory, first perform the "eject" operation of the drive and then remove it.
Otherwise, videos and photos stored in the camera may be corrupted.
Insta360 X4 Camera Indicator Light Meaning
The indicator light can be turned off/on in the| Indicator Light Status | description |
|---|---|
| Always lit in cyan (light blue) | Power on (standby / charging / pre-recording / U-Disk mode) |
| Flashes 3 times in cyan (light blue) | Starting Quick Capture |
| Flashes 5 times in cyan (light blue) | During power off sequence |
| Constantly lit in red | Charging |
| lights out | Charging finished / power off |
| flashing red | Video shooting in progress |
| flashing blue | Firmware update in progress |
| Constantly lit yellow | Storage space full / File error / USB error |
| flashing yellow | microSD card is not inserted |
| Flashes yellow 3 times every 5 seconds | Battery is dead |
| Flashing yellow 3 times | Temperature too high/too low |
| flashing green | Reverse charging/downloading to app |
MicroSD card for Insta360 X4
The maximum bitrate of Insta360 X4 camera can reach around 200Mbps. To record 8K 30fps video, you need a microSD card with UHS Class 3 (U3), Video Class 30 (V30), UHS-I or higher performance. Prepare a microSD card with thePlease note that some models of the same series of microSD cards do not support U3 depending on the capacity.
For example, shooting a 1-minute video clip at 8K 30fps (bit rate 200Mbps) will consume approximately 12GB. To store 10 such video clips, approximately 120GB of space is required. The maximum capacity supported by Insta360 X4 Camera is 1TB.
Insta360 X4 Camera specifications
| item | description |
|---|---|
| Sensor Size | 1/2'' |
| Aperture | F1.9 |
| 35mm Equivalent Focal Length | 6.7mm |
| Video Resolution |
360º Mode: 8K: 7680x3840@30/25/24fps 5.7K+: 5760x2880@30/25/24fps 5.7K: 5760x2880@60/50/30/25/24fps 4K: 3840x1920@100/60/50/30/25/24fps Single-Lens Mode: 4K: 3840x2160@60/50/30/25/24fps 2.7K: 2720x1536@60/50/30/25/24fps 1080p: 1920x1080@60/50/30/25/24fps Me Mode: 4K: 3840x2160@30/25/24fps 2.7K: 2720x1536@120/100/60/50fps 1080p: 1920x1080@120/100/60/50fps |
| Photo Resolution |
72MP (11904x5952) 18MP (5888x2944) |
| Video Format |
Single-Lens Mode: MP4 360: INSV |
| Photo Format |
INSP (can export via mobile app or Studio desktop software) DNG |
| Video Modes | Video, Active HDR, Timelapse, TimeShift, Bullet Time, Loop Recording, Pre-recording |
| Photo Modes | Photo, HDR Photo, Interval, Starlapse, Burst |
| Color Profiles | Standard, Vivid, Flat |
| Video Coding | H.264, H.265 |
| Max. Video Bitrate | 200Mbps |
| Exposure Value | ±4EV |
| ISO Range | 100-6400 |
| Shutter Speed |
Photo: 1/8000 - 120s Video: 1/8000 - to the limit of frames per second |
| White Balance | Auto, 2000K-10000K |
| Audio Modes |
· Auto Wind Reduction · Active Wind Reduction · Stereo · Direction Focus |
| Audio Format | 48 kHz, 16bits, AAC |
| Weight | 203g |
| Dimensions (W x H x D) | 46x123.6x37.6mm |
| MicroSD Card | UHS-I V30 speed class, exFAT format SD cards with a max storage of 1TB are recommended. |
| Mics | 4 |
| Battery Capacity | 2290mAh |
| Charging Time |
Charge to 80% in 38 minutes (9V 2A) Charge to 100% 55 minutes (9V 2A) |
| Run Time |
135 mins tested in a lab environment in Video Mode at 5.7K30fps. Run time at 8K30fps is 75 minutes. |
| Operating Temperature | -4°F to 104°F (-20℃ to 40℃) |
| Waterproof | 10m |
| Bluetooth | BLE 5.2 |
| Wi-Fi | 2.4GHz, 5GHz 802.11a/b/g/n/ac |
| USB |
Type-C USB 3.0 *Note: Only supports wired connection to Android devices (via Micro-USB or Type-C). Does not support wired connection to iOS devices. Full wireless support is available for both iOS and Android. |
| Gyroscope | 6-axis gyroscope |