


 How to install a remote ID transmitter on a drone (for Japan)
In Japan, drones with a takeoff weight of 100g or more, including battery, must be equipped with a remote ID transmitter.
I will explain how to set up a commercially available remote ID transmitter and how to install it on a drone.
What is the remote ID function?
The Remote ID (RID) function is a function that uses Bluetooth 5.x Long Range, Wi-Fi Neighbor Awareness Networking or Wi-Fi Beacon technology to wirelessly broadcast the drone's recognition information to the surrounding area. According to aviation law, it is required to be installed on unmanned aircraft/drones with a takeoff weight of 100g (250g in Europe and the US) or more. The RID signal sent by Remote ID must be in accordance with international standard ASTM F3411-19, be sent at least once per second, and include the following information:- “registration ID” obtained from the Drone Registration System/Drone UAS Information Platform System (DIPS-REG) operated by the Ministry of Land, Infrastructure, Transport and Tourism Japan (MLIT).
- Serial number specified by the manufacturer
- Unmanned aircraft position/speed information and time information
- Authentication information
When equipped on the drone from the time of purchase
Recently released aerial photography/self-leveling drones takeoff weight over 100g are usually equipped with a remote ID function from the beginning. Please read the product instructions carefully and register in the drone registration system and enable the remote ID function. If the remote ID function is not installed, you will need to install it yourself.
When not equipped with remote ID function
If the remote ID function is not installed, flight methods will be limited. In other words, it is only permitted to fly over areas that have been notified to the Minister of Land, Infrastructure, Transport and Tourism after taking necessary measures, or to fly while moored to the ground with wires.
However, aircraft registered in the drone registration system by June 19, 2022 are exempt from being equipped with the remote ID function. The above restrictions do not apply.
Get your remote ID transmitter
Many manufacturers in Japan produce remote ID transmitters. Get a remote ID transmitter that can be mounted on your drone. Check points are size, weight, and power supply voltage.As of February 2024, the remote ID transmitter manufacturers that can be specified in the drone registration system are as follows.
TEAD Co., Ltd., Xiamen Huoshiquan Import & Export CO., LTD, Futaba Electronics Industries Co., Ltd., Japan Aviation Electronics Industry, Ltd., Hongo Aerospace, Inc., EAMS ROBOTICS Co., Ltd., AEROENTRY Co., Ltd., Sorarobo Co., Ltd., ACSL Co., Ltd., Braveridge Co., Ltd., Yamaha Motor Co., Ltd.
-
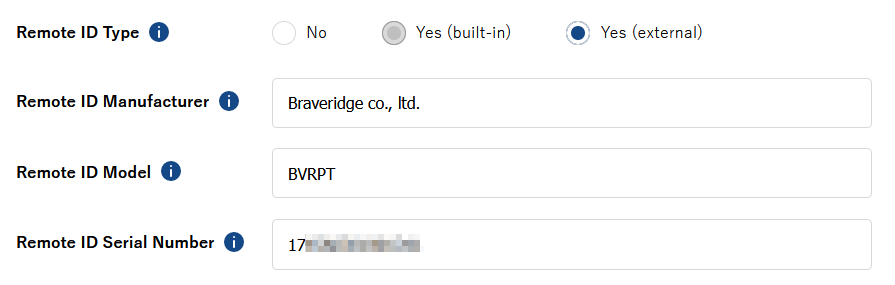
Braveridge Remote ID mini (external antenna, antenna and power line installed) BVRPT

Braveridge 2023/03 JPY16,800(USD113)
Weight 1.6 g (excluding antenna and power line) (Total weight including antenna line and power line: 3.5 g) The world's smallest and lightest "Remote ID BVRPA/BVRPN" Braveridge, which has achieved an overwhelmingly low price for remote ID devices, is now releasing an overwhelmingly smaller and lighter remote ID device that is the world's smallest and lightest. We have achieved this goal.

Product variety
Drone Remote ID Portal (Japanese:Braveridge)
Overview of remote ID transmitter installation procedure
Once you have obtained the drone and the remote ID transmitter to be installed, install it in the following order.-
First, register your drone in the
drone registration system
.
When registering, also enter the "manufacturer name", "model", and "serial number" of the remote ID transmitter.
You can also register the remote ID transmitter information later as a additional. -
Connect the power to the remote ID transmitter and write the RID information to the remote ID transmitter using the
(DIPS APP)(App Store)
on your smartphone.
- Equip your drone with a remote ID transmitter.
Register your drone in the drone registration system
 First, register the drone information in the
Drone Registration System/Drone Information Infrastructure System (DIPS-REG: MLIT)
operated by the Ministry of Land, Infrastructure, Transport and Tourism Japan.
First, register the drone information in the
Drone Registration System/Drone Information Infrastructure System (DIPS-REG: MLIT)
operated by the Ministry of Land, Infrastructure, Transport and Tourism Japan.
When installing a remote ID transmitter, enter the "manufacturer name," "model," and "serial number" of the remote ID transmitter on the "Input Aircraft Information" screen as shown in the figure.
Please see below for instructions on how to use the drone registration system.
When adding information about the remote ID transmitter later
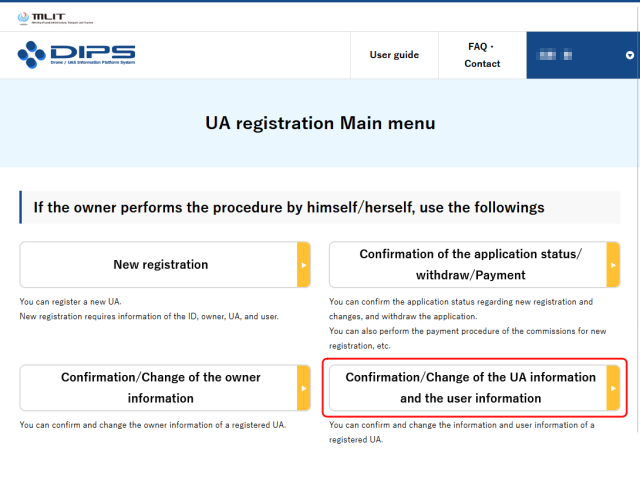 Open the "UA registration Main menu" in the drone registration system and click "Confirm/Change of the UA Information and the user Information".
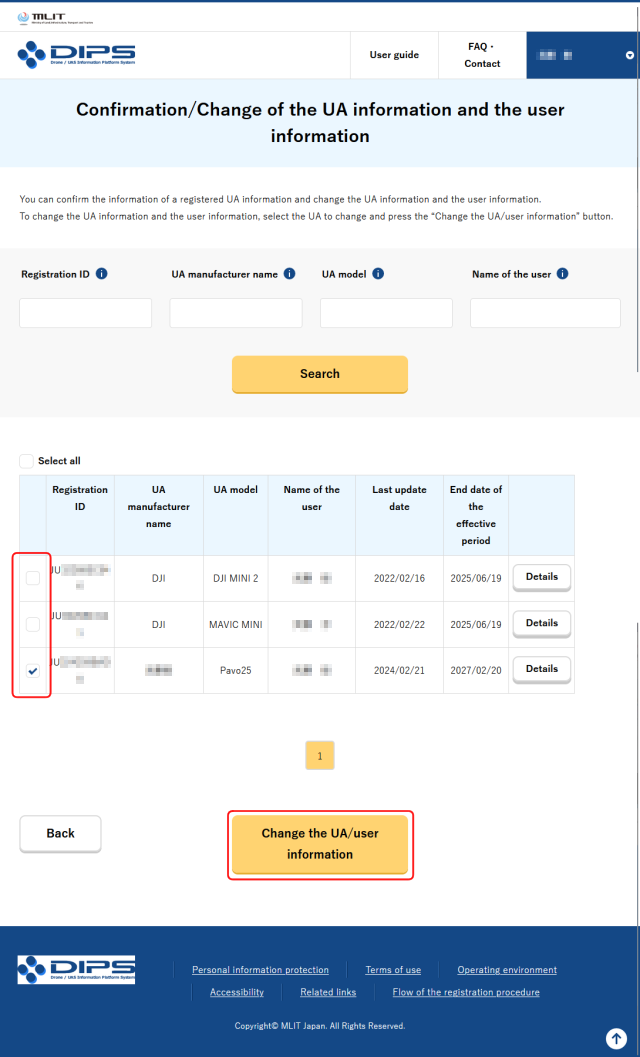 A list of registered drones you own will be displayed.
Place a checkmark next to the aircraft you want to add information to, and click "Change the UA/user information."
A list of registered drones you own will be displayed.
Place a checkmark next to the aircraft you want to add information to, and click "Change the UA/user information."
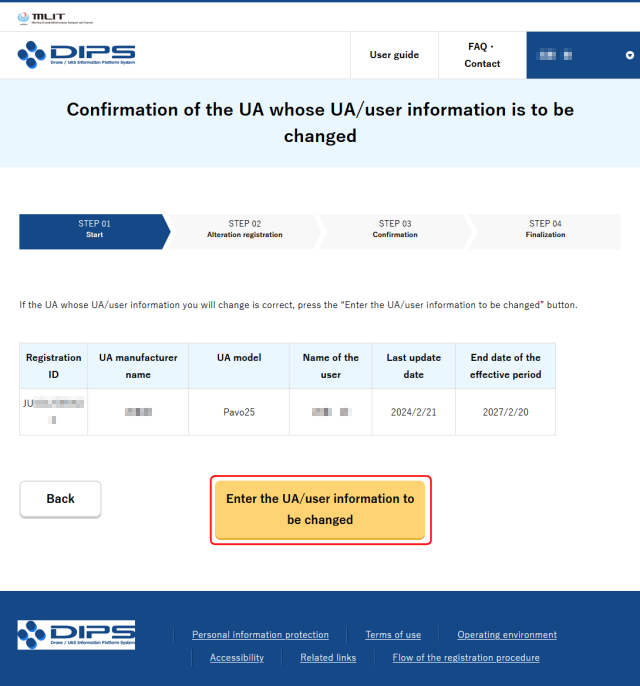 A confirmation screen for the selected aircraft will appear.
If there is no problem, click "Enter the UA/user information to be changed".
A confirmation screen for the selected aircraft will appear.
If there is no problem, click "Enter the UA/user information to be changed".
 The screen will look like this.
Select "No" if you only want to add information about the remote ID transmitter.
This is selected by default.
Scroll through the screen and enter information about your remote ID transmitter.
The screen will look like this.
Select "No" if you only want to add information about the remote ID transmitter.
This is selected by default.
Scroll through the screen and enter information about your remote ID transmitter.
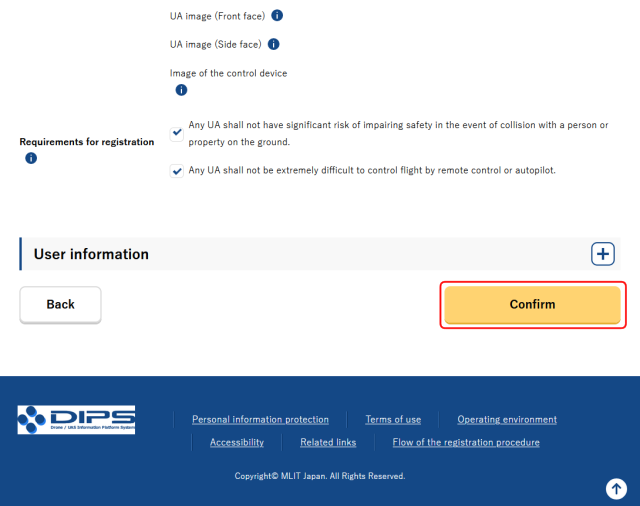 Scroll further down the screen, click the "Confirm" button at the bottom, and follow the instructions.
Write RID information to remote ID transmitter
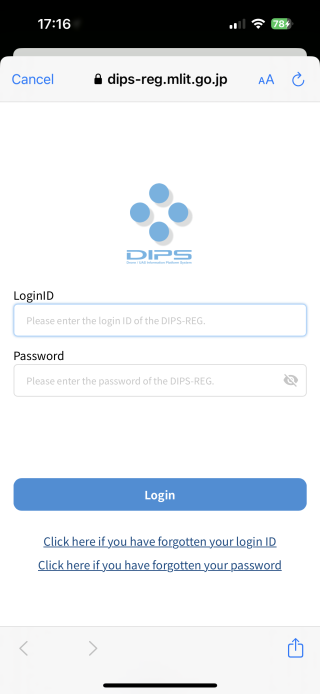
Please install DIPS APP on your smartphone in advance.-
DIPS APP - Drone Portal App
Next Generation Air Mobility Planning Office Japan Civil Aviation Bureau MLIT Utilities free
This app allows you to implement various operations related to UA (drones, and the like). - Registration Request ... Apply for and manage UA Owner Information, UA Information, and User Information - Writing Remote ID … Writes ID information to a remote ID product or the like for registered UA - Apply Flight Permission … Apply for flight permits and approvals for UA, and report accidents, and the like - Share Flight Information … Report flight plans of UA, and reference other flight plans, and the like
view the details (App Store)DIPS APP usage manual (Japanese: MLIT)
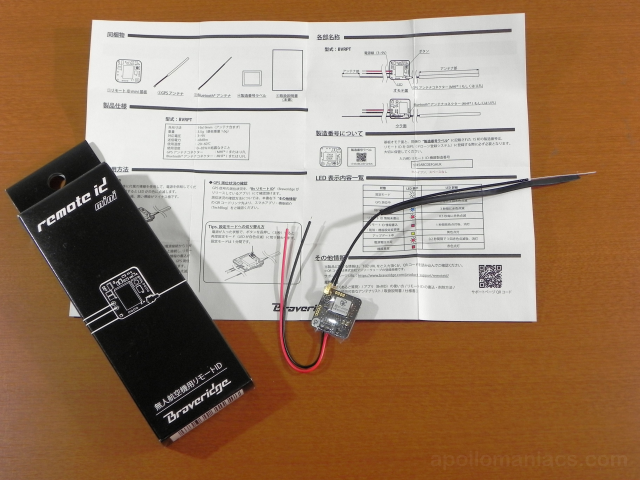 This time, I will use
Braveridge's
"Remote ID mini BVRPT".
The total weight including the antenna is only 3.5g, and the power supply is compatible with 3~9V (1s~2s), making it suitable for FPV drones.
This time, I will use
Braveridge's
"Remote ID mini BVRPT".
The total weight including the antenna is only 3.5g, and the power supply is compatible with 3~9V (1s~2s), making it suitable for FPV drones.
 Open
Open
 The app's home screen opens.
Tap the "LIST" icon at the bottom center of the screen.
The app's home screen opens.
Tap the "LIST" icon at the bottom center of the screen.
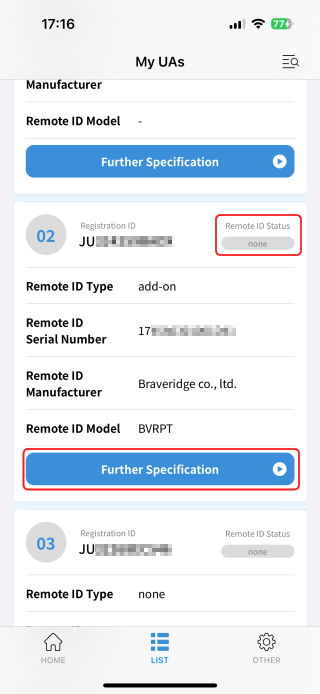 A list of aircraft you have registered in the drone registration system will be displayed.
Please look for the aircraft on which you will install the remote ID transmitter.
Then tap the "Further Specification" button.
A list of aircraft you have registered in the drone registration system will be displayed.
Please look for the aircraft on which you will install the remote ID transmitter.
Then tap the "Further Specification" button.
Furthermore, "Remote ID status" is displayed to the right of the registration ID. It shows "none" on a gray background.
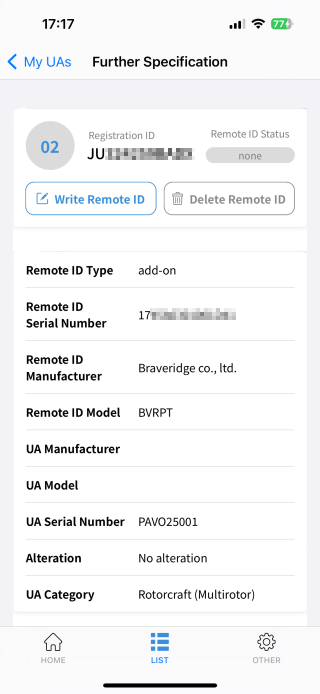 A screen like this will appear.
Next, prepare the remote ID transmitter.
A screen like this will appear.
Next, prepare the remote ID transmitter.
 Connect the power to the remote ID transmitter and put it into remote ID writing mode.
For this method, please refer to the manual of the product you obtained.
Connect the power to the remote ID transmitter and put it into remote ID writing mode.
For this method, please refer to the manual of the product you obtained.
In the case of "Remote ID mini BVRPT", it will enter remote ID write/update mode for 1 minute after power is connected. While in remote ID writing mode, the LED lights white at 1 second intervals. During this time, complete the following steps.
If you can't do it in time (the LED flashes red), turn the power off and on again, or press and hold the button on the board for 3 seconds.
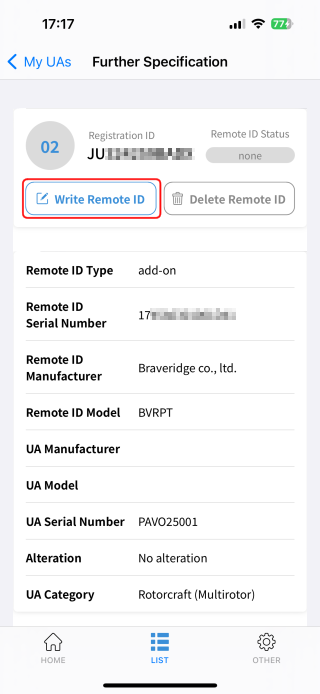 Bring your smartphone close to the remote ID transmitter and tap the "Write remote ID" button on the
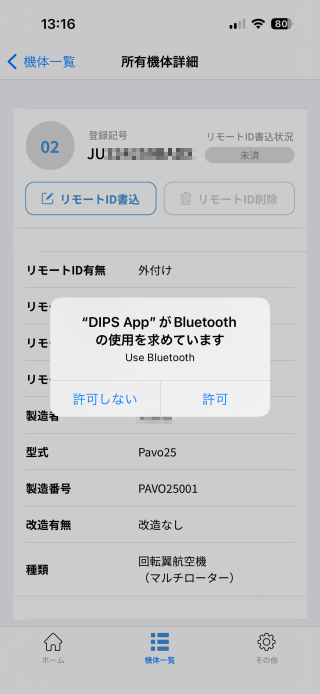 You will then be asked for permission to use Bluetooth.
Tap "Allow".
You will then be asked for permission to use Bluetooth.
Tap "Allow".
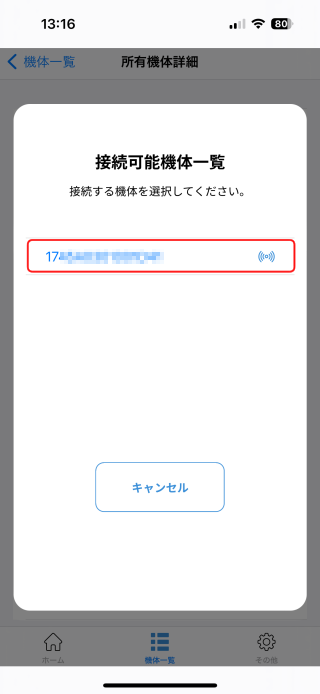 The serial number of the nearby remote ID transmitter will then be displayed.
Tap this.
The serial number of the nearby remote ID transmitter will then be displayed.
Tap this.
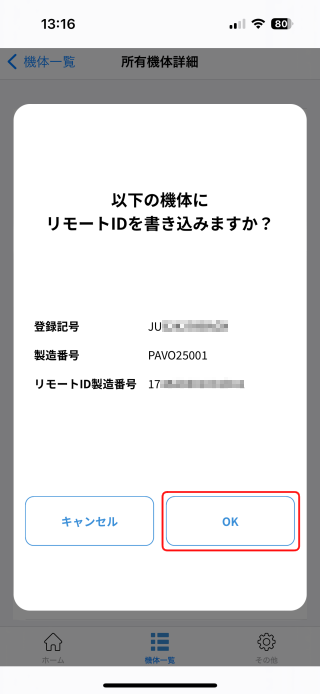 The confirmation screen will be displayed.
The registration code and serial number of the drone and the serial number of the remote ID transmitter will be displayed.
If it is correct, tap "Ok".
The confirmation screen will be displayed.
The registration code and serial number of the drone and the serial number of the remote ID transmitter will be displayed.
If it is correct, tap "Ok".
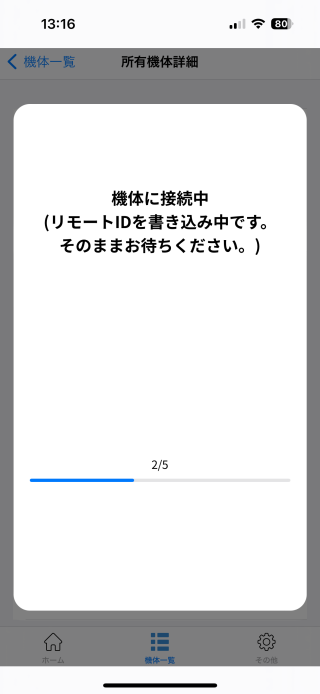 Writing of RID information to the remote ID transmitter will begin.
Writing takes only a few seconds.
Writing of RID information to the remote ID transmitter will begin.
Writing takes only a few seconds.
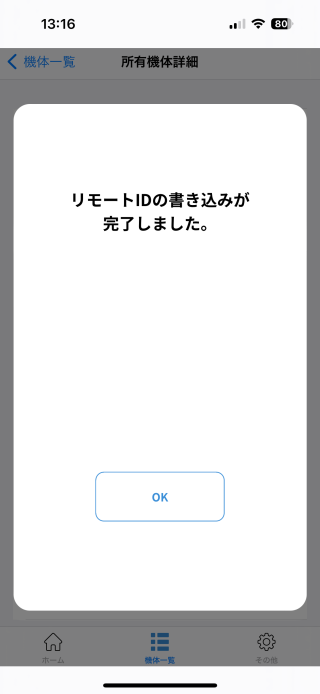 When a screen like this appears, writing is complete.
Remove the power from the remote ID transmitter and install it on the drone.
When a screen like this appears, writing is complete.
Remove the power from the remote ID transmitter and install it on the drone.
 When you look at the
You will also receive an email titled "[DIPS-REG] Notification of completion of remote ID information registration" from the Civil Aviation Bureau of the Ministry of Land, Infrastructure, Transport and Tourism.
You can also update or delete RID information using the same procedure. If you want to install this remote ID transmitter on another drone, update or delete the RID information.
In the case of "Remote ID mini BVRPT", if the RID information has been successfully written, the device will enter "GPS positioning" mode one minute after connecting the power and the LED will blink in blue.
After connecting the power, you need to wait at least 1 minute before you can fly.
Install a remote ID transmitter on your drone
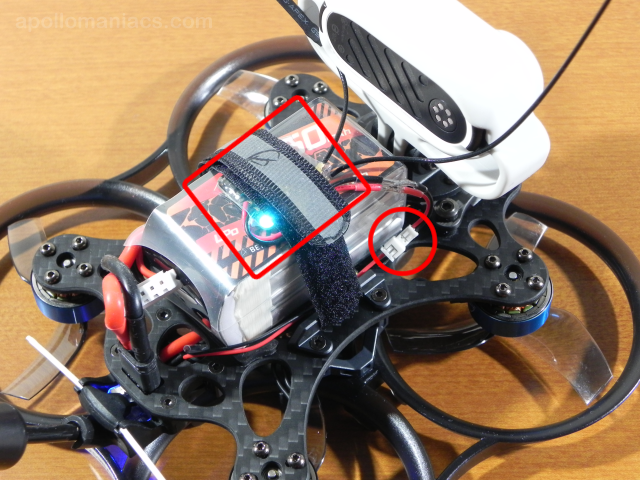 This time I installed a remote ID transmitter on the FPV drone
BETAFPV Pavo25 v2
.
The part circled in red is the connection part between the 5V BEC connector for the LED light on the aircraft and the power supply for the remote ID transmitter.
Both are replaced with 2-pin Micro JST (1.25mm pitch) connectors.
This time I installed a remote ID transmitter on the FPV drone
BETAFPV Pavo25 v2
.
The part circled in red is the connection part between the 5V BEC connector for the LED light on the aircraft and the power supply for the remote ID transmitter.
Both are replaced with 2-pin Micro JST (1.25mm pitch) connectors.
Also, the board surrounded by a red square with a lit blue LED light is the remote ID transmitter. I decided to fasten this together with the battery using Velcro tape.
During the flight of an FPV drone, the battery output voltage will fluctuate greatly as the motor rotation speed changes. Do not connect additional devices such as remote ID transmitters directly to the battery output terminals. Take the power from the BEC connector on the FC board, or connect an electrolytic capacitor for output smoothing to the battery output terminal.
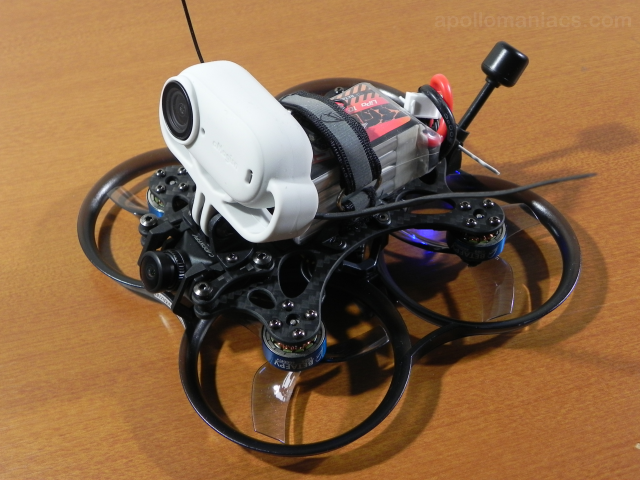 This is the completed photo.
The antennas sticking out on both sides of the back of the
Insta360 Go3 camera
are the Bluetooth and GPS antennas of the remote ID transmitter.
This is the completed photo.
The antennas sticking out on both sides of the back of the
Insta360 Go3 camera
are the Bluetooth and GPS antennas of the remote ID transmitter.